1. Einleitung
This manual provides detailed instructions for the installation, operation, and maintenance of your GAMEON Midnight I Series Mid Tower Gaming PC Case. Please read this manual thoroughly before beginning installation to ensure proper setup and to maximize the performance and lifespan of your product. Keep this manual for future reference.
2. Sicherheitshinweise
- Always disconnect the power supply from the wall outlet before performing any installation or maintenance inside the PC case.
- Handle the tempered glass panels with care. Tempered glass, while durable, can shatter if dropped or subjected to sharp impacts.
- Avoid exposing the case to extreme temperatures or high humidity.
- Do not attempt to modify the case or its components. Unauthorized modifications may void your warranty and pose safety risks.
- Kleinteile und Schrauben von Kindern fernhalten.
3. Packungsinhalt
Bitte überprüfen Sie, ob alle unten aufgeführten Artikel in Ihrem Paket enthalten sind:
- GAMEON Midnight I Series Mid Tower Gaming PC Case
- 7 x 120mm ARGB PWM Cooling Fans (pre-installed)
- Accessory Box (containing screws, cable ties, and other mounting hardware)
- ARGB/PWM Fan Controller and Remote Control
- Benutzerhandbuch (dieses Dokument)
4. Produktüberschreitungview
The GAMEON Midnight I Series PC case is designed for optimal cooling and aesthetic appeal, featuring tempered glass panels and pre-installed ARGB PWM fans.

Figure 4.1: Internal layout of the PC case, highlighting the spacious interior for component installation.

Figure 4.2: Rear and top internal view, illustrating fan placement and overall structure.
4.1 ARGB+PWM Case Fans
The case comes with 7 pre-installed 120mm ARGB PWM fans, providing efficient cooling and customizable lighting. The fans are controlled via an included ARGB/PWM controller and remote.

Figure 4.3: ARGB+PWM fan features and fan mounting support. The front supports 360mm water cooling. Fan mounts include 3x120mm for PSU cover, 3x120mm for bottom, 3x120mm for top, and 1x120mm for rear.
4.2 Front-I/O-Anschlüsse
Die Frontblende bietet bequemen Zugriff auf wichtige Anschlüsse.
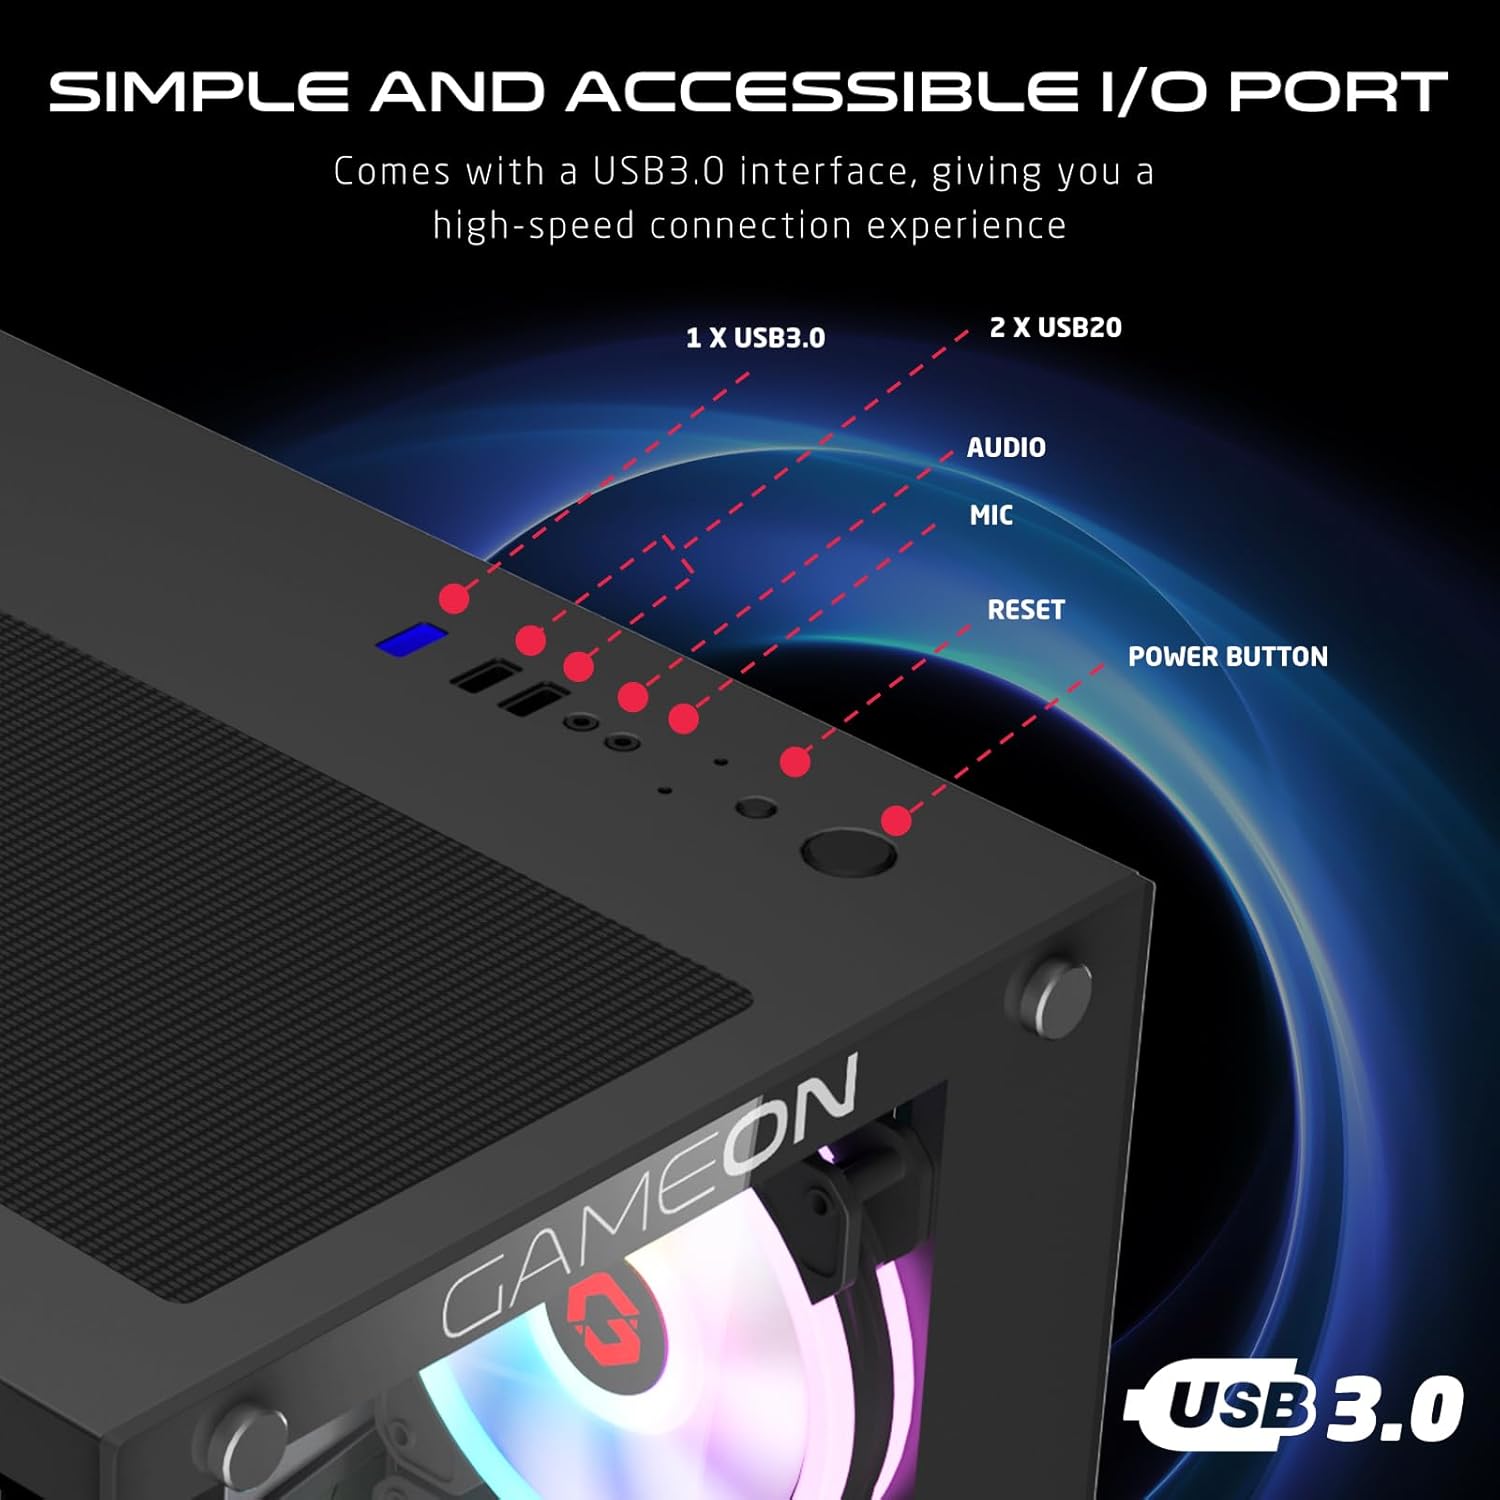
Figure 4.4: Front I/O ports, including 1x USB 3.0, 2x USB 2.0, Audio jack, Microphone jack, Reset button, and Power button.
4.3 Cooling and Construction
The case is designed with an optimized cooling solution, featuring multiple fan mounts and durable tempered glass panels.

Figure 4.5: Optimized cooling solution with massive air intake and exhaust. Features 7 pre-installed fans and durable tempered glass construction.
4.4 Compatibility and Drive Support
The case offers wide compatibility for various motherboard form factors and ample drive bay support.

Figure 4.6: Motherboard compatibility includes ATX, M-ATX, and ITX. Drive bay support for 2x HDD and 2x SSD. Also shown are the front panel header connections.
5. Einrichtungsanweisungen
Follow these steps to install your components into the GAMEON Midnight I Series PC case.
5.1 Vorbereitung des Falls
- Stellen Sie das Gehäuse auf eine ebene, stabile Oberfläche.
- Carefully remove the tempered glass side panel(s) by unscrewing the thumb screws and gently sliding the panel off. Set them aside in a safe place.
- Entfernen Sie sämtliches Innenverpackungsmaterial.
5.2 Motherboard-Installation
- Installieren Sie die I/O-Blende (falls diese nicht bereits auf Ihrem Motherboard vorinstalliert ist) in die hintere Öffnung des Gehäuses.
- Align your motherboard with the standoffs inside the case. Ensure the standoffs match your motherboard's form factor (ATX, M-ATX, ITX).
- Befestigen Sie das Motherboard mit den mitgelieferten Schrauben.
5.3 Installation des Netzteils (PSU)
- Suchen Sie den Montagebereich für das Netzteil unten hinten am Gehäuse.
- Slide your PSU into position from the rear of the case.
- Befestigen Sie das Netzteil mit den mitgelieferten Schrauben.
5.4 Laufwerksinstallation (HDD/SSD)
The case supports 2x 3.5" HDDs and 2x 2.5" SSDs.
- Für 3.5"-Festplatten: Locate the drive cage, typically near the PSU shroud. Slide the HDD into the drive bay and secure it with screws.
- Für 2.5"-SSDs: Mount the SSDs to the designated mounting points, usually on the back of the motherboard tray or within the drive cage, using the provided screws.
5.5 Installation der Grafikkarte und der Erweiterungskarte
- Entfernen Sie die erforderlichen PCIe-Steckplatzabdeckungen von der Rückseite des Gehäuses.
- Stecken Sie Ihre Grafikkarte oder andere Erweiterungskarten in die entsprechenden PCIe-Steckplätze auf Ihrem Motherboard.
- Befestigen Sie die Karten mit Schrauben.
5.6 Kabelmanagement
Nutzen Sie die Kabeldurchführungen und Befestigungspunkte hinter dem Mainboard-Tray, um die Kabel ordentlich zu verlegen. Dies verbessert die Luftzirkulation und die Optik.
5.7 Connecting Front Panel I/O and Fans
- Connect the front panel cables (Power SW, Reset SW, HDD LED, Power LED, USB 3.0, USB 2.0, HD Audio) to their corresponding headers on your motherboard. Refer to your motherboard manual for header locations.
- Ensure the pre-installed ARGB fans are connected to the included ARGB/PWM controller. Connect the controller to a SATA power connector from your PSU and a 3-pin ARGB header (if available) and a 4-pin PWM header on your motherboard for software control, or use the remote for standalone control.
6. Bedienungsanleitung
6.1 Ein-/Ausschalten
- After all components are installed and cables connected, replace the side panels.
- Schließen Sie Monitor, Tastatur, Maus und Netzkabel an das Netzteil an.
- Press the Power button on the front panel to turn on your PC.
- To turn off, use the operating system's shutdown function or press and hold the Power button for several seconds.
6.2 ARGB-Lüftersteuerung
Die vorinstallierten ARGB-Lüfter können auf zwei Arten gesteuert werden:
- Fernbedienung: Use the included remote to cycle through various lighting effects, adjust brightness, and change fan speed.
- Motherboard-Software: If the ARGB controller is connected to a compatible 3-pin ARGB header on your motherboard, you can synchronize lighting effects with your motherboard's RGB software (e.g., ASUS Aura Sync, MSI Mystic Light Sync, ASRock Polychrome RGB, Gigabyte RGB Fusion).
7. Wartung
Regelmäßige Wartung trägt dazu bei, eine optimale Leistung und Langlebigkeit Ihres PC-Gehäuses zu gewährleisten.
7.1 Reinigung des Staubfilters
The case includes dust filters to prevent dust buildup. It is recommended to clean them every 1-3 months, depending on your environment.
- Locate the dust filters (e.g., top, bottom, front).
- Gently remove the filters.
- Clean them using compressed air, a soft brush, or by rinsing with water (ensure they are completely dry before re-installing).
- Re-attach the dust filters.
7.2 Allgemeine Reinigung
- Verwenden Sie ein weiches,amp Verwenden Sie ein Tuch, um die Außenflächen des Gehäuses abzuwischen. Vermeiden Sie scheuernde Reinigungsmittel.
- For tempered glass panels, use a glass cleaner and a microfiber cloth to avoid streaks.
7.3 Lüfterreinigung
Periodically inspect the fan blades for dust accumulation. Use compressed air to gently clear dust from the fan blades and grilles.
8. Fehlerbehebung
If you encounter issues with your PC case, refer to the following common problems and solutions.
8.1 Fans Not Spinning or ARGB Not Working
- Überprüfen Sie den Stromanschluss: Ensure the ARGB/PWM controller is properly connected to a SATA power connector from your PSU.
- Lüfteranschlüsse prüfen: Verify that all fans are securely connected to the ARGB/PWM controller.
- Batterie der Fernbedienung: Wenn Sie die Fernbedienung verwenden, prüfen Sie, ob deren Batterie ausgetauscht werden muss.
- Motherboard-Software: If using motherboard software for control, ensure the controller is connected to the correct ARGB header and the software is installed and configured correctly.
- Lüfterrichtung: Stellen Sie sicher, dass die Ventilatoren für einen optimalen Luftstrom (Zuluft/Abluft) richtig ausgerichtet sind.
8.2 Front-I/O-Anschlüsse funktionieren nicht
- Check Motherboard Connections: Ensure all front panel cables (USB 3.0, USB 2.0, HD Audio) are correctly and securely connected to their respective headers on the motherboard. Refer to your motherboard manual.
8.3 PC Not Powering On
- Power Button Connection: Verify the Power SW cable from the front panel is correctly connected to the motherboard's front panel header.
- PSU Connection: Stellen Sie sicher, dass das Netzteil ordnungsgemäß an die Wandsteckdose angeschlossen ist und sich der Netzschalter am Netzteil in der Position „EIN“ befindet.
- Interne Stromkabel: Check that all necessary power cables (24-pin ATX, CPU, GPU) are securely connected to the motherboard and components.
9. Spezifikationen
| Besonderheit | Spezifikation |
|---|---|
| Modellname | GO-EMPERORII-M (Midnight I Series) |
| Gehäusetyp | Mittlerer Turm |
| Material | Gehärtetes Glas |
| Farbe | Schwarz |
| Produktabmessungen (L x B x H) | 44 x 28 x 42.7 cm |
| Artikelgewicht | 6.45 kg |
| Motherboard-Unterstützung | ATX, Micro-ATX, ITX |
| Vorinstallierte Lüfter | 7 x 120-mm-ARGB-PWM-Lüfter |
| Lüftergröße | 120 mm |
| Kühlmethode | Air, Water (supports up to 360mm radiator in front) |
| Laufwerksschächte | 2 x 3.5"-HDD, 2 x 2.5"-SSD |
| Front I / O Ports | 1 x USB 3.0, 2 x USB 2.0, Audio, Mic, Reset, Power |
| Zusätzliche Merkmale | Dust Filters, ARGB Controller with Remote |
10. Garantie und Support
This product comes with a standard manufacturer's warranty. For specific warranty terms and conditions, please refer to the documentation provided with your purchase or contact GAMEON customer support. For technical assistance or further inquiries, please visit the official GAMEON webBesuchen Sie die Website oder kontaktieren Sie deren Supportkanäle.