monTEK HW1243BK
monTEK Ultra Slim TV Wall Mount User Manual
Model: HW1243BK | Brand: monTEK
1. Einleitung
Thank you for choosing the monTEK Ultra Slim TV Wall Mount. This manual provides comprehensive instructions for the safe and efficient installation, operation, and maintenance of your new TV wall mount. Please read all instructions carefully before beginning installation to ensure proper setup and to prevent damage or injury.

Image: The monTEK Ultra Slim TV Wall Mount, showcasing its main components including the wall plate, articulating arms, and TV brackets, along with included accessories like cable ties and a bubble level.
This full-motion TV wall mount is designed to provide a sleek, low-profile appearance while offering maximum viewing flexibility. It is engineered for durability and ease of use, ensuring a secure and enjoyable viewErfahrung.
2. Wichtige Sicherheitshinweise
WARNUNG: Die Nichtbeachtung dieser Anweisungen kann zu Personenschäden, Sachschäden oder zum Verlust der Garantie führen.
- Gewichtskapazität: Überschreiten Sie nicht die maximale Gewichtskapazität von 132 kg. This mount is intended for use only with the maximum weights indicated. Use with products heavier than the maximum weights indicated may result in instability causing possible injury.
- TV-Größe: This mount is compatible with TVs from 43 bis 90 Zoll.
- Wandtyp: Diese Halterung ist für die Montage an folgenden Gegenständen vorgesehen: 16"/18" wood studs, concrete, and brick walls. DO NOT INSTALL THE MOUNT ON DRYWALL ALONE!
- Professionelle Installation: Wenn Sie sich bezüglich des Installationsprozesses oder der Eignung Ihrer Wand unsicher sind, konsultieren Sie einen qualifizierten Fachmann.
- Komponentenprüfung: Before installation, ensure all parts are present and undamaged. Do not use if any parts are missing or defective.
- Kinder: Keep children away from the installation area. Small parts may be a choking hazard.

Image: A child and pet playing near a securely mounted TV, illustrating the importance of proper installation for safety.
3. Packungsinhalt
Verify that all components listed below are included in your package. If any parts are missing or damaged, please contact monTEK customer support.

Image: A visual representation of all included hardware, screws, spacers, cable ties, a bubble level, and the instruction manual.
Typische Komponenten:
- Wandplattenbaugruppe
- TV-Halterungen (x2)
- Verschiedene TV-Schrauben (M4, M6, M8)
- Distanzstücke und Unterlegscheiben
- Wandanker (für Beton/Ziegel)
- Lag Bolts (for wood studs)
- Wasserwaage
- Kabelbinder
- Bedienungsanleitung
4. Spezifikationen
| Besonderheit | Spezifikation |
|---|---|
| Modellnummer | HW1243BK |
| Kompatibilität mit TV-Größen | 43 - 90 Zoll |
| Gewichtskapazität | 132 kg |
| VESA-Kompatibilität (Mindestanforderungen) | 100x200 mm |
| VESA-Kompatibilität (Max.) | 600x400 mm |
| Wandkompatibilität | 16"/18" Wood Studs, Concrete, Brick |
| Neigungswinkel | +3° / -12° |
| Schwenkwinkel | +/- 60° (max rotation depends on screen size) |
| Pegelanpassung | +/- 3 ° |
| Profile (Retracted) | 1.1 inches (2.8 cm) from wall |
| Verlängerung von der Wand | Bis zu 16.5 Zoll (41.9 cm) |
| Material | Legierter Stahl |
| Farbe | Schwarz |
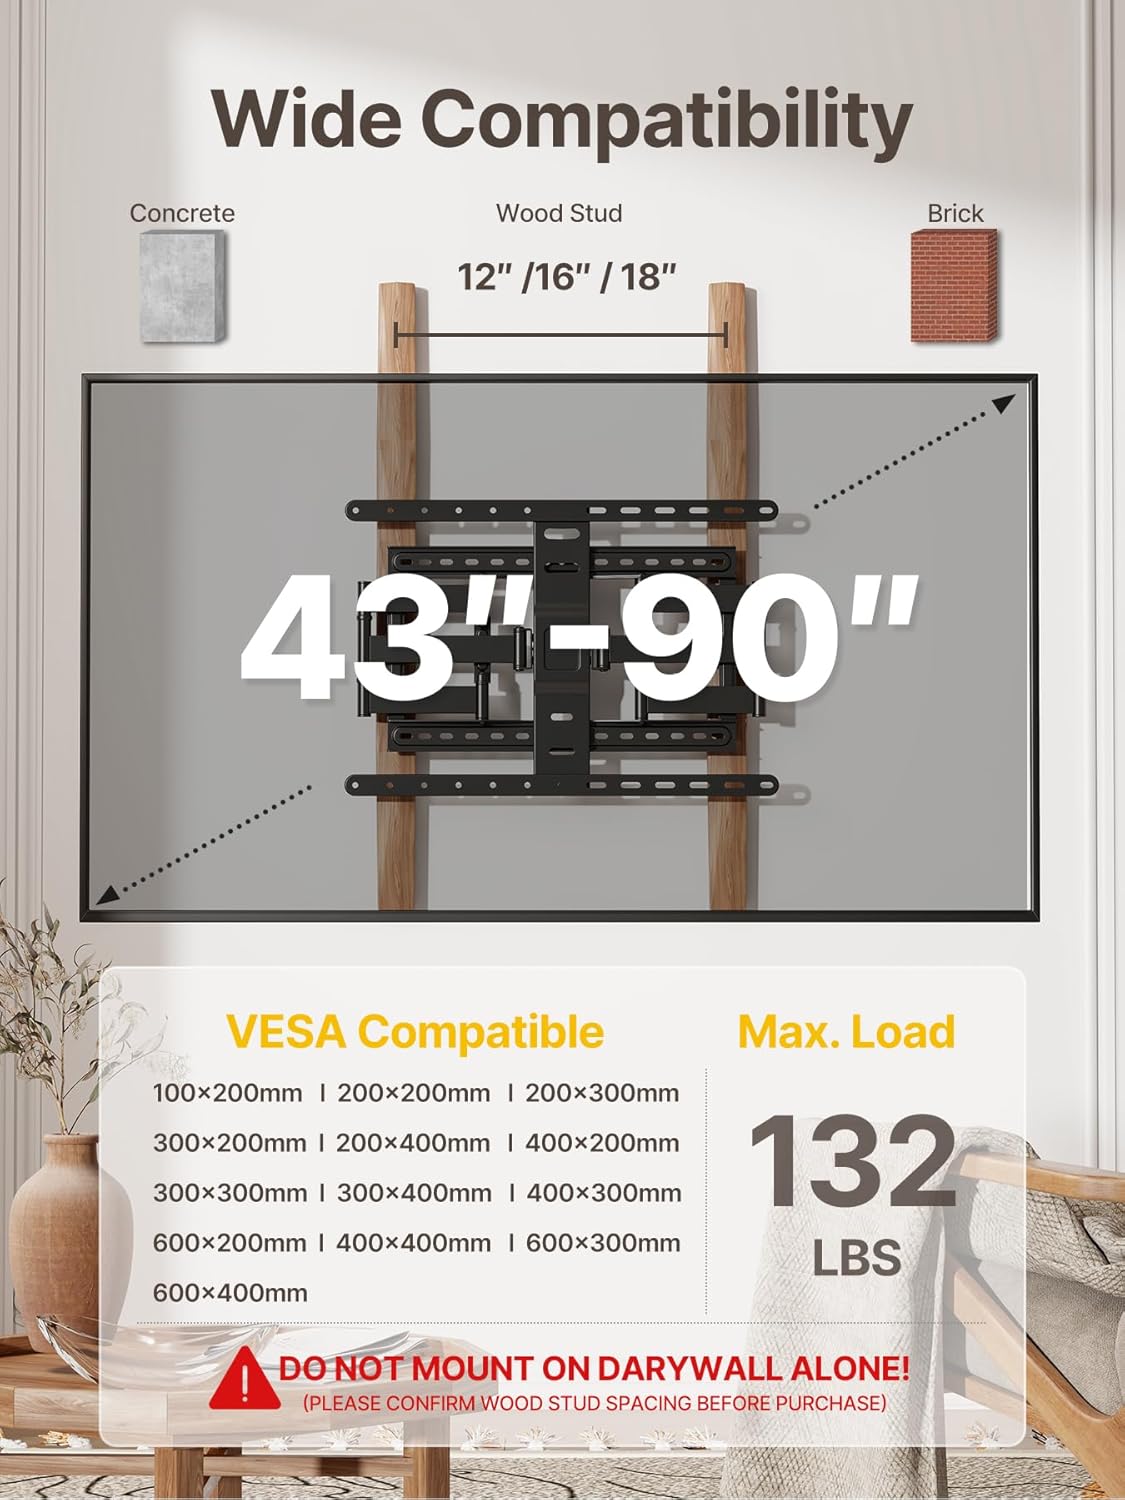
Image: A diagram illustrating the wide compatibility of the mount, showing supported TV sizes (43-90 inches), VESA patterns, and maximum load capacity (132 lbs).

Image: A visual guide explaining VESA mounting patterns, showing how the horizontal and vertical distances between mounting holes determine compatibility.

Image: Illustrations of compatible wall types: brick wall, wood stud (16"/18" spacing), and concrete wall, with a clear warning against drywall-only installation.
5. Einrichtung und Installation
Follow these steps carefully for a secure and successful installation. It is recommended to have at least two people for installation.
Prüfungen vor der Installation:
- TV-Kompatibilität prüfen: Ensure your TV's size (43-90 inches), weight (under 132 lbs), and VESA pattern (100x200mm to 600x400mm) are compatible with the mount.
- Wandtyp identifizieren: Ermitteln Sie, ob Ihre Wand aus Holzständerwerk, Beton oder Ziegeln besteht. Lokalisieren Sie Holzständerwerk mithilfe eines Ständerdetektors.
- Check Cable Outlets: Ensure the mount will not obstruct any cable outlets on the back of your TV or wall.

Image: A diagram showing the importance of checking cable outlet locations on the back of the TV to ensure they are not blocked by the mount.
Installationsschritte:

Image: A visual guide to the three main installation steps: attaching VESA plates to the TV, attaching the wall plate to the wall, and hanging the TV onto the wall plate.
- Befestigen Sie die TV-Halterungen am Fernseher:
- Legen Sie Ihren Fernseher vorsichtig mit dem Bildschirm nach unten auf eine weiche, saubere Oberfläche.
- Align the TV brackets with the VESA mounting holes on the back of your TV.
- Select the appropriate screws (M4, M6, or M8) and spacers that fit your TV's mounting holes. Use washers if necessary.
- Securely fasten the TV brackets to the TV. Do not overtighten.

Bild: Nahaufnahme view of the pre-assembled design, showing how the TV brackets attach to the back of the TV, saving installation time.

Image: A diagram illustrating various VESA mounting reference positions and how to select the correct hanging holes on the mount for your TV's VESA size.
- Wandplatte an der Wand befestigen:
- Ermitteln Sie die gewünschte Höhe für Ihren Fernseher.
- Hold the wall plate against the wall at the desired location and use the included bubble level to ensure it is perfectly horizontal.
- Mark the drilling locations through the holes on the wall plate.
- Drill pilot holes according to your wall type (wood stud, concrete, or brick). For concrete/brick, insert wall anchors.
- Secure the wall plate to the wall using the appropriate lag bolts (for wood studs) or wall anchors and screws (for concrete/brick). Ensure it is firmly attached.
- Fernseher an der Wandplatte befestigen:
- Heben Sie den Fernseher mitsamt den angebrachten Halterungen vorsichtig mit Hilfe einer zweiten Person an.
- Hook the TV brackets onto the wall plate. Ensure the TV is securely seated on the mount.
- Engage any safety locks or screws on the TV brackets to prevent accidental dislodgement.
- Use the integrated cable management features (velcro ties) to organize and hide cables for a neat appearance.
6. Betrieb und Anpassungen
Your monTEK TV wall mount offers various adjustments to achieve the optimal viewErfahrung.
Aus- und Einfahren:
The mount can extend up to 16.5 inches from the wall for flexible viewing and retract to a mere 1.1 inches for a super-slim, discreet profile.

Image: A visual representation of the TV mount extending up to 16.5 inches and retracting to 1.1 inches from the wall.
Neigungseinstellung:
Adjust the tilt angle from +3° to -12° to reduce glare from lights or windows and achieve a comfortable viewing angle, especially useful for TVs mounted higher up.

Image: A person demonstrating the +3° to -12° tilt adjustment of the TV mount, highlighting its ability to enhance comfort and reduce glare.
Schwenkeinstellung:
Swivel your TV up to +/- 60° to direct the screen towards different seating areas in the room. The maximum swivel angle depends on your TV's size and its distance from the wall.

Image: A TV mounted on the wall, swiveling to demonstrate the +/- 60° range of motion, along with a close-up of the integrated cable management system.
Pegeleinstellung:
After installation, you can fine-tune the TV's level by adjusting +/- 3° to ensure it is perfectly straight.

Image: A TV on a wall, showing the +/- 3° leveling adjustment capability, allowing for perfect positioning after hanging.
7. Wartung
Regelmäßige Wartung trägt zur Langlebigkeit und zum sicheren Betrieb Ihrer TV-Wandhalterung bei.
- Reinigung: Wischen Sie die Halterung mit einem weichen, trockenen Tuch ab, um Staub zu entfernen. Verwenden Sie keine Scheuermittel oder Lösungsmittel, da diese die Oberfläche beschädigen können.
- Regelmäßige Kontrollen: Periodically check all screws and bolts to ensure they remain tight and secure. Over time, vibrations or adjustments may cause them to loosen slightly.
- Bewegung: If the mount's movement becomes stiff, a small amount of silicone-based lubricant can be applied to the articulating joints. Avoid oil-based lubricants.
8. Fehlerbehebung
If you encounter any issues with your monTEK TV wall mount, refer to the common problems and solutions below.
| Problem | Mögliche Ursache | Lösung |
|---|---|---|
| Der Fernseher steht nach der Installation nicht waagerecht. | Geringfügige Fehlausrichtung während der Installation. | Use the +/- 3° level adjustment feature to fine-tune the TV's position. |
| Schwierigkeiten beim Schwenken oder Neigen des Fernsehers. | Die Gelenke können steif oder überdreht sein. | Ensure no cables are obstructing movement. Apply a small amount of silicone-based lubricant to the articulating joints if needed. Check that all bolts allowing movement are not overtightened. |
| Die Halterung sitzt locker an der Wand. | Wall plate not securely fastened or wall material issues. | Immediately remove the TV from the mount. Re-check all lag bolts/screws securing the wall plate to the wall. Ensure you are installing on a compatible wall type (wood stud, concrete, or brick) and not drywall alone. If unsure, consult a professional. |
| TV screws do not fit. | Incorrect screw size or length for your TV. | The kit includes various screw sizes (M4, M6, M8) and spacers. Try different combinations to find the correct fit. Refer to your TV's manual for specific screw requirements. |
If the problem persists or is not listed here, please contact monTEK customer support for assistance.
9. Garantie und Support
monTEK is committed to providing high-quality products and reliable customer service. This TV mount is designed for durability and comes with reliable after-sales service and technical support.
For any queries, technical assistance, or warranty claims, please reach out to monTEK customer support through the retailer's platform or the official monTEK website. Please have your product model number (HW1243BK) and purchase details ready when contacting support.
Ask a question about this manual
Ask about setup, troubleshooting, compatibility, parts, safety, or missing instructions. Manuals+ will review the question and use this page’s manual context to help answer it.