
1. Einleitung
This manual provides essential information for setting up, operating, and maintaining your Whadda Raspberry Pi 4 Starter Kit (4GB). This comprehensive kit is designed to facilitate various electronic and programming projects, offering a robust platform for learning and experimentation. Please read these instructions carefully before use to ensure proper functionality and safety.
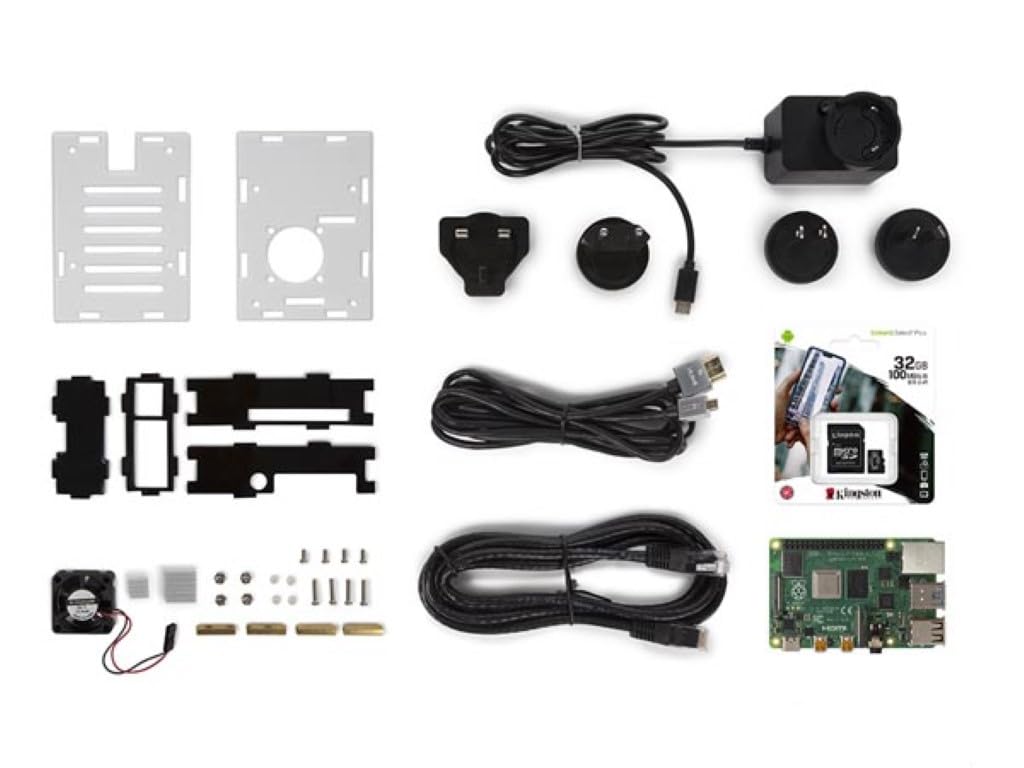
Image 1: Whadda Raspberry Pi 4 Starter Kit with Cooling Case, showing the assembled Raspberry Pi 4 board inside a transparent and black cooling case with a fan visible on top.
2. Packungsinhalt
Bitte überprüfen Sie, ob alle unten aufgeführten Artikel in Ihrem Paket enthalten sind:
- 1x Raspberry Pi 4 Model B (4GB RAM version)
- 1x Cooling Case for Raspberry Pi 4
- 1x 32GB MicroSD Card (pre-loaded with NOOBS or Raspberry Pi OS Lite)
- 1x USB Type-C Power Supply with 4 Travel Adapters (EU, UK, US, AU)
- 1x Ultra-thin Ethernet Cable
3. Sicherheitshinweise
Beachten Sie die folgenden Sicherheitsrichtlinien, um Schäden am Gerät oder Verletzungen zu vermeiden:
- Do not expose the Raspberry Pi or its components to water or excessive moisture.
- Avoid operating the device in extreme temperatures or direct sunlight.
- Use only the provided power supply or a compatible 5.1V 3A USB-C power adapter.
- Handle the circuit board by its edges to avoid electrostatic discharge.
- Keep out of reach of small children due to small components.
4. Einrichtungsanweisungen
Follow these steps to assemble and prepare your Raspberry Pi 4 Starter Kit:
4.1. Installing the Raspberry Pi into the Cooling Case
- Carefully place the Raspberry Pi 4 board into the bottom part of the cooling case, aligning the ports with the case openings.
- Attach the fan to the designated pins on the Raspberry Pi's GPIO header (typically 5V and Ground pins). Refer to the case's specific instructions for fan connection.
- Secure the top part of the cooling case, ensuring all components are properly seated and the fan is unobstructed.

Abbildung 2: Oben view of the Raspberry Pi 4 board securely installed within the cooling case, showing the fan and various components.
4.2. Einsetzen der MicroSD-Karte
Locate the MicroSD card slot on the Raspberry Pi board. Gently insert the provided 32GB MicroSD card until it clicks into place. Ensure the card is inserted correctly to avoid damage.

Abbildung 3: Unterseite view of the Raspberry Pi 4 in its cooling case, highlighting the MicroSD card slot where the operating system is stored.
4.3. Peripheriegeräte anschließen
Connect your monitor(s) using the HDMI ports, a keyboard and mouse to the USB ports, and the Ethernet cable if a wired network connection is desired. The Raspberry Pi 4 supports dual 4K displays via its two micro-HDMI ports.
4.4. Einschalten
Once all peripherals are connected, plug the USB Type-C power supply into the Raspberry Pi's power port and then into a wall outlet. The Raspberry Pi will automatically begin to boot up.
5. Bedienungsanleitung
The Raspberry Pi 4 runs a Linux-based operating system, typically Raspberry Pi OS. Upon first boot, you may be guided through an initial setup wizard to configure language, keyboard layout, Wi-Fi, and update software.
5.1. Kühlleistung
The included cooling case significantly improves thermal management. Without active cooling, the Raspberry Pi 4 can reach high temperatures under heavy load, potentially leading to performance throttling.

Image 4: Thermal image illustrating high temperatures (up to 80°C) on a Raspberry Pi 4 after a CPU-intensive benchmark without a cooling case.
With the cooling case, temperatures are maintained at a much lower level, ensuring stable and optimal performance even during demanding tasks.

Image 5: Thermal image showing the Raspberry Pi 4 operating at approximately 45°C with the cooling case installed, demonstrating effective heat dissipation.
5.2. Konnektivität
- Ethernet: Use the provided Ethernet cable for a stable wired network connection.
- W-lan: Connect to wireless networks via the integrated 2.4 GHz and 5.0 GHz IEEE 802.11ac Wi-Fi.
- Bluetooth: Utilize Bluetooth 5.0 for connecting wireless peripherals such as keyboards, mice, or audio devices.
- HDMI: Connect up to two 4K displays using the micro-HDMI ports.
- USB: The Raspberry Pi 4 features two USB 2.0 ports and two USB 3.0 ports for various peripherals.
6. Wartung
Regular maintenance ensures the longevity and optimal performance of your Raspberry Pi 4:
- Reinigung: Periodically clean the cooling fan and case vents to prevent dust buildup, which can hinder airflow and cooling efficiency. Use a soft brush or compressed air.
- Software-Updates: Regularly update your Raspberry Pi OS to ensure you have the latest features, security patches, and bug fixes. This can typically be done via the terminal using
sudo apt updateUndsudo apt full-upgrade. - Pflege der MicroSD-Karte: Avoid frequently removing and inserting the MicroSD card while the Raspberry Pi is powered on. Always shut down the system properly before removing the card to prevent data corruption.
7. Fehlerbehebung
Sollten Probleme auftreten, beachten Sie bitte die folgenden gängigen Schritte zur Fehlerbehebung:
- Keine Anzeigeausgabe: Ensure HDMI cables are securely connected and your monitor is set to the correct input. Try a different HDMI cable or monitor.
- Probleme mit der Stromversorgung: Verify the USB-C power supply is correctly plugged into both the Raspberry Pi and a working power outlet. Ensure it is the recommended 5.1V 3A supply.
- Überhitzung: Check that the cooling fan is properly connected and spinning. Ensure the case vents are not blocked. If temperatures remain high, reduce workload or consider additional passive cooling.
- Betriebssystem startet nicht: Re-seat the MicroSD card. If the issue persists, try re-flashing the operating system onto the MicroSD card using a reliable tool like Raspberry Pi Imager.
- Peripheres Gerät nicht erkannt: Versuchen Sie, das Peripheriegerät an einen anderen USB-Anschluss anzuschließen. Stellen Sie sicher, dass die vom Betriebssystem benötigten Treiber installiert sind.
For more detailed troubleshooting and community support, visit the official Raspberry Pi forums or the Whadda support webWebsite.
8. Spezifikationen
| Besonderheit | Spezifikation |
|---|---|
| Modellnummer | WPK4-4GB |
| Prozessor | Broadcom BCM2711, Quad-Core Cortex-A72 (ARM v8) 64-Bit-SoC bei 1.5 GHz |
| RAM | 4 GB LPDDR4-3200 SDRAM |
| Lagerung | 32 GB MicroSD-Karte (im Lieferumfang enthalten) |
| Konnektivität | 2.4-GHz- und 5.0-GHz-WLAN nach IEEE 802.11ac, Bluetooth 5.0, Gigabit-Ethernet |
| USB-Anschlüsse | 2x USB 3.0, 2x USB 2.0 (Total 4) |
| Videoausgang | 2x micro-HDMI ports (up to 4Kp60 supported) |
| Leistungsaufnahme | 5.1 V DC über USB-C-Anschluss (mindestens 3 A) |
| Abmessungen (Produkt) | 5.8 x 17.5 x 15.5 cm |
| Gewicht (Produkt) | 480 Gramm |
| Hersteller | Velleman Group nv |
| Ursprungsland | Belgien |
9. Garantie und Support
The Whadda Raspberry Pi 4 Starter Kit (WPK4-4GB) comes with a 2 Jahr Garantie Die Garantie deckt Herstellungsfehler ab Kaufdatum ab. Bitte bewahren Sie Ihren Kaufbeleg für Garantieansprüche auf.
For technical support, inquiries, or warranty service, please contact Whadda customer support or visit the Velleman Group nv website. Contact information can typically be found on the product packaging or the official Whadda brand store.
Hersteller: Velleman Group nv