
1. Einleitung
Thank you for choosing the Aiwa AWPOK200D Bluetooth Audio Tower. This powerful audio system is designed to deliver clear, precise sound with deep bass, suitable for both indoor and outdoor use. It features Bluetooth connectivity, TWS function, USB playback and charging, microphone inputs for karaoke, and dynamic LED lighting. This manual provides essential information for safe and optimal use of your device.
2. Sicherheitshinweise
Please read all safety instructions carefully before using the device and retain this manual for future reference. Incorrect operation due to disregard of instructions may cause damage to the product or personal injury.
- Energiequelle: Connect the device only to an AC 100-240V, 50/60Hz power supply. Ensure the voltage erfüllt die Anforderungen vor dem Einstecken.
- Belüftung: Blockieren Sie keine Lüftungsöffnungen. Sorgen Sie für ausreichend Platz um das Gerät herum, um eine ordnungsgemäße Luftzirkulation zu gewährleisten.
- Wasser und Feuchtigkeit: Do not expose the device to rain, moisture, or dripping/splashing liquids. Do not place objects filled with liquids, such as vases, on the apparatus. The device is not waterproof.
- Wärmequellen: Halten Sie das Gerät von Wärmequellen wie Heizkörpern, Heizlüftern, Öfen oder anderen Geräten (einschließlich) fern. ampKonverter (Lüfter), die Wärme erzeugen.
- Reinigung: Ziehen Sie vor der Reinigung den Netzstecker. Verwenden Sie ein trockenes, weiches Tuch. Verwenden Sie keine flüssigen oder Aerosol-Reinigungsmittel.
- Wartung: Versuchen Sie nicht, dieses Produkt selbst zu warten. Überlassen Sie alle Wartungsarbeiten qualifiziertem Servicepersonal.
- Platzierung: Stellen Sie das Gerät auf eine stabile, ebene Fläche, um ein Umfallen zu verhindern.
- Kinder: Außerhalb der Reichweite von Kindern aufbewahren.
3. Produktüberschreitungview
Familiarize yourself with the main components of your Aiwa AWPOK200D Audio Tower.

Bild 3.1: Front view of the Aiwa AWPOK200D Audio Tower, showcasing its dual speakers and dynamic blue and purple LED lighting.

Bild 3.2: Hinteren view of the Aiwa AWPOK200D Audio Tower, highlighting the power input and bass reflex ports.

Bild 3.3: Detaillierte view of the top control panel of the Aiwa AWPOK200D, showing USB ports, AUX input, microphone inputs, and various control buttons for playback, volume, and functions.
4. Einrichtung
Follow these steps to set up your Aiwa AWPOK200D Audio Tower.
- Auspacken: Carefully remove the audio tower from its packaging. Retain the packaging for future transport or storage.
- Platzierung: Place the audio tower on a stable, flat surface. Ensure there is enough space around the unit for proper ventilation.
- Stromanschluss: Connect the power cable to the AC input on the rear of the unit and then plug it into a standard AC 100-240V, 50/60Hz wall outlet.
- Erstes Einschalten: Press the power button (usually located on the top control panel) to turn on the device. The LCD display should illuminate.
5. Bedienungsanleitung
This section details how to use the various functions of your audio tower.
5.1. Bluetooth-Konnektivität
- Bluetooth aktivieren: Turn on the audio tower. Press the "FUNCTION" button on the control panel until "BT" appears on the LCD display, indicating Bluetooth mode.
- Paarung: On your mobile device (smartphone, tablet, etc.), enable Bluetooth and search for available devices. Select "AWPOK200D" from the list.
- Verbindung: Once paired, the audio tower will indicate a successful connection, and you can now play audio from your device wirelessly.
5.2. True Wireless Stereo (TWS)-Funktion
The TWS function allows you to pair two AWPOK200D units together for a stereo sound experience.
- Beide Geräte einschalten: Ensure both AWPOK200D units are powered on and in Bluetooth mode.
- Initiate TWS Pairing: On one of the units (this will be the primary unit), press and hold the TWS button (if available, otherwise refer to specific button on control panel, often combined with another function or a dedicated TWS button). The unit will search for another AWPOK200D.
- Verbinden: Once connected, both units will play audio in stereo. Connect your mobile device to the primary unit via Bluetooth as described in section 5.1.
5.3. USB-Wiedergabe und -Aufladung
- USB-Wiedergabe: Stecken Sie einen USB-Stick mit MP3-Audiodateien ein. files into the USB port labeled "USB" (5V=200mA). The unit will automatically switch to USB mode and begin playback. Use the playback controls (Play/Pause, Next/Previous) on the control panel.
- Mobiles Aufladen: The USB port labeled "USB CHARGE" (5V=1000mA) can be used to charge your mobile devices. Connect your device's USB charging cable to this port.
5.4. Auxiliary (AUX) and RCA Inputs
- AUX-Eingang: Connect an external audio device (e.g., MP3 player, smartphone) using a 3.5mm audio cable to the "AUX IN" port. Press the "FUNCTION" button until "AUX" is displayed.
- Cinch-Eingang: Connect devices with RCA audio output (e.g., DVD player, TV) to the "AUDIO RCA" input ports (red for right, white for left). Press the "FUNCTION" button until "RCA" is displayed.
5.5. Microphone Inputs and Karaoke Function
- Mikrofonanschluss: Connect up to two microphones to the 6.3mm "MIC 1" and "MIC 2" input jacks.
- Mikrofonlautstärke: Adjust the microphone volume using the "MIC VOL +/-" controls.
- Echo-Effekt: Use the "EQ/ECHO" knob or button to add an echo effect to the microphone audio.
- Voice Cancel: Activate the "VOICE CANCEL" function (often labeled "KEY/VOICE CANCEL") to reduce or remove vocals from a playing track, making it suitable for karaoke.
5.6. Sound Enhancements and Equalizer
- Super Bass: Press the "SUPER BASS" button to activate or deactivate the enhanced bass effect.
- Equalizer-Voreinstellungen: Use the "EQ" button to cycle through 5 preset equalizer functions (e.g., Pop, Rock, Jazz, Classic, Flat) to optimize sound for different music genres.
5.7. LED-Beleuchtung
- Lichtsteuerung: Press the "LIGHT" button to cycle through different LED light modes or to turn the lights off. The unit features intermittent LED lights with mode selection.
6. Wartung
Proper care and maintenance will ensure the longevity of your audio tower.
- Reinigung: Always unplug the device before cleaning. Use a soft, dry cloth to wipe the exterior surfaces. Do not use abrasive cleaners, waxes, or solvents as they may damage the finish.
- Lagerung: If not in use for an extended period, unplug the power cable and store the unit in a cool, dry place, away from direct sunlight and extreme temperatures.
- Belüftung: Ensure the ventilation openings are free from dust and debris. Use a soft brush or vacuum cleaner to gently clear any blockages.
7. Fehlerbehebung
If you encounter issues with your Aiwa AWPOK200D, refer to the following common problems and solutions.
| Problem | Mögliche Ursache | Lösung |
|---|---|---|
| Kein Strom | Power cable not connected; Power outlet not working; Unit is off. | Ensure power cable is securely connected. Test the outlet with another device. Press the power button to turn on the unit. |
| Kein Ton | Lautstärke zu niedrig; Falscher Eingangsmodus ausgewählt; Audiokabel nicht richtig angeschlossen; Bluetooth nicht gekoppelt. | Increase the master volume. Select the correct input mode (Bluetooth, USB, AUX, RCA). Check audio cable connections. Re-pair Bluetooth device. |
| Die Bluetooth-Kopplung schlägt fehl | Device too far; Bluetooth not enabled on source device; Unit not in pairing mode. | Move the source device closer to the audio tower. Ensure Bluetooth is enabled on your device. Make sure the audio tower is in Bluetooth pairing mode. |
| Mikrofon funktioniert nicht | Microphone not connected; Microphone volume too low; Microphone switch off. | Ensure microphone is securely plugged into the correct input. Increase "MIC VOL". Check if the microphone's power switch is on. |
| TWS-Pairing schlägt fehl | Units too far apart; One unit not in TWS pairing mode; Already connected to another device. | Ensure both units are close to each other. Verify both units are in Bluetooth mode and one is initiating TWS pairing. Disconnect any existing Bluetooth connections before TWS pairing. |
8. Spezifikationen
Detailed technical specifications for the Aiwa AWPOK200D Audio Tower.

Bild 8.1: Technical specifications of the Aiwa AWPOK200D, including features, power output, and power supply details.
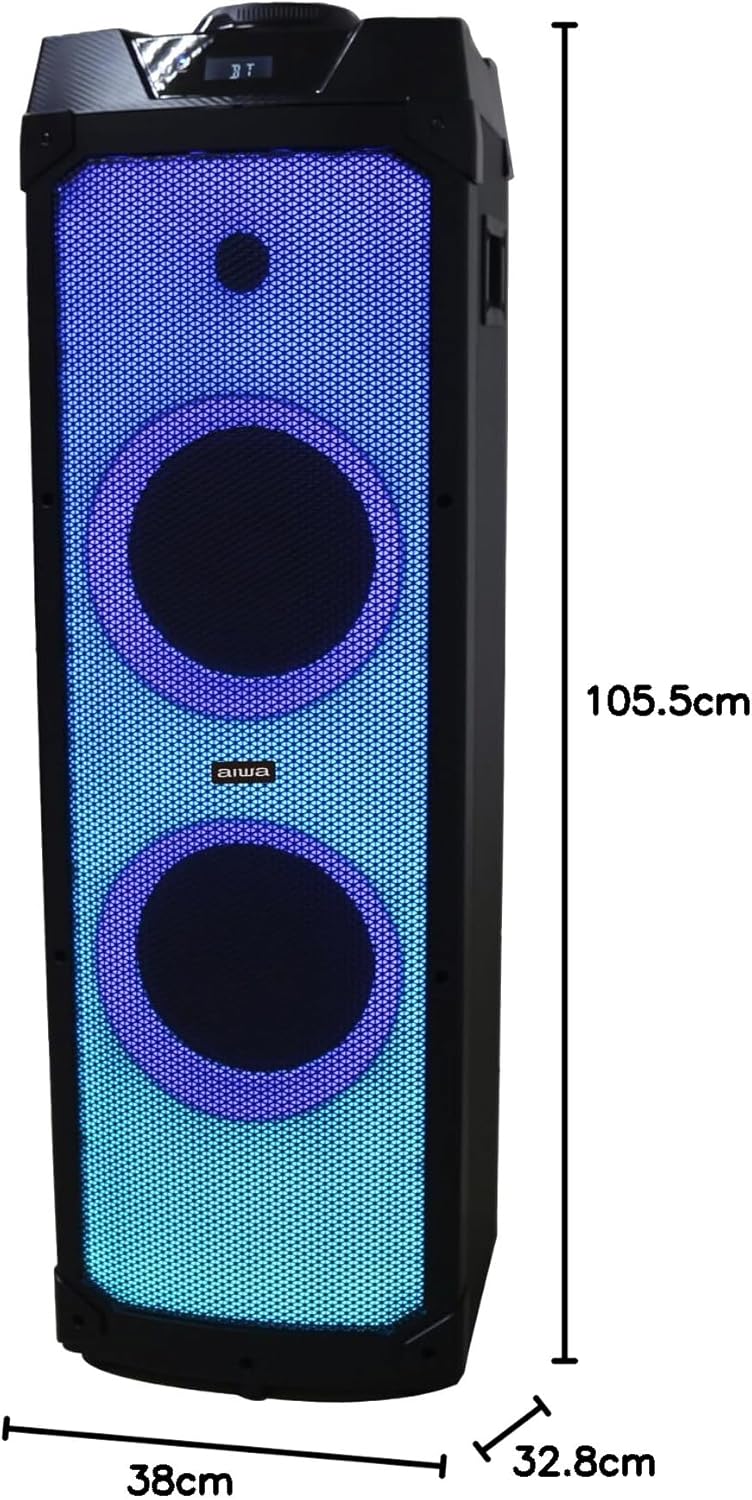
Bild 8.2: Dimensions of the Aiwa AWPOK200D Audio Tower, showing a height of 105.5 cm, width of 38 cm, and depth of 32.8 cm.
| Besonderheit | Detail |
|---|---|
| Marke | Aiwa |
| Modell | AWPOK200D |
| Lautsprechertyp | Subwoofer, Floor-standing |
| Maximale Ausgangsleistung | 2000 Watt (PMPO) |
| Ausgangsleistung (RMS) | 80W x 2 |
| Konnektivitätstechnologie | Bluetooth V5.1, USB, AUX (3.5mm), RCA |
| Stromquelle | Wechselstrom 100 – 240 V, 50/60 Hz |
| Mikrofoneingänge | 2 x 6.3 mm |
| USB-Anschlüsse | 1 for playback (5V=200mA), 1 for charging (5V=1000mA) |
| Besondere Merkmale | TWS Function, Intermittent LED Lights, Super Bass Effect, 5 Preset Equalizer Functions, Voice Cancel for Karaoke, LCD Display |
| Kontrollmethode | Tactile buttons, Knob |
| Abmessungen der Einheit (L x T x H) | 328 (L) X 381 (D) X 1040 (H) mm |
| Lautsprechergröße | 2 x 8" woofers, 1 x tweeter |
9. Garantie und Support
The Aiwa AWPOK200D Audio Tower comes with a limited warranty. For specific details regarding warranty coverage, duration, and terms, please refer to the warranty card included with your product or contact Aiwa customer support.
For technical assistance, troubleshooting beyond this manual, or service inquiries, please visit the official Aiwa webBesuchen Sie die Website oder kontaktieren Sie den Kundendienst. Bewahren Sie Ihren Kaufbeleg als Kaufnachweis für Garantieansprüche auf.
You can find more information and support by visiting the official Aiwa store: Aiwa Official Store