1. Einleitung
The PEAKMETER PM2016S is a compact and intelligent digital clamp meter designed for accurate electrical measurements. This instrument features a liquid crystal display with a maximum count value of 5999 and a backlight function for improved visibility in various environments. It offers a range of measurement functions with automatic range selection, making it suitable for both beginners and experienced users. The PM2016S can measure AC and DC voltage, AC current, resistance, frequency, and also includes continuity testing, Non-Contact Voltage (NCV) detection, and V/Ω/A auto-scan capabilities. Its portable design ensures ease of use and convenience.
2. Sicherheitshinweise
WARNING: To avoid electric shock or personal injury, read and understand all instructions and safety information before using this instrument.
- Vor Gebrauch stets sicherstellen, dass sich das Instrument in einwandfreiem Zustand befindet.
- Nicht mehr als die angegebene Menge auftragen.tage, as marked on the instrument, between the terminals or between any terminal and earth ground.
- Seien Sie vorsichtig beim Arbeiten mit VolumentagEs liegt über 30 V AC RMS, 42 V Spitze oder 60 V DC. Diese SpannungentagEs besteht die Gefahr eines Stromschlags.
- Do not use the instrument if it appears damaged or if the insulation is compromised.
- Ensure the test leads are in good condition, without any cracks or breaks in the insulation.
- Vor Funktionsänderungen müssen die Messleitungen immer vom Stromkreis getrennt werden.
- Tauschen Sie die Batterien sofort aus, sobald die Anzeige für niedrigen Batteriestand erscheint, um genaue Messwerte zu gewährleisten.
- Halten Sie sich an lokale und nationale Sicherheitsvorschriften.
This instrument complies with EN61010-1, EN61010-2-033, EN61326, CAT. III 600V safety ratings.
3. Produktmerkmale
- High Quality Jaw Head: Durable and precise clamp mechanism for current measurement.
- Clear LCD Display and Backlight: Easy-to-read 6000-count display with backlight for visibility in various lighting conditions.
- Einfache Bedienung: Simple, intuitive controls, often requiring just one click for common functions.
- Automatische Entfernungsmessung: Wählt automatisch den passenden Messbereich aus und vereinfacht so die Bedienung.
- Datenaufnahme: Friert den angezeigten Messwert zur bequemen Aufzeichnung ein.
- Kontaktloses Volumentage (NCV)-Erkennung: Erkennt sicher Wechselstromspannungtage ohne direkten Kontakt.
- V/Ω/A Auto Scan: Erkennt und misst automatisch das Volumentage, Widerstand oder Stromstärke.
- Durchgangsprüfung: Prüft die elektrische Durchgängigkeit mit einem akustischen Signalgeber.
- Frequenzmessung: Measures frequency via clamp oder voltage Eingabe.
- Kompakt und leicht: Handliches Design für Mobilität und einfache Bedienung.
- Auto Aus: Automatically shuts down after 10 minutes of inactivity to conserve battery life.
4. Packungsinhalt

Das Paket enthält üblicherweise folgende Artikel:
- Color Box (Packaging)
- PEAKMETER PM2016S Digital Clamp Meter
- Messleitungen (rot und schwarz)
- AAA Batteries (2x 1.5V)
- Bedienungsanleitung
Description: This image displays the complete contents of the PEAKMETER PM2016S Digital Clamp Multimeter package, including the device itself, test leads, batteries, and the user manual, all presented within its retail packaging.
5. Einrichtung
5.1 Einlegen der Batterie
The PM2016S requires two 1.5V AAA batteries. To install or replace batteries:
- Stellen Sie sicher, dass der Zähler ausgeschaltet ist.
- Suchen Sie den Batteriefachdeckel auf der Rückseite des Messgeräts.
- Verwenden Sie einen Schraubendreher, um das Batteriefach zu öffnen.
- Insert the two AAA batteries, observing the correct polarity (+ and -).
- Bringen Sie die Batteriefachabdeckung wieder an und sichern Sie sie mit der Schraube.
5.2 Anschließen der Testleitungen
Für voltage, resistance, frequency (voltage), and continuity measurements, connect the test leads:
- Stecken Sie die schwarze Messleitung in die "COM" (gemeinsame) Eingangsbuchse.
- Insert the red test lead into the "VΩ" input jack.
6. Bedienungsanleitung
The PM2016S features an auto-ranging function, simplifying most measurements. Press the red power button to turn the meter on or off. The meter will typically start in auto-scan mode (V/Ω/A Auto Scan).
6.1 AC/DC-Voltage Messung
- Schließen Sie die Messleitungen wie in Abschnitt 5.2 beschrieben an.
- Turn on the meter. It will automatically detect AC or DC voltage.
- Berühren Sie mit den roten und schwarzen Messspitzen die Stellen im Schaltkreis, an denen Sie die Lautstärke messen möchten.tage.
- Lesen Sie den Bandtage-Wert auf dem LCD-Display.
Description: This video demonstrates the unboxing of the PEAKMETER PM2016S and its accessories, followed by a practical demonstration of measuring AC voltage using the test leads. The user connects the leads to a power outlet and the meter displays the voltage lesen.
6.2 Wechselstrommessung (Clamp Funktion)
- Ensure the meter is on.
- Drücken Sie die Tasteamp Auslöser zum Öffnen des Mauls.
- Enclose a single conductor (not a bundle of wires) within the jaws. Ensure the jaws are fully closed.
- The meter will display the AC current reading.
Description: This video demonstrates the AC current measurement function of the PEAKMETER PM2016S. The user clamps the meter around a power cable connected to an appliance (kettle), and the meter displays the current draw.
6.3 Frequenzmessung
The PM2016S can measure frequency in two ways:
- Via Test Leads (Voltage Frequency): In Bdtage measurement mode, the meter can display frequency. Press the "Hz/NCV" button to toggle to frequency display.
- Via Clamp (Current Frequency): Bei der Messung von Wechselstrom mit dem Klamp, the meter can also display the frequency of the current. Press the "Hz/NCV" button to toggle to frequency display.

Description: This image shows the clear LCD display of the PM2016S, highlighting its backlight feature and the various measurement indicators, including frequency (Hz).
6.4 Berührungslose Voltage (NCV) Erkennung
- Press the "Hz/NCV" button to activate NCV mode. The display will show "NCV".
- Move the top end of the meter near a live AC voltagDie Quelle.
- The meter will beep and the NCV indicator will light up, with the frequency of beeps and light increasing, wenn es sich dem Volumen näherttagDie Quelle.
Description: This video demonstrates the NCV (Non-Contact Voltage) function of the PEAKMETER PM2016S. The user activates NCV mode and brings the meter near a power outlet, showing the audible and visual alerts when voltage wird erkannt.
6.5 Durchgangstest
- Schließen Sie die Messleitungen wie in Abschnitt 5.2 beschrieben an.
- The meter will automatically enter continuity mode if resistance is low.
- Berühren Sie mit den Prüfspitzen die beiden Punkte, die Sie auf Durchgang prüfen möchten.
- If there is continuity (resistance less than 30Ω), the buzzer will sound.
6.6 Datenspeicherung und Hintergrundbeleuchtung
- Datenaufnahme: Press the "HOLD" button (often combined with the backlight button) to freeze the current reading on the display. Press again to release.
- Hintergrundbeleuchtung: Press and hold the "HOLD" button (or a dedicated backlight button if present) to turn the backlight on or off.

Description: This image highlights the user-friendly design of the PM2016S, showing the main power button and other function buttons, emphasizing its easy operation.
7. Wartung
7.1 Reinigung
Löschen Sie den Fall mit Anzeigeamp Mit einem Tuch und mildem Reinigungsmittel reinigen. Keine Scheuermittel oder Lösungsmittel verwenden. Die Eingangsanschlüsse sauber und trocken halten.
7.2 Batteriewechsel
Wenn die Anzeige für niedrigen Batteriestand erscheint, tauschen Sie die Batterien wie in Abschnitt 5.1 beschrieben aus. Entfernen Sie die Batterien, wenn das Messgerät längere Zeit nicht benutzt wird, um ein Auslaufen zu verhindern.
8. Fehlerbehebung
- Anzeige/Zähler schaltet sich nicht ein: Überprüfen Sie den Batterieeinbau und stellen Sie sicher, dass die Batterien nicht entladen sind. Tauschen Sie sie gegebenenfalls aus.
- Ungenaue Messwerte: Ensure test leads are properly connected. Check for damaged leads. Verify the correct measurement function is selected (though auto-ranging minimizes this). Ensure the clamp jaws are fully closed for current measurements.
- „OL“ oder Überlastungsanzeige: The measured value exceeds the meter's range. Select a higher range if available, or ensure the input is within the meter's specifications.
- Keine NCV-Erkennung: Ensure NCV mode is active. The NCV sensor is typically at the top of the clamp head; ensure it is close to the AC source.
9. Spezifikationen
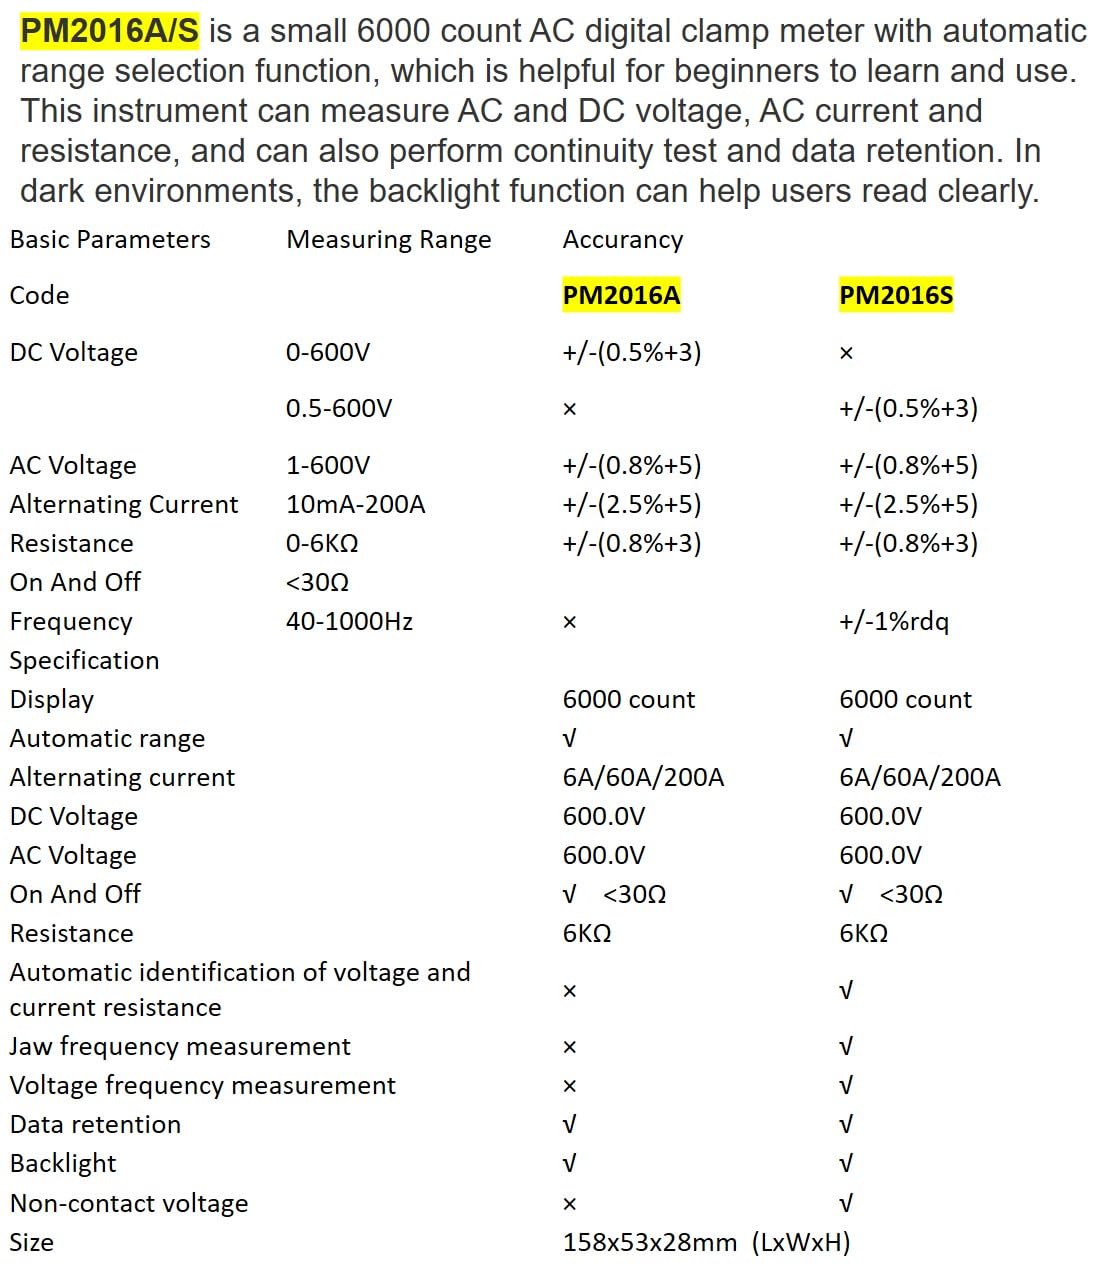
Description: This image presents a comprehensive table detailing the basic parameters, measuring ranges, and accuracy for both the PM2016A and PM2016S models, including features like display count, auto-ranging, and NCV.
| Parameter | Range (PM2016S) | Accuracy (PM2016S) |
|---|---|---|
| DC-Voltage | 0.5 bis 600 V | ± (0.5 % + 3) |
| AC-Lautstärketage | 1.0 bis 600 V | ± (0.8 % + 5) |
| Wechselstrom | 6A/60A/200A | ± (2.5 % + 8) |
| Widerstand | 0 ~ 6 kΩ | ± (0.8 % + 3) |
| Frequenz | 60 Hz ~ 1000 Hz | ± (1.0 % + 5) |
| Anzeige | 6000 Zählwerte | |
| Automatische Reichweite | Ja | |
| Kontinuität | <30Ω | |
| V/Ω/A Auto Scan | Ja | |
| Frequency (Clamp) | Ja | |
| Frequency (Voltage) | Ja | |
| Daten halten | Ja | |
| Hintergrundbeleuchtung | Ja | |
| NCV | Ja | |
| Stromversorgung | 2*1.5V AAA Batteries | |
| Nettogewicht | 122.4g (ohne Batterien) | |
| Größe | 158 mm * 55 mm * 29 mm | |
| Kiefergröße | Ø20 mm | |
| Sicherheitsbewertung | EN61010-1, EN61010-2-033, EN61326, Kat. III 600 V | |

Description: This image provides a visual representation of the physical dimensions of the PEAKMETER PM2016S, including its length, width, and jaw opening size, along with its weight.
10. Garantie und Support
The PEAKMETER PM2016S Digital Clamp Multimeter comes with a 1 Jahr Garantie ab Kaufdatum. Diese Garantie deckt Material- und Verarbeitungsfehler bei normalem Gebrauch ab.
For technical support, warranty claims, or service inquiries, please contact your retailer or the manufacturer directly. Keep your purchase receipt as proof of purchase for warranty purposes.