1. Einleitung
The PEAKMETER PM8215 is a compact, handheld digital multimeter designed for measuring various electrical parameters. This instrument offers high stability and accuracy, featuring a 4000-count display. It is suitable for a wide range of users, from hobbyists to professionals, for tasks requiring AC/DC voltage, AC/DC current, resistance, frequency, and capacitance measurements, along with continuity and diode testing.
2. Sicherheitshinweise
Always read and understand all safety instructions before operating the multimeter.
- This device complies with safety standards EN61010-1, EN61010-2-033, EN61326, and is rated for CAT. III 600V.
- Nicht anwenden voltage oder Strom, der die für das Multimeter festgelegten maximalen Grenzwerte überschreitet.
- Bei Arbeiten an unter Spannung stehenden Stromkreisen ist äußerste Vorsicht geboten. Hohe SpannungtagEs kann zu schweren Verletzungen oder zum Tod führen.
- Stellen Sie sicher, dass die Messleitungen in gutem Zustand sind und keine Beschädigungen an der Isolierung aufweisen.
- Do not operate the multimeter if it appears damaged or if the casing ist offen.
- Tauschen Sie die Batterie sofort aus, sobald die Anzeige für niedrigen Batteriestand erscheint, um genaue Messwerte zu gewährleisten.
- Vor Funktionsänderungen müssen die Messleitungen immer vom Stromkreis getrennt werden.
3. Produktüberschreitungview
3.1 Hauptmerkmale
- Anzeige: 4000 counts digital display.
- Messfunktionen: AC/DC-Voltage, AC/DC Current, Resistance, Frequency, Capacitance.
- Spezialfunktionen: Buzzer, Continuity Test, Diode Test, Low Battery Indication.
- Betriebsarten: Auto Range, Auto Power Off.
- Portabilität: Mini pocket design, lightweight (approx. 75g), and ultra-thin (12mm thickness).
- Sicherheit: Equipped with a 400mA/250V fuse for protection.
3.2 Physikalische Eigenschaften


4. Einrichtung
4.1 Einlegen der Batterie
The PM8215 multimeter is powered by one 3.0V CR2032 button battery.
- Stellen Sie sicher, dass das Multimeter ausgeschaltet ist.
- Suchen Sie das Batteriefach auf der Rückseite des Geräts.
- Use a small screwdriver or coin to open the battery cover.
- Insert the CR2032 battery, observing the correct polarity (+/-).
- Schließen Sie die Batterieabdeckung sicher.
Notiz: Tauschen Sie die Batterie aus, sobald die Anzeige für niedrigen Batteriestand erscheint, um die Messgenauigkeit zu gewährleisten.
5. Bedienungsanleitung
5.1 Ein-/Ausschalten
To power on the multimeter, rotate the central selector knob from the 'OFF' position to any desired measurement function. To power off, rotate the knob back to the 'OFF' position.
5.2 Auto Range Function
The PM8215 features an auto-ranging function, which automatically selects the appropriate measurement range. This simplifies operation as you do not need to manually select the range for most measurements.
5.3 Messfunktionen
Connect the test leads to the appropriate input jacks and the circuit under test. Select the desired function using the rotary switch.
- DC-Voltage (V–): Rotate the knob to the 'V–' position. Connect the red test lead to the positive side and the black test lead to the negative side of the DC voltagDie Quelle.
- AC-Lautstärketage (V∼): Rotate the knob to the 'V∼' position. Connect the test leads across the AC voltagDie Quelle.
- DC Current (mA/µA–): Rotate the knob to the 'mA/µA–' position. Use the 'SEL' button to switch between mA and µA. Connect the multimeter in series with the circuit.
- AC Current (mA/µA∼): Rotate the knob to the 'mA/µA∼' position. Use the 'SEL' button to switch between mA and µA. Connect the multimeter in series with the circuit.
- Widerstand (Ω): Rotate the knob to the 'Ω' position. Ensure the circuit is de-energized before measuring resistance. Connect the test leads across the component.
- Frequenz (Hz): Rotate the knob to the 'Hz' position. Connect the test leads across the signal source.
- Kapazität (F): Rotate the knob to the 'F' position. Ensure the capacitor is discharged before measurement. Connect the test leads across the capacitor.
- Diodentest (→|): Rotate the knob to the '→|' position. Connect the red lead to the anode and the black lead to the cathode of the diode. The display will show the forward voltage drop. Vertauschen Sie die Anschlüsse, um auf einen offenen Stromkreis zu prüfen.
- Durchlaufzeitprüfung (♫): Rotate the knob to the '♫' position. If the resistance between the test leads is below a certain threshold (typically 50Ω), the buzzer will sound, indicating continuity.
5.4 Funktionstasten
- SEL (Auswählen): Used to toggle between different measurement types within a single rotary switch position (e.g., AC/DC current, or diode/continuity).
- ANGEBOT: Allows manual selection of measurement ranges, overriding the auto-ranging function. Press repeatedly to cycle through available ranges.
- HALT: Friert den aktuellen Messwert auf dem Display ein. Zum Entsperren erneut drücken.
6. Wartung
6.1 Reinigung
Wischen Sie das Multimeter ab.asing mit Adamp Reinigen Sie das Gerät mit einem Tuch und einem milden Reinigungsmittel. Verwenden Sie keine Scheuermittel oder Lösungsmittel. Stellen Sie sicher, dass das Gerät vor Gebrauch vollständig trocken ist.
6.2 Batteriewechsel
Refer to Section 4.1 for instructions on replacing the CR2032 button battery.
6.3 Sicherungswechsel
The multimeter is equipped with a 400mA/250V fuse. If the current measurement function stops working, the fuse may need replacement. Fuse replacement should only be performed by qualified personnel. Open the casing carefully, replace the fuse with one of identical specifications, and ensure the casing is properly sealed before reuse.
7. Fehlerbehebung
- Kein Bildschirm: Check if the multimeter is turned ON. Verify battery installation and replace if necessary.
- Falsche Messwerte: Ensure test leads are properly connected and not damaged. Verify the correct function is selected for the measurement. Check battery level.
- Strommessung funktioniert nicht: The fuse may be blown. Refer to Section 6.3 for fuse replacement.
- Buzzer Not Sounding in Continuity Test: The resistance of the circuit may be too high, or the function is not correctly selected.
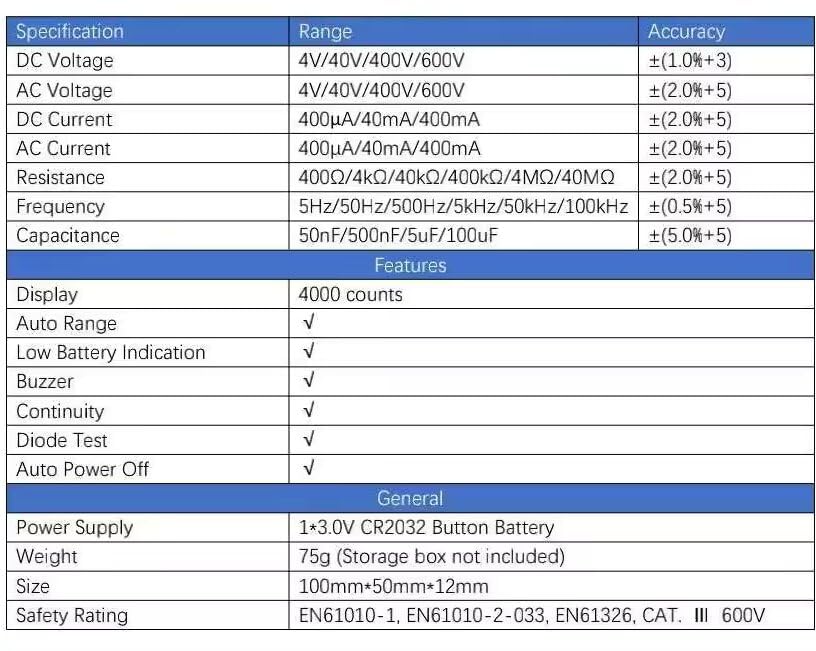
8. Spezifikationen
| Spezifikation | Reichweite | Genauigkeit |
|---|---|---|
| DC-Voltage | 4 V/40 V/400 V/600 V | ± (1.0 % + 3) |
| AC-Lautstärketage | 4 V/40 V/400 V/600 V | ± (2.0 % + 5) |
| Gleichstrom | 400µA/40mA/400mA | ± (2.0 % + 5) |
| Wechselstrom | 400µA/40mA/400mA | ± (2.0 % + 5) |
| Widerstand | 400Ω/4kΩ/40kΩ/400kΩ/4MΩ/40MΩ | ± (2.0 % + 5) |
| Frequenz | 5Hz/50Hz/500Hz/5kHz/50kHz/100kHz | ± (0.5 % + 5) |
| Kapazität | 50 nF/500 nF/5 µF/100 µF | ± (5.0 % + 5) |
| Merkmale | ||
| Anzeige | 4000 Zählwerte | |
| Automatische Reichweite | √ | |
| Anzeige für niedrigen Batteriestand | √ | |
| Summer | √ | |
| Diodentest | √ | |
| Automatische Abschaltung | √ | |
| Allgemein | ||
| Stromversorgung | 1*3.0V CR2032 Button Battery | |
| Gewicht | 75g (Storage box not included) | |
| Größe | 100 mm * 50 mm * 12 mm | |
| Sicherheitsbewertung | EN61010-1, EN61010-2-033, EN61326, Kat. III 600 V | |
9. Garantie und Support
9.1 Garantieinformationen
The PEAKMETER PM8215 Digital Mini Multimeter comes with a 1 Jahr Garantie Diese Garantie gilt ab Kaufdatum und deckt Herstellungsfehler ab. Sie gewährleistet, dass das Produkt die spezifizierten Leistungsdaten erfüllt. Bitte bewahren Sie Ihren Kaufbeleg für Garantieansprüche auf.
9.2 Kundendienst
Für technische Unterstützung, Fehlerbehebung, die über diese Anleitung hinausgeht, oder Garantieanfragen wenden Sie sich bitte direkt an Ihren Händler oder den Hersteller. Beachten Sie die Produktverpackung oder die offizielle Bedienungsanleitung des Herstellers. webWebsite für Kontaktdaten.