
BSIDE 2 channel handheld oscilloscope
BSIDE 2-Kanal Handoszilloskop Multimeter Signalgenerator Benutzerhandbuch
Model: 2 channel handheld oscilloscope
1. Einleitung
This manual provides detailed instructions for the BSIDE 2-Channel Handheld Oscilloscope Multimeter Signal Generator. This versatile 4-in-1 device integrates a dual-channel oscilloscope, a 6000-count multimeter, a signal generator, and supports a flexible current clamp for comprehensive electrical testing and analysis. It is designed for both professional and educational applications, offering portability and a wide range of measurement capabilities.
2. Sicherheitshinweise
Always observe the following safety precautions to prevent personal injury and damage to the instrument:
- Verwenden Sie das Gerät nicht, wenn es beschädigt erscheint oder nicht ordnungsgemäß funktioniert.
- Ensure all probes and test leads are properly connected and in good condition before use.
- Überschreiten Sie nicht die maximale Eingangslautstärketage-Bewertungen gemäß den technischen Spezifikationen.
- Avoid contact with live circuits when connecting or disconnecting probes.
- Bei der Arbeit mit hochvolumigen Stoffen ist Vorsicht geboten.tages oder Strömungen.
- Do not operate the device in wet or explosive environments.
- Refer to the manual for proper fuse replacement if necessary.
3. Packungsinhalt
Bitte überprüfen Sie, ob alle unten aufgeführten Artikel in Ihrem Paket enthalten sind:
- BSIDE 2-Channel 25MHz Oscilloscope Multimeter
- Oscilloscope Probe (Quantity: 2)
- Red and Black Crocodile Clip Probe
- Multimeter Test Leads (Pen type)
- Protective Cap (Quantity: 2)
- Color Ring (Quantity: 8)
- Regulating Rod (Quantity: 1)
- High-end EVA Storage Bag
- Bedienungsanleitung
- USB-Ladekabel

Image 3.1: The BSIDE 4-in-1 handheld device shown with its complete set of accessories, including oscilloscope probes, multimeter leads, crocodile clips, charging cable, and the protective EVA storage bag.
4. Produktüberschreitungview
4.1 Gerätemerkmale
The BSIDE handheld device combines four essential functions into one compact unit:
- Oszilloskop: Dual-channel, 25MHz bandwidth for waveform analysis.
- Multimeter: 6000-count for various electrical measurements.
- Signalgenerator: Produces 7 types of waveforms for testing.
- Flexibler Stromkreisamp Unterstützung: Allows measurement of high AC currents up to 6000A.

Image 4.1: A visual representation highlighting the integrated functions of the device: signal generation, multimeter measurements, and oscilloscope waveform display.
4.2 Bedienelemente und Anzeige
The device features a 3.98-inch TFT full-view color screen (480*320 IPS) for clear data visualization. Navigation and function selection are performed using the front panel buttons.
- Bildschirm: Shows waveforms, measurement readings, and menu options.
- CH1/CH2-Eingänge: Connect oscilloscope probes for dual-channel input.
- OSC Port (OUT/PUT): Signal generator output.
- Input/COM Terminals: Connect multimeter test leads.
- Netzschalter: Schaltet das Gerät ein/aus.
- MENU-Taste: Greift auf Systemeinstellungen und Optionen zu.
- MODE-Taste: Schaltet zwischen Oszilloskop-, Multimeter- und Signalgeneratormodus um.
- F1-F4 Function Buttons: Context-sensitive buttons for specific operations within each mode.
- Navigationstasten: Hoch, Runter, Links, Rechts zur Menünavigation und Parametereinstellung.
- AUTO PEAK Button: Automatic waveform acquisition and scaling in oscilloscope mode.
- Schaltfläche „Speichern“: Saves current data or waveform.
- x1/x10 Button: Adjusts probe attenuation setting.
- AC/DC-Taste: Selects AC or DC coupling.
5. Einrichtung
5.1 Laden des Akkus
The device is equipped with a 5000mA rechargeable lithium battery. Before first use, fully charge the device using the provided USB charging cable and a compatible USB power adapter (not included).
- Connect the small end of the USB charging cable to the charging port on the side of the device.
- Connect the standard USB end to a USB power source.
- Der Ladestatus wird auf dem Bildschirm angezeigt.

Image 5.1: The device being charged via its USB port, illustrating the battery icon on the display indicating charging status. A full charge provides approximately 10 hours in oscilloscope mode or 20 hours in multimeter mode.
5.2 Erstes Einschalten
Press and hold the Power button until the screen illuminates. The device will boot into its last used mode or a default mode.
5.3 Anschluss von Sonden und Leitungen
Always ensure the device is off or in a safe mode before connecting or disconnecting probes and leads.
- Oszilloskop-Tastköpfe: Connect to the CH1 and CH2 BNC inputs. Ensure the probe attenuation setting (x1 or x10) on the probe matches the setting on the device.
- Multimeter-Messleitungen: Insert the red lead into the 'Input' terminal and the black lead into the 'COM' terminal for voltage, resistance, capacitance, and diode measurements. For current measurements, refer to the specific current input terminals.
- Flexibler Stromkreisamp: Connect the flexible current clamp to the appropriate input terminals as indicated for high current measurements.
6. Betriebsarten
Verwenden Sie die MODUS button to switch between the primary operating modes: Oscilloscope, Multimeter, and Signal Generator.
6.1 Oszilloskopmodus
This mode allows for real-time visualization and analysis of electrical waveforms.
- Drücken MODUS to select Oscilloscope mode.
- Connect oscilloscope probes to CH1 and/or CH2 inputs.
- Adjust the probe attenuation (x1/x10) on both the probe and the device to match.
- Use the navigation buttons to adjust vertical sensitivity (V/div) and horizontal time base (s/div).
- Drücken AUTO PEAK for automatic waveform scaling and triggering.
- The display shows waveform parameters such as Vpp, Vmax, Vmin, duty cycle, and frequency.
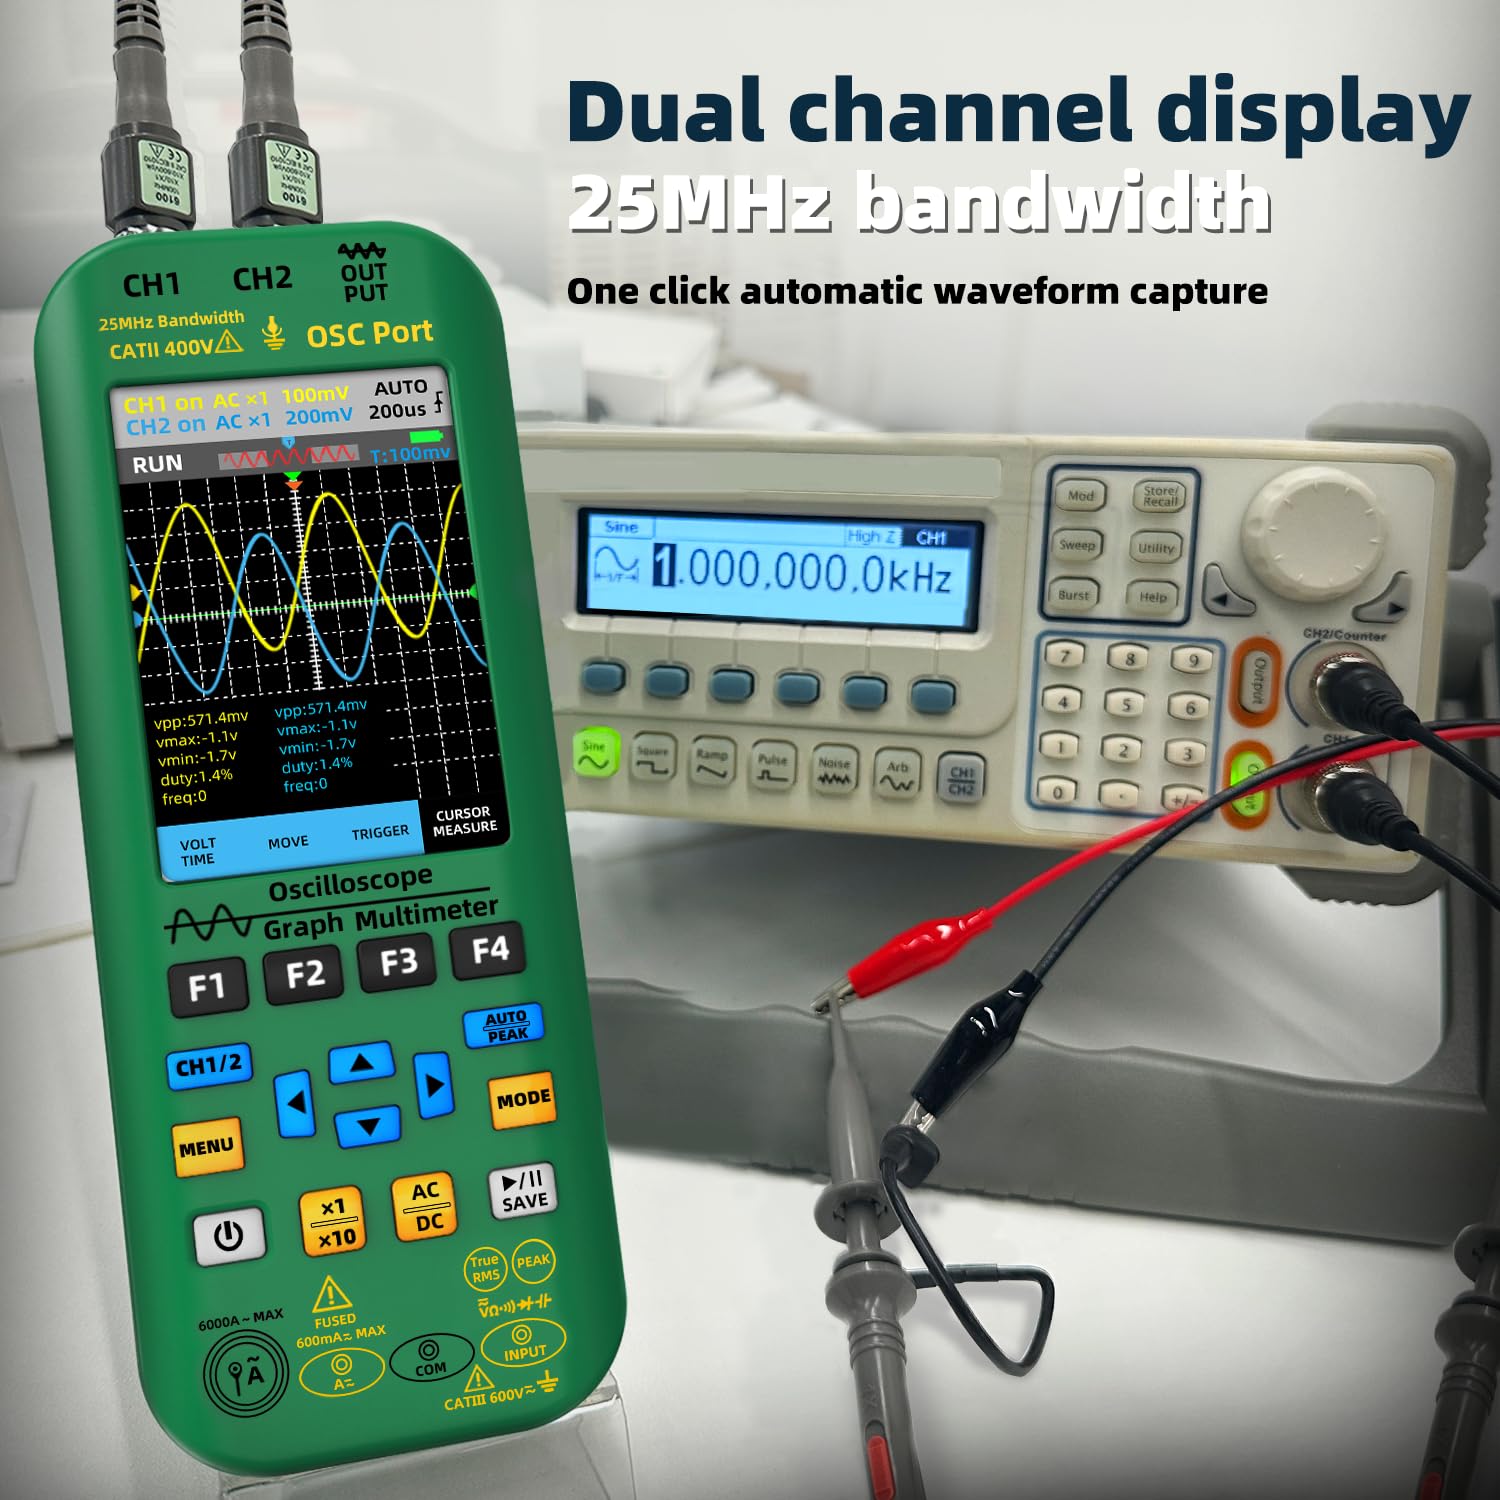
Image 6.1: The oscilloscope displaying dual-channel waveforms (CH1 and CH2) with various measurement parameters such as peak-to-peak voltage, maximale Lautstärketage, Mindestvolumentage, Tastverhältnis und Frequenz.
6.2 Multimeter-Modus
The multimeter function provides precise measurements of various electrical quantities.
- Drücken MODUS to select Multimeter mode.
- Connect the multimeter test leads to the appropriate input terminals.
- Use the F1-F4 buttons or navigation to select the desired measurement function (e.g., DC Voltage, AC-Voltage, Resistance, Capacitance, Current, Diode, Continuity, Temperature).
- For AC current measurements up to 6000A, connect the flexible current clamp.

Image 6.2: A user performing an AC voltage measurement within an electrical panel using the multimeter function of the BSIDE device. The display shows a reading of 235.6V AC.
6.3 Signalgeneratormodus
The signal generator can output various waveforms for testing electronic circuits.
- Drücken MODUS to select Signal Generator mode.
- Connect a test lead from the OSC Port (OUT/PUT) to the circuit under test.
- Use the F1-F4 buttons or navigation to select the desired waveform type (sine, square, triangle, half, full, sawtooth, DC).
- Passen Sie die Ausgabe an amplitude (0.1V-3.0V) and frequency (0Hz-2MHz) using the navigation buttons.
- For square waves, the duty cycle can be adjusted from 1% to 99%.
6.4 Datenmanagement
The device supports data storage, preview, and export functions.
- Drücken Sie die SPEICHERN button to store current waveform data or measurement readings.
- Navigate through saved data for preview.
- Connect the device to a computer via the USB port for high-speed data transmission and export of stored data.

Image 6.3: The BSIDE device connected to a laptop, demonstrating its high-speed data transmission capability. Waveform data saved on the device can be exported and viewed on a computer for further analysis.
7. Wartung
7.1 Reinigung
Verwenden Sie zum Reinigen des Geräts ein weiches, damp Mit einem Tuch abwischen. Keine Scheuermittel oder Lösungsmittel verwenden. Vor der Reinigung sicherstellen, dass das Gerät ausgeschaltet und von allen Stromquellen getrennt ist.
7.2 Batteriepflege
The integrated 5000mA Li-ion battery provides extended operation. To maximize battery life:
- Laden Sie den Akku auf, sobald die Anzeige für niedrigen Akkustand erscheint.
- Vermeiden Sie häufiges vollständiges Entladen des Akkus.
- Wenn Sie das Gerät über einen längeren Zeitraum lagern, laden Sie es auf etwa 50 % auf und bewahren Sie es an einem kühlen, trockenen Ort auf.
7.3 Speicherung
When not in use, store the device in its provided high-end EVA storage bag to protect it from dust, moisture, and physical impact. Store in a dry environment away from direct sunlight and extreme temperatures.
8. Fehlerbehebung
If you encounter issues with your BSIDE device, refer to the following common problems and solutions:
- Das Gerät lässt sich nicht einschalten: Stellen Sie sicher, dass der Akku geladen ist. Schließen Sie das Ladekabel an und versuchen Sie es erneut.
- Kein oder nur schwaches Display: Check battery level. Adjust backlight settings in the menu.
- Incorrect readings in Multimeter mode: Verify test lead connections. Ensure the correct measurement function is selected. Check for damaged leads.
- No waveform in Oscilloscope mode: Check probe connections to both the device and the circuit. Ensure probe attenuation matches the device setting. Use AUTO PEAK to automatically adjust settings. Verify the circuit under test is active.
- Signal Generator output not working: Ensure the device is in Signal Generator mode and the output is enabled. Check connections from the OSC Port.
- Probleme bei der Datenübertragung: Ensure the USB cable is securely connected to both the device and the computer. Check computer's device manager for proper driver installation.
Wenn das Problem weiterhin besteht, wenden Sie sich für weitere Unterstützung an den Kundendienst.
9. Spezifikationen
| Besonderheit | Spezifikation |
|---|---|
| Anzeige | 3.98-inch TFT Color Screen, 480*320 IPS, 6000 words |
| Sampling-Rate | 3 times / second (Multimeter) |
| Bandbreite | 25MHz (Dual-channel) |
| Echtzeit-Sampling-Rate | 208 MSa / s |
| Anzahl der Kanäle | 2 Kanäle |
| Eingangsimpedanz | 1 MΩ, @16 pF |
| Sondendämpfung | ×1, ×10 |
| Maximale Eingangslautstärketage | ×1 range <150V, ×10 range <300V (DC + AC peak) |
| Horizontal Sampling Ratenbereich | 1.5 Sa/s - 208 MSa/s |
| Vertikale Empfindlichkeit | 20 mV/div - 10 V/div |
| Anzeigemodus | XT, XY, Scroll |
| Nachglühzeit | Min, 500ms, 1s, 10s, Unlimited |
| DC-Voltage (V) | 0.001V - 1000V (0.8%+3) |
| AC-Lautstärketage (V) | 0.001V - 750V (1.0%+3) |
| Gleichstrom (mA) | 0.01mA - 600.0mA (1.0%+3) |
| Wechselstrom (mA) | 0.01mA - 600.0mA (1.2%+5) |
| Flexibler Stromkreisamp Wechselstrom | 0.1A - 6000A (1.0%+5) |
| Widerstand | 0.1Ω - 60.00MΩ (1.0%+3) |
| Kapazität | 0.1nF - 99.99mF (4.5%+5) |
| Temperatur | (-20 - 1000)°C / (-4 - 1832)°F (2.5%+5) |
| Signal Generator Waveform Types | Sine, Square, Triangle, Half, Full, Sawtooth, DC |
| Frequenzbereich des Signalgenerators | 0 Hz – 2 MHz |
| Signalgeneratorausgang AmpBreitengrad | 0.1 V - 3.0 V |
| Signal Generator Square Wave Duty Cycle | 1 % - 99 % |
| Batterie | 5000mA Li-ion (2 Lithium Ion batteries included) |
| Maße | 216.6 x 84.5 x 36.0 mm (8.5 x 3.31 x 1.42 Zoll) |
| Gewicht | 384 g (13.55 Unzen) |
10. Garantie und Support
For warranty information and technical support, please refer to the documentation included with your purchase or contact BSIDE customer service through their official website or the retailer where the product was purchased. Please have your model number (2 channel handheld oscilloscope) and purchase details ready when contacting support.
11. Videoinformationen
Vom Verkäufer standen keine offiziellen Produktvideos zur Verfügung, die in dieses Handbuch eingebettet werden konnten.
Ask a question about this manual
Ask about setup, troubleshooting, compatibility, parts, safety, or missing instructions. Manuals+ will review the question and use this page’s manual context to help answer it.