1. Einleitung
Welcome to the world of water sports with your new tectake Palagios Inflatable Stand-Up Paddle Board. This high-quality SUP is designed for stability, durability, and performance, suitable for paddlers of all skill levels. With its robust Drop-Stitch material construction, it offers maximum hardness and longevity. This manual provides essential information for the safe and proper assembly, operation, and maintenance of your SUP board.

2. Sicherheitshinweise
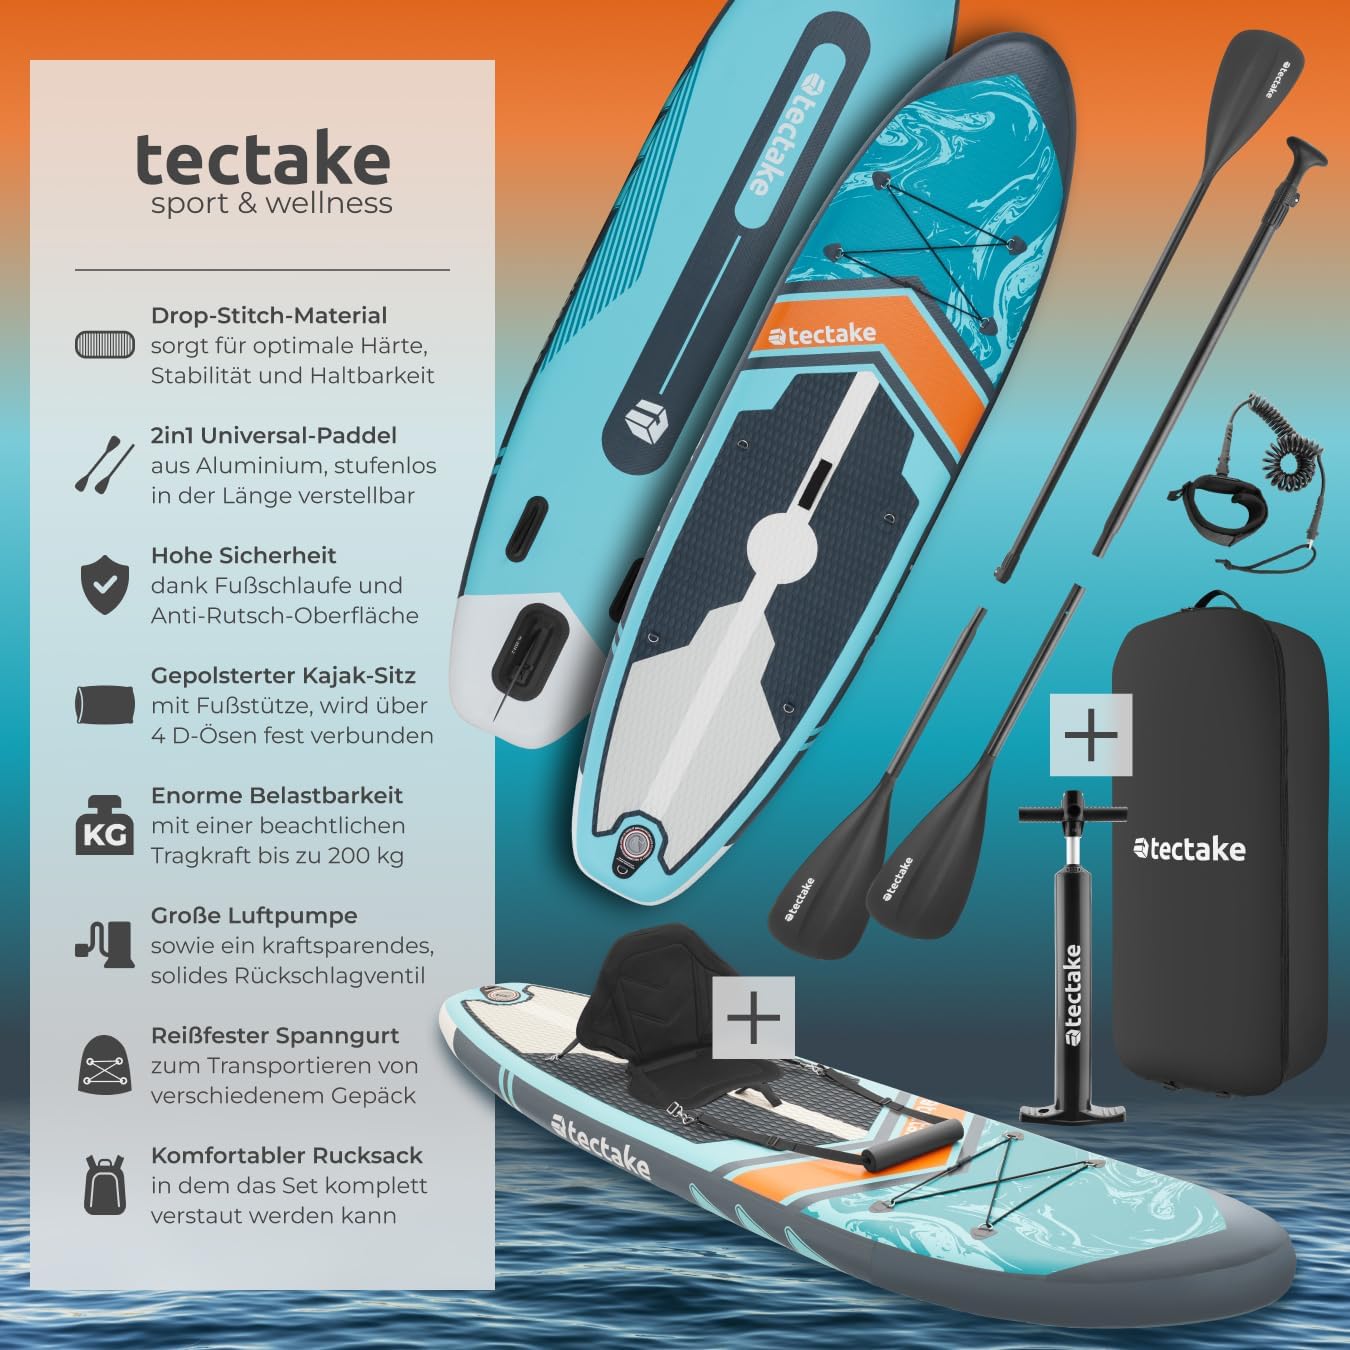
Always prioritize safety when using your SUP board. Adhere to local regulations and wear a personal flotation device (PFD). Do not exceed the maximum weight capacity of 200 kg. Avoid paddling in strong currents, high winds, or stormy weather. Always inform someone of your paddling plans and expected return time. Ensure the leash is securely attached to your ankle and the board to prevent separation in case of a fall.

3. Produktkomponenten
Your tectake Stand Up Paddle Board set includes the following components:
- Aufblasbares SUP Board
- 2-in-1 Adjustable Aluminum Paddle (convertible to double paddle)
- High-Pressure Air Pump with Pressure Gauge
- Removable 3-Fin System (large slide-in fin)
- Padded Kayak Seat with Footrest
- Coiled Ankle Leash
- Repair Kit (2 patches)
- Function Key for Valve Opening
- Comfortable Transport Backpack
4. Aufbau und Montage
4.1. Unpacking and Preparing the Board
Remove the SUP board and all accessories from the transport backpack. Unroll the board on a clean, flat surface, free from sharp objects.
4.2. Aufblasen des Bretts
- Locate the air valve on the board. Ensure the inner pin of the valve is in the 'up' position (closed for inflation). If it's down, press it to pop it up.
- Connect the hose from the high-pressure air pump to the board's valve by twisting it clockwise until secure.
- Begin pumping. The large air pump with its energy-saving non-return valve allows for quick and easy inflation. Monitor the pressure gauge on the pump.
- Inflate the board to the recommended pressure, typically between 12-15 PSI (0.8-1.0 BAR). The board will become very rigid.
- Once the desired pressure is reached, quickly disconnect the pump hose by twisting counter-clockwise. The valve's inner pin will prevent air from escaping.

4.3. Attaching the Fin System
The 3-fin system, including a large slide-in fin, ensures optimal tracking and stability. Slide the large fin into its slot at the rear underside of the board and secure it with the provided clip or pin. The smaller side fins are typically fixed.
4.4. Zusammenbau des Paddels
The adjustable aluminum paddle can be configured as a single SUP paddle or a double kayak paddle. Connect the paddle sections and adjust the length to your height. For SUP, the paddle handle should reach your wrist when your arm is extended overhead. For kayak use, attach the second blade section.
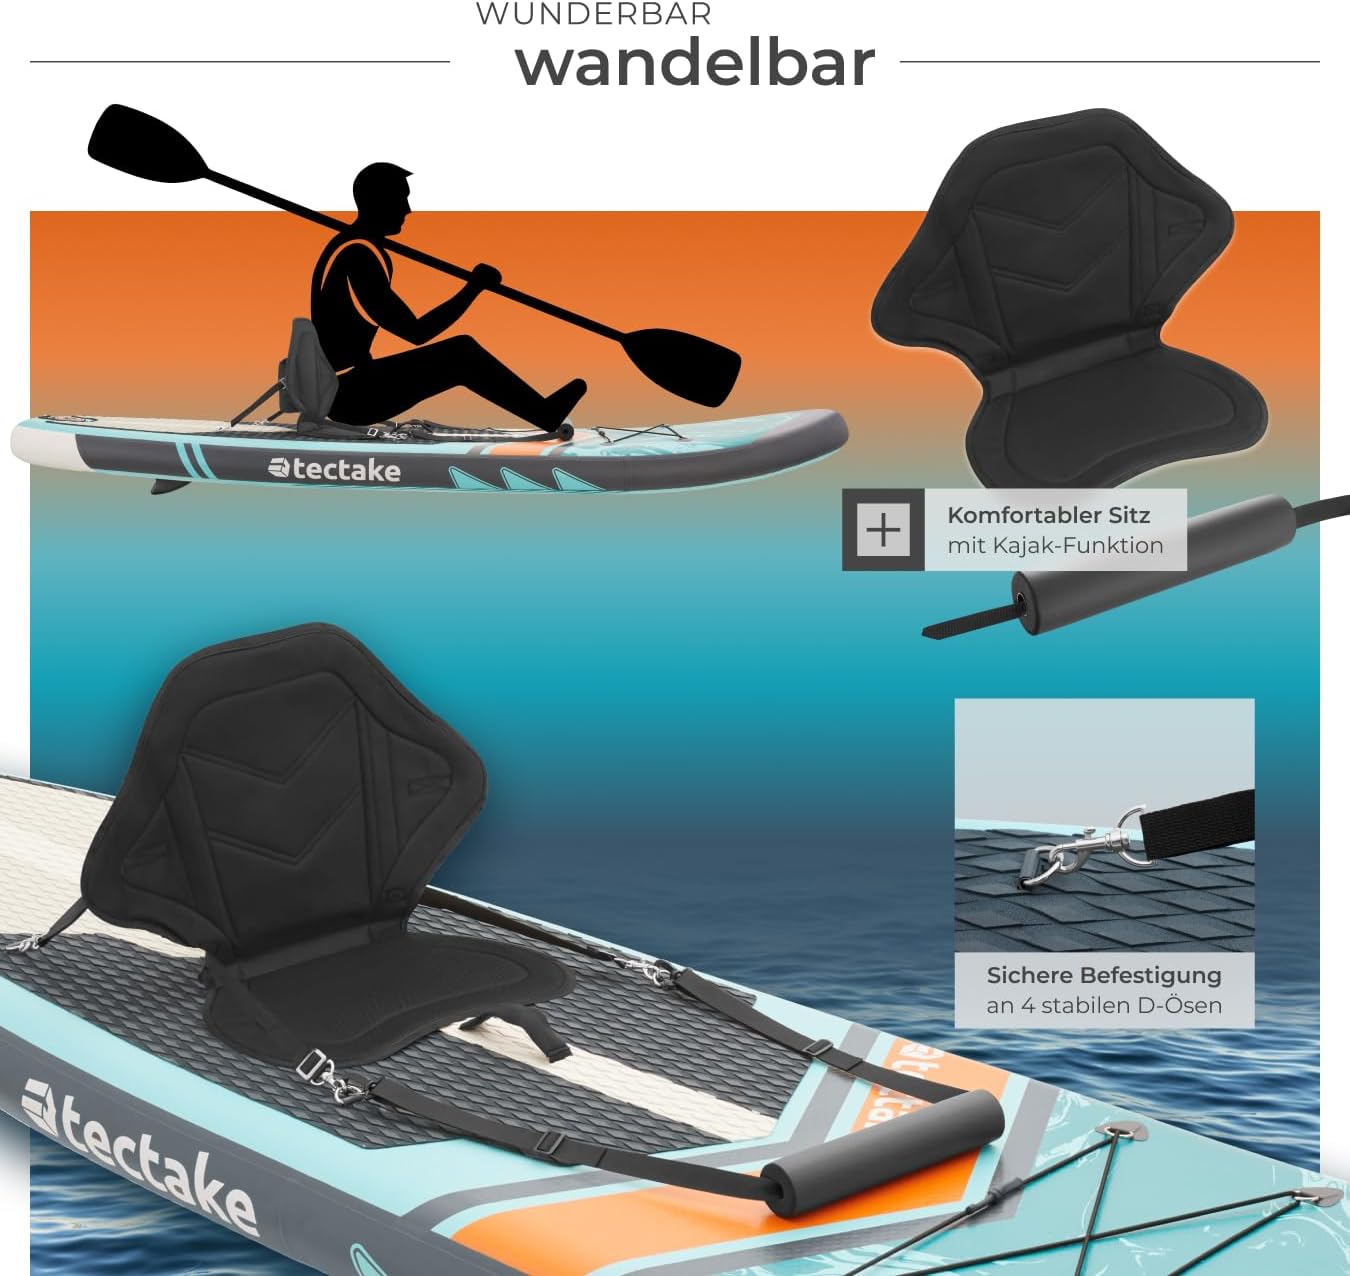
4.5. Attaching the Kayak Seat (Optional)
If you wish to use the board as a kayak, attach the padded kayak seat to the D-rings on the board using the straps provided. Ensure all four straps are securely fastened for stability.
5. Operating the SUP Board
5.1. Entering the Water
Carry the inflated board to the water using the central carrying handle. Attach the coiled ankle leash to your ankle and the D-ring at the rear of the board. This prevents the board from drifting away if you fall.
5.2. Paddeltechniken
Start by kneeling on the board to get a feel for its stability. Once comfortable, slowly stand up, placing your feet shoulder-width apart in the center of the board, facing forward. Use the paddle to propel yourself through the water. The anti-slip surface made of high-quality EVA foam ensures excellent grip and stability.

5.3. Using the Elastic Bungee Cord
The elastic bungee cord at the front of the board is perfect for securing dry bags, water bottles, or other small items during your paddle. Ensure items are tightly secured to prevent loss.
6. Pflege und Wartung
6.1. Reinigung
Spülen Sie das Brett nach jedem Gebrauch gründlich mit klarem Wasser ab, um Salz, Sand und Schmutz zu entfernen. Verwenden Sie bei Bedarf milde Seife. Vermeiden Sie scharfe Chemikalien oder Scheuermittel.
6.2. Trocknen
Ensure the board is completely dry before deflating and storing it. This prevents mold and mildew growth. Dry it in a shaded area to avoid direct sunlight exposure for prolonged periods.
6.3. Deflation und Lagerung
To deflate, press the inner pin of the valve down and twist it to lock it in the open position. Allow the air to escape. You can gently roll the board from the nose towards the tail to expel remaining air. Store the deflated board and all accessories in the provided transport backpack in a cool, dry place, away from direct sunlight and extreme temperatures.

6.4. Verwendung des Reparatursets
In case of minor punctures, use the included repair kit. Clean and dry the damaged area. Apply adhesive (not included, typically PVC glue) to the patch and the board, then firmly press the patch onto the puncture. Allow sufficient time for the adhesive to cure before re-inflating.

7. Fehlerbehebung
7.1. Platine hält die Luft nicht
- Ventilleck: Ensure the valve cap is tightly screwed on. Check if the inner pin is in the 'up' (closed) position after inflation. If the valve itself is leaking, use the function key to tighten it.
- Punktion: Inspect the board for any visible holes or tears. Use soapy water to locate small leaks (bubbles will appear). Repair using the provided repair kit.
7.2. Pump Not Working / Pressure Gauge Inaccurate
- Schlauchanschluss: Ensure the pump hose is securely attached to both the pump and the board valve.
- Gauge Functionality: The pressure gauge typically only registers pressure once the board starts to become firm (around 7 PSI). If it still doesn't work, contact customer support.
8. Technische Daten
| Besonderheit | Spezifikation |
|---|---|
| Produktabmessungen (L x B x H) | 288 x 77 x 22.5 cm (approx. 9.45 ft x 2.53 ft x 0.74 ft) |
| Brettgewicht | Ca. 7 kg |
| Gesamtgewicht (mit Zubehör) | Ca. 11.5 kg |
| Maximale Tragfähigkeit | 200 kg |
| Material | Polyvinylchloride (PVC), Drop-Stitch core, EVA foam surface |
| Paddle Length | 165 - 209 cm (verstellbar) |
| Double Paddle Length | 225 cm |
| Kayak Seat Dimensions | 45 x 46 x 37 cm |
| Ankle Leash Length | Bis zu 330 cm |

9. Garantie und Support
Informationen zur Garantie und zum Kundendienst finden Sie in der mit Ihrem Kauf gelieferten Dokumentation oder kontaktieren Sie den Verkäufer direkt. Bewahren Sie Ihren Kaufbeleg für eventuelle Garantieansprüche auf.
In den bereitgestellten Daten waren keine offiziellen Produktvideos des Verkäufers verfügbar, die in dieses Handbuch eingebettet werden konnten.