1. Einleitung
Thank you for choosing the Sandberg Survivor Radio All-in-1 2000, Model 421-04. This versatile device is designed to provide reliable communication and essential functions in various situations, including emergencies. It features AM/FM/WB radio reception, a powerful flashlight, an SOS alarm, and multiple charging options including solar, hand crank, and USB. This manual will guide you through the proper setup, operation, and maintenance of your radio to ensure its optimal performance and longevity.
2. Sicherheitshinweise
Bitte lesen und verstehen Sie alle Sicherheitshinweise, bevor Sie dieses Produkt verwenden. Die Nichtbeachtung dieser Hinweise kann zu Stromschlag, Brand oder schweren Verletzungen führen.
- Setzen Sie das Gerät keinen extremen Temperaturen, direkter Sonneneinstrahlung oder hoher Luftfeuchtigkeit aus.
- Keep the device away from water and other liquids. If it gets wet, turn it off immediately and allow it to dry completely before reuse.
- Versuchen Sie nicht, das Gerät zu zerlegen, zu reparieren oder zu verändern. Überlassen Sie alle Wartungsarbeiten qualifiziertem Fachpersonal.
- Use only the specified charging methods (USB, hand crank, solar).
- Außerhalb der Reichweite von Kindern aufbewahren.
- Entsorgen Sie das Gerät und die Batterie verantwortungsbewusst gemäß den örtlichen Vorschriften.
- Avoid prolonged exposure to loud sounds from the radio to prevent hearing damage.
3. Packungsinhalt
Überprüfen Sie, ob alle Artikel in Ihrem Paket vorhanden sind:
- Sandberg Survivor Radio All-in-1 2000 (Model 421-04)
- USB-Ladekabel
- Bedienungsanleitung
4. Produktüberschreitungview
Familiarize yourself with the various parts and controls of your Sandberg Survivor Radio.
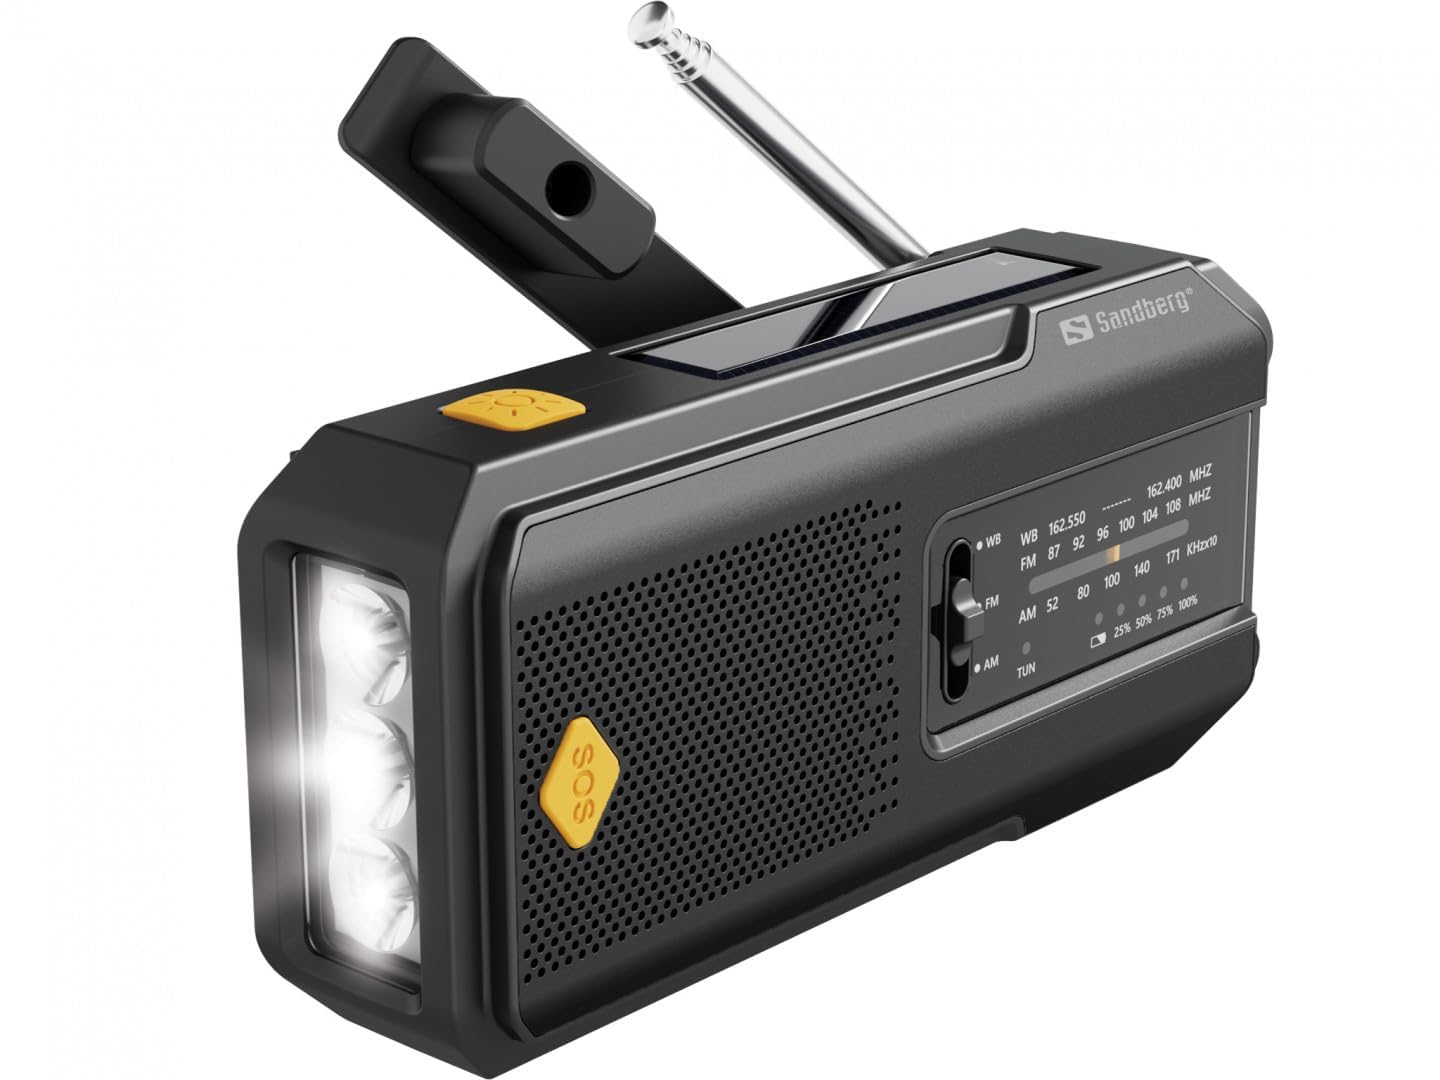
Abbildung 1: Front view of the Sandberg Survivor Radio, showing the main speaker, tuning dial, antenna, and folded hand crank.
- Teleskopantenne: Für einen besseren Radioempfang.
- Handkurbel: Zur manuellen Stromerzeugung.
- Solarmodul: For charging the internal battery via sunlight.
- Taschenlampe: Integrierte LED-Leuchte zur Beleuchtung.
- SOS-Taste: Activates an emergency alarm and flashing light.
- Lautsprecher: Audioausgang für Radio.
- Abstimmregler: Zur Auswahl von Funkfrequenzen.
- Bandauswahl: Switches between AM, FM, and WB (Weather Band).
- Volume Control / Power Switch: Adjusts volume and turns the radio on/off.
- USB-Ausgangsport: Zum Laden externer Geräte.
- Micro-USB-Eingangsanschluss: Zum Aufladen des Radios über USB.
- Batterieanzeige: Zeigt den aktuellen Batteriestand an.

Abbildung 2: Seite view highlighting the integrated flashlight and the yellow SOS button.

Abbildung 3: Spitze view illustrating the solar charging panel and the hand crank in its operational position.
5. Einrichtung
5.1 Erstaufladung
Before first use, it is recommended to fully charge the radio's internal battery using the USB charging cable.
- Connect the micro USB end of the provided cable to the Micro USB Input Port on the radio.
- Verbinden Sie das Standard-USB-Ende mit einem USB-Netzteil (nicht im Lieferumfang enthalten) oder einem USB-Anschluss Ihres Computers.
- The battery indicator lights will show charging progress. Once all lights are solid, the radio is fully charged.
6. Bedienung
6.1 Ein-/Ausschalten und Lautstärkeregelung
Drehen Sie den Volume Control / Power Switch Im Uhrzeigersinn drehen, um das Radio einzuschalten und die Lautstärke zu erhöhen. Gegen den Uhrzeigersinn drehen, um die Lautstärke zu verringern und das Radio auszuschalten.
6.2 Radio Function (AM/FM/WB)
- Erweitern Sie die Teleskopantenne vollständig für optimalen Empfang.
- Verwenden Sie die Bandauswahl to choose between AM, FM, or WB (Weather Band).
- Drehen Sie den Einstellrad um nach Radiosendern zu suchen.
- Passen Sie die Lautstärkeregelung auf Ihre gewünschte Lautstärke einstellen.
Note: Weather Band (WB) provides access to NOAA weather alerts and broadcasts in applicable regions.
6.3 Taschenlampe
Drücken Sie die entsprechende Taschenlampentaste (usually located on the side or front) to turn the flashlight on. Press again to turn it off.
6.4 SOS-Alarm
Im Notfall die Taste gedrückt halten SOS-Taste (often yellow) to activate a loud siren and a flashing light. Press it again to deactivate the alarm.
6.5 Charging the Radio (Internal Battery)
The radio can be charged using three methods:
- USB-Aufladung: As described in Section 5.1. This is the fastest and most efficient method.
- Laden per Handkurbel: Entfalten Sie die Handkurbel and rotate it clockwise or counter-clockwise at a steady pace (approximately 130-150 RPM). A few minutes of cranking can provide enough power for a short period of radio use or flashlight operation.
- Solarladung: Place the radio with the Solarpanel facing direct sunlight. This method is ideal for maintaining charge or slow charging in emergency situations. It is less efficient than USB or hand cranking for rapid charging.
6.6 Laden externer Geräte (Powerbank-Funktion)
The radio can act as a power bank to charge small electronic devices like smartphones.
- Schließen Sie das Ladekabel Ihres Geräts an den USB-Ausgangsanschluss im Radio.
- The radio's internal battery will begin charging your external device.
- Note: This will drain the radio's internal battery. Use this function judiciously, especially in emergency situations.
7. Wartung
- Reinigung: Wischen Sie das Radio mit einem weichen, damp Tuch. Verwenden Sie keine scharfen Chemikalien oder Scheuermittel.
- Lagerung: Store the radio in a cool, dry place away from direct sunlight and extreme temperatures. If storing for extended periods, it is recommended to fully charge the battery every 3-6 months to maintain battery health.
- Batteriepflege: Avoid fully discharging the battery frequently. Recharge it when the battery indicator shows low power.
8. Fehlerbehebung
| Problem | Mögliche Ursache | Lösung |
|---|---|---|
| Das Radio lässt sich nicht einschalten. | Batterie ist leer. | Charge the radio using USB, hand crank, or solar power. |
| Schlechter Radioempfang. | Antenne nicht ausgefahren; schwaches Signal; Störungen. | Extend the telescopic antenna fully. Try repositioning the radio. Tune slowly. |
| Taschenlampe funktioniert nicht. | Battery is depleted; flashlight button not pressed correctly. | Charge the radio. Ensure the flashlight button is pressed firmly. |
| Externes Gerät wird nicht geladen. | Die Batterie des Funkgeräts ist schwach; falsches Kabel; Gerät nicht kompatibel. | Ensure the radio has sufficient charge. Use the correct USB cable for your device. Some high-power devices may not be fully supported. |
9. Spezifikationen
- Modell: 421-04
- Marke: Sandberg
- Radiobänder: AM, FM, WB (Wetterband)
- Lademethoden: USB, Hand Crank, Solar Panel
- Funktionen: Radio, Flashlight, SOS Alarm, Power Bank
- Hersteller: Sandberg
- Herkunftsland/-region: Deutschland
10. Garantie und Support
Sandberg products are manufactured to high quality standards. For information regarding warranty terms and technical support, please refer to the official Sandberg website or contact your local retailer. Please retain your purchase receipt as proof of purchase for warranty claims.
Weitere Hilfe erhalten Sie unter: www.sandberg.it