1. Einleitung
Thank you for choosing the Dexter 800AG2-125.5AB1 Angle Grinder. This manual provides essential information for the safe and efficient operation, maintenance, and troubleshooting of your new tool. Please read this manual thoroughly before first use and keep it for future reference.
This angle grinder is designed for cutting and grinding metal and various coatings. Its 800W motor delivers 11,500 RPM, accommodating 4.1/2" / 5" (115/125mm) discs. The tool features a 3-meter power cord for extended reach and an ergonomic grip for comfortable handling.
2. Sicherheitshinweise
Beachten Sie beim Bedienen von Elektrowerkzeugen stets die grundlegenden Sicherheitsvorkehrungen, um das Risiko von Bränden, Stromschlägen und Verletzungen zu verringern.
- Geeignete persönliche Schutzausrüstung (PSA) tragen.: Always wear safety glasses, hearing protection, and gloves. A dust mask is recommended for dusty operations.
- Sichern Sie das Werkstück: Always clamp oder das Werkstück so zu befestigen, dass es sich während des Betriebs nicht bewegen kann.
- Maintain a clean work area: Cluttered areas invite accidents. Ensure your workspace is well-lit.
- Vermeiden Sie gefährliche Umgebungen: Do not use power tools in damp or wet locations, or expose them to rain. Keep the work area well-ventilated.
- Halten Sie Kinder und Unbeteiligte fern: All visitors should be kept a safe distance from the work area.
- Lagern Sie unbenutzte Werkzeuge: When not in use, tools should be stored in a dry, high, or locked-up place, out of reach of children.
- Wenden Sie keine Gewalt an: It will do the job better and more safely at the rate for which it was designed.
- Verwenden Sie das richtige Werkzeug: Do not force a small tool or attachment to do the job of a heavy-duty tool.
- Auf beschädigte Teile prüfen: Before using the tool, check for any damaged parts. A guard or other part that is damaged should be properly repaired or replaced by an authorized service center.
- Trennen Sie die Stromversorgung: Always disconnect the tool from the power source before making any adjustments, changing accessories, or storing the tool.
- Verwenden Sie den Zusatzhandgriff: Always operate the angle grinder with the auxiliary handle securely attached for maximum control.
3. Produktüberschreitungview
Familiarize yourself with the components of your Dexter Angle Grinder.
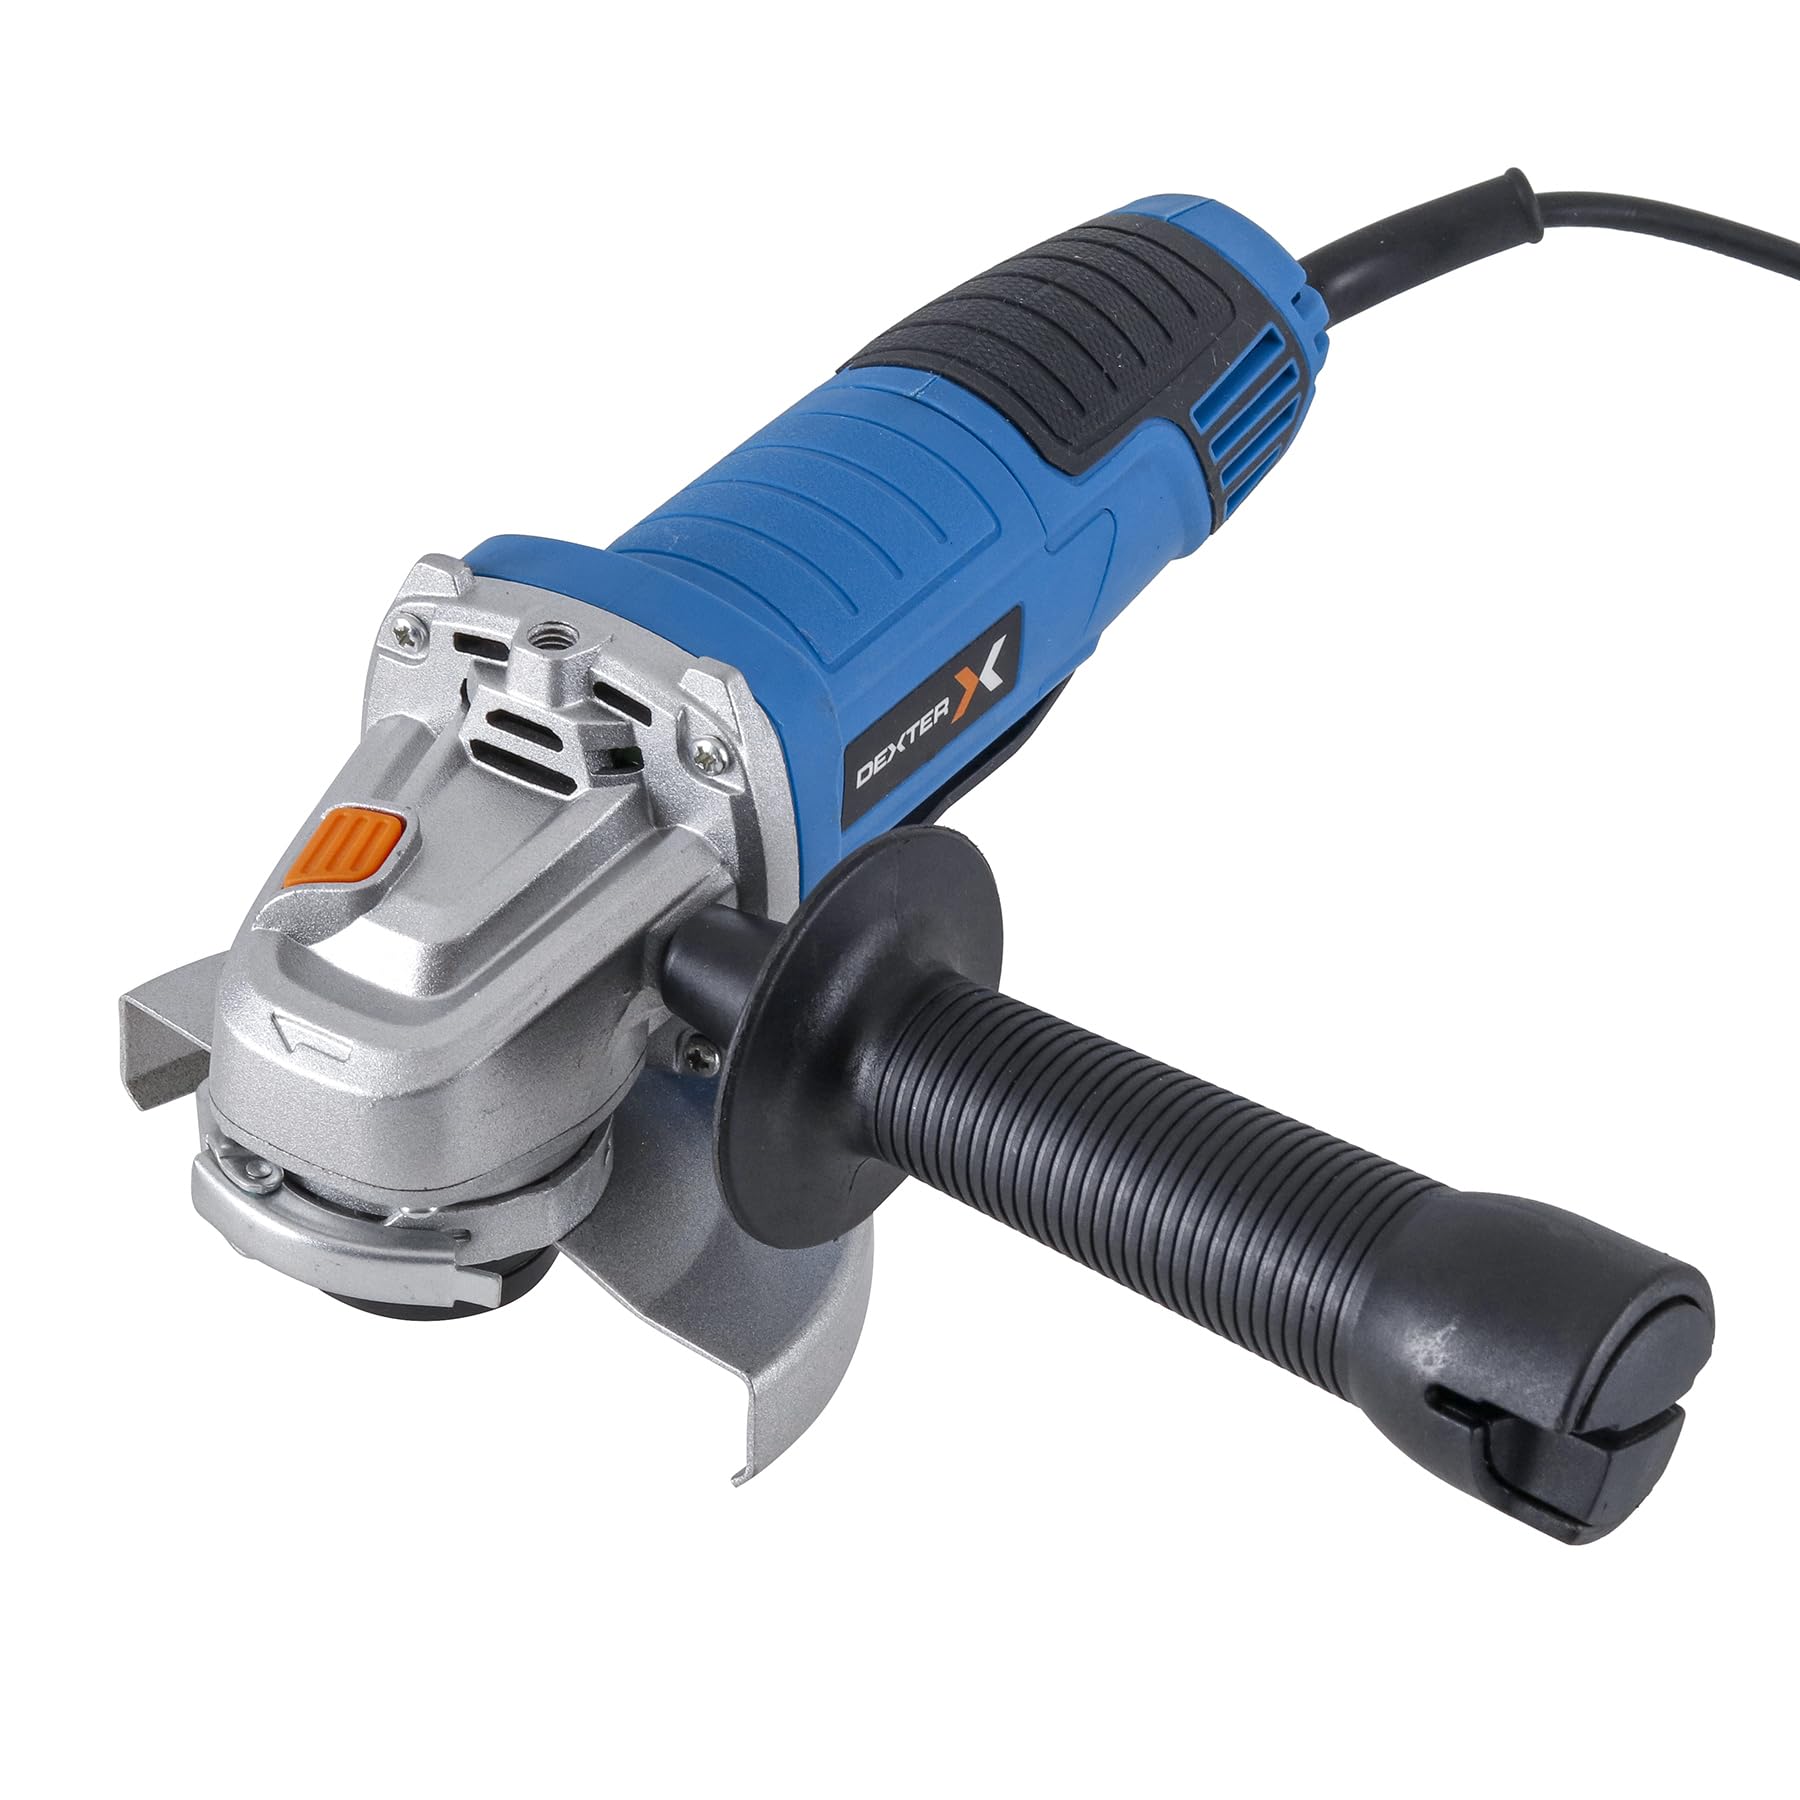
Abbildung 1: Gesamt view of the Dexter Angle Grinder, highlighting its powerful motor suitable for heavy-duty tasks.

Abbildung 2: Detail of the power switch, indicating the tool's robust power for demanding work.

Abbildung 3: View of the disc mounting area, designed for simple and quick disc changes.

Abbildung 4: Close-up of the spindle lock button, essential for secure disc changes.

Abbildung 5: The ergonomic handle design, ensuring light and comfortable use.
Enthaltene Komponenten:
- 1 x Dexter 5" Angle Grinder
- 1 x Schraubenschlüssel
- 1 x Zusatzgriff
- 1 x Disc Guard 115mm
- 1 x Disc Guard 125mm
4. Einrichtung
4.1 Attaching the Disc Guard
- Stellen Sie sicher, dass die Mühle vom Stromnetz getrennt ist.
- Select the appropriate disc guard (115mm or 125mm) for your chosen disc size.
- Position the disc guard over the spindle housing, ensuring it aligns with the mounting points.
- Secure the guard firmly using the provided screws or clamping mechanism. Ensure it is oriented to provide maximum protection during operation.
4.2 Montage des Zusatzgriffs
The auxiliary handle can be attached in three different positions (left, right, or top) to suit your working preference and ensure optimal control.
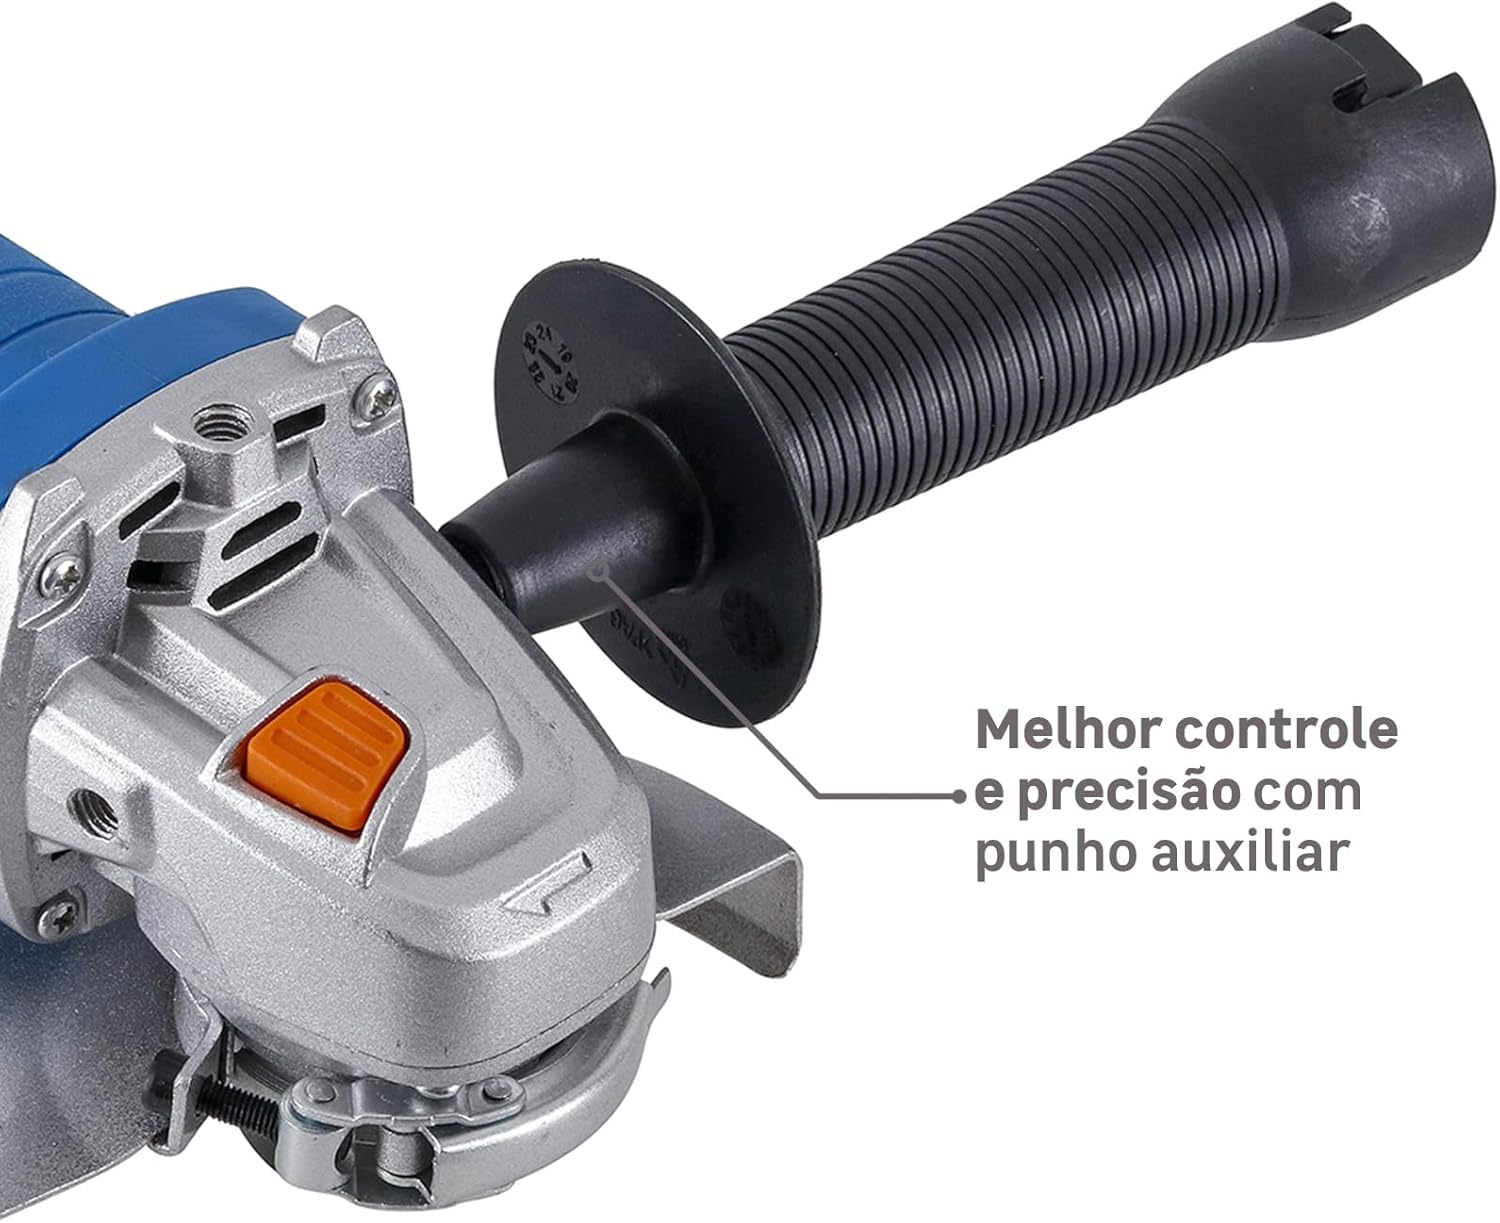
Abbildung 6: Angle grinder with auxiliary handle attached, providing enhanced control and precision.
- Identify the threaded holes on the grinder's gear housing.
- Screw the auxiliary handle clockwise into the desired position until it is securely tightened.
4.3 Mounting a Grinding/Cutting Disc
- Stellen Sie sicher, dass die Mühle vom Stromnetz getrennt ist.
- Press and hold the spindle lock button (Figure 4) to prevent the spindle from rotating.
- Setzen Sie den inneren Flansch auf die Spindel.
- Setzen Sie die Schleif- oder Trennscheibe auf den inneren Flansch und achten Sie darauf, dass sie plan aufliegt.
- Screw the outer flange onto the spindle, hand-tightening it.
- Use the provided wrench to firmly tighten the outer flange, ensuring the disc is securely mounted. Release the spindle lock button.
5. Bedienungsanleitung
5.1 Ein-/Ausschalten
- To turn on the grinder, slide the power switch (Figure 2) forward.
- To turn off the grinder, slide the power switch backward to the 'OFF' position.
5.2 Schleif- und Schneidtechniken
Always hold the grinder firmly with both hands, using the main handle and the auxiliary handle.

Abbildung 7: Angle grinder in use, demonstrating its effectiveness for cutting metal profiles and coatings.

Abbildung 8: Angle grinder being used for sanding a wooden surface, showcasing seine Vielseitigkeit.
- For Grinding: Hold the grinder at an angle of approximately 15-30 degrees to the workpiece. Apply moderate pressure and move the tool evenly across the surface.
- For Cutting: Hold the grinder perpendicular to the workpiece. Allow the disc to cut through the material without forcing it. Ensure the workpiece is stable and supported.
- Überlastung vermeiden: Do not apply excessive pressure, as this can reduce disc life and motor efficiency.
- Allow the tool to reach full speed: Before making contact with the workpiece, allow the disc to reach its full operating speed.
6. Wartung
Regelmäßige Wartung gewährleistet die Langlebigkeit und den sicheren Betrieb Ihres Winkelschleifers.
- Reinigung: Reinigen Sie die Lüftungsöffnungen regelmäßig, um Staubablagerungen und damit verbundene Überhitzung zu vermeiden. Verwenden Sie dazu eine weiche Bürste oder Druckluft.
- Kohlebürsten: This tool uses a brushed motor. Carbon brushes are wear parts and should be checked periodically. If they are worn down, they must be replaced by qualified personnel.
- Netzkabel: Inspect the power cord for any damage before each use. Do not use the tool if the cord is damaged.
- Austausch der Disc: Replace worn or damaged discs immediately. Always use discs rated for the grinder's speed and application.
- Lagerung: Bewahren Sie das Werkzeug an einem trockenen, sicheren Ort außerhalb der Reichweite von Kindern auf.
7. Fehlerbehebung
| Problem | Mögliche Ursache | Lösung |
|---|---|---|
| Die Mühle startet nicht. | Keine Stromversorgung. Fehlerhafter Netzschalter. Abgenutzte Kohlebürsten. | Überprüfen Sie die Steckdose und das Netzkabel. Wenden Sie sich an das Servicecenter. Have brushes replaced by qualified personnel. |
| Übermäßige Vibrationen. | Disc improperly mounted. Damaged or unbalanced disc. | Re-mount disc securely. Ersetzen Sie die Disc. |
| Überhitzung. | Verstopfte Lüftungsschlitze. Das Werkzeug wird überlastet. | Reinigen Sie die Lüftungsschlitze. Reduce pressure and allow tool to cool. |
| Sparks excessively. | Abgenutzte Kohlebürsten. | Have brushes replaced by qualified personnel. |
8. Spezifikationen
| Besonderheit | Spezifikation |
|---|---|
| Modell | 800AG2-125.5AB1 |
| Marke | Dexter |
| Stromquelle | Kabelgebundene Elektrik |
| Bandtage | 220 V |
| Leistung | 800 Watt |
| Maximale Drehzahl | 11,500 U/min |
| Motortyp | Bürstenmotor |
| Geschwindigkeitsregelung | NEIN |
| Disc Diameter (mm) | 125 mm |
| Disc Diameter (inches) | 5 Zoll |
| Disc Included | NEIN |
| Produktgewicht | 1.77 kg |
| Spindelarretierung | Ja |
| Spindelgewinde | M14 |
| Empfohlene Verwendung | Cutting and grinding metal and coatings |
| Nutzungsintensität | Moderate use up to 5 hours/day |
9. Garantie und Support
For warranty information, technical support, or service inquiries, please refer to the warranty card included with your product or contact your local Dexter authorized service center. Keep your purchase receipt as proof of purchase.