1. Einleitung
Thank you for choosing the tectake Bathroom Cabinet Model 405366. This instruction manual provides important information for the safe assembly, proper use, and maintenance of your new cabinet. Please read this manual thoroughly before assembly and retain it for future reference.
This country house style cabinet is designed to offer practical storage solutions in your bathroom, featuring two spacious compartments, two doors with magnetic closure, and a dedicated siphon cutout with edge protection for under-sink installation.
2. Sicherheitshinweise
- Um Kratzer zu vermeiden, montieren Sie den Schrank immer auf einer sauberen, weichen Unterlage.
- Vergewissern Sie sich vor Beginn der Montage, dass alle Teile vorhanden und unbeschädigt sind. Fahren Sie mit der Montage nicht fort, wenn Teile fehlen oder beschädigt sind.
- Kleinteile und Verpackungsmaterialien von Kindern und Haustieren fernhalten, um Erstickungsgefahr zu vermeiden.
- Verwenden Sie die in der Montageanleitung angegebenen Werkzeuge. Ziehen Sie die Schrauben nicht zu fest an, da dies das Material beschädigen kann.
- For stability, ensure the cabinet is placed on a level surface.
- Do not overload the cabinet. The maximum load capacity is 35 kg.
- If wall mounting is required, ensure suitable wall fixings are used for your wall type.
3. Packungsinhalt
Please check that all components are included in your package. The typical package includes:
- Schrankfronten (Oberseite, Unterseite, Seiten, Rückseite)
- 2 Türen
- 1 Verstellbarer Fachboden
- Hinges and magnetic closures
- Türgriffe
- Siphon cutout edge protection
- Montagezubehör (Schrauben, Dübel usw.)
- Bedienungsanleitung
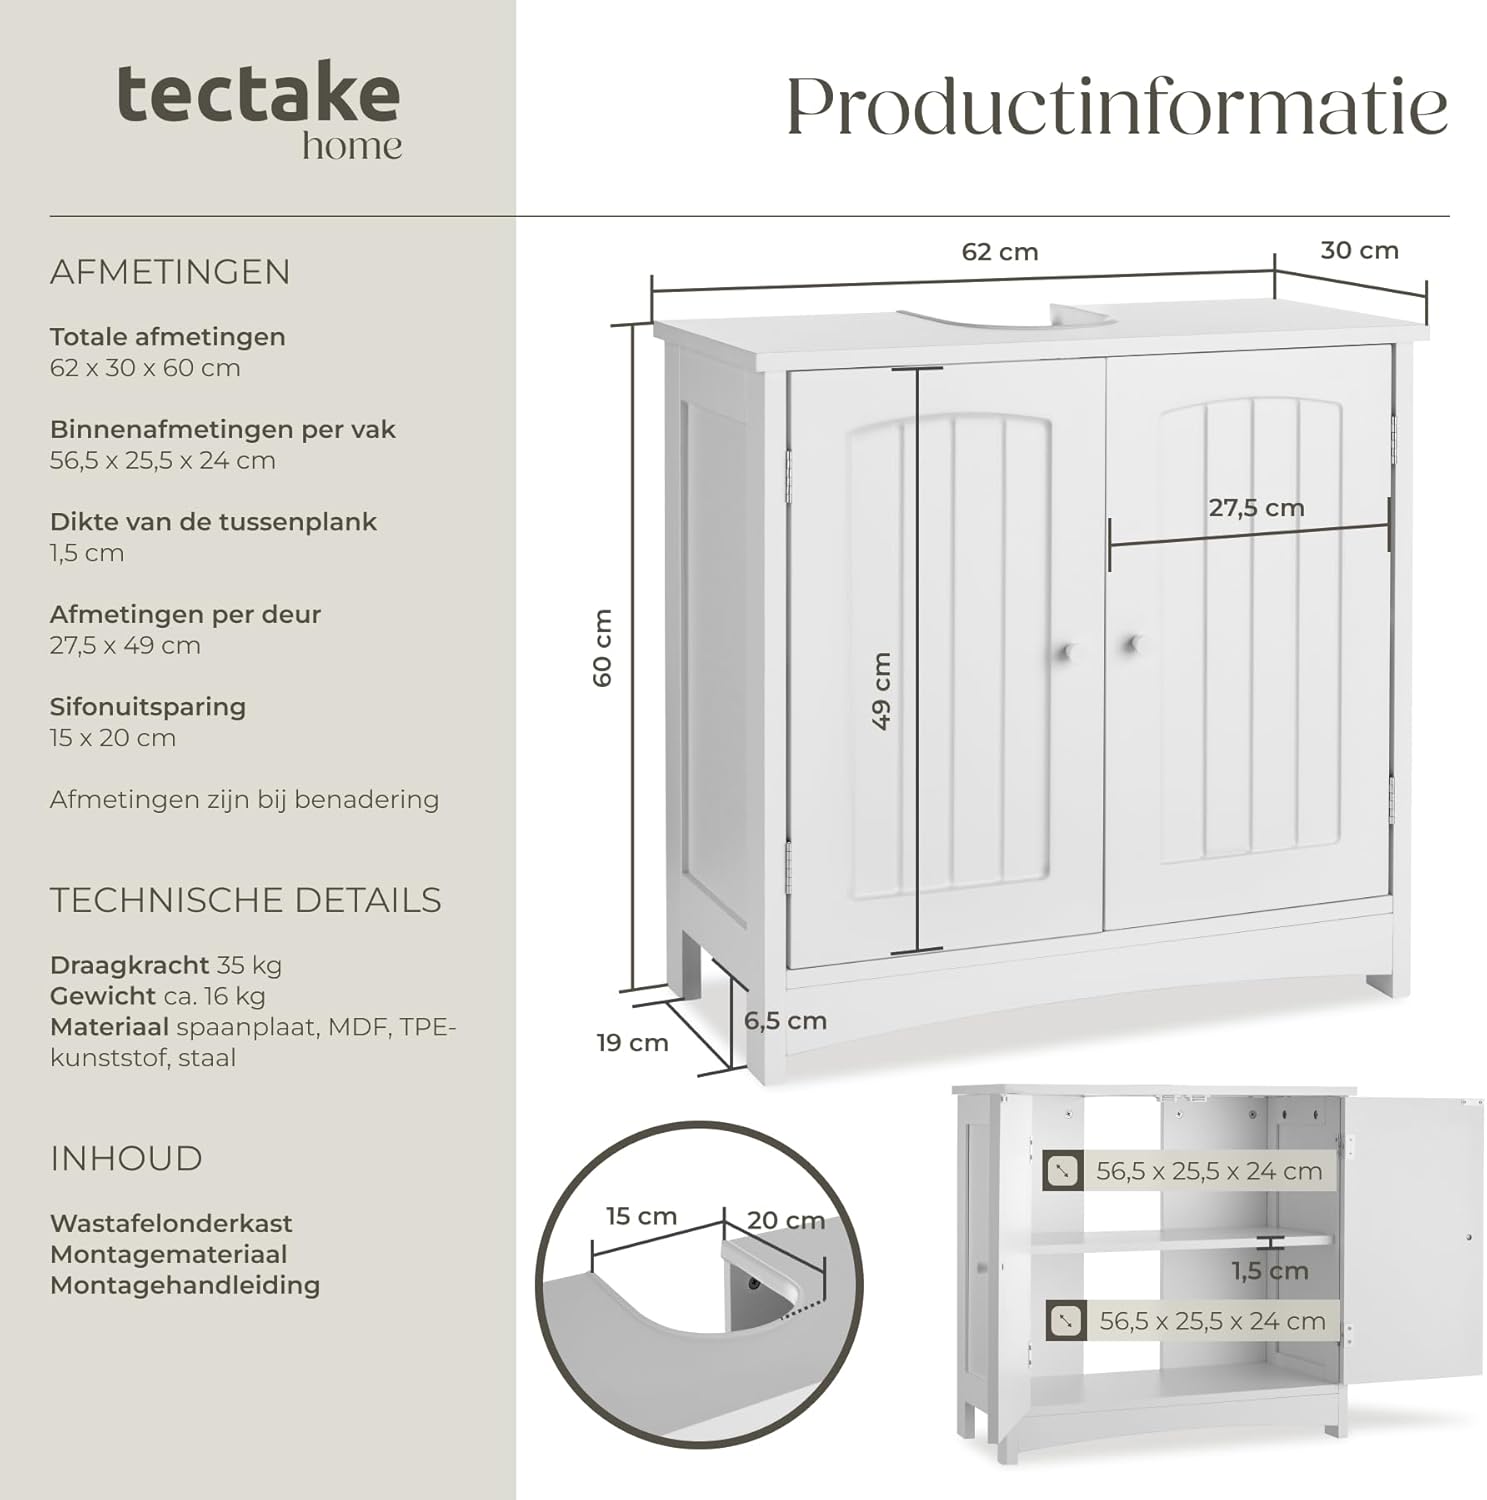
Figure 3.1: Product dimensions and internal layout. This diagram illustrates the overall dimensions of the cabinet (62 cm width, 30 cm depth, 60 cm height) and the internal compartment sizes (56.5 x 25.5 x 24 cm per section). It also shows the siphon cutout dimensions (15 x 20 cm) and the thickness of the shelf (1.5 cm).
4. Montageanleitung
Follow these steps carefully for a smooth assembly process. It is recommended to have two people for assembly.
- Bereiten Sie den Arbeitsbereich vor: Lay out all components on a soft, clean surface to prevent damage. Identify each part using the provided diagrams (if any, otherwise refer to general component names).
- Montieren Sie den Schrankrahmen: Attach the side panels to the bottom panel using the provided screws and dowels. Ensure the pre-drilled holes align correctly.
- Rückwand montieren: Slide or screw the back panel into place. This adds stability to the frame.
- Befestigen Sie die obere Platte: Secure the top panel to the assembled frame. Ensure the siphon cutout is positioned correctly for your sink.
- Regal einsetzen: Place the adjustable shelf into the desired position using the shelf pins. The cabinet features a sturdy intermediate shelf that divides the interior space.
- Türen und Scharniere einbauen: Attach the hinges to the doors and then to the cabinet frame. The cabinet uses 4 robust hinges for smooth operation.
- Türgriffe anbringen: Befestigen Sie die Griffe an den Türen.
- Install Magnetic Closures: Attach the magnetic closures to the cabinet frame and doors to ensure they remain securely shut.
- Apply Siphon Edge Protection: Insert the plastic edge protection around the siphon cutout on the top panel. This protects the wood from moisture damage.
- Endkontrolle: Stellen Sie sicher, dass alle Schrauben fest angezogen sind und der Schrank stabil steht.

Abbildung 4.1: Innenraum view with shelf. This image shows the cabinet interior with the sturdy intermediate shelf installed, dividing the space into two compartments.

Figure 4.2: Detail of door hinge. This close-up shows one of the robust hinges, designed for smooth and frequent opening and closing of the cabinet doors.

Figure 4.3: Siphon cutout protection. This image highlights the durable plastic edge protection around the siphon cutout, designed to prevent moisture damage to the cabinet.
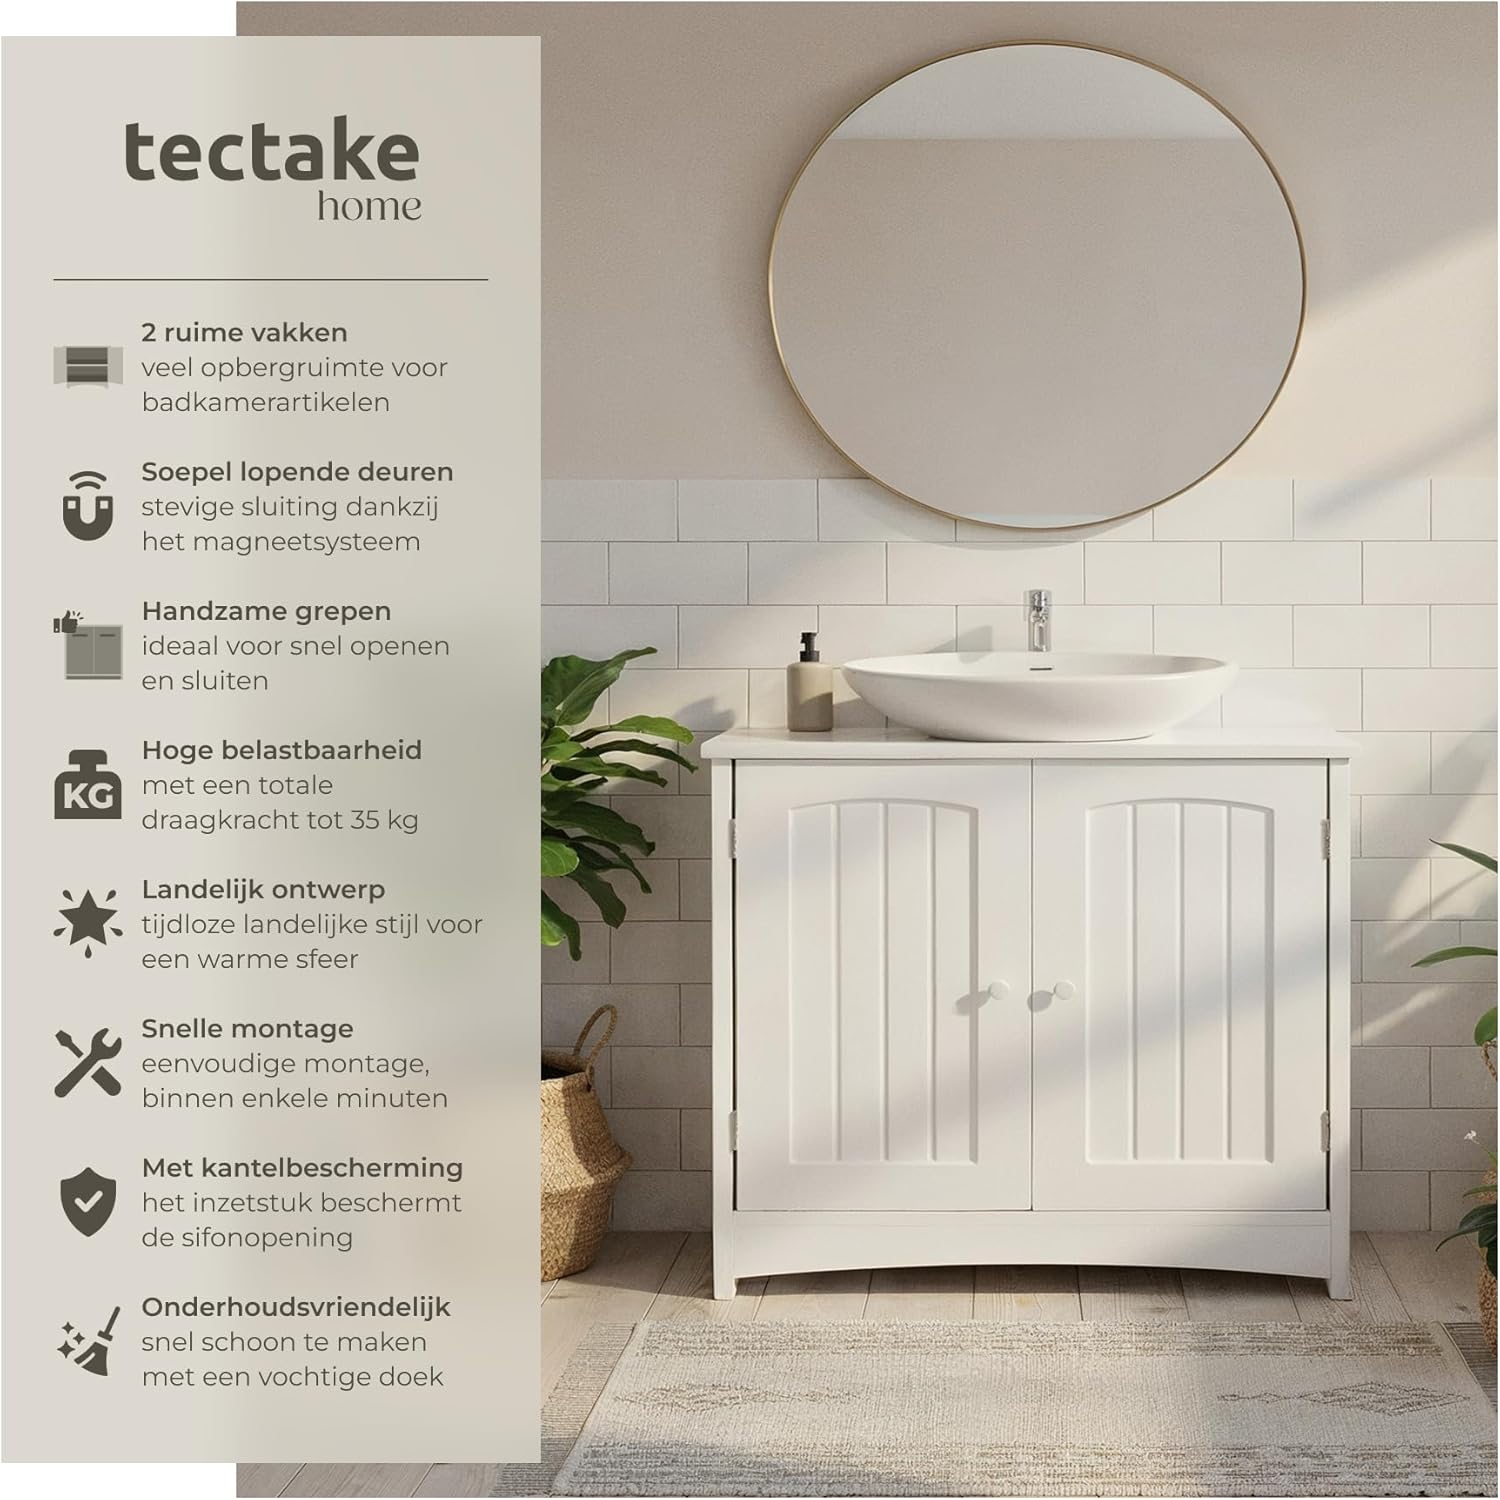
Figure 4.4: Fully assembled cabinet. This image shows the tectake bathroom cabinet fully assembled, ready for use under a sink.
5. Bedienungsanleitung
The tectake Bathroom Cabinet is designed for convenient storage in your bathroom.
- Lagerung: Utilize the two spacious compartments for organizing toiletries, towels, cleaning supplies, and other bathroom essentials. The adjustable shelf allows for flexible storage configurations.
- Türbetrieb: The two hinged doors open smoothly, providing easy access to the contents. The magnetic closures ensure the doors stay securely shut when not in use.
- Platzierung unter dem Spülbecken: The integrated siphon cutout allows the cabinet to fit neatly under most standard bathroom sinks, maximizing space utilization.

Figure 5.1: Organized interior. This image demonstrates the cabinet's storage capacity, showing towels and various bathroom items neatly stored within its two compartments.
6. Wartung
To ensure the longevity and appearance of your tectake Bathroom Cabinet, follow these simple maintenance guidelines:
- Reinigung: Oberflächen regelmäßig mit einem weichen, fusselfreien Tuch abwischen.amp cloth. For stubborn marks, a mild, non-abrasive cleaner can be used. Avoid harsh chemicals or abrasive cleaning tools, as these can damage the painted finish.
- Feuchtigkeitsschutz: Although the siphon cutout has edge protection, it is advisable to wipe away any standing water or spills immediately to prevent moisture damage to the wood material.
- Hardwareprüfung: Überprüfen Sie regelmäßig alle Schrauben und Verbindungsstücke, um sicherzustellen, dass sie fest sitzen. Ziehen Sie sie gegebenenfalls nach.
7. Fehlerbehebung
Sollten Sie Probleme mit Ihrem Schrank haben, beachten Sie bitte die folgenden häufig auftretenden Probleme und Lösungen:
| Problem | Mögliche Ursache | Lösung |
|---|---|---|
| Die Türen schließen nicht richtig oder sind falsch ausgerichtet. | Loose hinges or magnetic closures. Uneven floor. | Tighten hinge screws. Adjust magnetic closures. Ensure the cabinet is on a level surface. |
| Der Schrank wirkt wackelig oder instabil. | Loose assembly screws. Uneven floor. | Check and tighten all assembly screws. Place the cabinet on a level surface. |
| Scratches or damage during assembly. | Assembly on a hard or rough surface. | Always assemble on a soft, protective surface (e.g., carpet or blanket). |
8. Spezifikationen
| Modellnummer | 405366 |
| Marke | tectake |
| Gesamtabmessungen (L x B x H) | 62 x 30 x 60 cm |
| Gewicht | 13.1 kg |
| Material | Engineered Wood (Particle board) |
| Farbe | Weiß |
| Anzahl der Fächer | 2 |
| Anzahl Türen | 2 |
| Maximale Tragfähigkeit | 35 kg |
| Besondere Merkmale | Siphon cutout with edge protection, Magnetic door closure |
9. Garantie und Support
tectake products are manufactured with quality and durability in mind. For information regarding warranty coverage, please refer to the purchase documentation or contact your retailer.
If you have any questions, require assistance with assembly, or need to report a missing/damaged part, please contact tectake customer support or your point of purchase. Have your model number (405366) and purchase date ready when contacting support.