1. Sicherheitshinweise
Please read these instructions carefully before installation and retain them for future reference. Improper installation or use can lead to electrical shock, fire, or other hazards.
- Stromversorgung trennen: Vor der Installation, Wartung oder Reinigung der Leuchte muss immer die Hauptstromversorgung am Sicherungsautomaten ausgeschaltet werden.
- Qualifizierter Elektriker: Die Installation sollte von einem qualifizierten Elektriker oder einer Person durchgeführt werden, die mit dem Aufbau und der Funktionsweise des Produkts sowie den damit verbundenen Gefahren vertraut ist.
- Erdung: Um einen möglichen Stromschlag zu vermeiden, stellen Sie sicher, dass die Leuchte ordnungsgemäß geerdet ist.
- Anforderungen an die Glühbirne: Use only E26 base bulbs. Do not exceed the maximum recommended wattage of 100W for incandescent bulbs or 14W for LED bulbs.
- Vorsichtig handhaben: The glass panels are sturdy but can break if mishandled.
- Nur für den Außenbereich: This fixture is designed for outdoor use and is waterproof.
2. Packungsinhalt
Verify that all components are present before beginning installation. This product is supplied as a 2-pack.
- Outdoor Wall Light Fixture (2 units)
- Bedienungsanleitung
- Mounting Hardware (including wire connectors and screws)
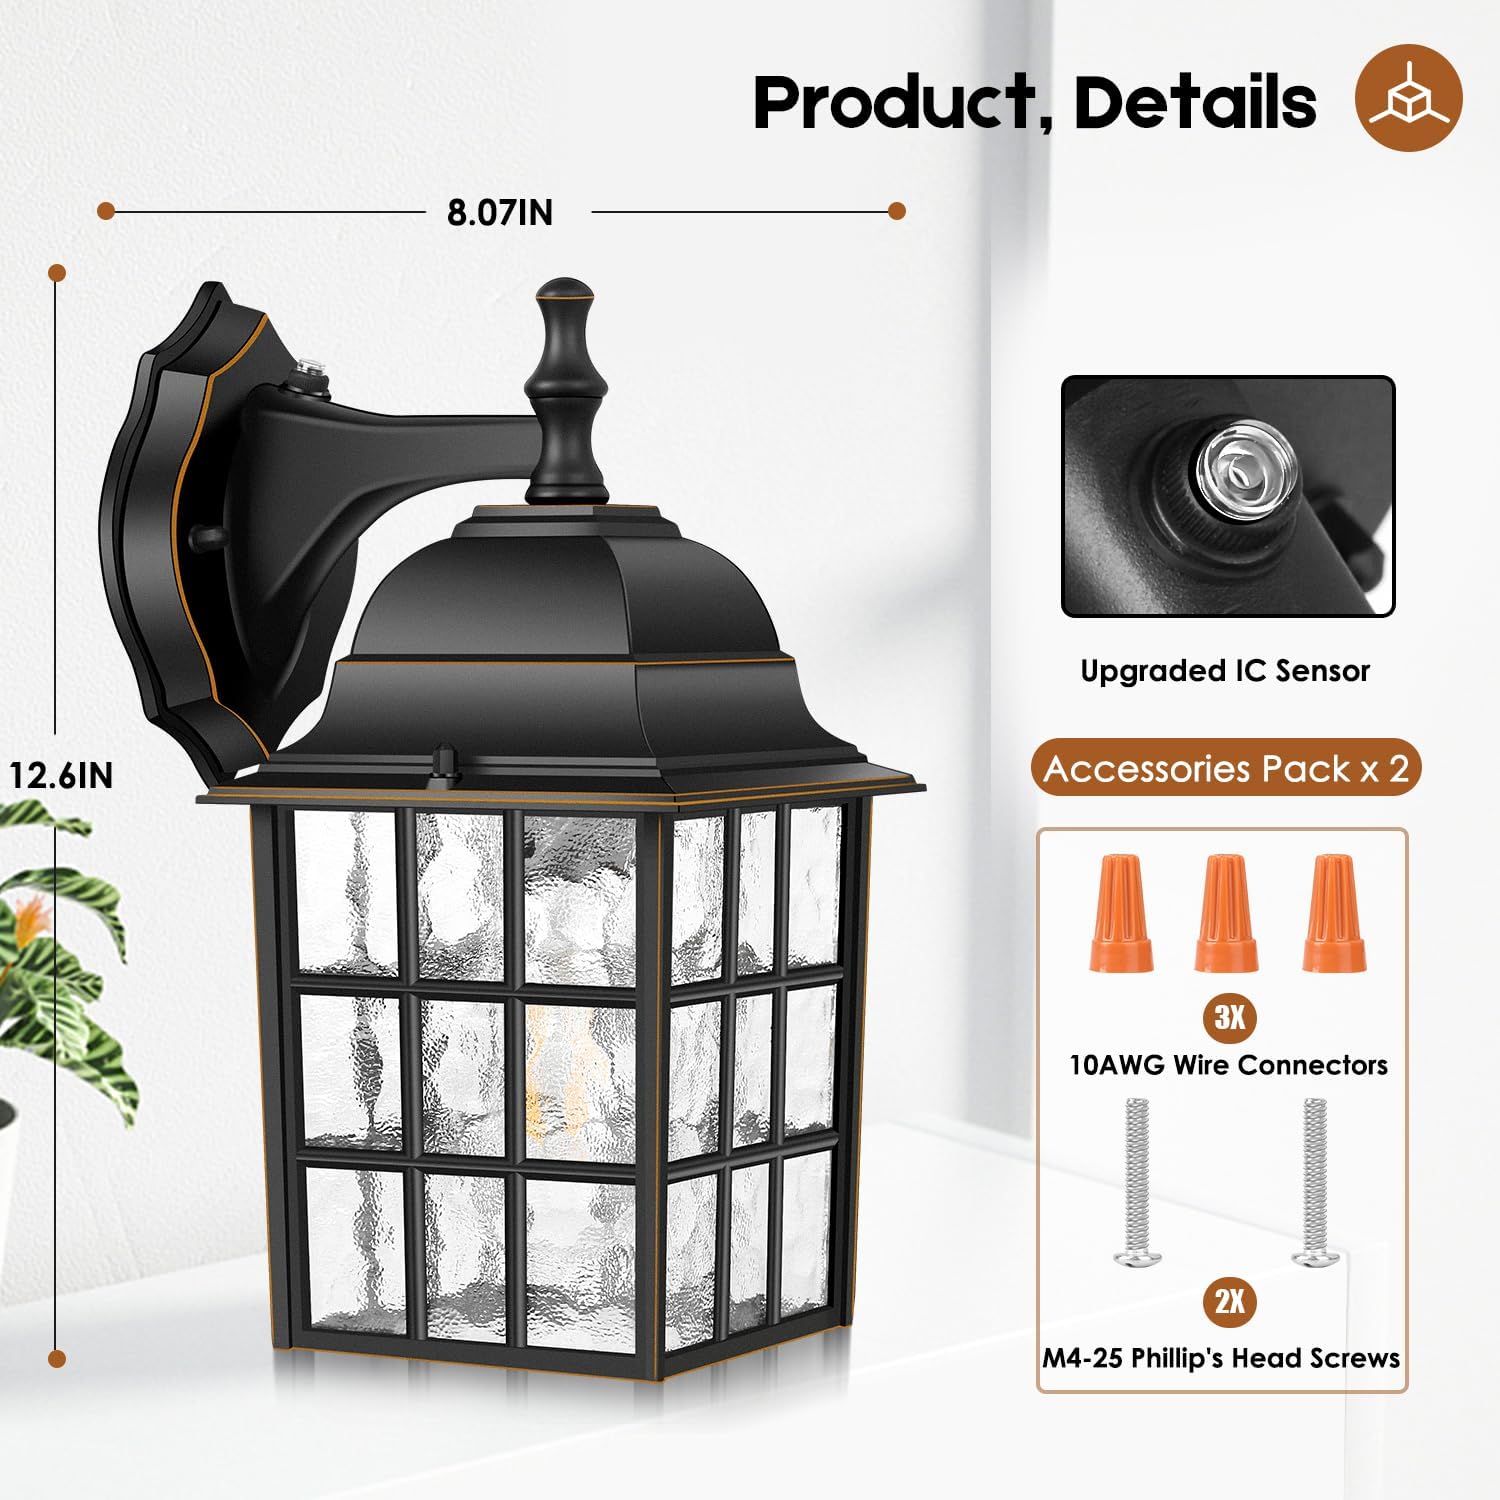
Figure 2.1: Product dimensions and included accessories for installation.
3. Produktmerkmale
The Brightever Dusk to Dawn Outdoor Wall Light Fixture is designed with several key features for convenience and durability:
- Dusk to Dawn Photocell Sensor: Automatically turns the light on at dusk and off at dawn, optimizing energy use and providing hands-free operation.
- Anti-corrosion & Weather Resistant: Constructed with a pure aluminum framework, waterfall glass panels, and a bronze alloy finish, ensuring resistance to rain, snow, and extreme temperatures.
- Sturdy Waterfall Glass: Features thick, durable glass panels designed to withstand outdoor elements.
- Offenes Bodendesign: Facilitates easy bulb replacement and cleaning without disassembling the fixture.
- Standardfassung E26: Compatible with various E26 base bulbs, including LED, CFL, and incandescent types (bulb not included).
- Langlebige Metallkonstruktion: High-quality metal ensures longevity and robust performance in outdoor environments.
Video 3.1: Ein überview of the Brightever Dusk to Dawn Outdoor Wall Light, highlighting its automatic operation, waterproof design, durable metal, E26 socket, and water-ripple glass.

Figure 3.2: Durability comparison highlighting the fixture's waterproof and anti-corrosion properties.

Figure 3.3: Bulb compatibility for the E26 socket.

Abbildung 3.4: Bspamples of the outdoor wall light in various application scenarios.
4. Einrichtung (Installation)
Follow these steps to install your Brightever outdoor wall light fixture. Ensure power is disconnected before starting.
- Vorbereitung für die Installation: Turn off power at the main circuit breaker. Gather necessary tools (screwdriver, wire strippers, electrical tape, ladder).
- Montieren Sie die Vorrichtung: Befestigen Sie die Montagehalterung mit den mitgelieferten Schrauben an der Anschlussdose. Achten Sie auf einen festen Sitz.
- Drahtverbindungen: Connect the fixture's wires to your household electrical wires using the included wire connectors. Match black to black (live), white to white (neutral), and green/bare copper to green/bare copper (ground). Secure all connections with electrical tape.
- Befestigungselement anbringen: Carefully align the fixture with the mounting bracket and secure it with the provided screws.
- Glühbirne einbauen: Insert an E26 base bulb (max 100W incandescent or 14W LED) into the socket.
- Strom wiederherstellen: Schalten Sie den Strom am Leistungsschalter wieder ein.
5. Bedienungsanleitung
This fixture features an integrated photocell sensor for automatic operation.
- Automatisches Ein-/Ausschalten: The photocell sensor detects ambient light levels. The light will automatically turn on when it gets dark (dusk) and turn off when it becomes bright (dawn).
- Optimale Platzierung: For best performance, ensure the photocell sensor is not obstructed by objects or exposed to direct artificial light sources (e.g., other bright lights, streetlights) at night, as this may interfere with its operation.

Figure 5.1: Illustration of the automatic dusk to dawn functionality.
6. Wartung
Regelmäßige Wartung gewährleistet die Langlebigkeit und optimale Leistung Ihrer Leuchte.
- Reinigung: Um die Leuchte zu reinigen, stellen Sie sicher, dass der Strom abgeschaltet ist. Wischen Sie die Außenseite mit einem weichen, feuchten Tuch ab.amp cloth. Avoid abrasive cleaners or solvents that could damage the finish or glass.
- Lampenwechsel: Due to the open bottom design, bulb replacement is straightforward. Simply unscrew the old E26 bulb and screw in a new one (ensure power is off before replacing).
- Inspektion: Periodically check for any loose wiring or damage to the fixture.
7. Fehlerbehebung
Sollten Sie Probleme mit Ihrer Leuchte haben, beachten Sie bitte die folgenden häufigen Probleme und Lösungen:
| Problem | Mögliche Ursache | Lösung |
|---|---|---|
| Das Licht geht nachts nicht an. | No power; faulty bulb; photocell sensor obstructed or exposed to light. | Check circuit breaker. Replace bulb. Ensure sensor is clear and not receiving external light. |
| Das Licht wird tagsüber nicht ausgeschaltet. | Photocell sensor obstructed or faulty; insufficient ambient light. | Ensure sensor is clear and receiving sufficient daylight. If problem persists, sensor may be faulty. |
| Licht flackert. | Loose bulb; faulty bulb; unstable power supply. | Tighten or replace bulb. Check wiring connections. Consult an electrician if power supply is suspected. |
8. Spezifikationen
Detailed specifications for the Brightever Dusk to Dawn Outdoor Wall Light Fixture (Model 9033-A):
- Marke: Brightever
- Modellnummer: 9033-A
- Farbe: Bronze
- Material: Metal (Aluminum framework)
- Schattenmaterial: Waterfall Glass
- Artikelabmessungen (L x B x H): 8.07" x 8.07" x 12.6"
- Energiequelle: Kabelgebundene Elektrik
- Bandtage: 120 Volt
- Wastage: Max 100W (Incandescent), Max 14W (LED)
- Lampensockel: E26
- Controller-Typ: Photocell Sensor (Dusk to Dawn)
- Wasserbeständigkeit: Wasserdicht
- Helligkeit: Up to 800 lumens (bulb dependent)
- Farbtemperatur: 3000 Kelvin (bulb dependent)
- Installationstyp: Wandhalterung
- Anzahl der Artikel: 2 (2er-Pack)
9. Garantie und Support
Your Brightever Dusk to Dawn Outdoor Wall Light Fixture (Model 9033-A) comes with a manufacturer's warranty.
- Garantie: This product is covered by a 1-year seller warranty.
- Kundendienst: For any questions, technical assistance, or warranty claims, please contact Brightever customer support through your purchase platform or the official Brightever webWebsite.