Peakeep MHP6030
Peakeep Slim Digitaler Spiegelwecker MHP6030 Benutzerhandbuch
Modell: MHP6030
1. Einleitung
Thank you for choosing the Peakeep Slim Digital Mirror Alarm Clock. This modern and aesthetic clock is designed to complement any home or office decor while providing essential timekeeping and alarm functions. Its large LED display ensures clear readability, and its versatile features cater to various user preferences.
Key features include a slim design with a mirror face, a large LED display (6"L x 3"W inches) for easy viewing, 6 adjustable brightness levels, a loud alarm with 5 adjustable volumes (55 to 100 dB), a 9-minute snooze function, and a battery backup system to maintain settings during power outages.
2. Einrichtung
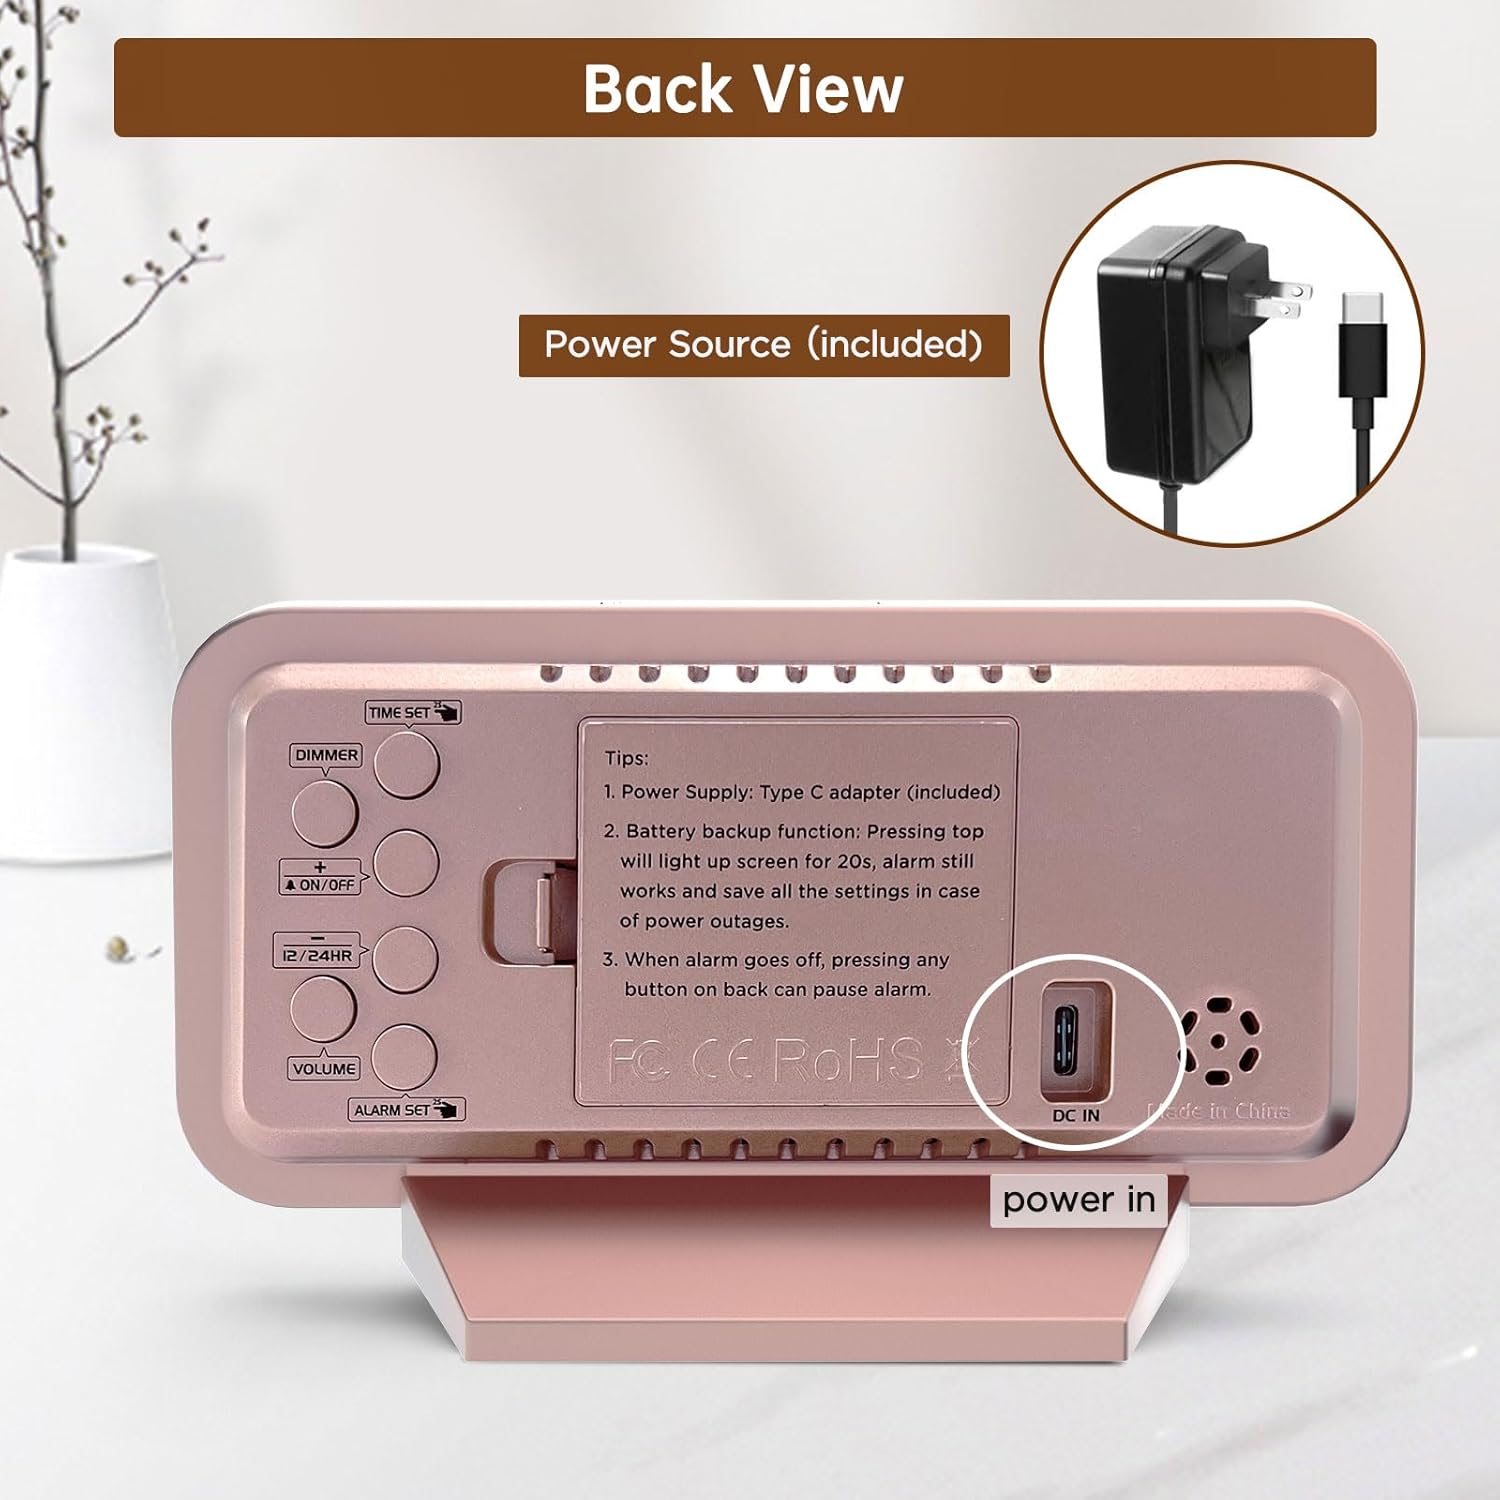
2.1. Die Uhr mit Strom versorgen
The Peakeep Digital Alarm Clock is primarily powered by the included Type C adapter. Connect the adapter to the DC IN port on the back of the clock and plug it into a standard electrical outlet. The clock display will illuminate, indicating it is powered on.

The clock is powered by the included Type C adapter, ensuring continuous operation.
2.2. Batterie-Backup-Installation
Zur Datensicherung bei Stromausfalltages, install 4 AAA batteries (not provided) into the battery compartment located on the back of the clock. These batteries will preserve your time and alarm settings and trigger the alarm in case of a power interruption. The screen will light up for 20 seconds with a top touch when running on battery power.

Battery backup ensures settings are saved and the alarm functions during power outages.
3. Bedienungsanleitung
The control buttons are located on the back of the clock for easy access and adjustment.

Hinteren view of the clock with clearly labeled buttons for various functions.
3.1. Uhrzeit einstellen
- Drücken Sie die ZEITEINSTELLUNG button once to enter time setting mode. The hour digits will start blinking.
- Verwenden Sie die + or - buttons to adjust the hour. Press and hold for fast adjustment.
- Drücken ZEITEINSTELLUNG again to set the minute digits. Use the + or - Tasten zum Einstellen der Minuten.
- Drücken ZEITEINSTELLUNG a third time to exit and save the time.
3.2. Einstellen des Alarms
- Drücken Sie die WECKER GESTELLT button once to enter alarm setting mode. The alarm hour digits will start blinking.
- Verwenden Sie die + or - Tasten, um die Weckstunde einzustellen.
- Drücken WECKER GESTELLT again to set the alarm minute digits. Use the + or - Tasten zum Einstellen der Minuten.
- Drücken WECKER GESTELLT a third time to exit and save the alarm.
- Zum Aktivieren/Deaktivieren des Alarms drücken Sie die Taste EIN/AUS Durch Drücken dieser Taste erscheint/verschwindet ein Alarmsymbol auf dem Display.
3.3. Anpassen der Displayhelligkeit (Dimmer)
The clock features 6 adjustable brightness levels (L1 to L5 and OFF) to suit various lighting conditions and personal preferences.
- Drücken Sie die DIMMER button repeatedly to cycle through the 6 brightness levels.
- Wählen Sie die gewünschte Helligkeitsstufe für einen angenehmen Komfort. viewTag oder Nacht.

The clock offers 6 brightness levels, from bright (L5) to off, for optimal visibility and comfort.
3.4. Einstellen der Alarmlautstärke
The alarm has 5 adjustable volume levels, ranging from 55 dB to 100 dB, suitable for both light and heavy sleepers.
- Drücken Sie die VOLUMEN button repeatedly to cycle through the 5 volume levels (V01 to V05).
- Choose the volume that best suits your waking needs.
Adjust the alarm volume from a gentle 55dB to a loud 105dB to ensure you wake up.
3.5. 12/24-Stunden-Format
Um zwischen 12-Stunden- (AM/PM) und 24-Stunden-Zeitformat (Militärformat) umzuschalten, drücken Sie die 12 / 24HR Taste.
3.6. Schlummerfunktion
Wenn der Alarm ertönt, drücken Sie die große Taste. SNOOZE / LICHT Drücken Sie die Taste oben auf der Uhr, um die 9-Minuten-Schlummerfunktion zu aktivieren. Der Alarm ertönt nach 9 Minuten erneut.
4. Wartung
- Clean the clock's mirror surface and body with a soft, dry cloth. Avoid using abrasive cleaners or solvents.
- Stellen Sie sicher, dass die Uhr auf einer stabilen, ebenen Fläche steht, um ein versehentliches Herunterfallen zu verhindern.
- Die Uhr sollte nicht direktem Sonnenlicht, extremen Temperaturen oder hoher Luftfeuchtigkeit ausgesetzt sein.
- If not using the battery backup function, remove the AAA batteries to prevent leakage.
5. Fehlerbehebung
5.1. Display is blank or not lighting up
- Ensure the Type C adapter is securely plugged into both the clock and a working power outlet.
- If using battery backup, press the top SNOOZE / LICHT button to temporarily illuminate the screen for 20 seconds. Batteries are for memory backup only and do not keep the display continuously lit.
5.2. Alarm does not sound
- Verify that the alarm is activated (alarm icon visible on the display).
- Check the alarm volume setting to ensure it is not set to V00 (mute).
- If running on battery backup, ensure the batteries are fresh and correctly installed.
5.3. Time/Alarm settings are lost after power outage
- Ensure 4 fresh AAA batteries are installed in the battery compartment for memory retention.
6. Spezifikationen
| Besonderheit | Detail |
|---|---|
| Marke | Spitzenreiter |
| Modellnummer | MHP6030 |
| Farbe | Rose Gold With Mirror |
| Anzeigetyp | Digitales |
| Stil | Modern |
| Technische Daten | 6 Zoll B x 3.5 Zoll H |
| Artikelgewicht | 6.4 Unzen |
| Stromquelle | Type C Adapter (included) |
| Batterie-Backup | 4 AAA-Batterien erforderlich (nicht im Lieferumfang enthalten) |
| Besondere Merkmale | Slim Design Mirror Face, Large Numbers, 6 Brightness Levels, Loud Alarm, Adjustable Volume, Snooze Function |
| Material | Plastic, Electronic, Glass |
| Montagetyp | Tischplatte |
7. Produktvideos
7.1. Battery Backup Functionality
This video demonstrates the battery backup feature of the Peakeep Digital Alarm Clock, highlighting how it retains settings and triggers the alarm during power outages.
7.2. Mirror Functionality
This video showcases the clock's mirror surface, illustrating its dual functionality as both a time display and a convenient mirror for quick checks.
8. Garantieinformationen
This product comes with a standard manufacturer's warranty. Please refer to the product packaging or contact customer support for specific warranty terms and conditions.
9. Kundendienst
For any questions, technical assistance, or support regarding your Peakeep Slim Digital Mirror Alarm Clock, please contact our customer support team:
- E-Mail: sales@us-myhome.com
Ask a question about this manual
Ask about setup, troubleshooting, compatibility, parts, safety, or missing instructions. Manuals+ will review the question and use this page’s manual context to help answer it.