
MUXWELL HU017B
MUXWELL DIY FM Radio Kit Instruction Manual
Model: HU017B
1. Einleitung
The MUXWELL DIY FM Radio Kit offers an engaging and educational experience for beginners and electronics enthusiasts. This kit allows you to assemble a functional FM radio receiver, providing hands-on soldering practice and insight into circuit design and radio wave principles. The completed radio features a clear acrylic case, showcasing the intricate internal components.

Figure 1: Assembled MUXWELL DIY FM Radio Kit.
This manual provides detailed instructions for assembling, operating, and maintaining your FM Radio Kit. Please read all instructions carefully before beginning assembly.
2. Lieferumfang
Your MUXWELL DIY FM Radio Kit includes all necessary components for assembly:
- Leiterplatte (PCB)
- LED-Anzeige
- Lautsprecher
- Audio AmpReiniger (AMP)
- 16P Socket
- CPU
- 8P Socket
- Antenne
- Ear Jack (3.5mm)
- FM Module
- LDO (Low-Dropout Regulator)
- Various Capacitors (0.1uF, 100uF, 1uF)
- LED
- USB-Buchse
- Buttons (6*6*12.5 key)
- Resistors (1k, 510, 10k)
- Schalten
- Potentiometer (200k)
- Tastenkappen
- M2 Screws & Nuts
- Power Cable (USB to Micro USB)
- Plastic Case components
- Bedienungsanleitung (dieses Dokument)

Abbildung 2: Kit-Komponenten im Überblickview.
3. Aufbau und Montage
Assembly of the MUXWELL DIY FM Radio Kit requires basic soldering skills. Ensure you have a soldering iron, solder, and safety glasses before beginning. Follow the steps below for proper assembly.
3.1 Lötanleitung
Carefully identify each component using the provided Bill of Materials (BOM) and the PCB layout. Solder components onto the PCB according to the markings and the assembly steps. Pay close attention to component polarity where indicated (e.g., LEDs, electrolytic capacitors, diodes, integrated circuits).

Figure 3: Bill of Materials (BOM).

Figure 4: PCB Layout.
3.2 Montageschritte
Follow the visual guide for the main soldering and case assembly steps. Ensure all connections are secure and free of solder bridges.

Figure 5: Soldering and Case Assembly Steps.
For a detailed visual guide on the assembly process, please refer to the official product video:
Video 1: MUXWELL FM Radio DIY Kit Assembly Guide. This video provides a comprehensive walkthrough of the assembly process, from component identification to final case enclosure.
4. Bedienungsanleitung
Once assembled, your MUXWELL FM Radio Kit is ready for operation. Familiarize yourself with the controls and functions:

Abbildung 6: Bedienelemente und Schnittstellen auf der Vorderseite.
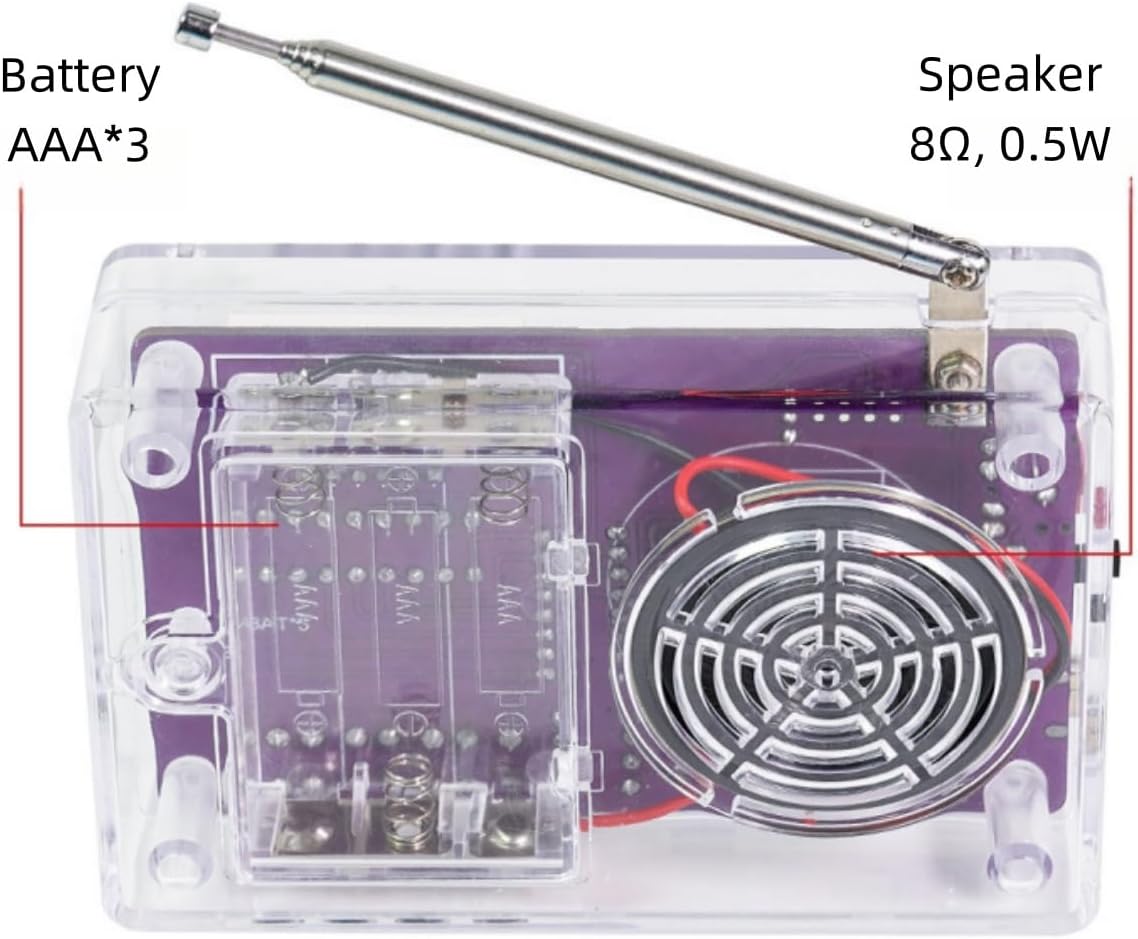
Figure 7: Back Panel Features.
4.1 Ein-/Ausschalten
- Für optimalen Empfang ziehen Sie die Antenne vollständig aus.
- Locate the power switch (refer to Figure 6) and slide it to the 'ON' position. The power indicator LED will illuminate.
- Wichtig: Do not connect both USB power and internal batteries simultaneously, as this may damage the radio.
4.2 Initial Scan and Channel Saving
- Upon first power-on, if no channels are saved, the radio will automatically scan and save available FM channels. This process may take a few moments.
- The radio can save a maximum of 30 channels.
4.3 Lautstärkeregelung
- Lautstärke erhöhen: Short press the 'V+' button.
- Lautstärke verringern: Short press the 'V-' button.
- The volume can also be adjusted using the volume adjustment part (potentiometer) on the PCB.
4.4 Channel Navigation and Scanning
- Nächster Kanal: Short press the 'F+' button.
- Vorheriger Kanal: Short press the 'F-' button.
- Scan Up (Temporary): Long press the 'F+' button. The scanned channel will not be automatically saved.
- Scan Down (Temporary): Long press the 'F-' button. The scanned channel will not be automatically saved.
4.5 Signal Threshold Adjustment
- Rufen Sie den Einstellungsmodus auf: Long press both 'V+' and 'V-' buttons simultaneously. The display will show 'Sn' followed by a number (default 04). This is the signal threshold adjust mode.
- Adjust Threshold: The range is 0-15. Short press 'V+' to increase the threshold, and 'V-' to decrease it.
- Wirkung: A smaller value allows more poor signal channels to be scanned. A higher value results in fewer poor signal channels being received.
- Einstellung beenden: Short press 'F-' or 'F+' to move to the next setting or exit.
4.6 Energiesparmodus
- Enter Power Saving Setting: From the signal threshold adjustment mode, short press 'F-' or 'F+' to enter the next setting. The display will show 'Po'. This is the power saving setting mode.
- Toggle Power Saving: Short press 'V+' or 'V-' to toggle the power saving mode (0 to turn off, 1 to turn on). The default value is 0 (off).
- Funktion: When power saving mode is on, the display will turn off after approximately 13 seconds of inactivity. Pressing any button will light the display again.
- Einstellung beenden: Short press 'F-' or 'F+' to move to the next setting or exit.
4.7 Signal Level Display
- Enter Signal Level Display Setting: From the power saving setting mode, short press 'F-' or 'F+' to enter the next setting. The display will show 'dP'. This is the signal level display setting mode.
- Toggle Display: Short press 'V+' or 'V-' to toggle the signal level display (0 to turn off, 1 to turn on). The default value is 0 (off).
- Funktion: If the signal level display mode is on, the signal frequency and level will be displayed alternately.
- Einstellung beenden: Short press 'F-' or 'F+' to return to the main menu.
4.8 Channel List Management
- Enter List Management Mode: From the main menu, long press both 'F-' and 'F+' buttons simultaneously. The segment display will continue to flash.
- Add Frequency to List: While in list management mode, short press 'V+' to increase the frequency. Long press 'V+' to save the currently scanned channel to the channel list.
- Decrease Frequency: Short press 'V-' to decrease the frequency.
- Remove Frequency from List: Long press 'V-' to remove unwanted frequencies from the list.
- Switch Saved Channels: Short press 'F-' to switch to the previous saved channel. Short press 'F+' to switch to the next saved channel.
- Exit List Management Mode: Long press both 'F-' and 'F+' again to exit list management mode.
5. Spezifikationen
| Besonderheit | Detail |
|---|---|
| Empfangsfrequenz | 87 bis 107 MHz |
| Stromversorgung | 3 x AAA batteries or USB (Micro USB cable included) |
| Arbeitsstrom | 250mA max. (at maximum audio tuning) |
| Gehäuseabmessungen | 103 x 68 x 30.5 mm (4.06 x 2.68 x 1.2 Zoll) |
| Gewicht | 136 g (5.6 Unzen) |
| Besonderheit | Tragbar |
| Konnektivitätstechnologie | Zusatz, USB |
| Tuner-Technologie | FM |
| Farbe | Lila |

Abbildung 8: Produktabmessungen und Spezifikationen.
6. Wartung
- Reinigung: Reinigen Sie die Außenseite des Radios mit einem weichen, trockenen Tuch. Vermeiden Sie die Verwendung von scharfen Chemikalien oder Scheuermitteln.
- Batteriewechsel: If using AAA batteries, replace all three batteries when the power indicator dims or the radio performance degrades. Ensure correct polarity when inserting new batteries.
- Lagerung: Store the radio in a cool, dry place away from direct sunlight and extreme temperatures. If storing for extended periods, remove the batteries to prevent leakage.
7. Fehlerbehebung
- Das Radio lässt sich nicht einschalten:
- Überprüfen Sie den Einbau der Batterien und stellen Sie sicher, dass die Batterien nicht entladen sind.
- Prüfen Sie, ob sich der Netzschalter in der Position „EIN“ befindet.
- If using USB power, ensure the cable is securely connected and the power source is active. Remember not to use USB power if batteries are installed.
- Inspect all soldered connections on the PCB for any cold joints or solder bridges.
- Kein Ton oder schlechte Tonqualität:
- Stellen Sie sicher, dass die Antenne vollständig ausgefahren ist.
- Adjust the volume using the 'V+' button or the potentiometer.
- Check the speaker connection to the PCB.
- If using earphones, ensure they are properly plugged into the 3.5mm jack.
- Try rescanning channels (long press V+ and F+ simultaneously) to find stronger signals.
- Adjust the signal threshold setting (refer to Section 4.5) to allow for weaker signals if necessary.
- Display ist aus:
- Press any button to reactivate the display. The power saving mode might be active (refer to Section 4.6).
- Check the display's soldered connections to the PCB.
- Cannot save channels:
- Ensure you are in the correct channel list management mode and using the long press 'V+' function to save (refer to Section 4.8).
- The radio has a limit of 30 saved channels. If full, you may need to remove existing channels before saving new ones.
8. Garantie und Support
For warranty information, technical support, or assistance with your MUXWELL DIY FM Radio Kit, please contact MUXWELL customer service through the platform where you purchased the product. Please have your model number (HU017B) and purchase details ready when contacting support.
Ask a question about this manual
Ask about setup, troubleshooting, compatibility, parts, safety, or missing instructions. Manuals+ will review the question and use this page’s manual context to help answer it.