Einführung
Thank you for choosing the Abovsare Digital Wall Clock. This 16-inch large display digital clock features 11 RGB color-changing options, remote control operation, and ambient night lights, making it a versatile addition to any living room, bedroom, office, or classroom. This manual provides detailed instructions for setup, operation, maintenance, and troubleshooting to ensure optimal performance and longevity of your device.
Hauptmerkmale:
- 16-inch High Definition LED Large Screen Display
- 11 RGB Color Changing Options for Jumbo Digits
- 9 Different Color Ambient Night Lights
- 10 Levels Automatic Brightness Dimmer (Manual & Auto-Dimming)
- Built-in Memory Function (retains time data after power disconnection)
- Count-up or Count-down Function (up to 99 minutes and 99 seconds)
- Convenient Remote Control Operation

Figure 1: Abovsare Digital Wall Clock showcasing its large, vibrant display with multiple color options.
Aufstellen
Packungsinhalt
Bevor Sie beginnen, überprüfen Sie bitte, ob alle Artikel in Ihrem Paket enthalten sind:
- Digital Clock Unit
- Fernbedienung
- Power Cable (10ft/3m)
- Netzteil (5 V/2 A)
- Wall Studs for Mounting
- Bedienungsanleitung (dieses Dokument)
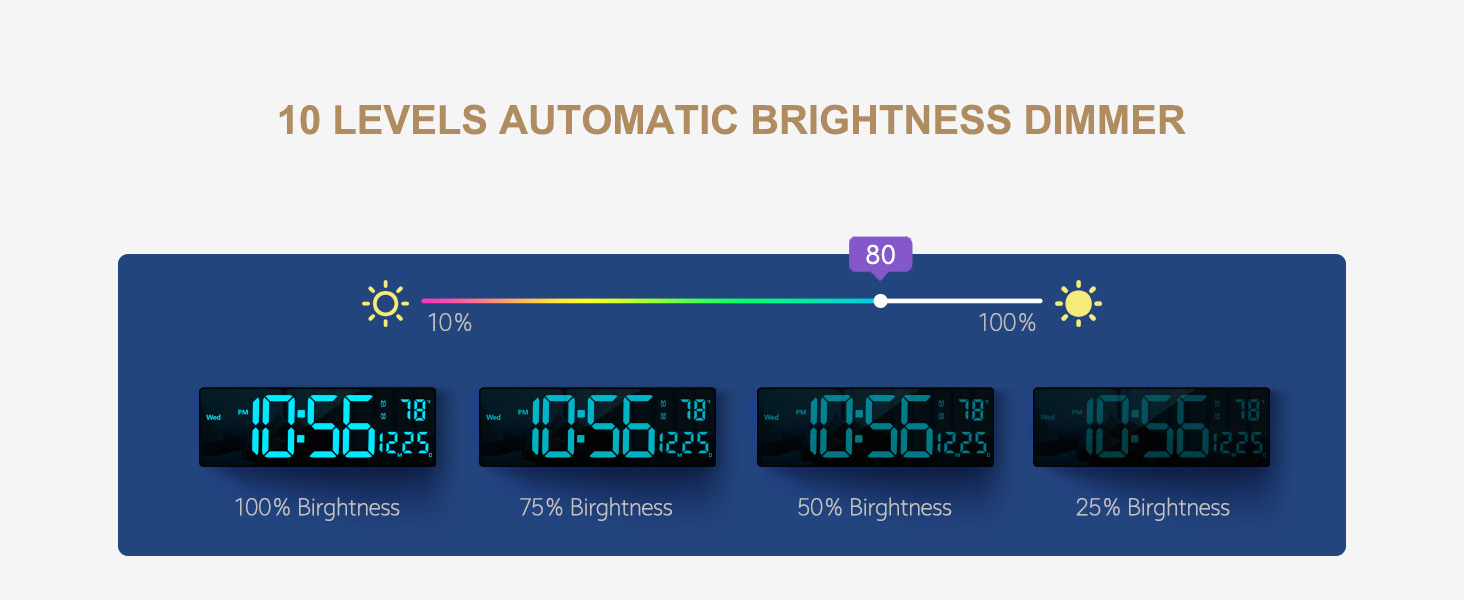
Abbildung 2: Rückseite view of the clock indicating power input and hanging points, alongside a visual representation of included accessories.
Einschalten
The Abovsare Digital Wall Clock requires continuous power to operate. It is not battery operated for primary function.
- Connect the provided power cable to the DC 5V/2A input port on the back of the clock.
- Stecken Sie das Netzteil in eine normale Steckdose.
- Die Uhranzeige leuchtet auf und signalisiert damit, dass sie eingeschaltet ist.
Note: The clock requires 2 C batteries (not included) for its memory function only. These batteries ensure that time data is not lost during a power outage, eliminating the need to reset the clock once power is restored. They do not power the display.
Montage und Platzierung
Your digital clock can be either wall-mounted or placed on a tabletop.
Wandmontage:
- Wählen Sie einen geeigneten Platz an der Wand, der sich in der Nähe einer Steckdose befindet.
- Use the provided wall studs and the hanging holes on the back of the clock to securely mount it. Ensure the clock is level.
- Route the power cable neatly to the outlet.
Platzierung der Tischplatte:
- Place the clock on a flat, stable surface such as a desk, shelf, or nightstand.
- Ensure the power cable can reach an outlet without being strained.
Bedienungsanleitung
All settings and operations for the clock are conveniently managed using the included remote control.
Fernbedienung überview
Familiarize yourself with the buttons on the remote control. (Specific button functions will be detailed in subsequent sections.)

Figure 3: The digital clock and its remote control, highlighting the ability to change display colors.
Einstellen von Uhrzeit und Datum
Refer to the remote control's specific buttons for time and date adjustment. Typically, there are dedicated buttons or a 'SET' button followed by navigation keys.
- Drücken Sie die SATZ Taste, um in den Einstellungsmodus zu gelangen.
- Verwenden Sie die AUF/AB or LINKS RECHTS arrows to adjust values (e.g., hour, minute, year, month, day).
- Drücken SATZ wieder oder OK um zu bestätigen und zur nächsten Einstellung zu gehen.
- Den Einstellungsmodus durch Drücken der Taste verlassen EXIT or SATZ button repeatedly until the display returns to normal.
Changing Display Colors (11 RGB Colors)
The clock offers 11 distinct colors for the jumbo digits, easily changeable via remote control.
- Suchen Sie die FARBE or dedicated color buttons on the remote.
- Press the button to cycle through the 11 available colors.
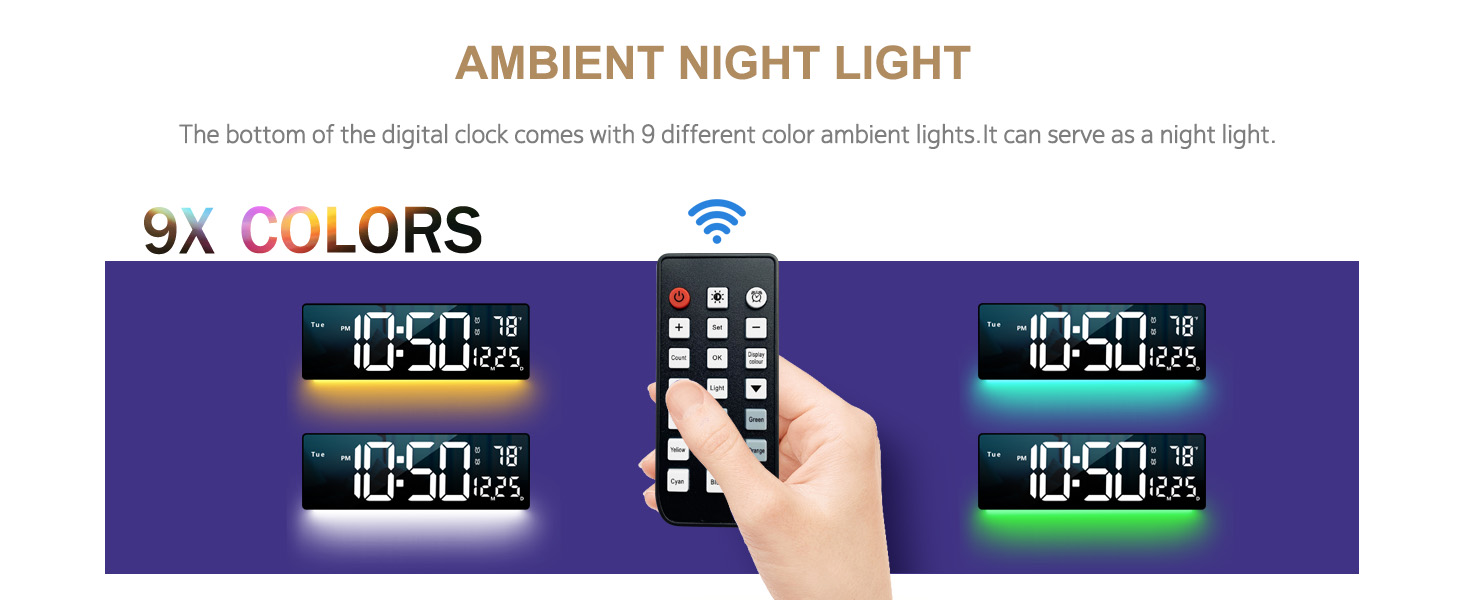
Abbildung 4: Bspamples of the 11 vibrant color modes available for the clock's display.
Ambient-Nachtlicht
The clock features 9 different ambient light colors at its base, which can function as a night light.
- Drücken Sie die UMGEBUNGSLICHT or NACHTLICHT Taste auf der Fernbedienung.
- Cycle through the 9 colors or turn the ambient light off.

Figure 5: The clock's ambient night light feature, demonstrating different color outputs.
Adjusting Brightness (10 Levels)
The clock offers 10 levels of adjustable brightness, both manual and automatic.
- Manuelle Einstellung: Verwenden Sie die HELLIGKEIT +/- buttons on the remote to set your desired brightness level (10% to 100%).
- Automatisches Dimmen: The built-in sensor automatically adjusts brightness based on ambient light conditions. Activate this mode via the remote (look for an AUTO or SENSOR Taste).

Figure 6: Visual representation of the clock's display at different brightness settings.
Count-up and Count-down Function
The clock includes a timer function for both counting up and counting down, up to 99 minutes and 99 seconds.
- Drücken Sie die TIMER button to activate the function.
- Use the remote to set the desired count-down time or start the count-up.
- Drücken START/STOP to control the timer.

Figure 7: The clock's timing and countdown feature in use.
Wartung
Reinigung
To maintain the clock's appearance and functionality:
- Unplug the clock from the power outlet before cleaning.
- Wischen Sie das Display ab und casing with a soft, dry, lint-free cloth.
- Do not use abrasive cleaners, solvents, or spray directly onto the clock.
Memory Function Battery
The clock uses 2 C batteries (not included) to power its memory function, preserving time settings during power interruptions.
- Suchen Sie das Batteriefach auf der Rückseite der Uhr.
- Insert 2 C batteries, ensuring correct polarity (+/-).
- Bringen Sie die Abdeckung des Batteriefachs wieder an.
- Replace batteries annually or if you notice settings are not retained after power outages.
Fehlerbehebung
| Problem | Mögliche Ursache | Lösung |
|---|---|---|
| Die Uhranzeige ist aus. | Nicht angeschlossen; Stromausfalltage; faulty power adapter/cable. | Ensure the clock is securely plugged into a working outlet. Check if the power adapter and cable are undamaged. Remember, the clock requires constant power and is not battery-operated for display. |
| Die Fernbedienung funktioniert nicht. | Remote batteries are dead or incorrectly inserted; remote not pointed at clock; obstruction. | Replace remote control batteries. Ensure batteries are inserted with correct polarity. Point the remote directly at the clock's sensor. Remove any obstructions between the remote and the clock. Check the packaging thoroughly for the remote and USB cable. |
| Time/Date settings are lost after power outage. | Memory function batteries are dead or not installed. | Install 2 C batteries into the memory function compartment on the back of the clock, ensuring correct polarity. Replace existing batteries if they are old. |
| Das Display ist zu hell/zu dunkel. | Brightness setting needs adjustment; automatic dimming enabled. | Use the BRIGHTNESS +/- buttons on the remote to manually adjust. If automatic dimming is active, ensure it is functioning correctly or switch to manual mode. |
| Temperature/Date not displaying correctly or missing segments. | Possible unit malfunction. | Ensure the clock is receiving stable power. If the issue persists, contact customer support for assistance. |
Technische Daten
| Besonderheit | Detail |
|---|---|
| Marke | Abovsare |
| Modellnummer | clock6658R |
| Anzeigetyp | Digitale LED |
| Technische Daten | 15 Zoll B x 5 Zoll H |
| Artikelgewicht | 1.2 Pfund |
| Stromquelle | Kabelgebundenes Elektrogerät (5V/2A-Adapter) |
| Memory Function Batteries | 2 C-Batterien (nicht im Lieferumfang enthalten) |
| Color Options (Digits) | 11 RGB-Farben |
| Umgebungslichtfarben | 9 Farben |
| Helligkeitsstufen | 10 (Manual & Automatic Dimming) |
| Montagetyp | Wandmontage & Tischmontage |
| Besondere Merkmale | Ambient Night Light, Automatic Brightness Dimmer, Count-up/Count-down Function, Memory Function, Remote Control |
Garantie und Support
Eingeschränkte Garantie
This Abovsare Digital Wall Clock comes with a limited warranty. Please retain your proof of purchase for any warranty claims. The warranty covers defects in materials and workmanship under normal use. It does not cover damage resulting from misuse, accidents, unauthorized modifications, or improper installation.
For specific warranty terms and conditions, please refer to the documentation included with your purchase or visit the official Abovsare brand store on Amazon: Abovsare Brand Store.
Kundenservice
If you encounter any issues not covered in the troubleshooting section, or require further assistance, please contact Abovsare customer support through the Amazon platform or via the contact information provided in your product packaging. When contacting support, please have your product model number (clock6658R) and purchase details ready.