1. Produktüberschreitungview
This manual provides detailed instructions for the installation, operation, and maintenance of your new WEELMOTO Headlights. These headlights are designed as a direct replacement for the original headlamps in 2005-2007 Jeep Liberty models without automatic leveling headlights.
The headlights are engineered to meet DOT (Department of Transportation) and SAE (Society of Automotive Engineers) standards, ensuring optimal performance and safety. They feature a clear lens with chrome housing and an amber reflector, providing a bright and clear light output.

Image 1.1: A pair of WEELMOTO replacement headlights, showcasing their clear lens and chrome housing design.

Image 1.2: A 2005-2007 Jeep Liberty with the WEELMOTO headlights installed, demonstrating the perfect fit and aesthetic integration.
2. Sicherheitshinweise
Please read all safety warnings and instructions carefully before installation and use. Failure to follow these instructions may result in injury or damage to the product or vehicle.
- Warnung zu Proposition 65: Dieses Produkt kann Chemikalien enthalten, von denen bekannt ist, dass sie Krebs, Geburtsfehler oder andere reproduktive Schäden verursachen.
- Kompatibilität der Glühbirnen: These headlights are designed for use with stock halogen bulbs (HB5). Nicht directly replace with LED bulbs unless specifically designed for this housing, as this may affect light pattern, performance, and potentially damage the headlight assembly or vehicle's electrical system.
- Professionelle Installation: While designed for easy installation, professional installation is recommended if you are unfamiliar with automotive electrical systems or vehicle component removal.
- Handhabung: Avoid touching the glass surface of the bulbs with bare hands, as oils can reduce bulb lifespan.

Image 2.1: A visual reminder emphasizing the importance of not directly replacing original bulbs with LED bulbs in this headlight assembly.
3. Packungsinhalt
Bitte überprüfen Sie nach dem Öffnen der Verpackung, ob alle Komponenten vorhanden und unbeschädigt sind:
- 1 x Driver Side Headlight Assembly (Left)
- 1 x Passenger Side Headlight Assembly (Right)
- Chromgehäuse
- Bernstein Reflektor
Note: Bulbs are not included. Please use your vehicle's stock HB5 bulbs for installation.
4. Installationsanweisungen
These headlights feature a plug-and-play design for straightforward installation. Follow these steps carefully:
- Fahrzeug vorbereiten: Ensure the vehicle is turned off and the parking brake is engaged. For safety, disconnect the negative terminal of the car battery.
- Remove Grille and Fasteners: Carefully remove the front grille of your Jeep Liberty. Locate and undo the screws, clips, or retainer springs that secure the existing headlight in place.
- Detach Old Headlight: Remove any additional fasteners typically found at the top and bottom of the headlight. Gently pull the old headlight assembly away from the vehicle.
- Verkabelung trennen: Disconnect the electrical wiring harness from the back of the stock headlight. Detach the stock headlight completely.
- Einbau neuer Scheinwerfer: Connect the vehicle's wiring harness to your new WEELMOTO headlight assembly. Ensure all connections are secure. Carefully fit the new headlight into its designated position.
- Secure Headlight: Reconnect all screws, clips, or retainer springs that hold the new headlight in place. Ensure they are sealed properly to prevent moisture ingress.
- Kühlergrill wieder einbauen: Carefully put the front grille back into place, ensuring it is securely fastened.
- Batterie wieder anschließen: Schließen Sie den Minuspol der Autobatterie wieder an.
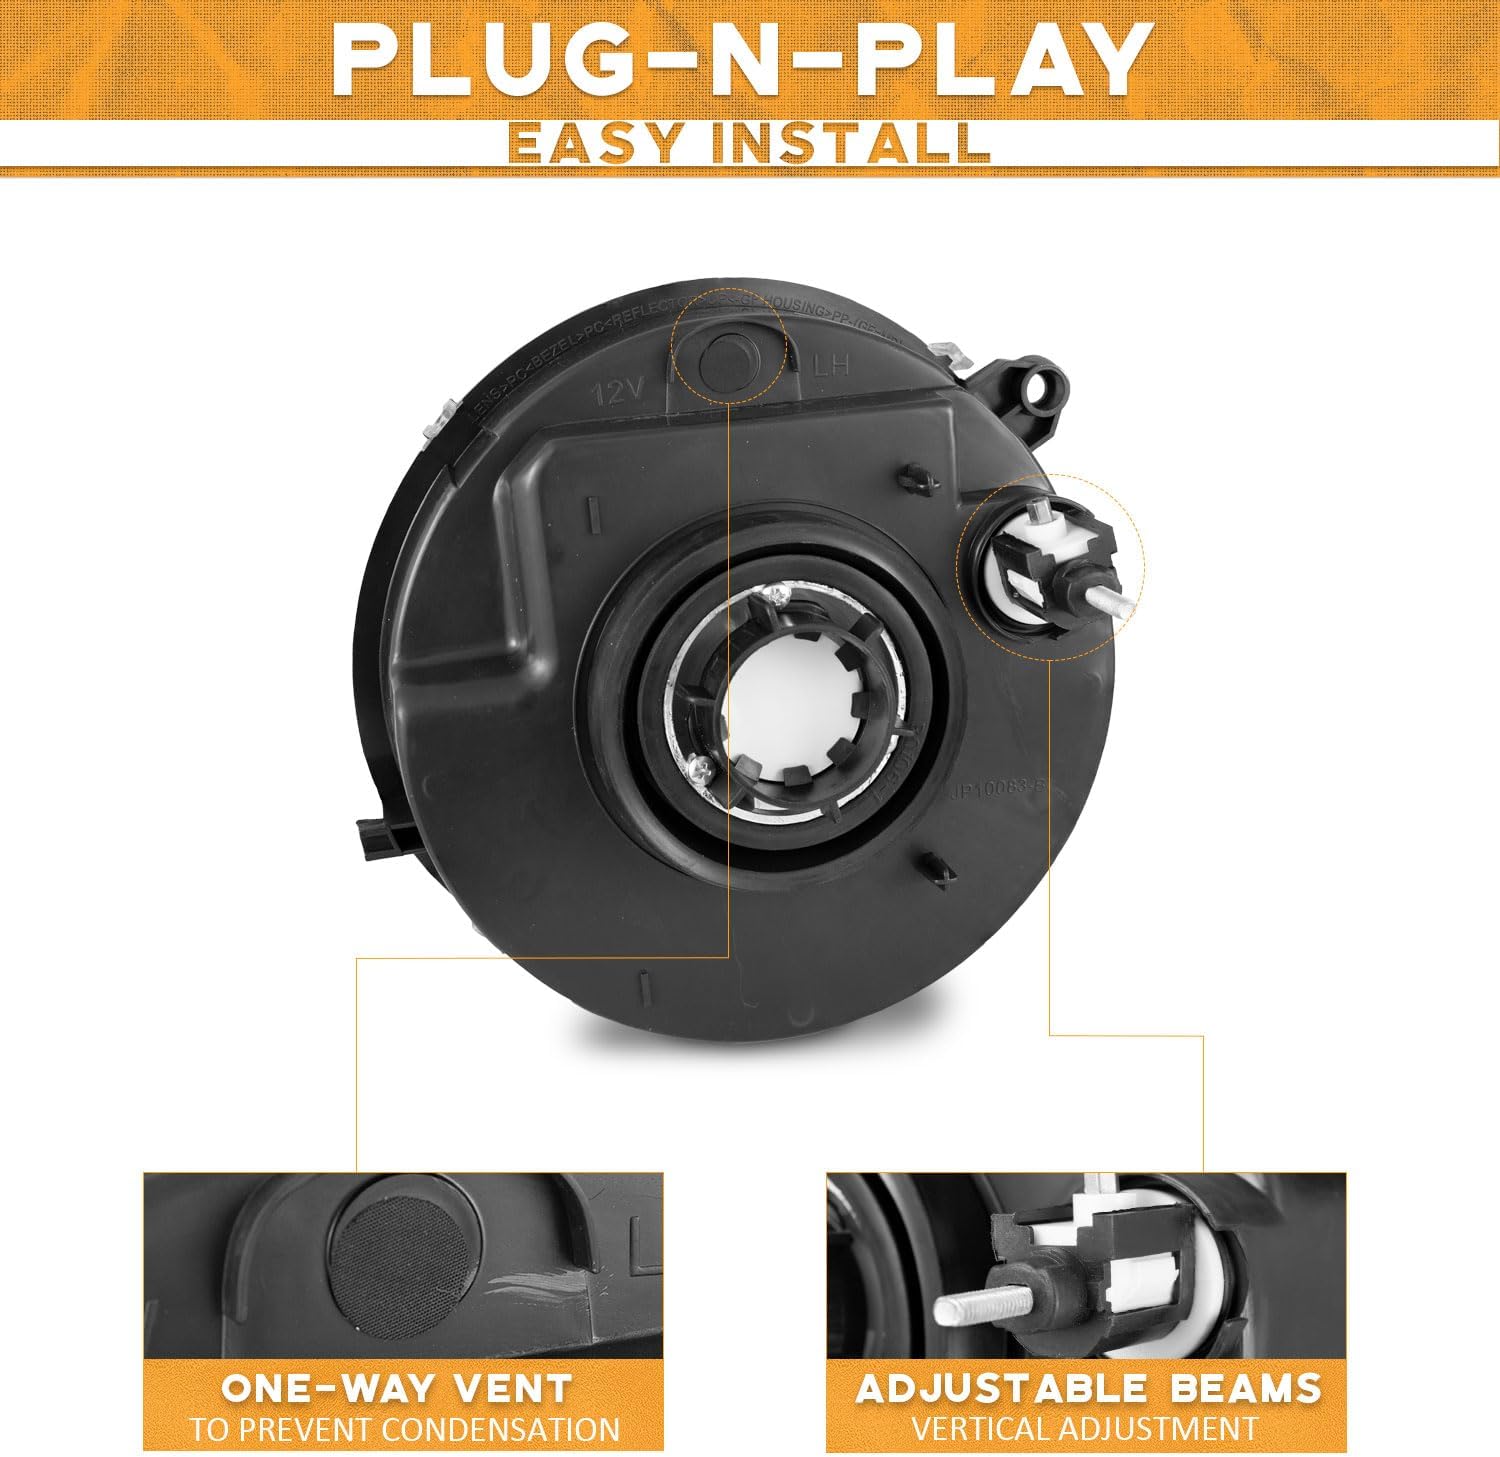
Bild 4.1: Hinten view of the headlight assembly, highlighting the plug-and-play connection points and adjustable beam mechanism.

Image 4.2: A visual guide illustrating the general steps for headlight installation and beam adjustment.
5. Operating Instructions (Beam Adjustment)
Your new headlights are pre-adjusted at the factory. Manual adjustment is generally not required. However, if you notice an unsatisfactory light pattern, you can adjust the beam angle using the integrated regulator.
How to Adjust Your Headlights:
- Fahrzeugposition: Park your car on a level surface approximately 25 feet (7.6 meters) in front of a flat wall.
- Mark Reference Points: Turn on your headlights. Mark the center points of each light beam on the wall with tape.
- Adjust Beams: Locate the adjustment screws on the top of each headlight assembly. Use a suitable tool to turn the regulator. Adjust the screws as needed to center the bright spots of the light pattern within the marked 'X' on the wall.
Wichtig: Do NICHT adjust the regulator more than three times in either the clockwise or counter-clockwise direction to prevent damage to the housing.
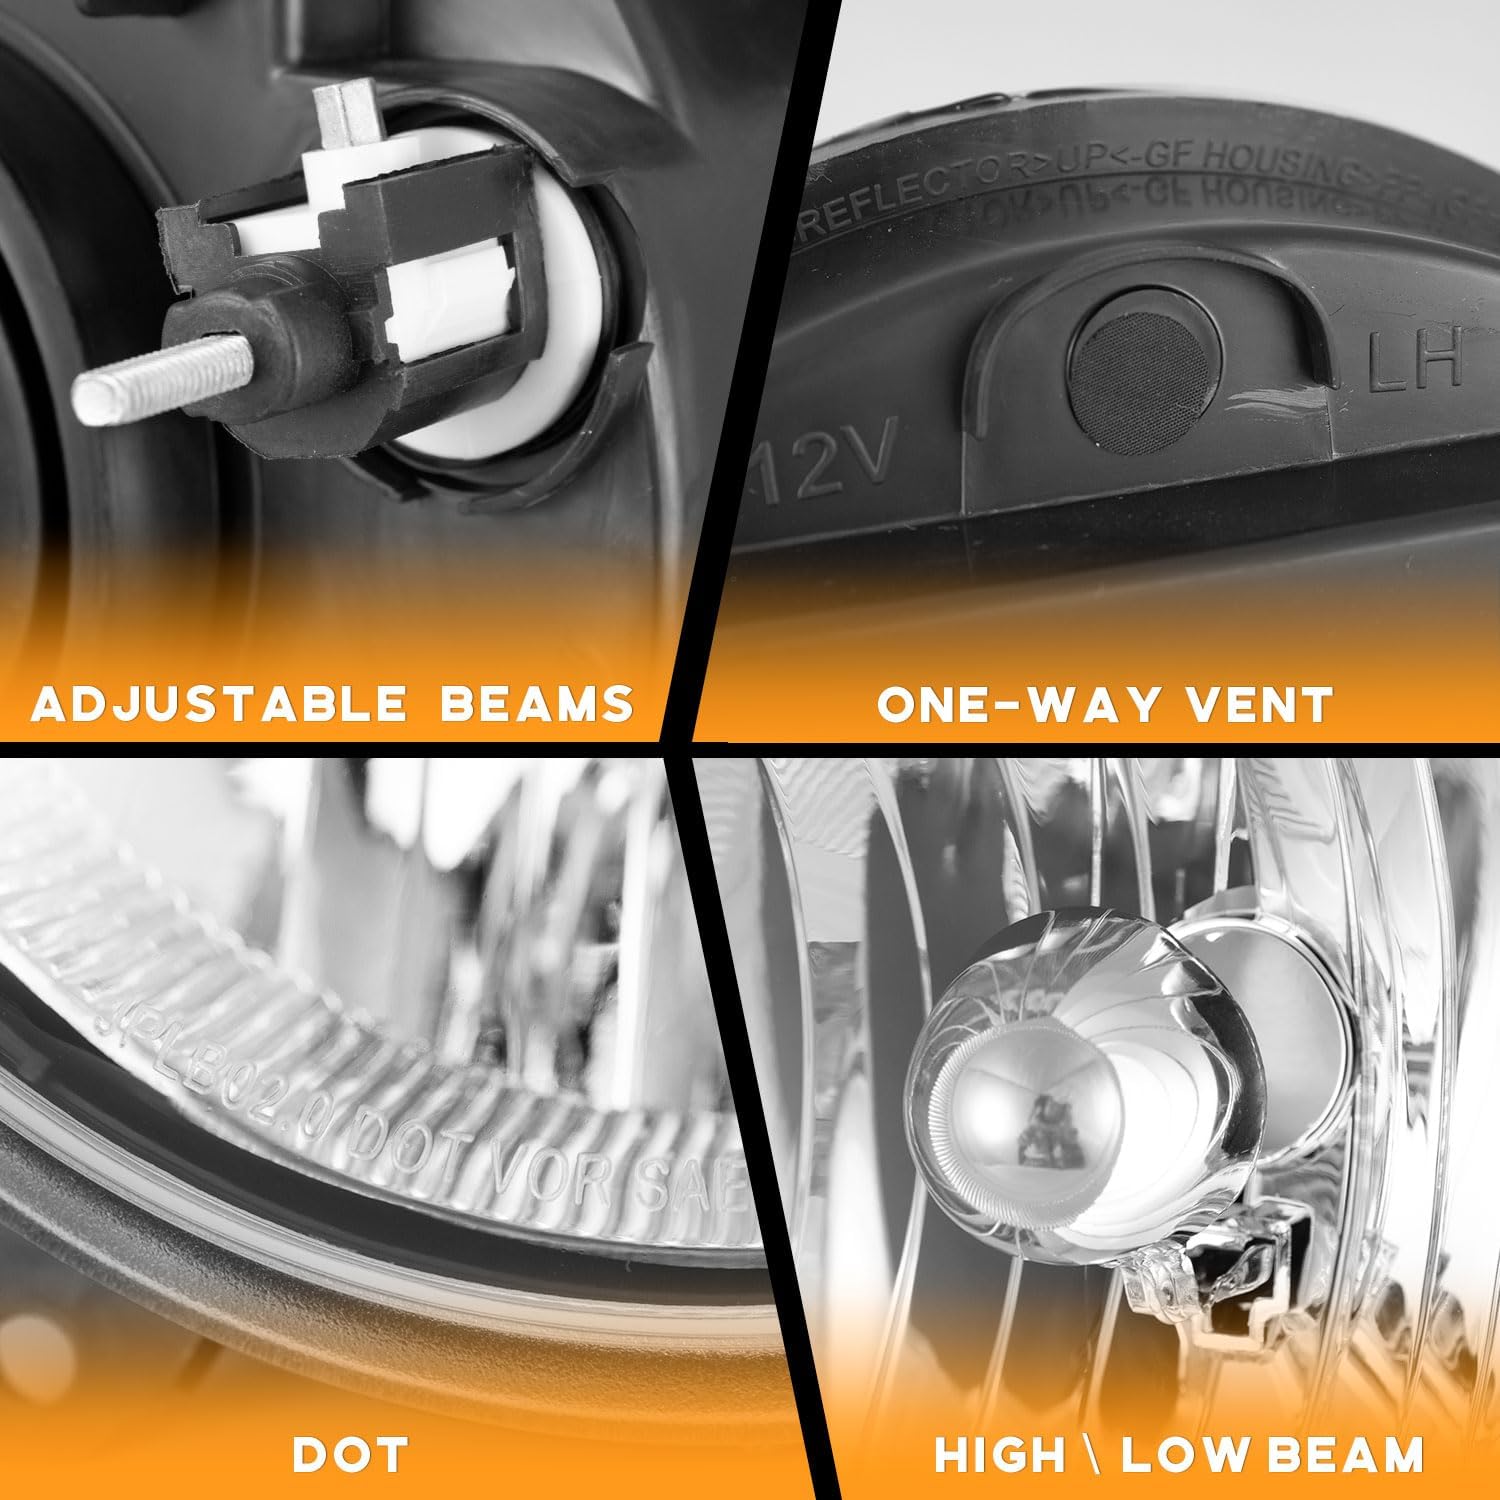
Abbildung 5.1: Detailansicht view of the headlight, showing the adjustable beam mechanism and one-way vent.
6. Wartung
Proper maintenance ensures the longevity and optimal performance of your headlights.
Reinigung:
- Clean the outer lens with a soft cloth and mild automotive soap. Avoid abrasive cleaners or harsh chemicals that could damage the UV coating.
- Rinse thoroughly with water and dry with a clean, soft cloth to prevent water spots.
Addressing Temporary Condensation:
It is normal for headlight lenses to experience temporary misting or fogging due to temperature differences, air pressure, or weather conditions. This is not a defect and can be resolved as follows:
- Lüftungsschlitze prüfen: Ensure the one-way vents on the headlight housing are not blocked. These vents allow moisture to escape.
- Activate Low Beams: Turn on your vehicle's low beams for approximately 20 minutes. The heat generated by the bulbs will help evaporate the moisture.
- Remove Bulbs (If Necessary): If condensation persists, carefully remove the bulbs and clear any visible mist from the inside of the housing.
- Use Desiccant: Place a silica gel packet inside the headlight housing (if accessible and safe to do so) to absorb residual moisture before reinstalling the bulbs.

Image 6.1: A Jeep Liberty driving in rainy conditions, demonstrating the IP65 certified waterproof design of the headlights.
7. Fehlerbehebung
In diesem Abschnitt werden häufig auftretende Probleme behandelt.
Issue: Headlights not working after installation.
- Lösung: Check all electrical connections to ensure they are secure and properly seated. Verify that the bulbs are correctly installed and not burnt out. Check vehicle fuses related to the headlights.
Issue: Uneven or poor light pattern.
- Lösung: Refer to Section 5, "Operating Instructions (Beam Adjustment)", to manually adjust the headlight beams. Ensure bulbs are correctly seated within the housing.
Issue: Condensation inside the headlight.
- Lösung: Refer to Section 6, "Maintenance - Addressing Temporary Condensation", for steps to resolve this.
8. Spezifikationen
| Besonderheit | Detail |
|---|---|
| Marke | WEELMOTO |
| Modell | JPLB-05 |
| OEM-Teilenummern | 55157140AA, 55157141AA |
| ABPA Partslink Numbers | CH2502156, CH2503156 |
| Fahrzeug-Servicetyp | 2005-2007 Jeep Liberty (without Automatic Leveling Headlights) |
| Farbe | Clear Lens / Chrome Housing / Amber Reflector |
| Spezifische Verwendungen für das Produkt | Scheinwerfer |
| Wastage | 60 watts (per assembly, with compatible bulbs) |
| Auto-Teileposition | Vorne Außen |
| Linsenmaterial | Polycarbonat |
| Besondere Merkmale | High Beam, Low Beam, Waterproof (IP65 Certified) |
| Artikelgewicht | 5.99 Pfund (ungefähr) |
| Verpackungsabmessungen | 17.25 x 11 x 11 Zoll (ungefähr) |
9. Garantie und Support
WEELMOTO provides a 3-year assurance period for this product, offering peace of mind regarding its quality and performance.
For any issues or questions regarding your WEELMOTO headlights, please contact our customer support. You can typically find contact information by visiting the WEELMOTO store page on the platform where you purchased the product and selecting the "ask a question" option. This direct communication ensures efficient resolution of any concerns.