1. Einleitung
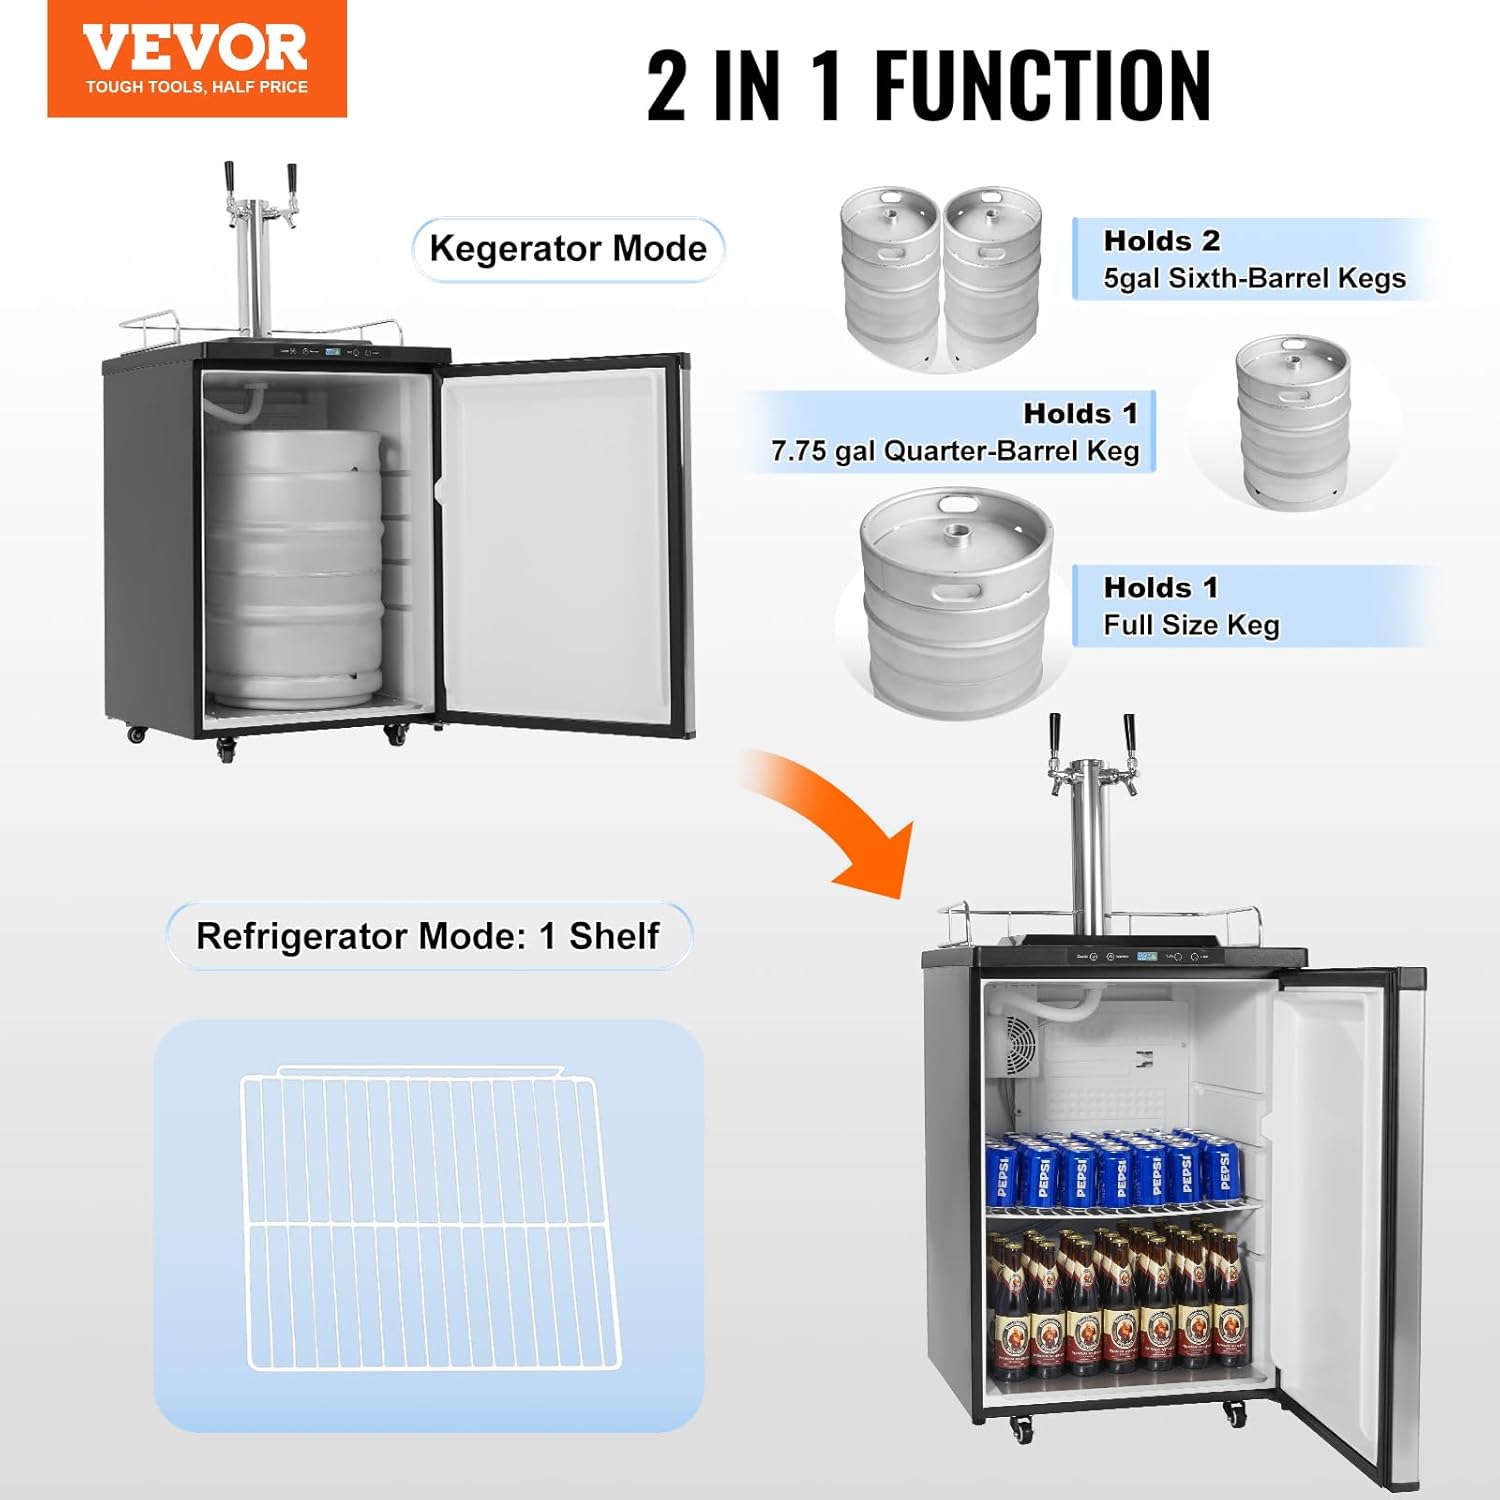
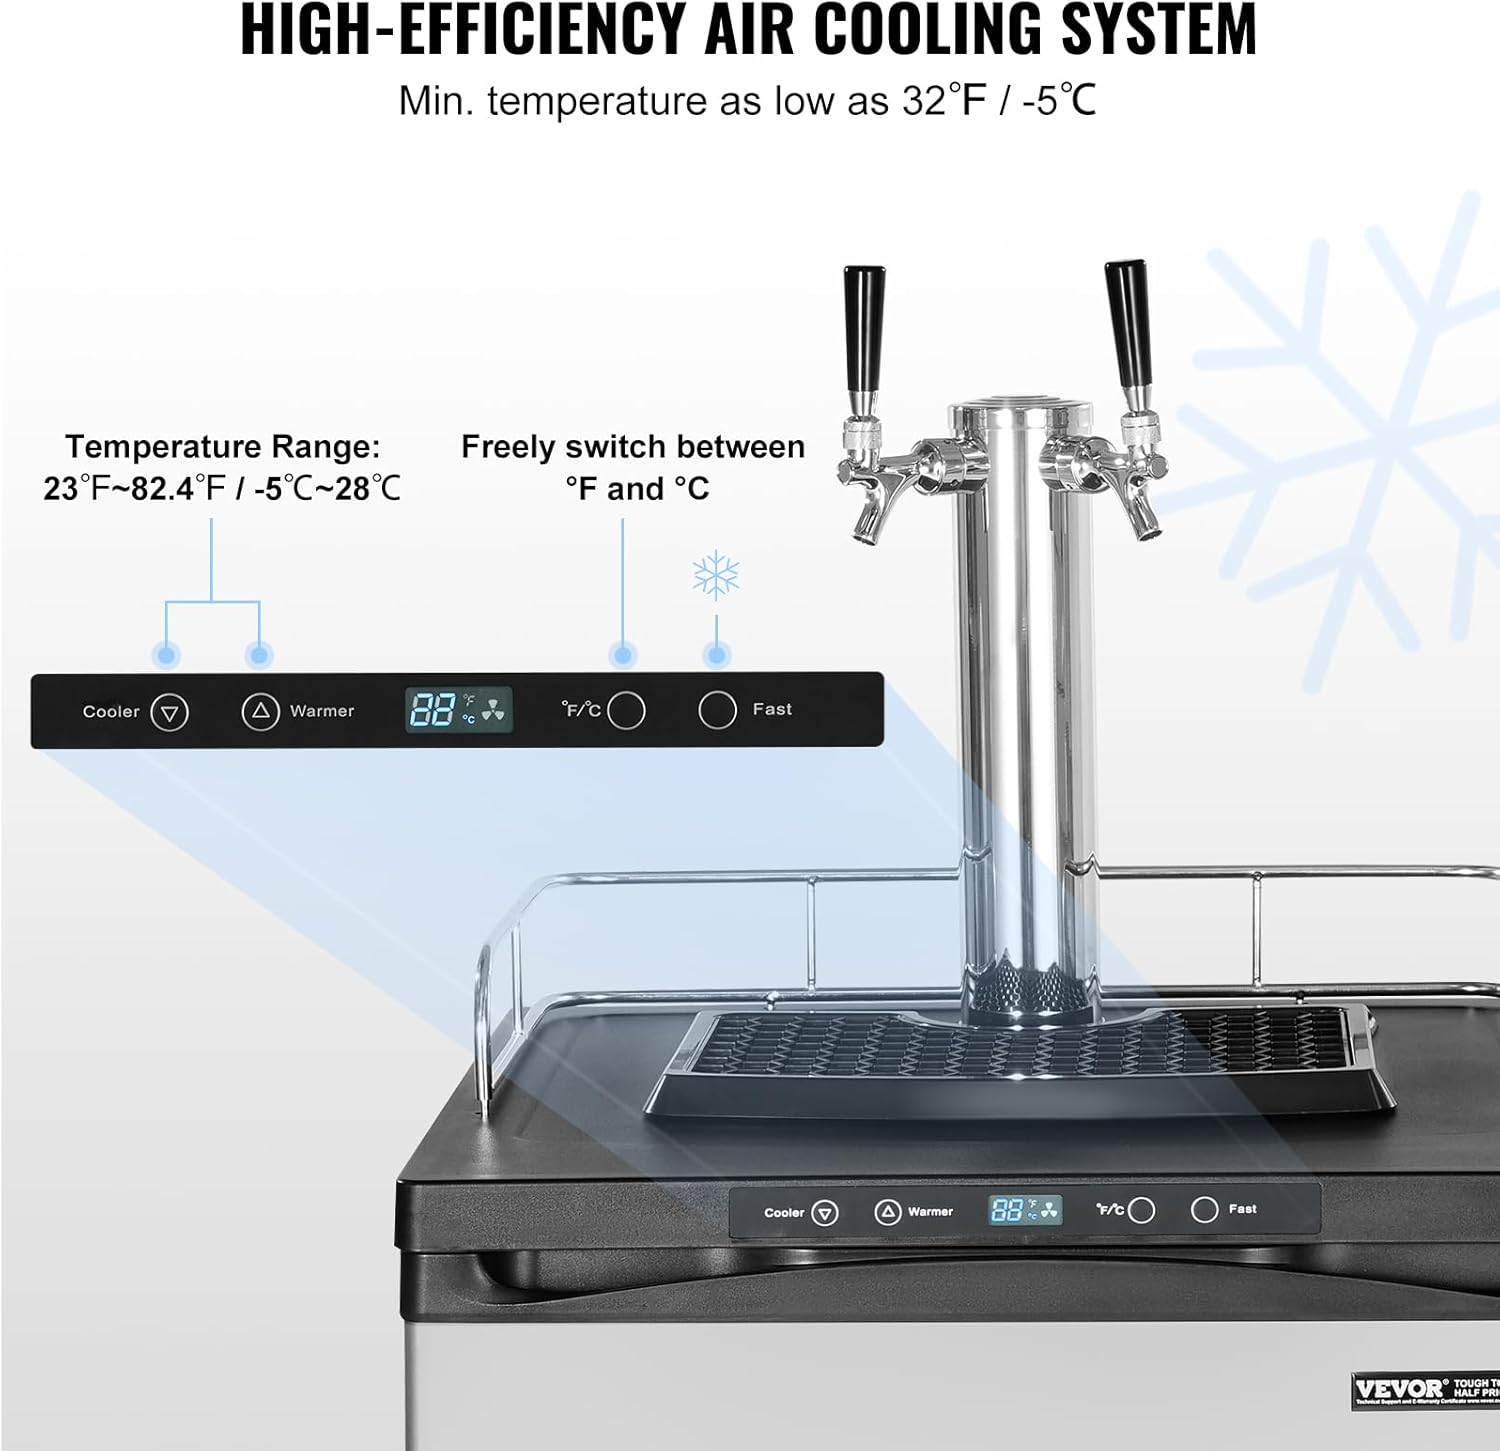
The VEVOR BM-162 Dual Tap Beer Kegerator is designed to provide a convenient and efficient way to dispense draft beer or other beverages. Featuring an air cooling system for rapid cooling and low-temperature preservation, it ensures optimal flavor. This kegerator includes a shelf for versatile use as an additional refrigerator and precise temperature control ranging from 23°F to 82.4°F (-5°C to 28°C). Its spacious interior can accommodate various keg sizes, making it suitable for home or commercial use.
2. Sicherheitshinweise
WARNUNG: Lesen Sie vor der Benutzung dieses Geräts alle Sicherheitshinweise und Anweisungen. Die Nichtbeachtung der Hinweise und Anweisungen kann zu Stromschlag, Brand und/oder schweren Verletzungen führen.
- Stellen Sie sicher, dass das Gerät auf einer stabilen, ebenen Fläche steht und nicht direkter Sonneneinstrahlung oder Wärmequellen ausgesetzt ist.
- Betreiben Sie das Gerät nicht mit einem beschädigten Kabel oder Stecker. Wenden Sie sich zur Reparatur an qualifiziertes Servicepersonal.
- Halten Sie die Belüftungsöffnungen frei.
- Lagern Sie keine explosiven Stoffe, wie beispielsweise Aerosoldosen mit brennbarem Treibmittel, in diesem Gerät.
- Vor der Reinigung oder Wartung muss das Gerät immer vom Stromnetz getrennt werden.
- CO2 cylinders must be handled with care. Ensure proper ventilation when connecting or disconnecting the CO2 tank.
- Dieses Gerät ist nicht für den Gebrauch durch Personen (einschließlich Kinder) mit eingeschränkten physischen, sensorischen oder geistigen Fähigkeiten oder Mangel an Erfahrung und Wissen bestimmt, es sei denn, sie werden von einer für ihre Sicherheit verantwortlichen Person beaufsichtigt oder erhalten Anweisungen zur Verwendung des Geräts.
3. Packungsinhalt
Your VEVOR BM-162 Dual Tap Beer Kegerator package includes the following items:
- 1 x Beer Kegerator Unit
- Beer Hose (59" / 1.5 m)
- Beer Taps (2)
- Beer Column (Tower)
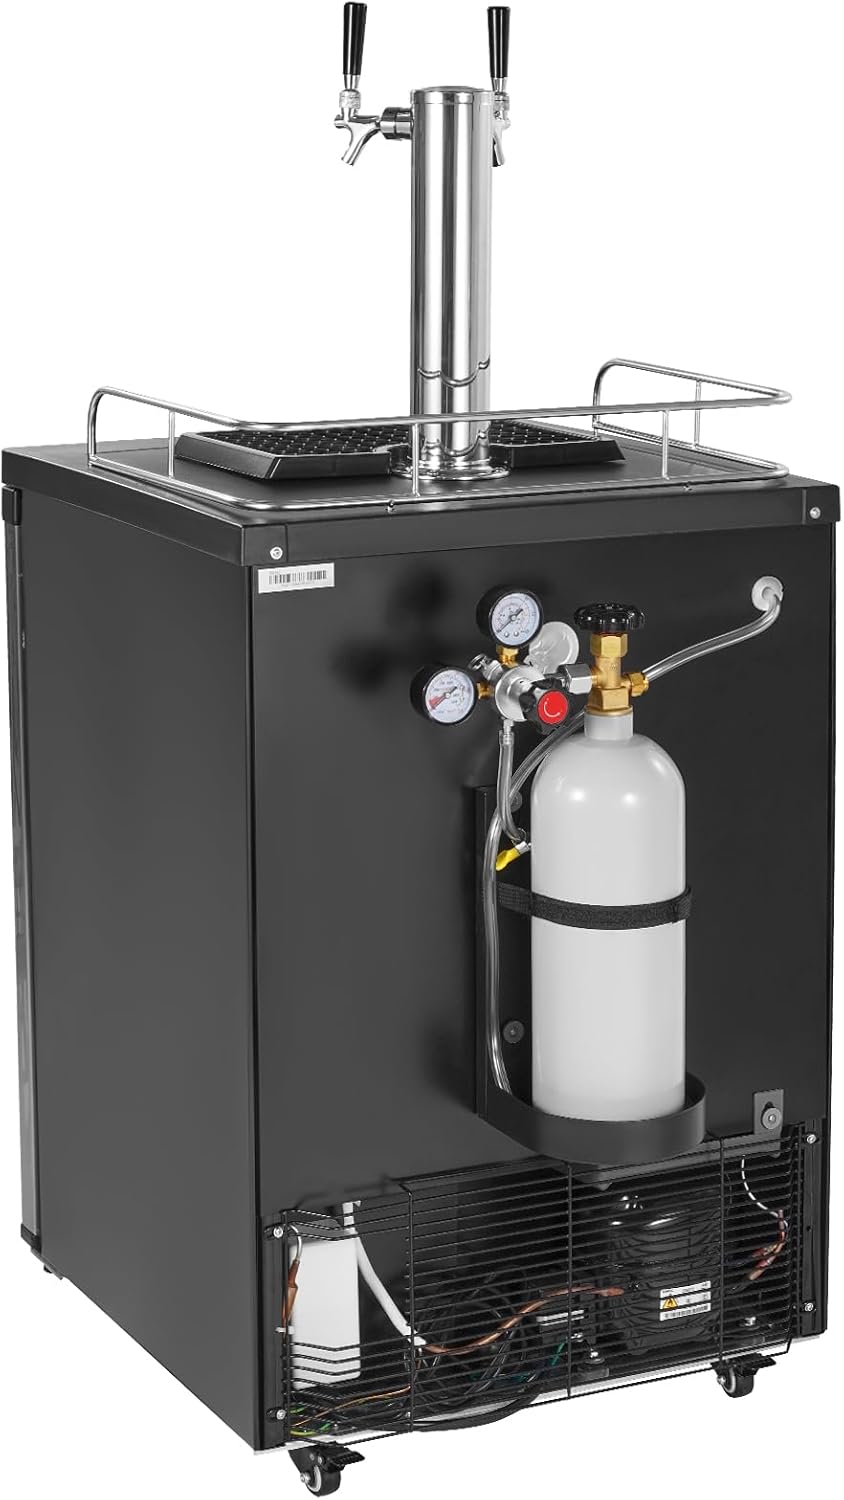
- CO2 Cylinder (5 lb aluminum, empty)
- Bottle Holder (for external CO2 tank placement)
- Tropfschale
- Leitplanke
- Shelf (for refrigerator use)
- Dual-Gauge Dual-Valve Regulator
- D-Type Keg Couplers (2)
- CO2 Gas Lines (2)
- Spare hose and clamp
- Installationstools
4. Einrichtungsanweisungen
Follow these steps to set up your VEVOR BM-162 Dual Tap Beer Kegerator:
- Auspacken und Aufstellen: Carefully unpack the kegerator. Place it on a firm, level surface. Ensure adequate ventilation around the unit.
- Install the Stainless Steel Guard Rail: Attach the guard rail to the top of the kegerator. This helps prevent items from falling off the top surface.
- Install the Beer Tower and Taps: Insert the beer tower into the designated opening on the top of the unit. Secure it with the provided hardware. Attach the beer taps to the tower.
- Installieren Sie die Tropfschale: Position the removable drip tray directly below the beer taps to catch any spills or foam.
- Mount CO2 Bracket and Tank: Mount the CO2 cylinder holder on the exterior back of the kegerator. Place the 5 lb aluminum CO2 cylinder (empty) into the holder.
- Assemble the Regulator: Attach the dual-gauge dual-valve regulator to the CO2 cylinder. Ensure all connections are tight to prevent leaks.
- Luftleitungen anschließen: Connect the CO2 gas lines from the regulator to the D-type keg couplers.
- Bierleitungen verbinden: Connect the beer hoses from the beer taps to the D-type keg couplers.
- Keg Installation: Place your desired kegs inside the kegerator. The unit can accommodate two 5-gallon sixth-barrel kegs, one 7.75-gallon quarter-barrel keg, or one full-size keg. Connect the keg couplers to the kegs.

Einrichtungsvideoanleitung
5. Bedienungsanleitung
Temperaturregelung
The kegerator features a digital display for precise temperature adjustment. The temperature can be set between 23°F and 82.4°F (-5°C and 28°C).
- Use the 'Cooler' and 'Warmer' buttons to adjust the desired temperature.
- The unit has a memory function that retains the last set temperature after a power outage.
- The air cooling system ensures rapid cooling and consistent temperature throughout the unit.
Bier ausschenken
To dispense beer, ensure the CO2 tank is open and the regulator is set to the appropriate pressure for your beer type.
- Stelle ein Glas unter den Wasserhahn.
- Pull the tap handle forward to open the flow.
- Push the tap handle back to close the flow.
- The extended 59-inch beer hose helps ensure proper foam for optimal taste and texture.

6. Wartung
Reinigen der Tropfschale
The drip tray is removable for easy cleaning. Regularly empty and wash the drip tray to maintain hygiene and prevent odors.
Auftauen
The kegerator automatically defrosts every 215 minutes for half an hour to ensure optimal cooling performance and prevent ice buildup.
CO2 Tank Exchange
When the CO2 tank is empty, it needs to be refilled or exchanged at a local supplier. Always ensure the regulator is closed before disconnecting the tank.
7. Fehlerbehebung
If you encounter issues with your kegerator, refer to the following common problems and solutions:
- Beer is Foamy: This can be caused by incorrect CO2 pressure, warm beer lines, or improper pouring technique. Adjust CO2 pressure, ensure beer lines are chilled, and pour with a quick, decisive motion.
- Beer is Not Cold Enough: Check the temperature setting on the digital display. Ensure the kegerator is not placed near a heat source and has adequate ventilation. Allow sufficient time for the unit to cool down after initial setup or keg change.
- No Beer Dispensing: Verify that the CO2 tank is not empty and the regulator is open and set to the correct pressure. Check all connections for leaks and ensure the keg coupler is properly engaged with the keg.
- CO2 Leaks: Inspect all connections (regulator to tank, lines to couplers) for tightness. Use the provided spare hose and clamp to replace any damaged components.
Bei anhaltenden Problemen wenden Sie sich bitte an den VEVOR-Kundendienst.
8. Spezifikationen
| Besonderheit | Spezifikation |
|---|---|
| Markenname | VEVOR |
| Modellinformationen | BM-162 |
| Artikelgewicht | 88.2 Pfund |
| Technische Daten | 23.7 x 29.1 x 52.4 Zoll |
| Kapazität | 162 Liter |
| Farbe | Silber |
| Bandtage | 110 Volt |
| Temperaturregelbereich | 23°F - 82.4°F (-5°C - 28°C) |
| Im Lieferumfang enthaltene Komponenten | 1 x Beer Kegerator (and accessories listed in Package Contents) |

9. Garantie und Support
Informationen zur Garantie und zum Kundendienst finden Sie in der Ihrem Produkt beiliegenden Dokumentation oder auf der offiziellen VEVOR-Website. webBewahren Sie Ihren Kaufbeleg als Kaufnachweis für eventuelle Garantieansprüche auf.