
Einführung
This manual provides essential information for the safe operation, assembly, maintenance, and troubleshooting of your new Electric Children's Buggy Can-am Maverick. Please read this manual thoroughly before assembly and use to ensure proper function and safety.

Image: A dynamic side view of the Electric Children's Buggy Can-am Maverick, showcasing its robust design and vibrant blue and black color scheme.
Wichtige Sicherheitsinformationen
To reduce the risk of injury, adult supervision is required at all times. Never use this vehicle on roadways, near cars, near steep inclines or steps. Do not submerge the vehicle in water or other liquids.
- Always ensure the child is wearing appropriate safety gear, such as a helmet.
- Vor jedem Gebrauch sicherstellen, dass alle Befestigungselemente fest angezogen sind.
- Only operate on flat, dry surfaces away from hazards.
- Halten Sie Hände, Haare und Kleidung von beweglichen Teilen fern.
Einrichtung und Montage
Assembly is required for this product. Please follow the steps below carefully.
Auspacken und Erstinspektion
Carefully remove all components from the packaging. Verify that all parts listed in the packing list are present and undamaged. If any parts are missing or damaged, do not proceed with assembly and contact customer support.
Montageschritte
- Radinstallation: Attach the wheels to the axles, ensuring they are securely fastened with the provided hardware.
- Lenkradmontage: Connect the steering wheel to the steering column. Ensure it clicks into place or is secured with the designated screw.
- Sitzeinbau: Place the seats into the designated slots and secure them. Ensure seatbelts are accessible and functional.
- Batterieanschluss: Connect the battery terminals. Refer to the battery compartment for specific instructions. Ensure the connection is firm.
- Erste Ladung: Laden Sie den Akku vor dem ersten Gebrauch 8–12 Stunden lang vollständig auf. Überladen Sie den Akku nicht.

Bild: Rückseite view of the electric buggy with the door open, highlighting the spacious interior and robust rear suspension components.
Bedienungsanleitung
Kontrollen überview

Image: The dashboard of the electric buggy, featuring the steering wheel, a digital speedometer display, and a multimedia screen.
- Start/Stopp-Taste: Located near the key slot, press to turn the vehicle on or off.
- Gaspedal: Drücken zum Vorwärtsfahren. Loslassen zum Bremsen.
- Lenkrad: Zum Lenken des Fahrzeugs nach links oder rechts abbiegen.
- Gangwahlschalter: (If applicable) Switch between forward, neutral, and reverse.
- Multimedia Screen: Provides entertainment and vehicle information.
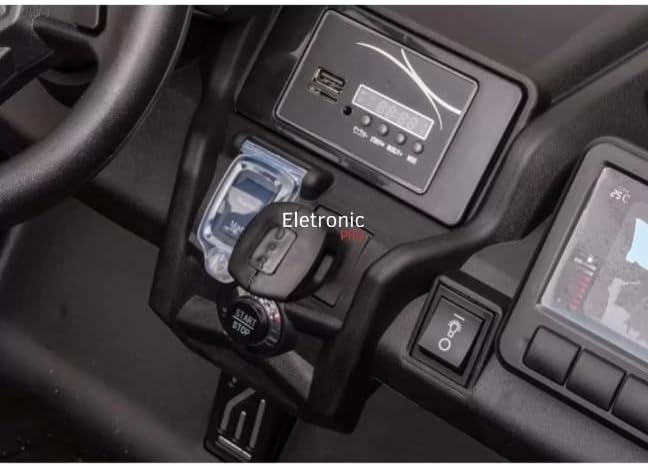
Bild: Eine Nahaufnahme view of the electric buggy's central console, showing the start/stop button and the key ignition slot.
Fahren des Fahrzeugs
- Ensure the child is seated properly and the seatbelt is fastened.
- Press the Start/Stop button to power on the vehicle.
- Gently press the accelerator pedal to move forward. Release the pedal to stop.
- Benutzen Sie das Lenkrad zur Navigation.
- Always supervise the child during operation.

Image: The interior of the electric buggy, featuring two black, contoured seats equipped with safety seatbelts.
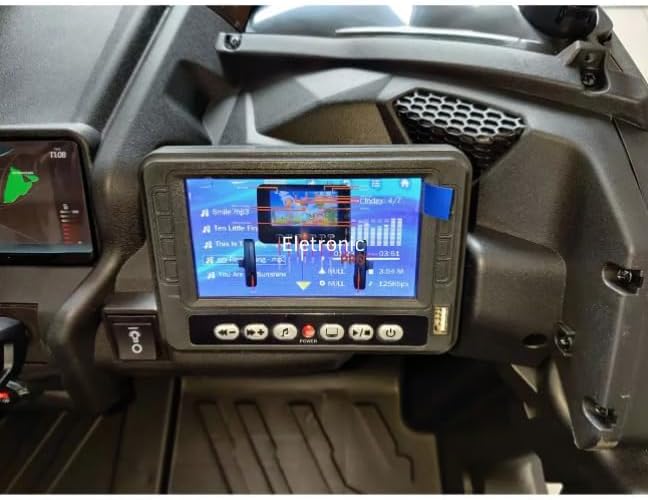
Image: A close-up of the electric buggy's multimedia screen, showing a music playback interface with song titles and an equalizer display.
Wartung
Batteriepflege
- Laden Sie den Akku nach jedem Gebrauch auf.
- Lassen Sie den Akku nicht vollständig entladen.
- If storing for extended periods, charge the battery once a month.
- Only use the charger provided with the vehicle.
Reinigung und Lagerung
- Wischen Sie das Fahrzeug mit dem Werbemittel ab.amp Tuch. Keine Scheuermittel verwenden.
- Lagern Sie das Fahrzeug an einem trockenen, kühlen Ort, geschützt vor direkter Sonneneinstrahlung und Feuchtigkeit.
- Protect the vehicle from extreme temperatures.
Fehlerbehebung
| Problem | Mögliche Ursache | Lösung |
|---|---|---|
| Fahrzeug bewegt sich nicht | Battery is low or disconnected; Loose wire connection; Blown fuse. | Charge battery; Check battery connections; Check fuse and replace if necessary. |
| Fahrzeug läuft langsam | Battery is low; Overloaded vehicle; Operating on rough terrain. | Recharge battery; Reduce load; Operate on smoother surfaces. |
| No sound from multimedia screen | Volume is too low; Audio cable disconnected. | Increase volume; Check audio connections. |
Technische Daten
- Modell: DK-CA001
- Marke: Generisch
- Empfohlenes Alter: 36 Monate – 8 Jahre
- Materialien: Plastic, Rubber, Steel Alloy
- Produktabmessungen: 145 x 84 x 79 cm
- Produktgewicht: 42 kg
- Montage erforderlich: Ja
- Zertifizierung: Nicht zutreffend
Garantie und Support
This product comes with a return policy of 7 days from the date of purchase. For any issues, questions, or to claim warranty support, please contact the seller directly. Please retain your proof of purchase for any warranty claims.
Verkäufer: ELETRONIC PRO LTDA