1. Einleitung
Welcome to the user manual for your Emerson CKSS7071 Sunrise Smartset Alarm Clock Radio. This device is designed to enhance your daily routine with its unique features, including a sunrise simulation, soothing sound options, Bluetooth connectivity, and an 8-color dimmable LED display. Please read this manual thoroughly to understand the full functionality and ensure proper use and care of your new alarm clock radio.
Video 1: Überview of the Emerson CKSS7071 Sunrise Smartset Alarm Clock Radio. This video demonstrates the key features and design of the product.
2. Wichtige Sicherheitshinweise
- Lesen Sie alle Anweisungen, bevor Sie das Gerät in Betrieb nehmen.
- Bewahren Sie diese Anleitung zum späteren Nachschlagen auf.
- Verwenden Sie dieses Gerät nicht in der Nähe von Wasser.
- Nur mit trockenem Tuch reinigen.
- Die Lüftungsöffnungen dürfen nicht blockiert werden. Die Installation muss gemäß den Anweisungen des Herstellers erfolgen.
- Installieren Sie das Gerät nicht in der Nähe von Wärmequellen wie Heizkörpern, Heizregistern, Öfen oder anderen Geräten (einschließlich ampKonverter (Lüfter), die Wärme erzeugen.
- Schützen Sie das Netzkabel vor Beschädigungen oder Beschädigungen durch Fußgänger, insbesondere an den Steckern, Steckdosen und an der Stelle, an der es aus dem Gerät austritt.
- Verwenden Sie nur vom Hersteller angegebene Zusatzgeräte/Zubehör.
- Trennen Sie das Gerät bei Gewitter oder längerer Nichtbenutzung vom Stromnetz.
- Überlassen Sie alle Wartungsarbeiten qualifiziertem Servicepersonal. Eine Wartung ist erforderlich, wenn das Gerät auf irgendeine Weise beschädigt wurde, z. B. wenn das Netzkabel oder der Stecker beschädigt sind, Flüssigkeit in das Gerät verschüttet wurde oder Gegenstände hineingefallen sind, das Gerät Regen oder Feuchtigkeit ausgesetzt war, nicht normal funktioniert oder fallengelassen wurde.
3. Packungsinhalt
Prüfen Sie beim Öffnen der Verpackung, ob alle Artikel vorhanden sind:
- Emerson CKSS7071 Sunrise Smartset Alarm Clock Radio
- Netzteil
- Bedienungsanleitung
4. Produktüberschreitungview
4.1-Vorderseite View

Bild 1: Front view of the alarm clock, featuring the digital time display and the sunrise simulation light panel.
The front of the unit features the main 1.2-inch LED time display and the large circular light panel for sunrise simulation and ambient lighting. Indicators for AM/PM, Alarm 1/2, and Bluetooth status are also visible.
4.2 Seite View (Steuerung)
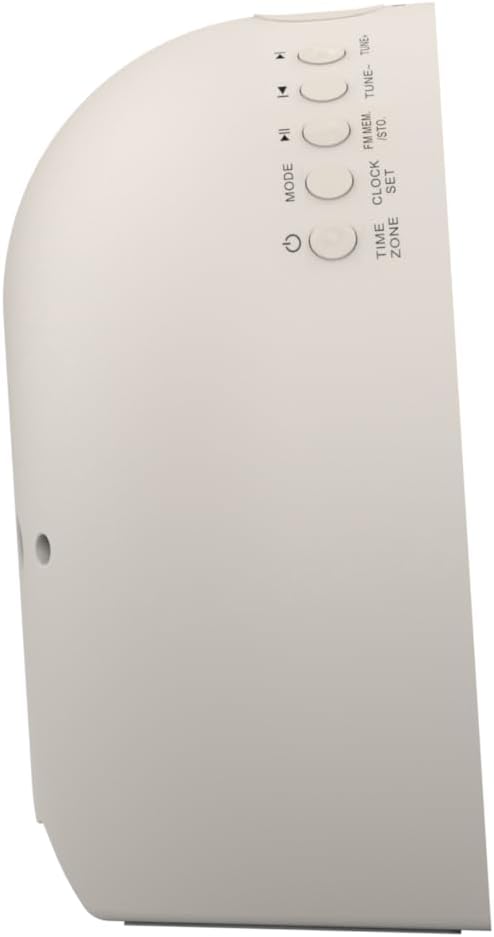
Bild 2: Seite view of the alarm clock, highlighting the control buttons for various functions.
The side panel houses the primary control buttons, including Power, Mode, Clock Set, Time Zone, Tune/Skip, and Volume controls. These buttons are used for setting time, alarms, and navigating audio functions.
4.3 Rückseite View

Bild 3: Hinteren view of the alarm clock, showing the speaker grille and power connection port.
The rear of the unit features the main speaker grille and the power input port for connecting the AC adapter.
5. Einrichtung
5.1 Stromanschluss
- Plug the AC power adapter into the DC IN jack located on the back of the unit.
- Stecken Sie das andere Ende des Adapters in eine normale Wandsteckdose (Wechselstrom 100-240 V, 50/60 Hz).
- Das Gerät schaltet sich automatisch ein.
5.2 SmartSet Automatic Time Setting
The SmartSet system automatically sets the correct time and date as soon as you plug in the unit. It also maintains time and alarm settings during power disruptions or outages, provided the button cell battery is installed.
5.3 Installation der Notstromversorgung
A button cell battery (CR2032, included) is required for battery backup. This ensures that time and alarm settings are retained during a power outage.
- Suchen Sie das Batteriefach an der Unterseite des Geräts.
- Öffnen Sie die Abdeckung des Batteriefachs.
- Legen Sie eine CR2032-Knopfzelle ein und achten Sie dabei auf die richtige Polarität (+/-).
- Schließen Sie den Batteriefachdeckel fest.
6. Bedienungsanleitung
6.1 Setting the Clock Manually
- Halten Sie die UHRZEITEINSTELLUNG Taste. Die Stundenziffern blinken.
- Verwenden Sie die TUNE -/+ Tasten zum Einstellen der Stunde. Drücken UHRZEITEINSTELLUNG zur Bestätigung.
- Die Minutenziffern blinken. Verwenden Sie die TUNE -/+ Tasten zum Einstellen der Minuten. Drücken UHRZEITEINSTELLUNG zur Bestätigung.
- Setzen Sie diesen Vorgang fort, um Jahr, Monat und Tag einzustellen.
- Drücken UHRZEITEINSTELLUNG Um den Zeiteinstellungsmodus erneut zu verlassen.
6.2 Alarme einstellen (Alarm 1 & Alarm 2)
The unit features dual alarms. Follow these steps for each alarm:
- Halten Sie die ALARM 1 or ALARM 2 Drücken Sie den Knopf. Die Ziffern der Weckzeit blinken.
- Verwenden Sie die TUNE -/+ Tasten zum Einstellen der Weckzeit. Drücken Sie die entsprechende Taste. ALARM Drücken Sie zur Bestätigung die Taste .
- The alarm minute digits will flash. Use the TUNE -/+ Tasten zum Einstellen der Alarmminuten. Drücken Sie die entsprechende Taste. ALARM Drücken Sie zur Bestätigung die Taste .
- Select the alarm source (Buzzer, FM Radio, or Soothing Sound). Press the respective ALARM Drücken Sie zur Bestätigung die Taste .
- Stellen Sie die Alarmlautstärke mit dem/der/den LAUTSTÄRKE -/+ buttons. Press the respective ALARM Drücken Sie zur Bestätigung die Taste .
- The alarm is now set. The alarm indicator (AL1 or AL2) will appear on the display.
6.3 Sonnenaufgangssimulation
The sunrise simulation feature gradually brightens the light panel before your set alarm time, mimicking a natural sunrise to gently wake you.
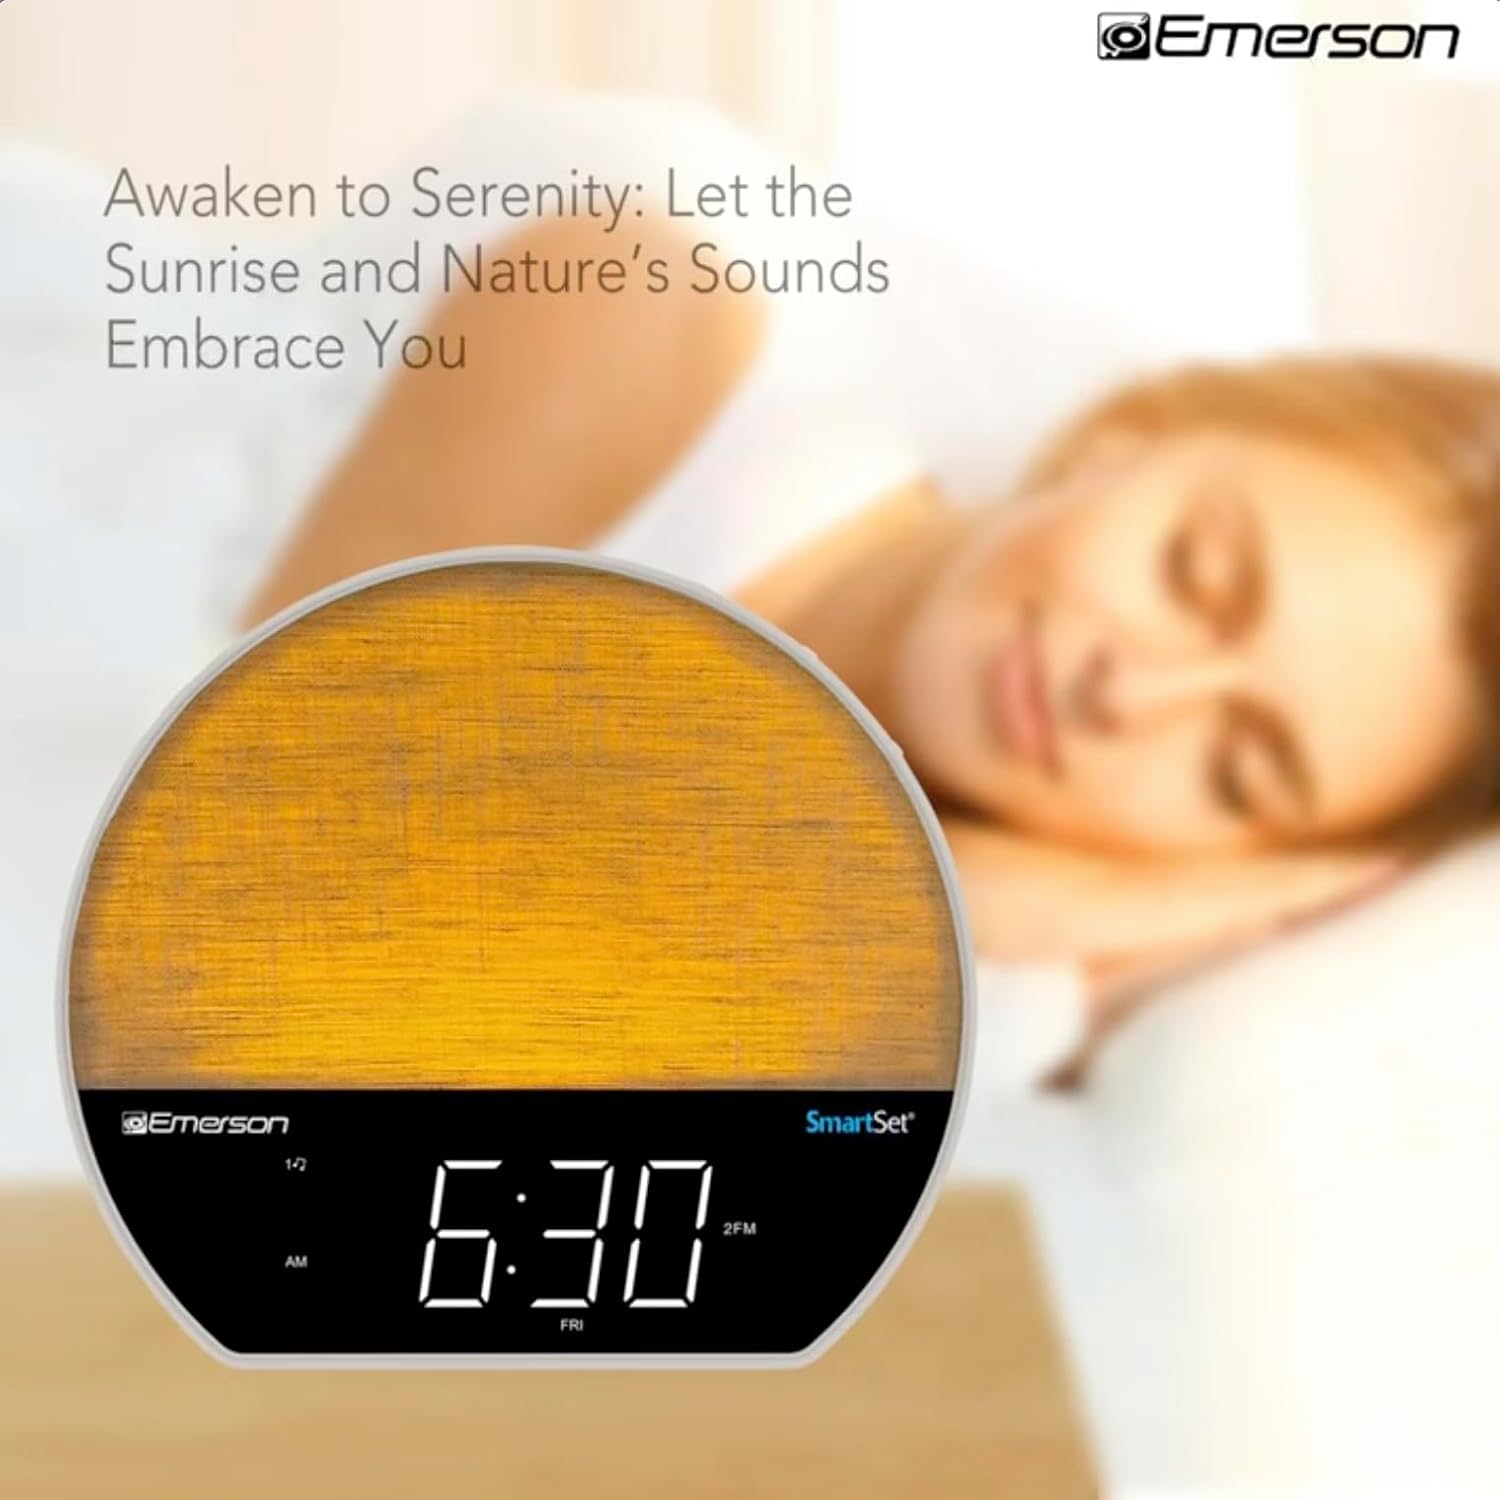
Bild 4: The alarm clock simulating a sunrise with a warm, increasing Lichtintensität.
To activate, ensure the sunrise option is selected during alarm setup. The light will begin to brighten 30 minutes before the alarm sounds.
6.4 Soothing Sounds and White Noise
The unit includes 6 soothing sounds and white noise to help with relaxation or waking up.
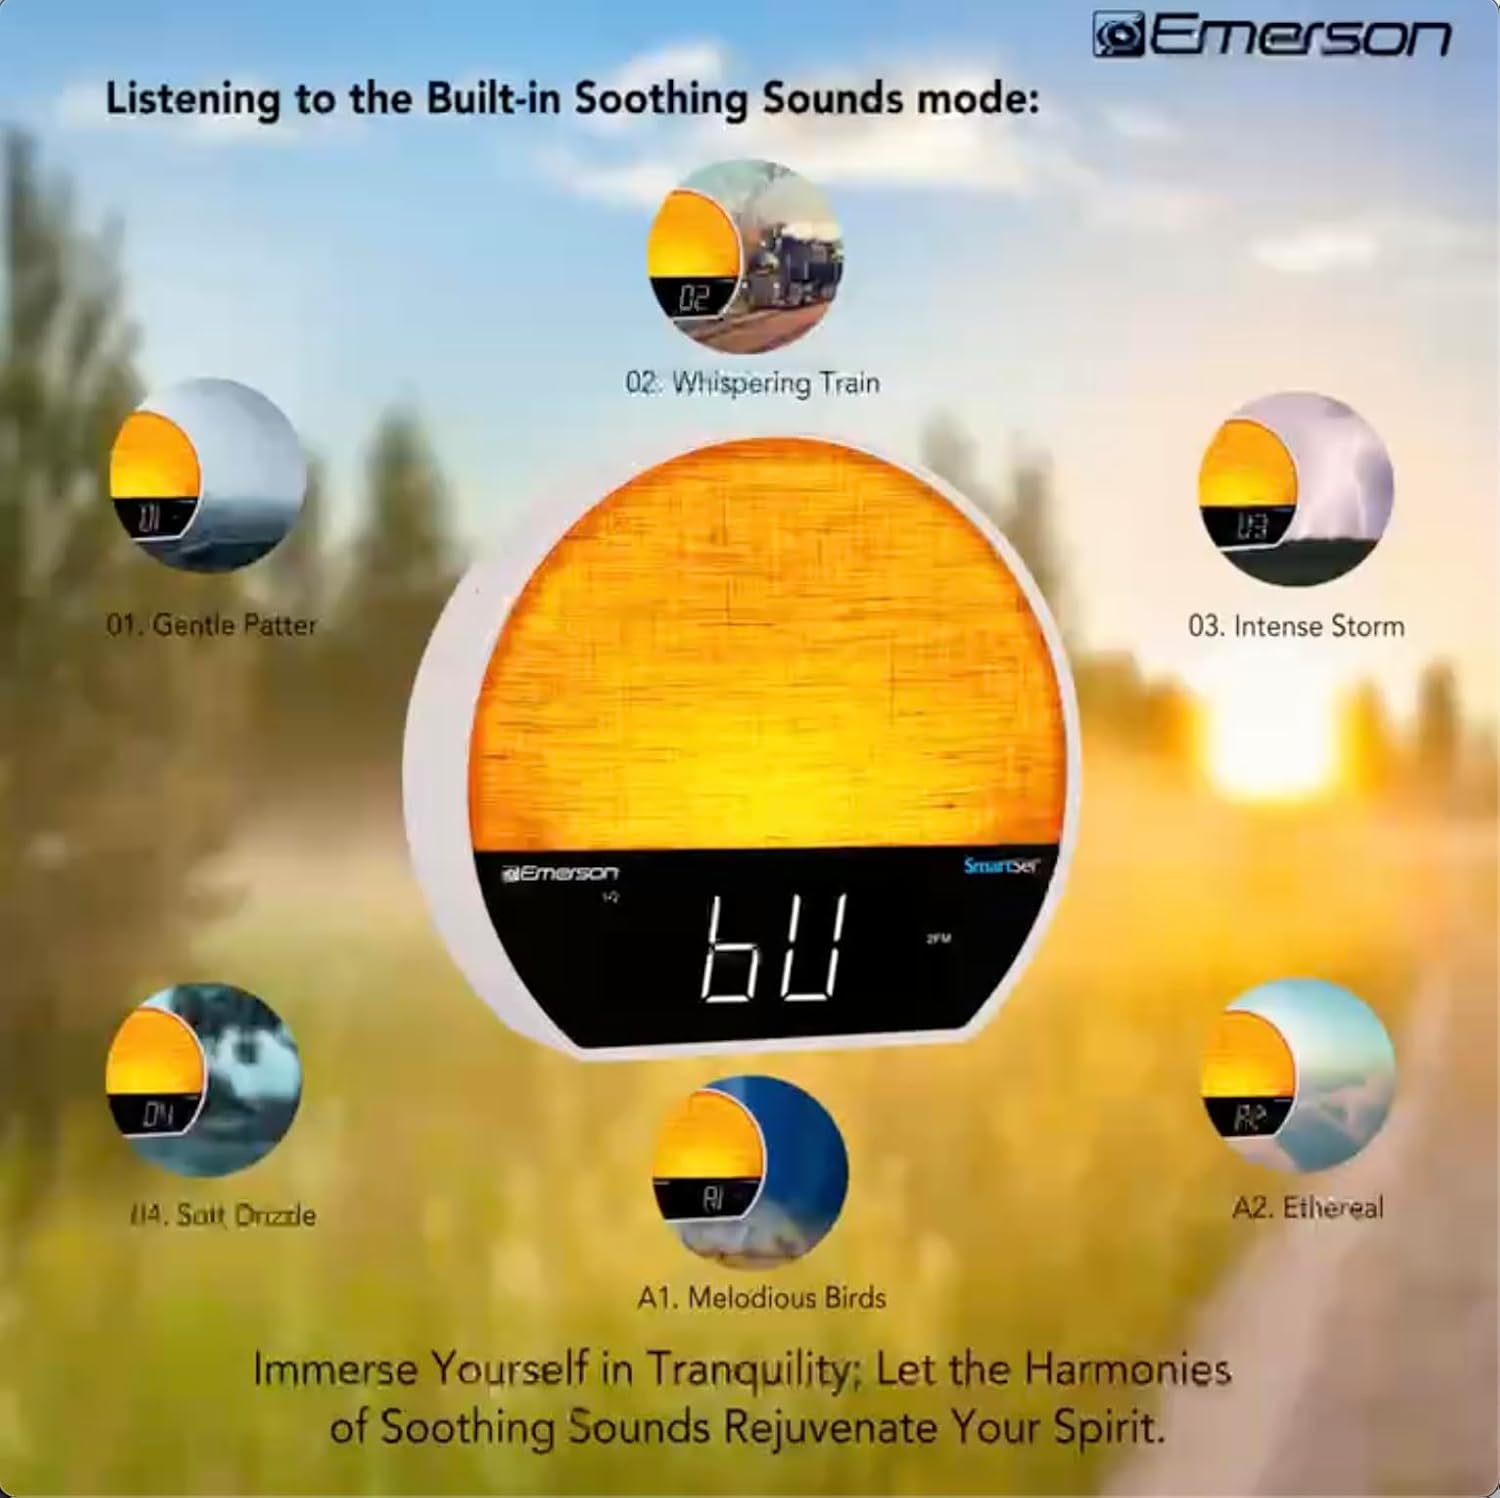
Bild 5: Visual representation of the six soothing sound modes available on the alarm clock.
- Drücken Sie die MODUS button repeatedly until the Soothing Sound mode is selected.
- Verwenden Sie die TUNE -/+ buttons to cycle through the available sounds (e.g., Gentle Patter, Whispering Train, Intense Storm, Soft Drizzle, Melodious Birds, Ethereal, White Noise).
- Stellen Sie die Lautstärke mit den LAUTSTÄRKE -/+ Schaltflächen.
6.5 Bluetooth-Lautsprecherfunktion
Verbinden Sie Ihr Smartphone oder ein anderes Bluetooth-fähiges Gerät, um Audio drahtlos zu streamen.

Bild 6: The alarm clock in Bluetooth mode, paired with a mobile device for audio streaming.
- Drücken Sie die MODUS button until 'BT' appears on the display, indicating Bluetooth mode.
- On your device, enable Bluetooth and search for 'Emerson CKSS7071'.
- Select the device to pair. A confirmation tone will sound upon successful pairing.
- Sie können nun Audio von Ihrem Gerät über den Lautsprecher des Weckers abspielen.
6.6 FM-Radiobetrieb
Schalten Sie Ihren bevorzugten FM-Radiosender ein.
- Drücken Sie die MODUS Drücken Sie die Taste so lange, bis „FM“ im Display erscheint.
- Drücken Sie die TUNE -/+ buttons briefly to manually tune to a station.
- Halten Sie die TUNE -/+ Tasten zum automatischen Scannen nach dem nächsten verfügbaren Sender.
- Um einen Sender zu speichern, halten Sie die Taste gedrückt. FM MEM Drücken Sie die Taste so lange, bis die voreingestellte Zahl blinkt. TUNE -/+ Um eine voreingestellte Nummer auszuwählen, drücken Sie dann FM MEM wieder zu speichern.
6.7 LED Decor and Dimmer Control
Customize the ambient light with 8 different colors and adjust the brightness.

Bild 7: The alarm clock demonstrating its 8-color dimmable LED decor options.
- Drücken Sie die LICHT button to cycle through the 8 available colors or turn the light off.
- To adjust the brightness of the LED decor light, press and hold the LICHT button. The brightness will cycle through 5 levels. Release the button at your desired brightness.
6.8 Display-Dimmersteuerung
Adjust the brightness of the 1.2-inch LED time display.

Bild 8: The alarm clock illustrating the five distinct levels of display luminescence.
Drücken Sie die DIMMER button (often combined with another function, refer to button labels) to cycle through 4 levels of display brightness (Bright, Moderate, Dim, Faint).
6.9 Sleeptimer
Set a timer for the audio to automatically turn off after a specified duration.

Bild 9: The alarm clock set for a sunset sleep timer, providing a harmonious end to the day.
- While audio is playing (FM or Soothing Sound), press the SCHLAFEN Taste.
- Drücken Sie wiederholt die SCHLAFEN button to cycle through available sleep timer durations (e.g., 15, 30, 60, 90 minutes, or OFF).
- The audio will automatically turn off after the selected time.
6.10 Schlummerfunktion
Wenn ein Alarm ertönt, drücken Sie die Taste SCHLAFEN Mit einer Taste (meist ein großer Knopf oben) kann der Alarm für einige Minuten stummgeschaltet werden. Nach Ablauf der Schlummerzeit ertönt der Alarm erneut.
7. Wartung
7.1 Reinigung
- Trennen Sie das Gerät vor der Reinigung immer vom Stromnetz.
- Verwenden Sie zum Reinigen der Außenflächen ein weiches, trockenes Tuch.
- Do not use liquid cleaners, abrasive cleaners, or chemical sprays, as these may damage the finish.
7.2 Batteriewechsel
Wenn die Zeit- und Alarmeinstellungen bei einem Stromausfall nicht beibehalten werdentage, the button cell backup battery may need to be replaced. Follow the instructions in section 5.3 to replace the CR2032 battery.
8. Fehlerbehebung
| Problem | Mögliche Ursache | Lösung |
|---|---|---|
| Gerät lässt sich nicht einschalten. | Netzteil nicht angeschlossen oder defekt. | Stellen Sie sicher, dass der Netzadapter fest mit dem Gerät und einer funktionierenden Steckdose verbunden ist. |
| Zeit-/Weckereinstellungen nach Stromausfall verlorentage. | Die Backup-Batterie ist defekt oder nicht installiert. | Install or replace the CR2032 button cell battery (see section 5.3). |
| Der Alarm ertönt nicht. | Der Alarm ist nicht aktiviert oder die Lautstärke ist zu niedrig. | Ensure the alarm is set and activated (AL1/AL2 indicator on). Increase alarm volume. |
| Das Bluetooth-Gerät konnte nicht gekoppelt werden. | Unit not in Bluetooth mode or device too far. | Ensure the unit is in Bluetooth mode ('BT' displayed). Move your device closer to the unit. Try unpairing and re-pairing. |
| Schlechter FM-Radioempfang. | Antenne nicht ausgefahren oder Störungen. | Extend the FM wire antenna fully and reposition it for better reception. Avoid placing near other electronic devices. |
| Das Display ist zu hell/zu dunkel. | Die Einstellung des Display-Dimmers muss angepasst werden. | Drücken Sie die DIMMER button to cycle through brightness levels (see section 6.8). |
9. Spezifikationen
| Besonderheit | Detail |
|---|---|
| Modellnummer | CKSS7071 |
| Stromquelle | AC 100-240V, 50/60Hz (via AC adapter) |
| Batterie-Backup | 1 x CR2032 Button Cell Battery (included) |
| Anzeigetyp | 1.2-inch LED Display |
| Bluetooth-Version | V5.4 |
| Beruhigende Klänge | 6 Nature Sounds + White Noise |
| LED Decor Colors | 8 Dimmable Colors |
| Produktabmessungen (B x T x H) | 7.09" x 3.15" x 6.37" |
| Gewicht | Nicht angegeben |
10. Garantieinformationen
Emerson products are manufactured to the highest quality standards. This product is covered by a limited warranty against defects in materials and workmanship for a period of one (1) year from the original date of purchase. This warranty does not cover damage caused by misuse, accident, unauthorized modification, or normal wear and tear. Proof of purchase is required for all warranty claims. Please retain your receipt.
11. Kundendienst
If you have any questions, require assistance, or experience issues with your Emerson CKSS7071 Sunrise Smartset Alarm Clock Radio, please contact our customer support team.
- WebWebsite: Visit the official Emerson webWebsite mit häufig gestellten Fragen und Support-Ressourcen.
- E-Mail: Beachten Sie die Angaben auf Ihrer Produktverpackung oder die offizielle Kennzeichnung. webWebsite für die Kontaktaufnahme per E-Mail an den Kundenservice.
- Telefon: Beachten Sie die Angaben auf Ihrer Produktverpackung oder die offizielle Kennzeichnung. webWebseite mit Kundendienst-Telefonnummern.
Please have your model number (CKSS7071) and proof of purchase ready when contacting support.