1. Produktüberschreitungview
The COUGAR FV150 RGB is a mid-tower gaming case designed for high-performance PC builds. It features a dual-chamber design, separating the main components from cables, storage drives, and the power supply unit (PSU) for a clean aesthetic and improved airflow. The case supports various motherboard form factors and offers extensive cooling options, including pre-installed ARGB fans.
Hauptmerkmale:
- Zweikammer-Design: Bietet eine klare view of your build through glass panels while concealing cables and other components.
- GPU-Unterstützung: Accommodates graphics cards up to 400mm in length, with options for vertical GPU orientation.
- Motherboard-Kompatibilität: Supports Mini-ITX, Micro-ATX, and ATX motherboards.
- Konstruierte untere Lüfterhalterung: Simplifies fan installation by allowing attachment prior to setup.
- Extensive Fan & Water Cooling Support: Multiple fan mounting points and radiator support up to 360mm.
- Nahtlose RGB-Synchronisierung: Integrated universal fan hub for easy ARGB lighting control.
- Modern I/O Panel: Includes 2 x USB Type-A and 1 x USB 3.2 Type-C ports.
- Flexible Lagerung: Supports combinations of 3.5" HDDs and 2.5" SSDs.
- Magnetische Staubfilter: Located on the top and right side for easy maintenance.

Bild 1.1: Schräg view of the COUGAR FV150 RGB case, highlighting its dual-chamber design and pre-installed ARGB fans.
2. Einrichtung und Installation
Follow these steps for proper installation of your PC components into the COUGAR FV150 RGB case.
2.1 Auspacken und erste Inspektion
- Nehmen Sie das Etui vorsichtig aus der Verpackung.
- Prüfen Sie den Koffer auf Anzeichen von Transportschäden.
- Remove the tempered glass side panel by unscrewing the thumb screws, if present, or by releasing der Verriegelungsmechanismus.
2.2 Motherboard-Installation
- Ensure the correct standoffs are installed for your motherboard form factor (Mini-ITX, Micro-ATX, or ATX).
- Setzen Sie die I/O-Blende in die hintere Öffnung des Gehäuses ein.
- Richten Sie Ihr Motherboard sorgfältig an den Abstandshaltern und der I/O-Blende aus und befestigen Sie es anschließend mit Schrauben.
2.3 Installation des Netzteils (PSU)
- The FV150 RGB supports bottom-mount PSUs.
- Slide the PSU into its designated compartment in the secondary chamber from the rear of the case.
- Befestigen Sie das Netzteil mit Schrauben von der Außenseite der Gehäuserückseite.
2.4 Installation des Speicherlaufwerks
- Locate the drive bays in the secondary chamber.
- For 3.5" HDDs, slide the drive into the appropriate tray and secure it.
- For 2.5" SSDs, mount them to the designated brackets or trays.
2.5 Installation der Grafikkarte (GPU)
- Entfernen Sie die erforderlichen Erweiterungssteckplatzabdeckungen an der Rückseite des Gehäuses.
- Insert your GPU into the PCIe slot on the motherboard and secure it with screws.
- The case supports GPUs up to 400mm. For vertical GPU mounting, a separate riser cable and bracket (not included) are required.
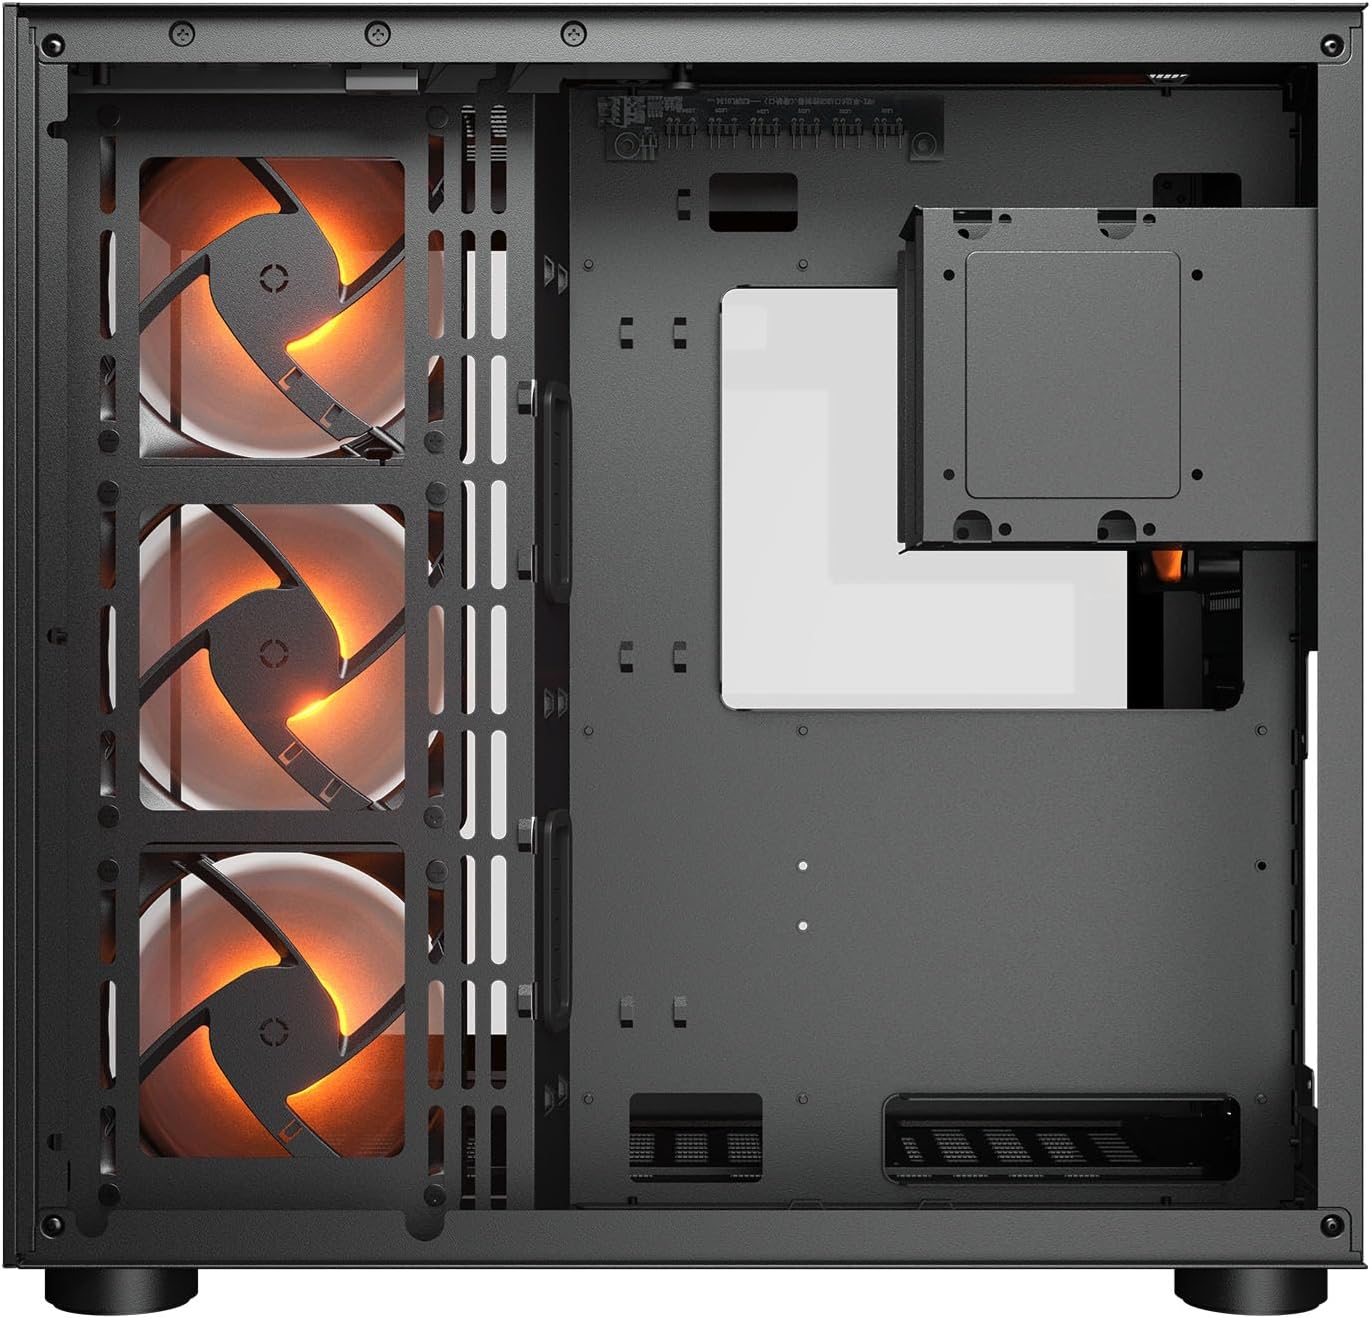
Abbildung 2.1: Intern view illustrating the main chamber for motherboard and GPU installation, with pre-installed side fans.
2.6 Lüfter- und Kühlerinstallation
- The case comes with 3 x 120mm ARGB side fans and 1 x 120mm ARGB rear fan pre-installed.
- Additional fans can be installed at the top (3 x 120mm or 2 x 140mm) and bottom (3 x 120mm or 2 x 140mm).
- Utilize the engineered bottom fan bracket for easier installation of bottom fans.
- For water cooling, radiators up to 360mm can be mounted on the top and 240mm on the side.

Image 2.2: Top internal view, showing potential mounting locations for additional cooling fans or radiators.
2.7 Kabelmanagement
- Route all power and data cables through the cutouts to the secondary chamber.
- Nutzen Sie die ample space and tie-down points in the secondary chamber to organize cables for optimal airflow and a clean appearance.
2.8 Connecting Front I/O Panel
- Connect the front panel cables (USB 3.2 Type-C, USB Type-A, audio, power, reset, LED) to the corresponding headers on your motherboard.
3. Bedienungsanleitung
Sobald alle Komponenten installiert und angeschlossen sind, können Sie Ihr System einschalten.
3.1 Einschalten
- Stellen Sie sicher, dass sich der Netzteilschalter in der Position „EIN“ befindet.
- Drücken Sie den Netzschalter an der Vorderseite des Gehäuses (I/O-Panel).
3.2 RGB-Beleuchtungssteuerung
- The integrated universal fan hub allows for easy synchronization of ARGB lighting.
- Connect the hub to your motherboard's ARGB header (5V 3-pin) to control lighting effects via motherboard software.
- Alternatively, use the dedicated RGB button on the front I/O panel to cycle through pre-set lighting modes if not connected to a motherboard header.
4. Wartung
Regelmäßige Wartung trägt dazu bei, die optimale Leistung und Langlebigkeit Ihrer PC-Komponenten zu gewährleisten.
4.1 Reinigung des Staubfilters
- The COUGAR FV150 RGB features magnetic dust filters on the top and right side, along with a ventilated bottom cover.
- Gently remove the magnetic dust filters.
- Clean them using compressed air or by rinsing with water (ensure they are completely dry before reattaching).
- Periodically clean the ventilated bottom cover.
4.2 Allgemeine Reinigung
- Verwenden Sie ein weiches, trockenes Tuch, um die Außenflächen des Gehäuses abzuwischen.
- For tempered glass panels, use a glass cleaner and a microfiber cloth to avoid streaks.
- Vermeiden Sie die Verwendung aggressiver Chemikalien oder Scheuermittel, die die Oberfläche beschädigen könnten.
5. Fehlerbehebung
Dieser Abschnitt bietet Lösungen für häufig auftretende Probleme.
5.1 System lässt sich nicht einschalten
- Netzteil prüfen: Ensure the power supply unit is properly connected to the wall outlet and the PSU switch is in the 'ON' position.
- Frontplattenanschlüsse: Überprüfen Sie, ob das Netzschalterkabel vom Gehäuse korrekt mit dem Frontpanel-Anschluss des Motherboards verbunden ist.
- Interne Stromkabel: Confirm all necessary power cables (24-pin ATX, 8-pin CPU, PCIe for GPU) are securely connected to the motherboard and components.
5.2 Lüfter drehen sich nicht oder RGB-Beleuchtung funktioniert nicht
- Fanverbindungen: Ensure all fan power cables are securely connected to the fan hub or motherboard headers.
- RGB-Anschlüsse: Verify the ARGB cables are correctly connected to the fan hub and the hub is connected to a 5V 3-pin ARGB header on the motherboard.
- Software/Button: If connected to the motherboard, check your motherboard's RGB control software. If not, try pressing the RGB button on the case's I/O panel to cycle modes.
5.3 USB-Anschlüsse funktionieren nicht
- Interne USB-Anschlüsse: Confirm that the USB 3.0 and USB Type-C cables from the front I/O panel are correctly plugged into the corresponding headers on your motherboard.
- Motherboard-Treiber: Ensure you have installed the latest chipset and USB drivers for your motherboard.
6. Spezifikationen
Detailed technical specifications for the COUGAR FV150 RGB Gaming Case.

Image 6.1: Case dimensions for planning your setup.
| Besonderheit | Spezifikation |
|---|---|
| Produktname | FV150 RGB |
| Fallformfaktor | Mittlerer Turm |
| Motherboard-Kompatibilität | Mini-ITX, Micro-ATX, ATX |
| Abmessungen (B x H x T) | 300 x 400 x 415 mm (11.8" x 15.7" x 16.3") |
| E/A-Bedienfeld | USB 3.2 Gen 2 Type-C x 1, USB-A 3.0 x 2, 4 Pole Headset Audio Jack, RGB Button |
| 3.5" Drive Bay | 2 |
| 2.5" Drive Bay | 1+1 (converted from 3.5" drive bays) |
| Erweiterungssteckplätze | 7+3 |
| Vertikale GPU-Unterstützung | Ja |
| Cooling Fan Support (Top) | 3 x 120 mm oder 2 x 140 mm |
| Cooling Fan Support (Bottom) | 3 x 120 mm oder 2 x 140 mm |
| Cooling Fan Support (Side) | 3 x 120 mm |
| Cooling Fan Support (Rear) | 1 x 120 mm |
| Pre-installed Fans (Side) | 3 x 120mm ARGB (Reversed) |
| Pre-installed Fans (Rear) | 1 x 120mm ARGB |
| Pre-installed Fan Speed | 1000 (±10 %) U/min |
| Pre-installed Fan Connector | 5V 3 Pin (ARGB) / 3 Pin (Fan) |
| Maximale Anzahl von Fans | 10 |
| Water Cooling Support (Top) | 360mm / 280mm / 240mm |
| Water Cooling Support (Side) | 240 mm / 120 mm |
| Water Cooling Support (Rear) | 120 mm |
| RGB Hub Sync with M/B | Ja |
| max. Grafikkartenlänge | 400 mm (15.7 Zoll) |
| max. Höhe des CPU-Kühlers | 180 mm (7.1 Zoll) |
| max. Netzteillänge | 210 mm (8.3 Zoll) |
| Material | Metall |
| Artikelgewicht | 6.83 Kilogramm |
7. Garantieinformationen
COUGAR products are manufactured to the highest quality standards. This product is covered by a manufacturer's warranty against defects in materials and workmanship. The specific duration and terms of the warranty may vary by region and retailer. Please retain your proof of purchase for warranty claims.
For detailed warranty information, please refer to the official COUGAR webBesuchen Sie unsere Website oder wenden Sie sich an Ihren Händler vor Ort.
8. Unterstützung
If you encounter any issues or have questions regarding your COUGAR FV150 RGB Gaming Case that are not covered in this manual, please contact COUGAR customer support.
- Besuchen Sie die offizielle COUGAR webWebseite mit häufig gestellten Fragen, Treiber-Downloads und Kontaktinformationen zum Support.
- Contact your retailer for assistance with product returns or exchanges.