MELONARE MWU-20-2H
MELONARE MWU-20-2H Zweikanal-Funkmikrofonsystem – Benutzerhandbuch
Professional Cordless Dynamic Mic Set
1. Zu Endeview
The MELONARE MWU-20-2H is a dual-channel wireless microphone system designed for clear and reliable audio transmission. It features an auto-scan function for optimal frequency selection, a long operating range, and user-friendly controls including one-tap mute and a lock function. The system is suitable for various applications such as singing, karaoke, church events, weddings, and DJ performances.

Figure 1: The MELONARE MWU-20-2H Dual Channel Wireless Microphone System, showing the receiver unit with two antennas and two handheld microphones.
2. Lieferumfang
The MELONARE MWU-20-2H system includes the following components:
- 1 x Kabelloser Empfänger
- 2 x Handsender (Mikrofone)
- 4 x AA-Batterien (für Mikrofone)
- 1 x Power Adapter (for receiver)
- 1 x 1/4"-Audiokabel
- 1 x Benutzerhandbuch
- 1 x 6.35mm to 3.5mm Cable Adapter
- 2 x Antennen
- 2 x Anti-Roll-Ringe
- 4 x Gummifüße

Figure 2: All items included in the MELONARE MWU-20-2H package.
3. Einrichtung
- Strom anschließen: Plug the power adapter into the wireless receiver's DC IN port and then into a power outlet. The receiver's display should illuminate.
- Antennen anbringen: Screw the two included antennas firmly into the antenna ports on the back of the receiver. Ensure they are positioned vertically for optimal signal reception.
- Batterien in Mikrofone einlegen: Unscrew the bottom part of each handheld transmitter (microphone). Insert two AA batteries into each microphone, observing the correct polarity (+/-). Screw the bottom part back on securely.
- Mit Audiosystem verbinden:
- For mixers or audio interfaces with XLR inputs, connect the receiver's XLR audio outputs to your device using XLR cables (not included).
- Für amplifiers, karaoke machines, or portable speakers, use the included 1/4" audio cable to connect the receiver's 1/4" Mixed Output to your device's input. If your device has a 3.5mm input, use the provided 6.35mm to 3.5mm cable adapter.
- Einschalten: Press the power button on the receiver to turn it on. Press the power button on each handheld microphone to turn them on.
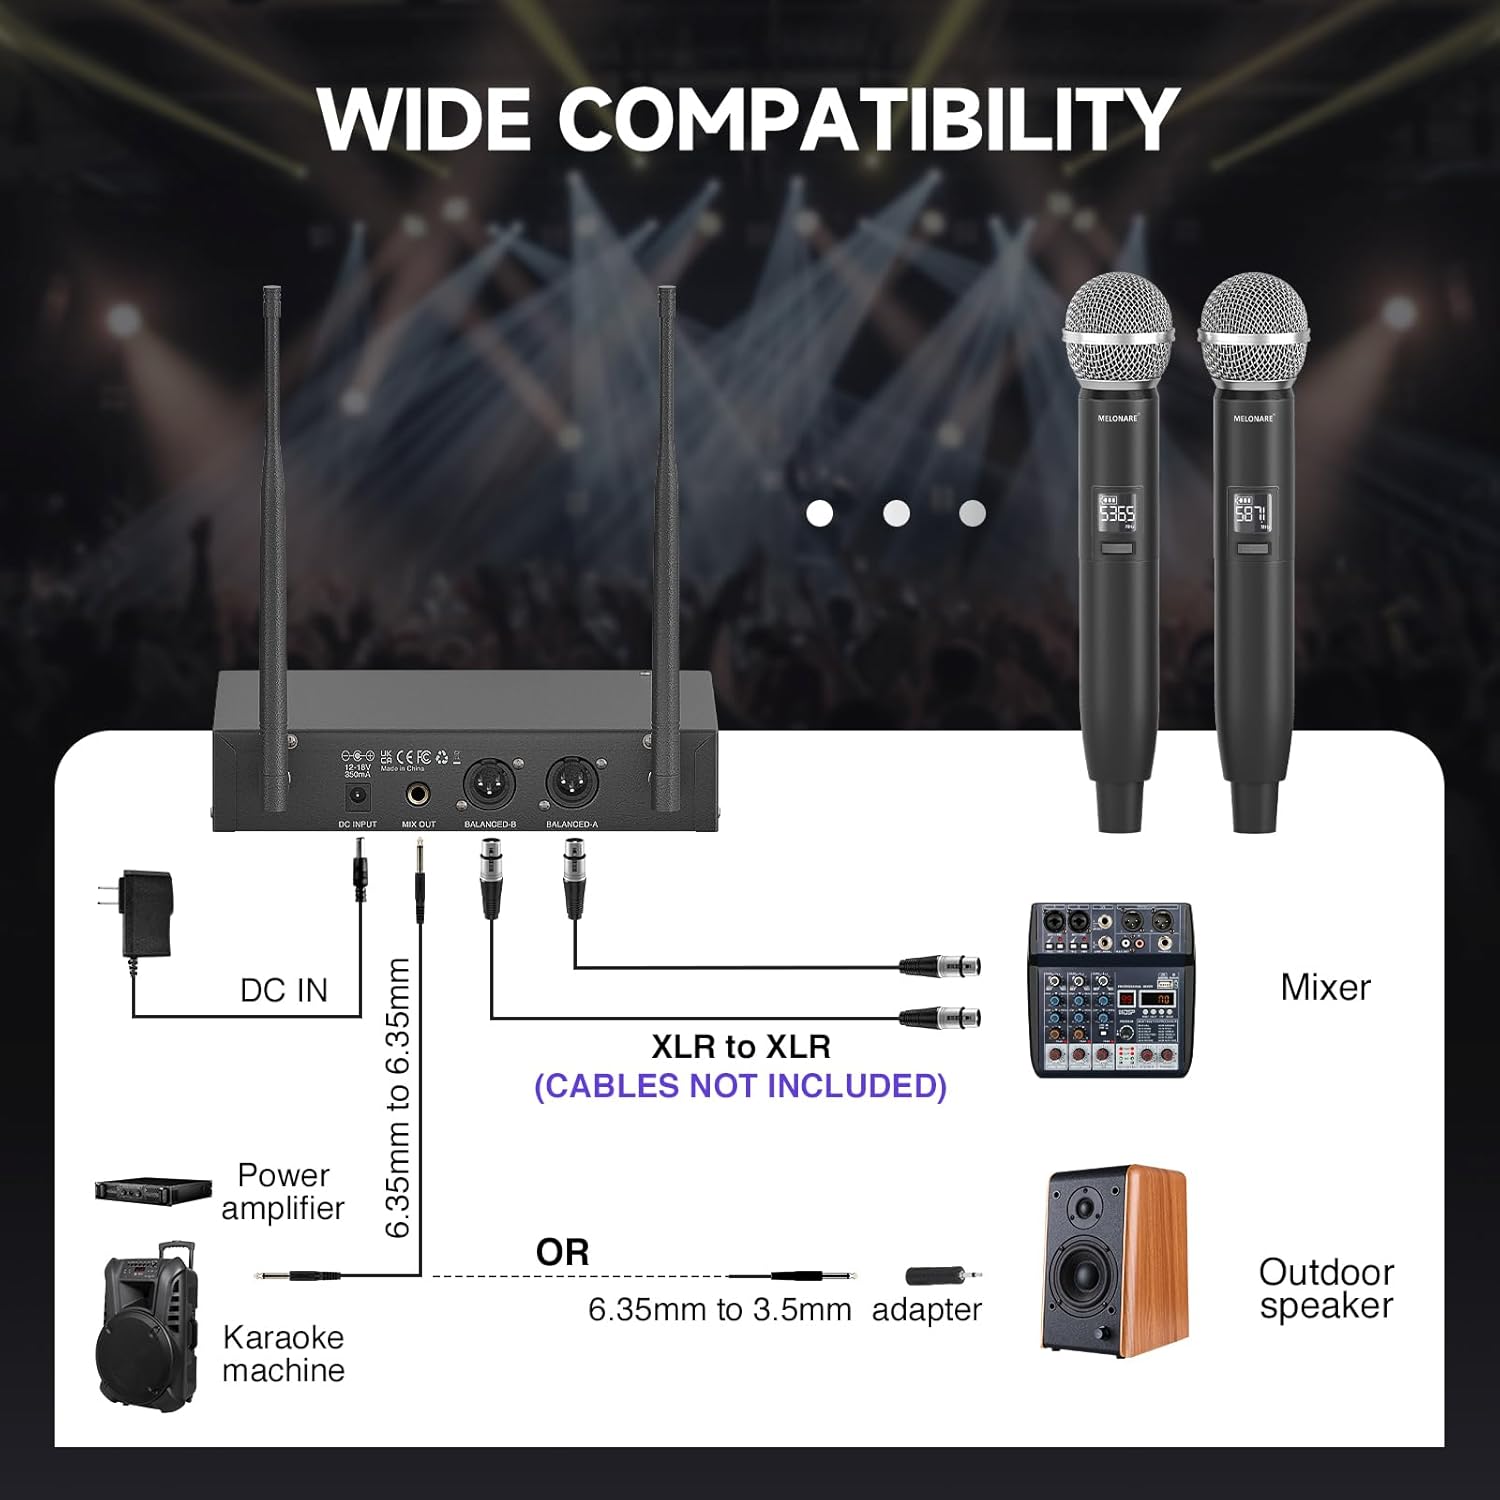
Figure 3: Connection options for the wireless microphone system with different audio equipment.
4. Bedienungsanleitung
4.1. Ein-/Ausschalten
- Empfänger: Drücken Sie die LEISTUNG button on the front panel to turn the receiver on or off.
- Handsender: Halten Sie die LEISTUNG button on each microphone for a few seconds to turn it on or off. A short tap will mute/unmute the microphone.
4.2. Frequency Pairing (Auto-Scan & IR Sync)
The system features an Auto-Scan function to find the most stable frequency and IR Sync for quick pairing.
- Initiate Auto-Scan: Am Empfänger die Taste lange drücken SATZ button to initiate the Auto-Scan function. The receiver will automatically scan for the clearest available frequency.
- Häufigkeit bestätigen: Wait until the selected frequency appears on the receiver's LCD display.
- IR Sync Microphones:
- Ensure the handheld microphone is powered on.
- Align the IR window on the microphone (usually near the power button) vertically with the IR window on the receiver.
- Drücken Sie die SATZ button on the receiver to initiate IR sync. The microphone's frequency will automatically match the receiver's.
- Wiederholen Sie den Vorgang für das zweite Mikrofon.

Figure 4: The receiver's display showing the auto-scan feature for quick frequency matching.
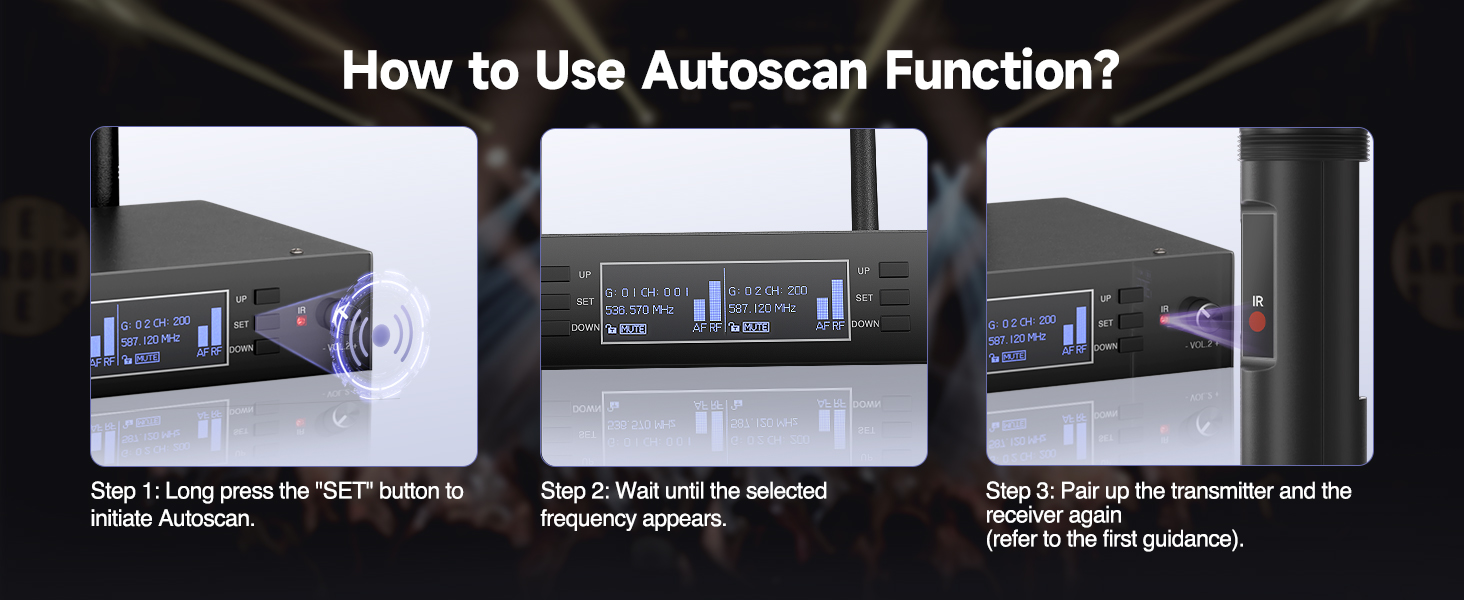
Figure 5: Step-by-step guide for IR synchronization between the microphone and receiver.
4.3. Mute and Lock Functions
- One-Tap Mute (Microphone): Tippen Sie kurz auf LEISTUNG button on the handheld microphone to mute or unmute the audio output. The microphone's display will indicate "MUTE" when active.
- Lock Function (Receiver): Um versehentliche Änderungen der Einstellungen zu verhindern, halten Sie die Taste gedrückt. UP button on the receiver. This will activate the lock function, indicated on the display. Long press again to unlock.

Figure 6: Details of the handheld microphone, including the mute function and color-coded base for easy identification.

Figure 7: The receiver's display indicating the active lock function to secure settings.
4.4. Lautstärkeregelung
The receiver has individual volume control knobs for each microphone channel (VOL 1 and VOL 2). Rotate the respective knob clockwise to increase volume and counter-clockwise to decrease volume.
5. Wartung
- Batteriewechsel: The handheld microphones are powered by AA batteries. Replace them when the battery indicator on the microphone's display shows low power. Always use fresh AA batteries for optimal performance.
- Reinigung: Use a soft, dry cloth to clean the receiver and microphones. Do not use liquid cleaners or abrasive materials, as they may damage the finish or internal components.
- Lagerung: When not in use for extended periods, store the system in a cool, dry place away from direct sunlight and extreme temperatures. Remove batteries from the microphones before long-term storage to prevent leakage.
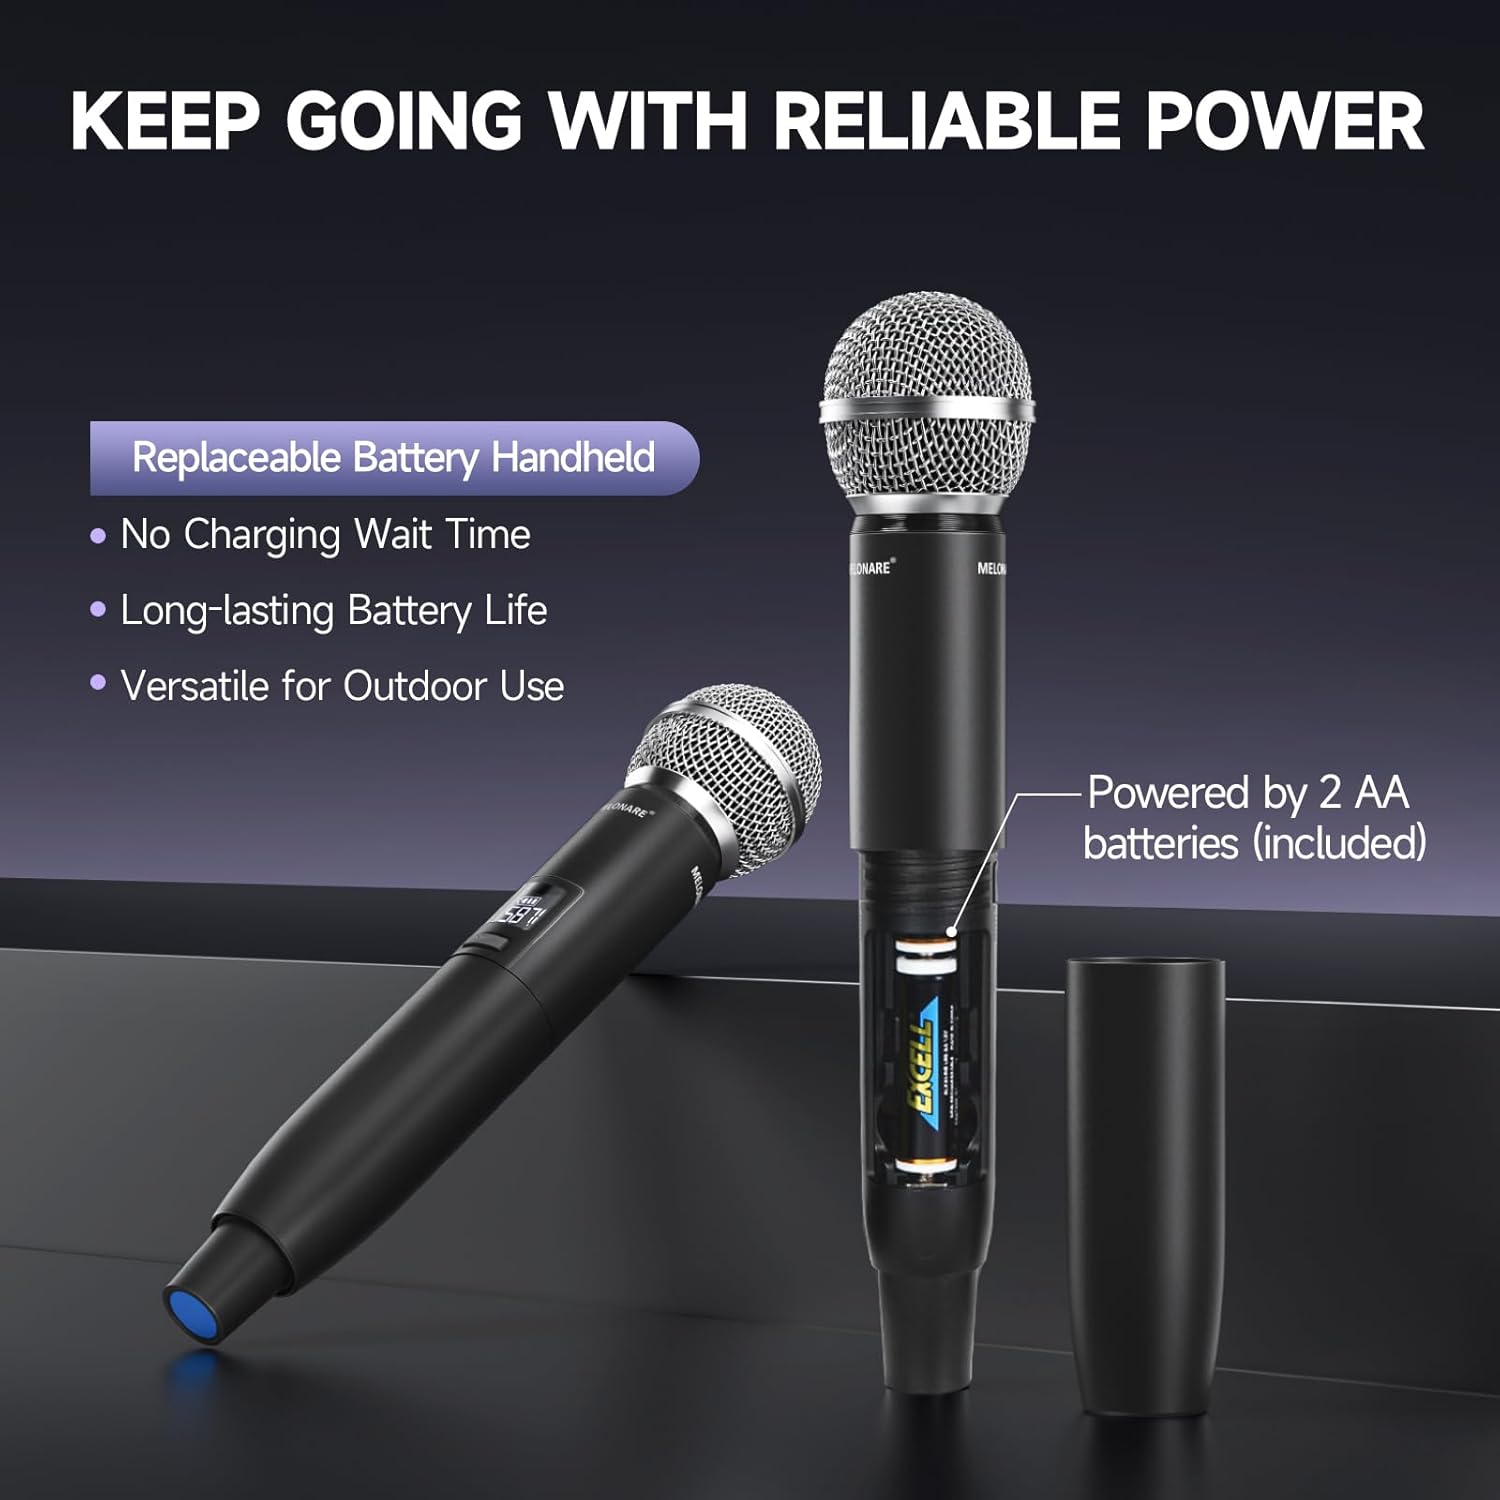
Figure 8: The handheld microphone's battery compartment, illustrating the use of replaceable AA batteries.
6. Fehlerbehebung
| Problem | Mögliche Ursache | Lösung |
|---|---|---|
| Kein Ton vom Mikrofon | Microphone or receiver not powered on; Low microphone battery; Incorrect frequency pairing; Microphone muted; Audio cable disconnected. | Ensure both units are powered on. Replace AA batteries. Perform IR Sync to pair frequencies. Tap power button to unmute. Check all audio cable connections. |
| Störungen oder schlechte Tonqualität | Nearby electronic devices causing interference; Frequency conflict; Obstacles blocking signal. | Move receiver away from other electronic devices. Use the Auto-Scan function to find a clear frequency. Ensure clear line-of-sight between microphone and receiver. |
| Kurze Reichweite | Antennas not properly positioned; Environmental obstacles (walls, metal structures); Low microphone battery. | Ensure antennas are fully extended and positioned vertically. Minimize obstacles between microphone and receiver. Replace AA batteries. |
| Das Display des Receivers funktioniert nicht. | Receiver not powered on; Power adapter issue. | Check power connection and ensure receiver is turned on. Try a different power outlet or adapter if available. |
7. Spezifikationen
| Besonderheit | Detail |
|---|---|
| Modellnummer | MWU-20-2H |
| Frequenzbereich | 2x100 UHF Frequencies (530-580 MHz) |
| Betriebsbereich | Bis zu 260 Fuß (100 m) |
| Mikrofontyp | Dynamic, Cardioid Polar Pattern |
| Mikrofon-Netzteil | 2 x AA Batteries (per microphone) |
| Stromquelle des Empfängers | Netzteil (im Lieferumfang enthalten) |
| Empfängerausgänge | XLR Audio Outputs, 1/4" Mixed Output |
| Artikelgewicht | 4.29 Pfund |
| Verpackungsabmessungen | 17.56 x 12.2 x 3.43 Zoll |

Figure 9: The system's long-range performance, capable of up to 260 feet of uninterrupted audio.
8. Garantie und Support
For warranty information, technical support, or any inquiries regarding your MELONARE MWU-20-2H Dual Channel Wireless Microphone System, please refer to the contact details provided in the included user manual or visit the official MELONARE webWebsite.
MELONARE is committed to providing affordable, user-friendly audio products and aims to bring joy and convenience through sound.
Ask a question about this manual
Ask about setup, troubleshooting, compatibility, parts, safety, or missing instructions. Manuals+ will review the question and use this page’s manual context to help answer it.