ACROMA 12-Light 40In Wagon Wheel Chandelier
ACROMA 12-flammiger 40-Zoll-Kronleuchter im modernen Landhausstil mit Wagenrad-Design – Bedienungsanleitung
Einführung
Thank you for choosing the ACROMA 12-Light 40-Inch Modern Farmhouse Wagon Wheel Chandelier. This manual provides essential information for the safe installation, operation, and maintenance of your new lighting fixture. Please read these instructions thoroughly before beginning installation and retain them for future reference.

Image: The ACROMA 12-Light 40-Inch Chandelier elegantly suspended in a modern farmhouse living room setting, showcasing its design and scale.
Sicherheitshinweise
- WARNUNG: Um einen Stromschlag zu vermeiden, muss vor der Installation oder Wartung sichergestellt werden, dass die Stromzufuhr am Sicherungsautomaten abgeschaltet ist.
- All electrical connections must be in accordance with local codes, ordinances, and the National Electric Code (NEC). Consult a qualified electrician if you are unfamiliar with electrical wiring.
- Diese Leuchte ist nur für den Innenbereich bestimmt. Vor Wasser und Feuchtigkeit schützen.
- Verwenden Sie nur den angegebenen Lampentyp und die angegebene Wattzahl.tage to prevent fire or electrical hazard.
- Handle the fixture with care. Avoid dropping or striking the fixture, as this may cause damage.

Image: The ACROMA 12-Light Chandelier shown with a UL Certified logo, indicating compliance with safety standards.
Packungsinhalt
Carefully unpack all components and check for any damage. Ensure all parts are present before discarding packaging materials. If any parts are missing or damaged, contact ACROMA customer support.
- Chandelier Frame (Wagon Wheel)
- Baldachin und Montagezubehör
- Verstellbare Kette
- Candle Sleeves / Sockets (12 units)
- Verdrahtungssteckverbinder
- Bedienungsanleitung
Erforderliche Werkzeuge (nicht im Lieferumfang enthalten)
- Kreuzschlitzschraubendreher
- Flachkopfschraubenzieher
- Abisolierzangen
- Zange
- Isolierband
- Leiter
- Schutzbrille
Setup und Installation
Before beginning installation, ensure the power is disconnected at the circuit breaker. It is recommended to have two people for installation.
Schritt 1: Bereiten Sie die Installation vor
- Schalten Sie den Strom am Hauptschalter aus.
- Carefully remove the old fixture (if applicable) and disconnect all wiring.
- Unpack your new chandelier and lay out all parts on a clean, flat surface.
Step 2: Install Mounting Plate and Canopy
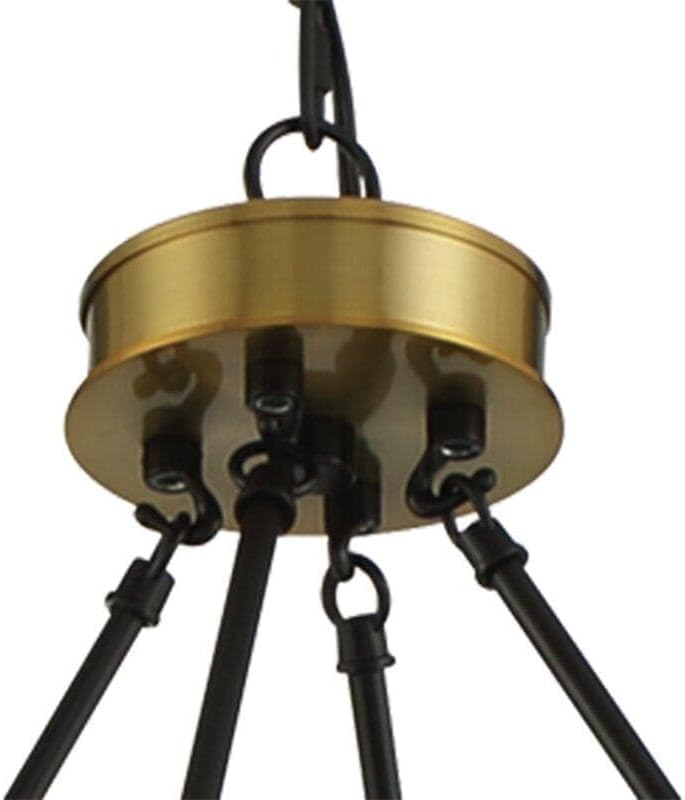
Bild: Eine detaillierte view of the chandelier's brass-finished canopy and the black mounting plate with wiring connections.
- Attach the mounting plate to the junction box in the ceiling using the provided screws. Ensure it is securely fastened.
- Determine the desired hanging height for your chandelier. The fixture offers an adjustable height from 40 inches to 138 inches. Adjust the chain length accordingly by removing links if necessary.
- Thread the fixture wires through the chain and canopy.

Image: A diagram illustrating the key dimensions of the chandelier, including a 40-inch width, a minimum hanging height of 40 inches, and a maximum hanging height of 138 inches.
Schritt 3: Kabelverbindungen
- Connect the fixture's ground wire (usually bare copper or green) to the house supply ground wire using a wire connector.
- Connect the fixture's neutral wire (usually white) to the house supply neutral wire (white) using a wire connector.
- Connect the fixture's hot wire (usually black) to the house supply hot wire (black) using a wire connector.
- Stecken Sie alle Drähte vorsichtig in die Anschlussdose.
Schritt 4: Sichern Sie die Vorrichtung
- Raise the canopy to the ceiling and secure it to the mounting plate with the provided screws.
- Ensure the fixture is firmly attached and stable.
Schritt 5: Glühbirnen installieren

Bild: Eine Nahaufnahme view of the chandelier's candle-style light sockets, showing the detail of the black candle sleeves and brass accents with clear bulbs installed.
- Screw in 12 E12 base (candelabra) bulbs (not included) into the sockets. Do not exceed the maximum wattage im Abschnitt „Spezifikationen“ angegeben.
- Stellen Sie die Stromversorgung am Leistungsschalter wieder her und testen Sie die Vorrichtung.
Bedienungsanleitung
Once installed and powered, the ACROMA Chandelier operates like any standard lighting fixture. Use a wall switch to turn the lights on and off.
- Lampentyp: Requires 12 E12 Candelabra base bulbs.
- Dimmbar: This fixture is dimmable when used with dimmable bulbs and a compatible dimmer switch (both sold separately).
Wartung
- Reinigung: To clean the fixture, turn off the power and allow it to cool. Wipe with a soft, dry cloth. Do not use abrasive cleaners or solvents, as they may damage the finish.
- Lampenwechsel: Ensure power is off and bulbs are cool before replacing. Unscrew old bulbs and screw in new ones of the correct type and wattage.
- Inspektion: Überprüfen Sie regelmäßig alle Verbindungen und Befestigungselemente, um sicherzustellen, dass sie fest sitzen.
Fehlerbehebung
| Problem | Mögliche Ursache | Lösung |
|---|---|---|
| Licht geht nicht an. |
|
|
| Flackernde Lichter. |
|
|
Technische Daten
- Modell: ACROMA 12-Light 40-Inch Wagon Wheel Chandelier
- Marke: ACROMA
- ASIN: B0DN66272K
- Abmessungen: 40 inches (Diameter), Adjustable Height (Min 40 inches, Max 138 inches)
- Anzahl der Lichter: 12
- Lampensockel: E12 Kandelaber
- Maximal Watttage pro Birne: 60W (Incandescent equivalent, LED recommended)
- Bandtage: 120 V
- Material: Metall
- Beenden: Schwarz mit goldenen Akzenten
- Zertifizierung: UL-zertifiziert
Garantie und Support
ACROMA products are manufactured to high-quality standards. For specific warranty information or technical support, please refer to the warranty card included with your purchase or visit the official ACROMA website. If you have any questions or require assistance, please contact ACROMA customer service.
Kontaktinformationen: Please refer to your purchase documentation or the ACROMA brand store on Amazon for the most current contact details.
Ask a question about this manual
Ask about setup, troubleshooting, compatibility, parts, safety, or missing instructions. Manuals+ will review the question and use this page’s manual context to help answer it.