1. Einleitung
This manual provides detailed instructions for the setup, operation, and maintenance of your JoFomp 17.3" Large Digital Wall Clock. Please read this manual thoroughly before use to ensure proper functionality and longevity of the product.
2. Sicherheitshinweise
- Ensure the clock is connected to a stable power source (5V/2A adapter included).
- Setzen Sie das Gerät keinen extremen Temperaturen, direkter Sonneneinstrahlung oder hoher Luftfeuchtigkeit aus.
- Außerhalb der Reichweite von Kindern aufbewahren.
- Versuchen Sie nicht, das Gerät selbst zu zerlegen oder zu reparieren. Wenden Sie sich an den Kundendienst, um Hilfe zu erhalten.
- Die Fernbedienung benötigt 2 AAA-Batterien (nicht im Lieferumfang enthalten).
- A 1 AAA battery (not included) is required for the memory function to retain settings during power outages.
3. Packungsinhalt
Überprüfen Sie, ob alle Artikel im Paket vorhanden sind:
- JoFomp 17.3" Digital Wall Clock
- Fernbedienung
- 5V/1A DC-Netzteil
- Netzkabel
- Mounting Hooks (2)
- Mounting Template Ruler
- Benutzerhandbuch (dieses Dokument)

Abbildung 3.1: Mitgeliefertes Zubehör und Hauptgerät.
4. Produktüberschreitungview
The JoFomp 17.3" Large Digital Wall Clock features a clear LED display and multiple functions for convenience.

Figure 4.1: Front display of the digital wall clock.
4.1 Anzeigefunktionen
- Zeitanzeige: Large 17.3" LED digits.
- Datumsanzeige: Monat und Tag.
- Wochentag: Indicated by illuminated text (Mon-Sun).
- Temperatur: Anzeige in Celsius oder Fahrenheit.
- Luftfeuchtigkeit: Zeigt die relative Luftfeuchtigkeit in Prozent antage.
- Doppelalarme: Zwei unabhängige Alarmeinstellungen.
- Sommerzeitanzeige: Daylight Saving Time status.

Figure 4.2: Labeled display functions.
4.2 Back Panel and Buttons
The back of the clock houses control buttons and connection ports.

Figure 4.3: Back panel with labeled components.
- Einstelltasten: Five buttons for manual adjustments (Light, SET, +, -, Alarm).
- Speicherbatteriefach: For 1 AAA battery (not included) to retain settings.
- Stromanschluss: Zum Anschluss des Netzteils.
- Befestigungsbohrungen: Zur Wandmontage.
5. Einrichtung
5.1 Stromanschluss
- Connect the power cord to the clock's power port.
- Plug the 5V/2A power adapter into a standard electrical outlet. The clock will power on and display.
Notiz: The clock requires continuous power to operate. It is not battery-powered for primary display.
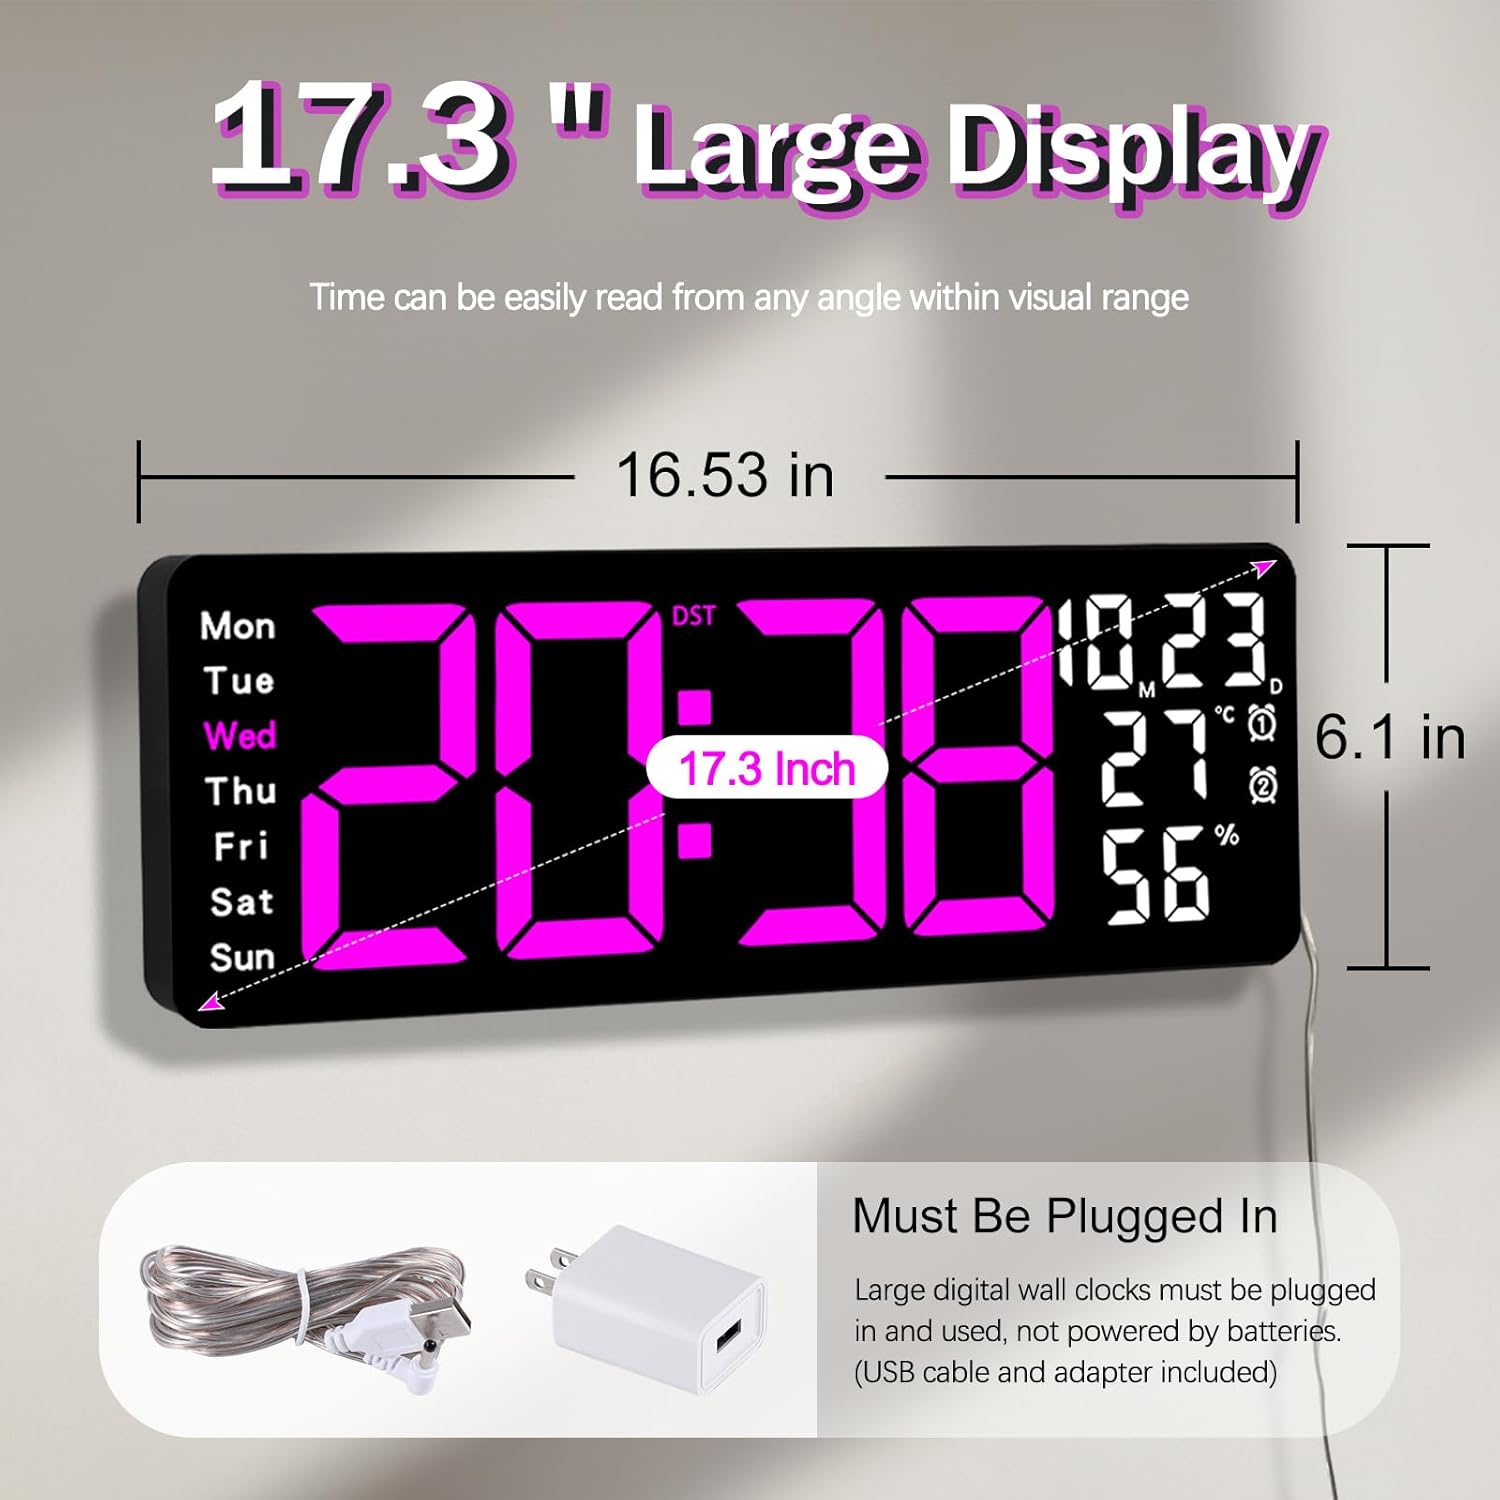
Figure 5.1: Power connection and dimensions.
5.2 Memory Battery Installation (Optional)
To retain time and settings during a power outage, install a 1 AAA battery (not included) into the memory battery compartment on the back of the clock.
- Locate the memory battery compartment on the back of the clock.
- Öffnen Sie die Fachabdeckung.
- Legen Sie eine 1.5V AAA-Batterie ein und achten Sie dabei auf die richtige Polarität (+/-).
- Schließen Sie die Fachabdeckung sicher.
5.3 Wandmontage
Use the included mounting template ruler and hooks for easy wall installation.
- Determine the desired location for your clock.
- Place the mounting template ruler on the wall at the desired height.
- Mark the positions for the mounting hooks according to the ruler's indications.
- Install the mounting hooks into the wall at the marked positions.
- Carefully hang the clock onto the installed hooks, ensuring it is level and secure.
6. Bedienungsanleitung
The clock can be operated using either the remote control or the buttons on the back.
6.1 Uhrzeit- und Datumseinstellung
Use the remote control or the "SET" button on the back of the clock.
- Drücken Sie die SATZ button (on remote or back of clock) to enter setting mode.
- Verwenden Sie die + Und - Tasten zum Einstellen des Blinkwertes (z. B. Stunde, Minute, Jahr, Monat, Tag).
- Drücken SATZ again to confirm the current setting and move to the next parameter.
- Wiederholen Sie den Vorgang, bis alle Einstellungen konfiguriert sind.
6.2 12/24 Hour Format Conversion
So wechseln Sie zwischen 12-Stunden- und 24-Stunden-Zeitformat:
- Drücken Sie die entsprechende 12/24 Uhr Taste auf der Fernbedienung.
- Alternatively, during time setting, the format option will appear.

Figure 6.1: 12/24H format conversion.
6.3 Umrechnung der Temperatureinheiten (°C/°F)
So wechseln Sie zwischen den Temperatureinheiten Celsius und Fahrenheit:
- Drücken Sie die ° C / ° F Taste auf der Fernbedienung.
6.4 Alarmeinstellung (Doppelalarme)
Die Uhr unterstützt zwei unabhängige Alarme.
- Drücken Sie die ALARM Taste auf der Fernbedienung oder auf der Rückseite der Uhr.
- Verwenden + Und - , um die gewünschte Weckzeit einzustellen.
- Drücken ALARM again to confirm and move to the next alarm or exit.
- To activate/deactivate an alarm, press the corresponding alarm button (e.g., AL1 or AL2) auf der Fernbedienung.
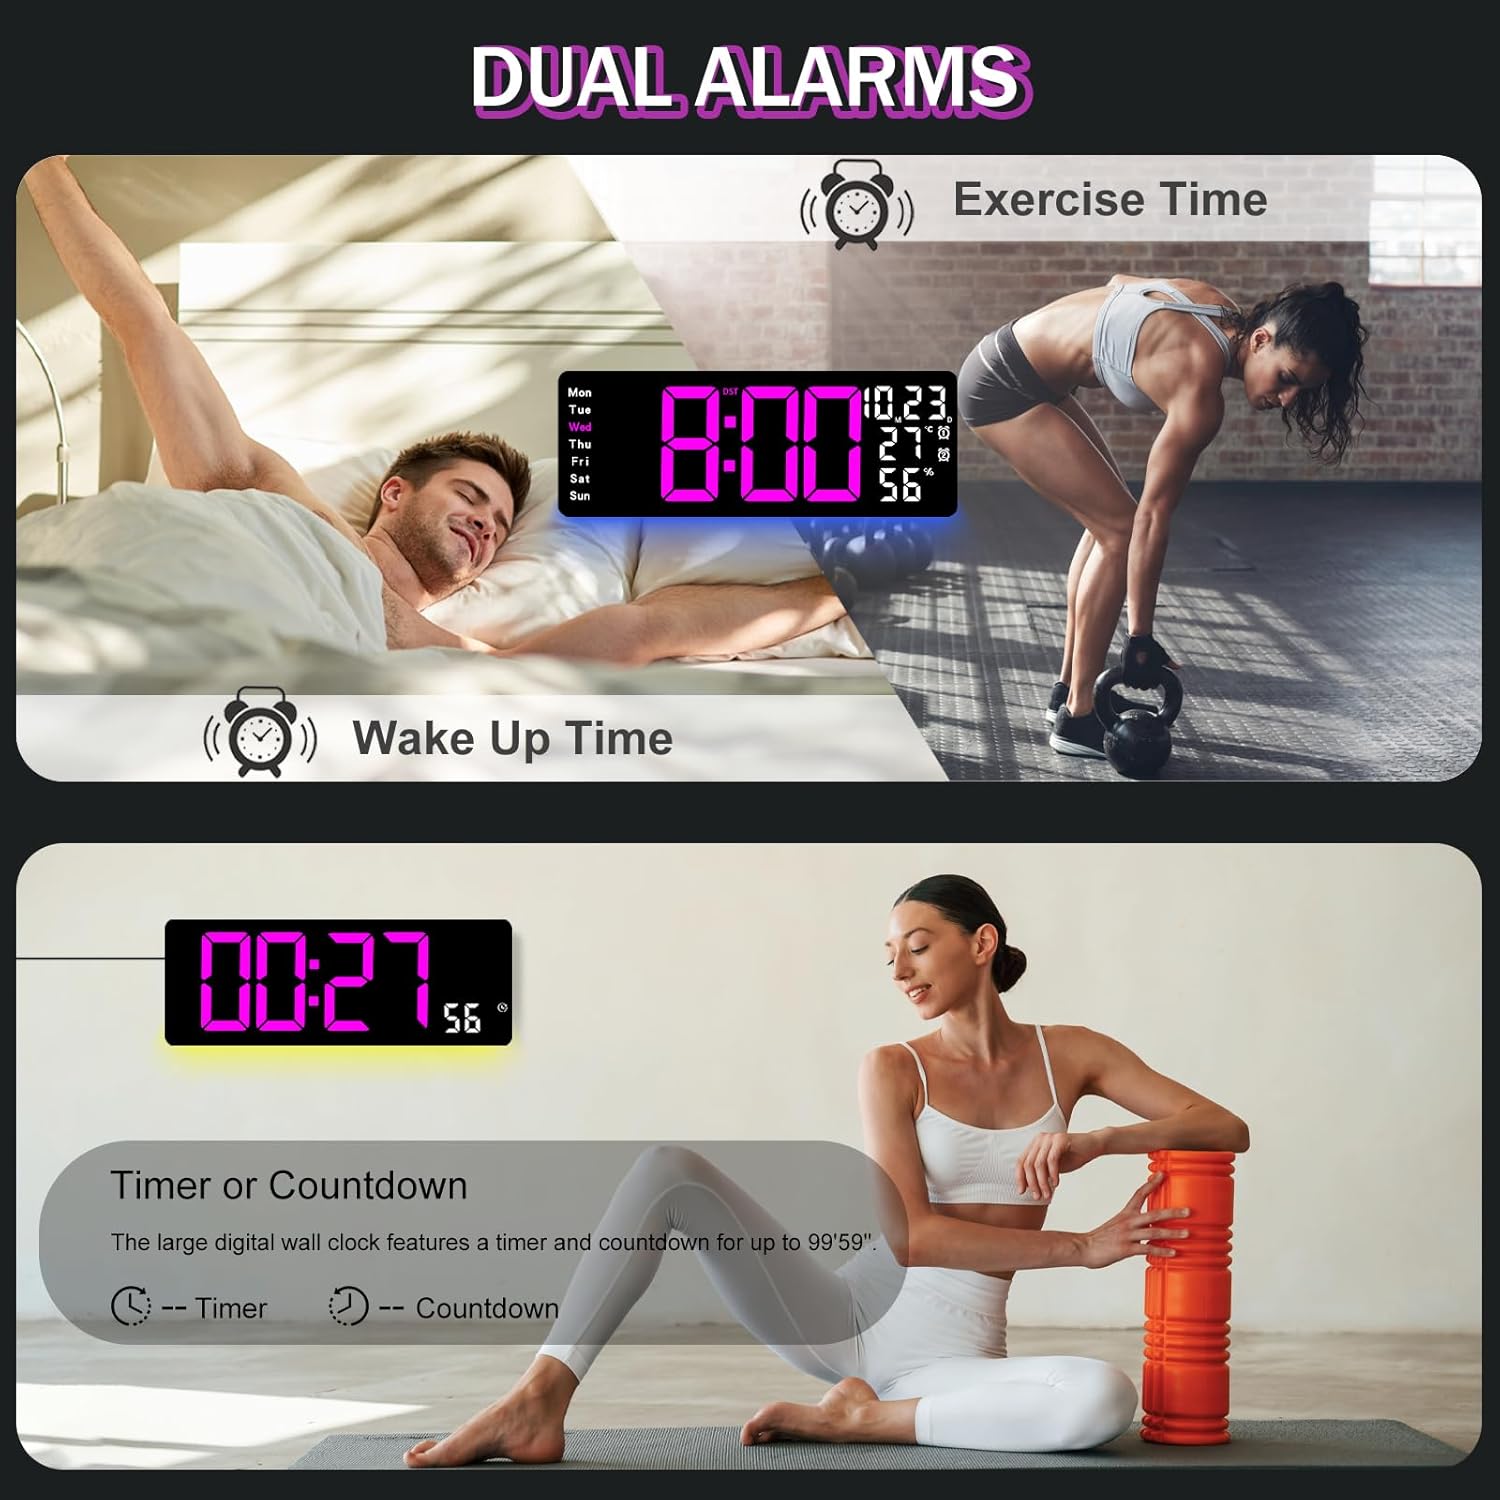
Figure 6.2: Dual alarm and timer functions.
6.5 Helligkeitseinstellung
The clock offers 10 levels of brightness, adjustable manually or automatically.
- Automatische Helligkeit: The built-in light sensor adjusts brightness based on ambient light. Activate this mode by pressing the AUTO Taste auf der Fernbedienung.
- Manuelle Helligkeit: Drücken Sie die HELLIGKEIT button on the remote, then use + Und - to select one of the 10 levels.

Figure 6.3: Custom and auto-brightness settings.

Figure 6.4: Brightness regulator illustration.
6.6 Umgebungslichtfunktionen
The clock includes a night light feature at the bottom with multiple color options.
- Drücken Sie die LICHT button on the remote control or the back of the clock to cycle through 8 fixed colors and 1 multi-color mode.
- In multi-color mode, the colors automatically convert. Press OK to fix a favorite color.
- Adjust the brightness of the ambient light using the + Und - buttons when the ambient light is active.

Figure 6.5: Multiple ambient night light options.

Figure 6.6: 9 color ambient light options.
6.7 Timer- und Countdown-Funktion
The clock features a timer (count-up) and countdown function up to 99 minutes and 59 seconds.
- Drücken Sie die TIMER Taste auf der Fernbedienung.
- Verwenden + Und - to set the desired time for countdown.
- Drücken START/STOP to begin or pause the timer/countdown.
- Drücken ZURÜCKSETZEN um den Timer zu löschen.

Figure 6.7: Timing function (count-up/countdown).
Video 6.1: Demonstration of multi-functional features including night light change, brightness control, count-up, and countdown. This video also shows the time, date, day, alarm clock, temperature, and humidity displayed on the same screen, along with 12/24 hour conversion, Celsius/Fahrenheit conversion, and DST enablement. The back design and buttons are also briefly shown.
6.8 Sommerzeit (DST)
If DST is observed in your region, you can enable or disable it.
- Drücken Sie lange die - button on the remote control to enable or disable DST. The DST indicator will appear/disappear on the display.

Figure 6.8: Enabling and disabling Daylight Saving Time.

Figure 6.9: Daylight Saving Time (DST) functionality.
6.9 Verwendung der Fernbedienung
The remote control provides convenient access to all clock functions without needing to reach the clock directly.

Figure 6.10: Remote control and its functions.

Abbildung 6.11: Fernbedienung im Einsatz.
- Ensure the remote control has 2 AAA batteries installed (not included).
- Point the remote control directly at the clock for optimal response.
- Each button on the remote corresponds to a specific function as described in this manual.
7. Wartung
- Clean the clock's display and body with a soft, dry cloth. Avoid abrasive cleaners or solvents.
- Ensure the power adapter and cord are free from damage.
- Replace the memory battery annually to ensure settings are retained during power interruptions.
8. Fehlerbehebung
| Problem | Mögliche Ursache | Lösung |
|---|---|---|
| Die Uhranzeige ist aus. | Keine Stromversorgung. | Check if the power adapter is securely plugged into the clock and the outlet. Ensure the outlet is functional. |
| Fernbedienung funktioniert nicht. | Low or dead batteries in remote; obstruction; remote out of range. | Replace remote batteries (2 AAA). Ensure no obstructions between remote and clock. Point directly at the clock within effective range. |
| Einstellungen nach Stromausfall verlorentage. | No memory battery or dead memory battery. | Install a fresh 1.5V AAA battery in the memory compartment. |
| Falsche Temperatur-/Luftfeuchtigkeitsmessung. | Sensor interference or placement. | Ensure the clock is not placed near heat sources, direct sunlight, or in areas with extreme drafts. Allow time for the sensor to stabilize. |
| Ambient light not changing colors. | Stuck in fixed color mode. | Press the LIGHT button on the remote to cycle through modes. If stuck on a fixed color, press the OK button to release it from fixed mode. |
9. Spezifikationen
| Besonderheit | Detail |
|---|---|
| Marke | JoFomp |
| Modellnummer | 6669 |
| Anzeigetyp | Digitale LED |
| Anzeigegröße | 17.3 Zoll |
| Technische Daten | 16.5 Zoll B x 6.7 Zoll H |
| Stromquelle | Kabelgebundenes Elektrogerät (5V/2A-Adapter im Lieferumfang enthalten) |
| Speicherbatterie | 1 x AAA (nicht enthalten) |
| Helligkeitsstufen | 10 (Auto/Manual) |
| Umgebungslichtfarben | 8 Fixed + 1 Multi-color |
| Besondere Merkmale | Large Display, Adjustable Brightness, Temperature Display, Humidity Display, Dual Alarms, Timer, Countdown, DST, Remote Control |
| Montagetyp | Wandhalterung |
| Artikelgewicht | 1.95 Pfund |
10. Garantie und Support
JoFomp products are designed for reliability and performance. For warranty information or technical support, please refer to the contact details provided with your purchase or visit the official JoFomp webBewahren Sie Ihren Kaufbeleg als Kaufnachweis auf.