
Einführung
Thank you for choosing the Walfront Smart Thermostat TRV Valve. This device is designed to provide intelligent temperature control for your home, offering convenience through app and voice control, multiple operating modes, and programmable schedules. Please read this manual carefully before installation and operation to ensure proper use and optimal performance.
Sicherheitshinweise
- Stellen Sie vor der Installation oder Wartung sicher, dass die Stromversorgung unterbrochen ist.
- Dieses Gerät ist nur für den Gebrauch in Innenräumen vorgesehen.
- Das Gerät darf weder Wasser noch übermäßiger Feuchtigkeit ausgesetzt werden.
- Außerhalb der Reichweite von Kindern aufbewahren.
- Verwenden Sie ausschließlich den angegebenen Batterietyp (2 x AA-Batterien).
Packungsinhalt
Überprüfen Sie, ob alle Artikel im Paket vorhanden sind:
- 1 x Thermostatic Valve
- 10 x Installation Accessories
- 1 x Schraube
- 1 x Nut
- 1 x Benutzerhandbuch (dieses Dokument)
Notiz: A Zigbee hub is required for smart functionality and app control. The Zigbee hub is not included and must be purchased separately.
Produkt überview
The Walfront Smart Thermostat TRV Valve features an integrated display and control knob for easy interaction. Below is a diagram illustrating the key components and display indicators:

Bild: Front view of the Walfront Smart Thermostat TRV Valve, highlighting its display and various indicators for modes, settings, and battery status.
- Temperaturanzeige: Zeigt die aktuelle oder die eingestellte Temperatur an.
- Kindersicherungsanzeige: Appears when the child lock function is active.
- Batteriestandsanzeige: Zeigt die verbleibende Batterieleistung an.
- Aufwärts- und Abwärtspfeil: Used for adjusting temperature or navigating settings.
- Anzeige für manuellen Modus: Shows when the thermostat is in manual control.
- Programming Mode Indicator: Indicates an active programmed schedule.
- Holiday Mode Indicator: Activates during holiday settings.
- Comfort Mode Indicator: Engaged for comfort temperature settings.
- ECO Mode Indicator: Zeigt an, wenn der Energiesparmodus aktiv ist.
- Energy Saving Mode Indicator: Indicates energy-saving operation.
Technische Daten
| Besonderheit | Spezifikation |
|---|---|
| Artikeltyp | Thermostatventil |
| Material | ABS, PC |
| Stromversorgung | 3V, 2 x AA-Batterien (nicht im Lieferumfang enthalten) |
| Maximaler Hub | Ca. 5.5 mm / 0.22 Zoll |
| Genauigkeit | ±0.5℃ |
| Temperaturbereich einstellen | 5 bis 45℃ |
| Temperaturbereich anzeigen | 0 bis 70℃ |
| Betriebstemperatur | 0 bis 45℃ |
| Luftfeuchtigkeit bei Betrieb | 5 bis 95 % relative Luftfeuchtigkeit (nicht kondensierend) |
| Lagertemperatur | -5 bis 45℃ |
| Zeitfehler | 1% |
| Ebene | IP20 |
| Taste | Drehknopf |
| App-Kompatibilität | Tuya, Smart Life App |

Bild: Detailed dimensions of the Walfront Smart Thermostat TRV Valve.
Motor Characteristics:
- Ultraleise: Motor sound less than 25 decibels.
- Ultra large stroke: The motor stroke is 5.5mm / 0.22in.
- Extra large diameter: The motor rod diameter is 8mm / 0.31in.
- Energieeinsparung: The standby power consumption of the motor is very small.
Aufstellen
1. Einlegen der Batterie
- Gently twist and remove the top cover of the thermostatic valve.
- Legen Sie zwei AA-Batterien (nicht im Lieferumfang enthalten) in das Batteriefach ein und achten Sie dabei auf die richtige Polarität (+/-).
- Replace the top cover, twisting it until it clicks securely into place.
2. Physische Installation
The Walfront Smart Thermostat TRV Valve is designed for easy installation on various radiator valves. Use the provided installation accessories to match your specific valve type.
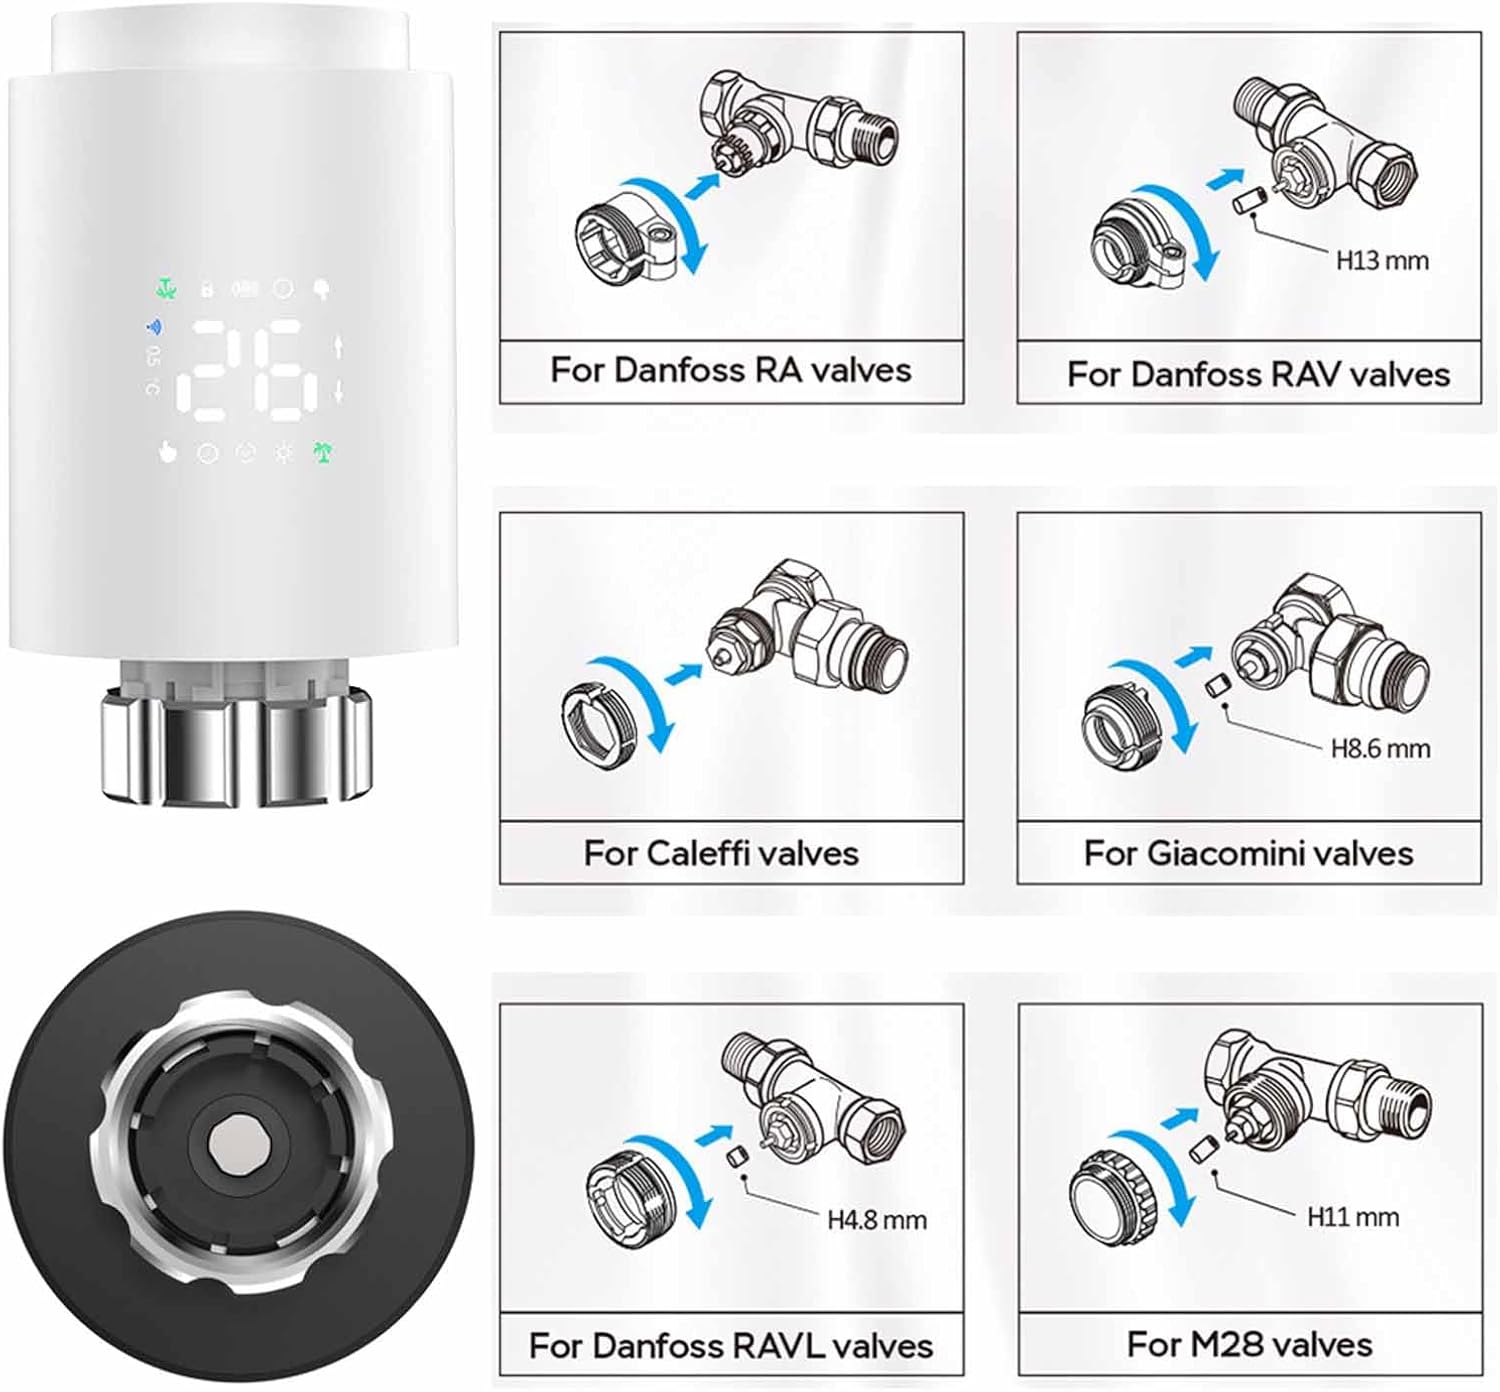
Bild: Installation guide for various radiator valve types, including adapters for Danfoss, Caleffi, Giacomini, and M28 valves.
- Ermitteln Sie den Typ Ihres vorhandenen Heizkörperventils.
- Select the appropriate adapter from the installation accessories.
- Attach the adapter to your radiator valve as shown in the diagrams.
- Screw the Walfront Smart Thermostat TRV Valve onto the adapter until it is firmly secured.
3. App Installation and Pairing (Requires Zigbee Hub)
To utilize the smart features of your thermostat, you need to connect it to a Zigbee hub via the Tuya or Smart Life app.

Bild: Visual representation of the Zigbee pairing process between the thermostat, a Zigbee gateway, and the mobile app.
- Laden Sie die Tuya Smart or Intelligentes Leben App aus dem App Store Ihres Smartphones (iOS oder Android).
- Registrieren Sie sich oder melden Sie sich in Ihrem Konto an.
- Stellen Sie sicher, dass Ihr Zigbee-Hub eingeschaltet und mit Ihrem Heim-WLAN-Netzwerk verbunden ist.
- Tippe in der App auf „Gerät hinzufügen“ oder auf das Symbol „+“.
- Select 'Gateway' or 'Zigbee Gateway' and follow the on-screen instructions to add your Zigbee hub.
- Once the Zigbee hub is added, select it and then choose 'Add sub-device'.
- Follow the app's instructions to put the TRV valve into pairing mode (usually by pressing and holding a button on the device until an indicator flashes).
- The app will detect and add the TRV valve. You can then rename the device for easy identification.
Bedienungsanleitung
1. Basic Operation (Manual Control)
- Temperatur einstellen: Rotate the knob on the thermostat to increase or decrease the desired temperature. The new set temperature will be displayed.
- Manueller Modus: The thermostat will maintain the set temperature until changed manually or a programmed schedule takes over.
2. App-Steuerung
Once paired with the Tuya or Smart Life app, you can control your thermostat remotely.

Bild: Mobile app interface demonstrating temperature control and device status.
- Open the Tuya Smart or Smart Life app and select your TRV valve.
- Du kannst view the current room temperature and adjust the set temperature directly from the app.
- Access various operating modes and programming options through the app interface.
3. Betriebsarten
The thermostat offers several modes to suit your needs:

Bild: App screenshots showing mode selection, weekly programming, and general settings.
- Manueller Modus: Hält eine vom Benutzer eingestellte konstante Temperatur aufrecht.
- Automatik-Modus: Folgt dem programmierten Wochenplan.
- Komfortmodus: Sets the temperature to a predefined comfortable level.
- ECO-Modus (Energiesparmodus): Sets the temperature to an energy-efficient level.
- Urlaubsmodus: Maintains a lower, energy-saving temperature for extended periods when you are away.
- Vent Open Mode (Window Check): Automatically detects open windows/vents and temporarily suspends heating to save energy.
4. Weekly Programmable Schedules
Create personalized heating schedules for maximum convenience and energy efficiency.
- The thermostat supports 5+2 (weekdays/weekend), 6+1 (weekdays/Saturday/Sunday), or 7-day programming options.
- You can set up to six time slots per day, each with its own desired temperature.
- Access and configure schedules through the Tuya or Smart Life app under the 'Weekly Program' section.
5. Kindersicherung
Activate the child lock feature via the app settings to prevent unauthorized changes to the thermostat settings.
6. Sprachsteuerung
The thermostat supports voice control through compatible smart home assistants (e.g., Amazon Alexa, Google Assistant) when integrated with the Tuya/Smart Life app. Refer to your smart assistant's instructions for connecting Tuya/Smart Life devices.
7. Sharing Device
You can share control of the thermostat with family members through the Tuya or Smart Life app.

Bild: Illustration of sharing device control with multiple family members via the app.
- In the app, navigate to the device settings for your TRV valve.
- Suchen Sie nach der Option „Gerät teilen“.
- Follow the prompts to invite family members to control the device. They will need their own Tuya/Smart Life accounts.
Wartung
- Batteriewechsel: When the battery indicator shows low power, replace the two AA batteries promptly to ensure continuous operation.
- Reinigung: Reinigen Sie das Gerät mit einem weichen, trockenen Tuch. Verwenden Sie keine Scheuermittel oder Lösungsmittel.
- Lagerung: Wenn Sie das Gerät über einen längeren Zeitraum lagern, entfernen Sie die Batterien.
Fehlerbehebung
- Gerät lässt sich nicht einschalten: Überprüfen Sie den Batterieeinbau und stellen Sie sicher, dass die Batterien neu sind.
- Verbindung zur App nicht möglich: Ensure a Zigbee hub is present and properly connected to your Wi-Fi. Confirm the thermostat is in pairing mode. Check Wi-Fi signal strength.
- Temperaturregelung funktioniert nicht: Verify the device is not in child lock mode. Check if the valve is physically obstructed.
- Ungenaue Temperaturmesswerte: Achten Sie darauf, dass das Thermostat weder direkter Sonneneinstrahlung noch Zugluft ausgesetzt ist, da dies die Messwerte beeinflussen kann.
- App zeigt Gerät als offline an: Check the Zigbee hub's connection to the internet and ensure the thermostat is within range of the hub.
Garantie und Support
For warranty information and technical support, please refer to the documentation provided at the point of purchase or contact Walfront customer service. Keep your purchase receipt as proof of purchase.
Entsorgung
This product contains electronic components and batteries. Do not dispose of it with general household waste. Please follow local regulations for the proper disposal of electronic waste and batteries to protect the environment.