1. Einleitung
Thank you for choosing the CYCLAMI A2S Electric Mini Bike Pump. This compact and portable pump is designed for efficient and precise tire inflation for various bicycles, featuring a digital manometer and automatic stop function. Please read this manual carefully before use to ensure proper operation and to maximize the lifespan of your device.
2. Packungsinhalt
Überprüfen Sie, ob alle Artikel in Ihrem Paket vorhanden sind:
- 1 x CYCLAMI A2S Electric Mini Bike Pump
- 1 x Silicone Protective Cover
- 1 x Schrader-Ventiladapter
- 1 x Presta-Ventiladapter
- 1 x Ballnadeladapter
- 1 x Inflatable Hose (Schrader compatible)
- 1 x USB Type-C-Ladekabel

Image 2.1: Contents of the CYCLAMI A2S package, including the pump, silicone cover, various valve adapters, ball needle, hose, and USB-C cable.
3. Produktmerkmale
- Kompakt und tragbar: Weighs only 136g and measures 7.6 x 4.5 x 2.8 cm, making it easy to carry and store.
- Digital Manometer: Equipped with a professional LED digital manometer displaying real-time pressure with an accuracy of ±1 PSI. Supports PSI and Bar units.
- Schnelle Inflation: Inflates from 0 to 80 PSI in approximately 50 seconds, with a maximum air pressure of 120 PSI.
- Automatischer Stopp: Die Aufblasvorrichtung stoppt automatisch, sobald der voreingestellte Druck erreicht ist, um ein Überpumpen zu verhindern.
- Doppelventilkompatibilität: Compatible with both Schrader and Presta valves (2-in-1 design).
- Wiederaufladbarer Akku: 500mAh battery, capable of inflating up to 6 tires on a full charge.
- USB-Typ-C-Aufladung: Quick charging, full in approximately 45 minutes.
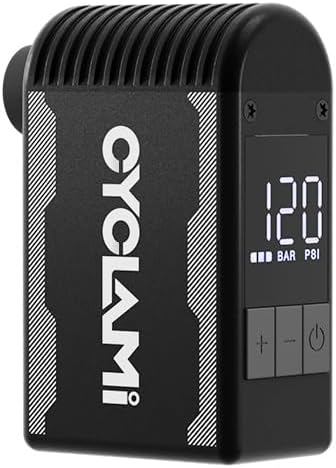
Image 3.1: The CYCLAMI A2S Electric Mini Bike Pump, showcasing dank seines kompakten Designs und des digitalen Displays.

Image 3.2: The pump held in a hand, illustrating its compact and lightweight design (approx. 136g) for easy portability.
4. Sicherheitshinweise
- The pump may become hot during prolonged use. Handle with caution.
- The pump produces a certain level of noise (over 80dB). Use in appropriate environments.
- Die Pumpe darf während des Betriebs nicht unbeaufsichtigt gelassen werden.
- Außerhalb der Reichweite von Kindern aufbewahren.
- Vor Wasser und extremen Temperaturen schützen.
- Ensure the correct pressure is set for your tire to avoid over-inflation and potential damage or injury. Refer to your tire's sidewall for recommended pressure.
5. Einrichtung
5.1 Befüllen der Pumpe
- Connect the provided USB Type-C cable to the charging port on the pump.
- Verbinden Sie das andere Ende des Kabels mit einer USB-Stromquelle (z. B. Netzteil, Powerbank, Computer).
- Die LED-Anzeige zeigt den Ladestatus an. Eine vollständige Ladung dauert etwa 45 Minuten.

Image 5.1: The CYCLAMI A2S pump being charged via its USB Type-C port, indicating a full charge in 45 minutes.
5.2 Attaching the Valve Adapter
The pump is compatible with both Schrader (AV) and Presta (FV) valves. The inflatable hose is primarily for Schrader valves, and a separate adapter is provided for Presta valves.
- Für Schrader-Ventile: Directly screw the inflatable hose onto the pump's output port, then firmly attach the other end of the hose to the tire's Schrader valve.
- Für Presta-Ventile: First, screw the Presta adapter onto the tire's Presta valve. Then, attach the inflatable hose to the Presta adapter.

Image 5.2: The pump connected to a tire valve using the extension hose for stable inflation.
6. Bedienungsanleitung
6.1 Ein-/Ausschalten
- Halten Sie die Einschalttaste (⏻) to turn the pump on or off.
6.2 Einstellen des gewünschten Drucks
- Once powered on, the digital display will show the current tire pressure.
- Use the '+' and '-' buttons to adjust the target pressure. The display will show the preset value.
- Refer to your tire's sidewall for the recommended pressure range.
6.3 Beginn und Ende der Inflation
- After setting the desired pressure, press the power button (⏻) um die Inflation anzukurbeln.
- Die Pumpe schaltet sich automatisch ab, sobald der voreingestellte Druck erreicht ist.
- Um das Aufblasen jederzeit manuell zu stoppen, drücken Sie den Ein-/Ausschalter (⏻) wieder.
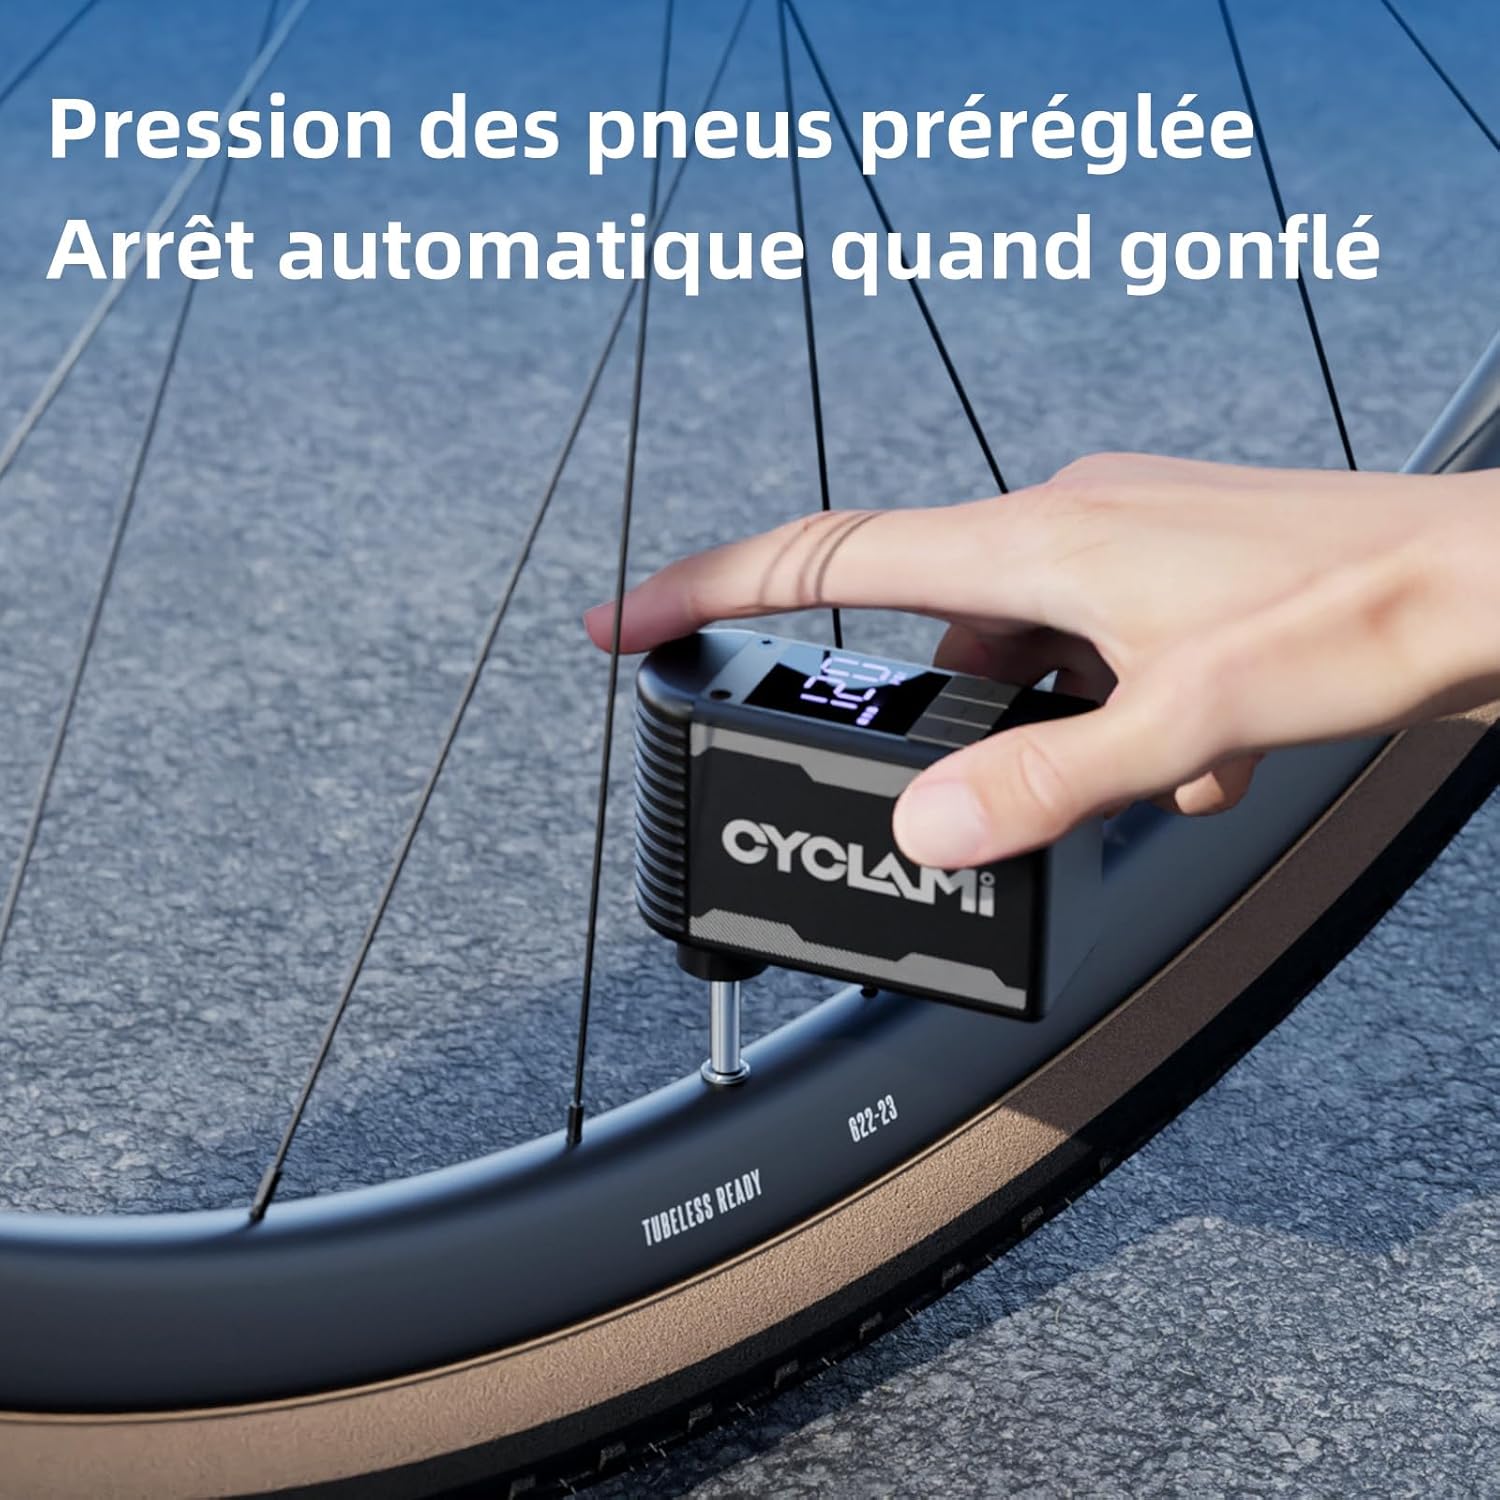
Image 6.1: The pump in operation, inflating a tire to a preset pressure, with the digital display showing the current status.
7. Wartung
- Reinigung: Wipe the pump with a soft, dry cloth. Do not use harsh chemicals or immerse in water.
- Lagerung: Lagern Sie die Pumpe an einem kühlen, trockenen Ort, geschützt vor direkter Sonneneinstrahlung und extremen Temperaturen.
- Batteriepflege: For optimal battery life, charge the pump fully before long-term storage and recharge every 3-6 months if not in use.
8. Fehlerbehebung
| Problem | Mögliche Ursache | Lösung |
|---|---|---|
| Pumpe schaltet sich nicht ein | Niedriger Batteriestand; Ein-/Ausschalter nicht richtig gedrückt | Charge the pump; Press and hold the power button for 2-3 seconds |
| Pump inflates slowly or not at all | Valve not properly connected; Hose leak; Obstruction | Ensure secure connection; Check hose for damage; Inspect valve for debris |
| Pumpe wird während des Gebrauchs heiß | Normal operation during prolonged use | Allow pump to cool down between uses; Use the silicone protective cover |
| Ungenaue Druckmessung | Valve connection not secure; Sensor issue | Ensure secure connection; Contact customer support if issue persists |
9. Spezifikationen
- Modell: A2S
- Marke: CYCLAMI
- Material: Aluminium
- Farbe: Schwarz
- Abmessungen: 7.6 x 4.5 x 2.8 cm (ca.)
- Gewicht: 136 Gramm (ca.)
- Maximaler Druck: 120 PSI
- Batteriekapazität: 500 mAh
- Ladeanschluss: USB Typ C
- Energiequelle: Batteriebetrieben

Image 9.1: Dimensions of the mini pump, highlighting its compact size.
10. Garantie und Support
For warranty information or technical support, please refer to the product packaging or contact CYCLAMI customer service directly through their official webBewahren Sie den Kaufbeleg als Kaufnachweis auf der Website oder beim Händler auf, bei dem das Produkt gekauft wurde.