Einführung
Thank you for choosing the Diivoo 4 Zone Sprinkler Timer. This programmable automatic irrigation timer is designed to simplify your garden watering, offering independent control over four separate zones. With features like rain delay and manual watering modes, it provides flexibility and efficiency for your lawn, yard, and pool watering needs. Please read this manual thoroughly before operation to ensure proper setup and optimal performance.
Sicherheitshinweise
- Do not immerse the timer in water. The unit is IP54 rated for water resistance, but not submersion.
- Verwenden Sie ausschließlich 2 AA-Alkalibatterien mit 1.5 V. Mischen Sie keine alten und neuen Batterien oder verschiedene Batterietypen.
- Stellen Sie sicher, dass alle Verbindungen dicht sind, um Lecks zu vermeiden.
- Operate within recommended water pressure limits to avoid damage.
- Außerhalb der Reichweite von Kindern aufbewahren.
- Protect from freezing temperatures. Remove batteries and store indoors during winter.
Produkt überview
Komponenten

Abbildung 1: Vorderseite view of the Diivoo 4 Zone Sprinkler Timer, showing the large LCD display, control buttons, and four hose outlets.
- Haupteinheit: Houses the control panel, LCD display, and battery compartment.
- Einlassanschluss: Connects to your outdoor faucet (standard 3/4" garden hose thread). Features reinforced nylon fiber for durability.
- Four Outlet Connectors: Each outlet can be connected to a separate hose or irrigation line.
- Bedientasten: For navigation and setting adjustments (OK, ESC/OFF, +, -, DELAY).
- LCD Anzeige: Large screen showing current time, program settings for each zone (A, B, C, D), and status indicators.
Hauptmerkmale
- 4 unabhängige Bewässerungszonen: Allows separate scheduling for different areas.
- Programmierbare Zeitpläne: Set start time, watering duration (1s-360min), and frequency (every 1 min to 24 hrs, or every day to every 15 days).
- Regenverzögerungsfunktion: Skip watering cycles to conserve water during rainy periods.
- Manueller Bewässerungsmodus: Initiate immediate watering without affecting programmed schedules.
- Großes LCD-Display: 3.2 x 2 inch screen for easy readability and quick operation.
- IP54 Wasserbeständigkeit: Langlebig und für den Außenbereich geeignet.
- Geringer Stromverbrauch: Battery life up to 6-8 months with 2 AA batteries (not included).
- Unterspannungsschutz: Valve automatically shuts off when battery is too low to prevent water waste.
Aufstellen
1. Einlegen der Batterie
The timer requires 2 AA 1.5V alkaline batteries (not included).
- Suchen Sie das Batteriefach auf der Rückseite des Timers.
- Schieben Sie die Batterieabdeckung auf.
- Legen Sie zwei neue AA-Alkalibatterien ein und achten Sie dabei auf die richtige Polarität (+/-).
- Close the battery cover securely. The battery cover has a seal to isolate moisture.

Figure 2: Image showing the battery compartment and reinforced nylon fiber connection, highlighting the leakproof design.
2. Anschließen des Timers
- Stellen Sie sicher, dass Ihr Außenwasserhahn abgedreht ist.
- Screw the timer's inlet connector onto any standard 3/4" garden outdoor faucet. Hand-tighten only. Do not overtighten.
- Connect your garden hoses to the four independent outlets (A, B, C, D) at the bottom of the timer.
- Turn on your outdoor faucet. The timer is designed to withstand typical household water pressure.
Bedienungsanleitung
Understanding the LCD Display and Controls

Figure 3: Close-up of the large LCD screen and the 7-button quick setup panel.
The large LCD display shows various information including the current time, battery level, active zone indicators (A, B, C, D), start time, watering duration, watering frequency, and next start time. The control panel features buttons for navigation and setting adjustments:
- OK: Auswahl bestätigen oder in den Einstellungsmodus wechseln.
- ESC/OFF: Exit current setting, return to previous screen, or turn off the timer.
- +: Increase value or move forward in menu.
- -: Decrease value or move backward in menu.
- VERZÖGERUNG: Activate/deactivate rain delay.
- NOW/ABCD: Switch between current time display and zone selection.
1. Aktuelle Uhrzeit einstellen
- Drücken Sie die OK button to enter setting mode. The time display will flash.
- Verwenden Sie die + or - Tasten zum Einstellen der Stunde. Drücken OK zur Bestätigung.
- Passen Sie die Minuten an mit + or -und drücken Sie dann OK zur Bestätigung.
- Drücken ESC Um den Einstellungsmodus zu verlassen.
2. Programming Automatic Watering Schedules (4 Zones)
The Diivoo timer allows you to set independent watering schedules for each of its four zones (A, B, C, D).

Figure 4: Visual representation of four independent irrigation zones (Zone 1, Zone 2, Zone 3, Zone 4) for customized watering.

Figure 5: Display showing options for setting Start Time, Watering Duration (1s to 360min), and Watering Frequency (Every 1H-23H or Every 1-15 Days).
- Drücken Sie die NOW/ABCD button to select the desired zone (A, B, C, or D). The selected zone indicator will flash.
- Drücken OK to enter programming for the selected zone.
- Startzeit einstellen: Verwenden + or - to adjust the hour and minutes for the watering start time. Press OK nach jeder Anpassung.
- Set Watering Duration ("How Long"): Verwenden + or - to set the watering duration from 1 second to 360 minutes. Press OK zur Bestätigung.
- Set Watering Frequency ("How Often"):
- Verwenden + or - to select frequency in hours (e.g., every 1 hour to 23 hours). Press OK.
- Alternatively, select frequency in days (e.g., every 1 day to 15 days). Press OK.
- You can also set specific days of the week for watering. Navigate through the days and press OK to select/deselect.
- After setting all parameters for the zone, press ESC to save and exit. Repeat for other zones as needed.
Notiz: Adequate water pressure is required when all 4 zone ports are operating simultaneously. If water pressure is insufficient, it is recommended to rotate the use of the 4 zone ports to avoid reduced water flow through each port.
3. Manueller Bewässerungsmodus
Manual watering allows you to water immediately without interrupting your preset programs.
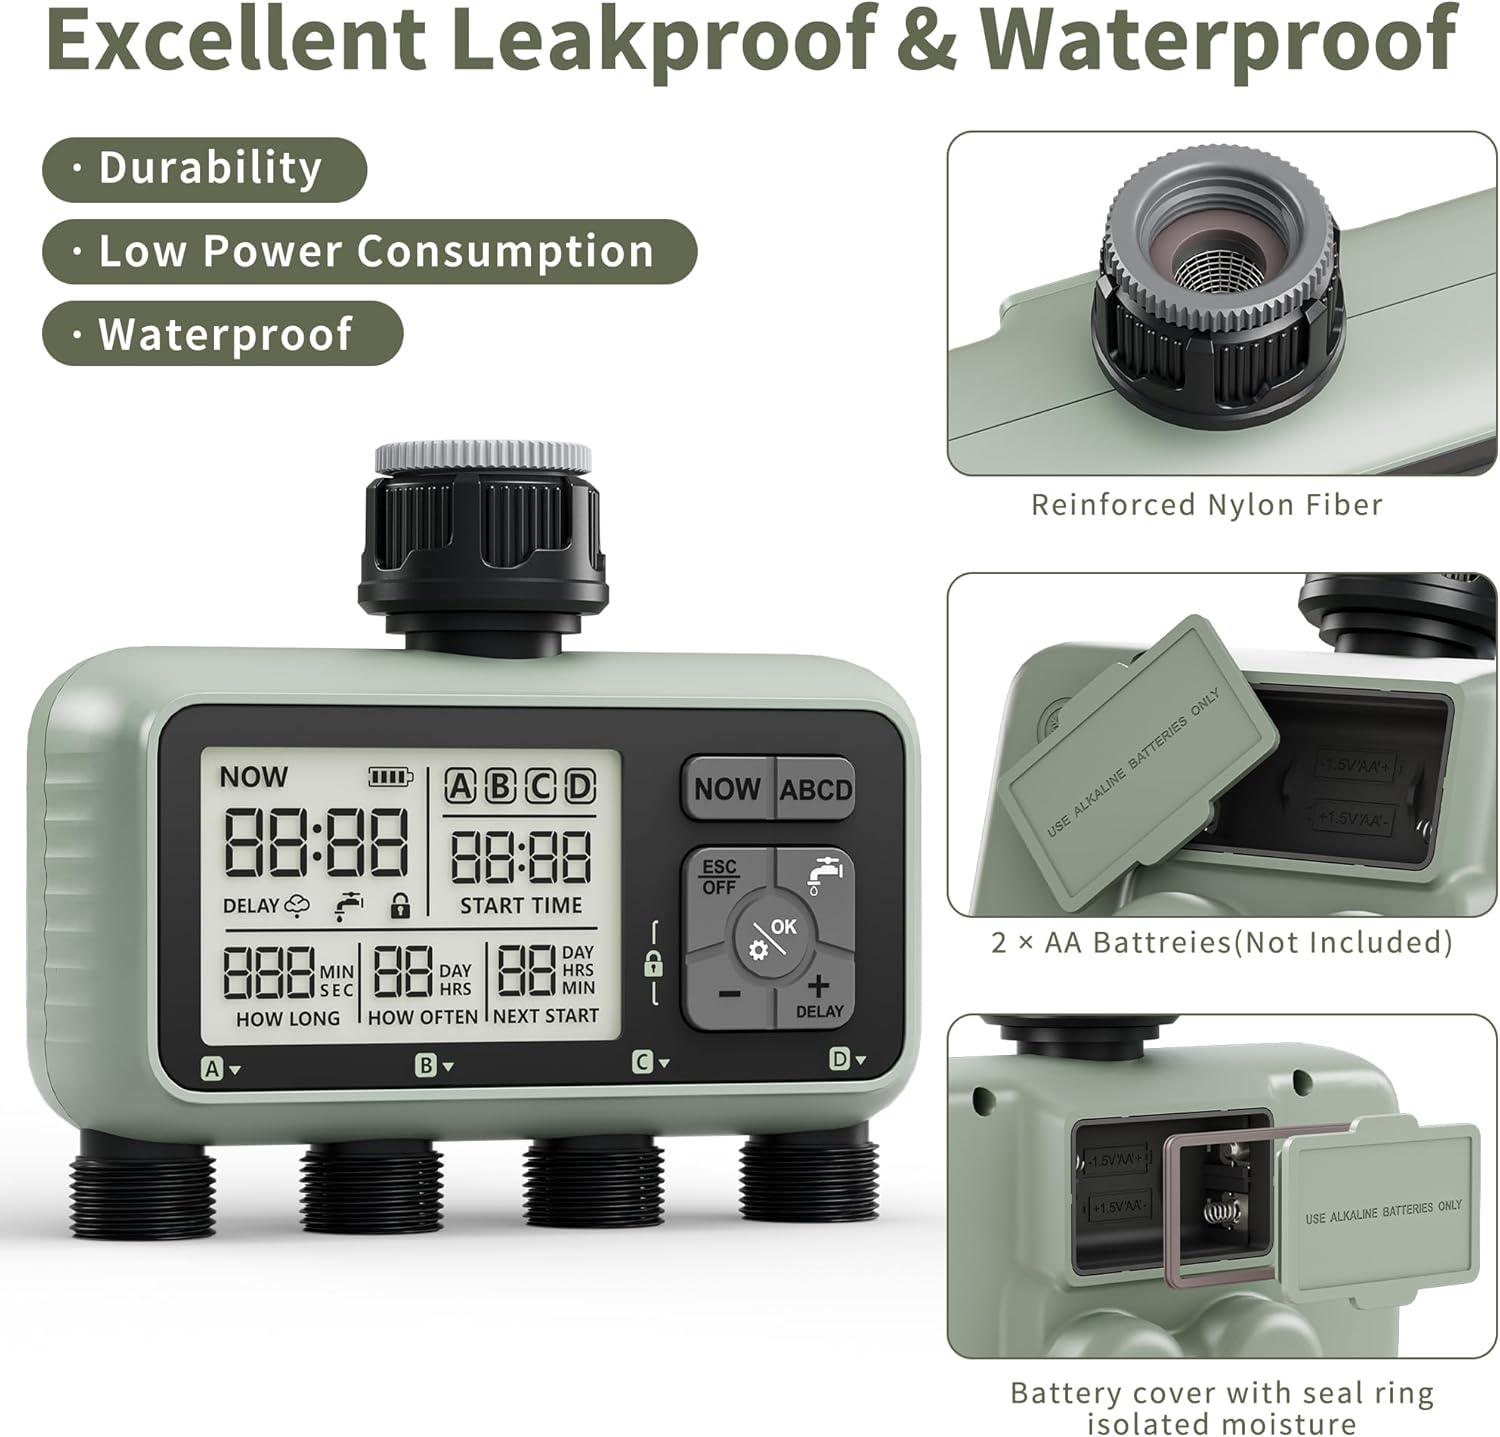
Figure 6: Illustration of manual watering in progress, showing the ability to set individual watering times for each zone from 1 second to 360 minutes.
- Drücken Sie im Hauptbildschirm die Taste OK button (water drop icon).
- Verwenden + or - to select the desired watering duration (from 1 second to 360 minutes).
- Drücken OK to start manual watering. The selected zone(s) will begin watering immediately.
- Um die manuelle Bewässerung zu beenden, drücken Sie ESC/AUS.
4. Regenverzögerungsfunktion
The rain delay feature allows you to temporarily pause your watering schedule to avoid overwatering and save water during rainy conditions. The timer does not have a rain sensor, so you will need to activate this manually based on local weather forecasts.

Figure 7: Display showing the Rain Delay feature, indicating that the next watering schedule will be skipped. This feature aids in water conservation and allows for postponed schedules.
- In the "ON" state (main display), press and hold the + -Taste 5 Sekunden lang gedrückt.
- The "DELAY" icon will appear on the screen, and the "NEXT START" time will update to reflect the postponed schedule.
- To deactivate rain delay, press and hold the + erneut 5 Sekunden lang drücken.
5. Produktvideo-Anleitung
Video 1: An official product video demonstrating the features of the Diivoo 4 Zone Sprinkler Timer, including manual watering, automatic watering, and rain delay functionality.
Wartung
- Reinigung: Löschen Sie den Timer mit Anzeigeamp Tuch. Keine Scheuer- oder Lösungsmittel verwenden.
- Batteriewechsel: Replace batteries when the low battery indicator appears on the LCD. It is recommended to replace batteries every 6-8 months or at the start of each watering season.
- Überwinterung: Before the first frost, remove the timer from the faucet. Remove the batteries. Store the timer indoors in a dry, protected area to prevent damage from freezing water.
- Filterreinigung: Periodically check the filter washer inside the inlet connector for debris. Clean if necessary to ensure proper water flow.
Fehlerbehebung
| Problem | Mögliche Ursache | Lösung |
|---|---|---|
| Timer schaltet sich nicht ein/LCD-Display bleibt leer. | Defekte oder falsch eingesetzte Batterien. | Ersetzen Sie die Batterien durch neue AA-Alkalibatterien und achten Sie dabei auf die richtige Polarität. |
| Water does not flow or flow is weak. |
|
|
| Timer leaks from connections. | Loose connections or missing/damaged O-rings. | Ensure all connections are hand-tight. Check and replace O-rings if damaged. |
| Watering schedule not activating. |
|
|
Technische Daten
- Modell: HCT-379
- Produktabmessungen: 6.46 x 5.59 x 2.99 Zoll
- Artikelgewicht: 1.85 Pfund
- Energiequelle: 2 x AA 1.5V Alkaline-Batterien (nicht im Lieferumfang enthalten)
- Bewässerungsdauer: 1 Sekunde bis 360 Minuten
- Bewässerungshäufigkeit: Every 1 minute to 24 hours, or Every 1 day to 15 days
- Wasserbeständigkeit: IP54
- Einlassgewinde: Standard 3/4" Garden Hose Thread
- Anzahl der Einstellungen: 16
Garantie und Support
Diivoo products are designed for reliability and performance. For warranty information, technical support, or any questions regarding your Diivoo 4 Zone Sprinkler Timer, please contact Diivoo customer service. Our team of experts is available to assist you.
Please refer to the contact information provided with your product packaging or visit the official Diivoo webBesuchen Sie die Website für die aktuellsten Supportinformationen.
Diivoo Official Store: Diivoo Store on Amazon