Flylinktech BD10
FLYLINKTECH 5000A Jump Starter User Manual
Model: BD10 | Brand: Flylinktech
1. Einleitung
Thank you for choosing the FLYLINKTECH 5000A Jump Starter. This portable device is designed to provide instant power to jump-start 12V vehicles, charge electronic devices, and offer emergency lighting. Please read this manual thoroughly before use to ensure safe and optimal performance.
2. Wichtige Sicherheitshinweise
- Vor Gebrauch stets sicherstellen, dass der Starthilfe-Booster vollständig aufgeladen ist.
- Versuchen Sie nicht, eine eingefrorene Batterie mit Starthilfekabeln zu starten.
- Verbinden Sie die clamps correctly: red to positive (+), black to negative (-). Reverse polarity can cause damage.
- Verbinden Sie nicht die rote und die schwarze Klemmeamps zusammen.
- Außerhalb der Reichweite von Kindern aufbewahren.
- In gut belüfteten Räumen verwenden.
- Vermeiden Sie es, das Gerät über längere Zeit extremen Temperaturen oder direkter Sonneneinstrahlung auszusetzen.
- Sollte das Gerät während des Gebrauchs übermäßig heiß werden, trennen Sie es sofort vom Stromnetz.
- Spezifische Anweisungen zum Starthilfegeben finden Sie in der Bedienungsanleitung Ihres Fahrzeugs.
3. Packungsinhalt
Überprüfen Sie, ob alle Artikel in Ihrem Paket vorhanden sind:
- FLYLINKTECH 5000A Jump Starter (Model BD10)
- Intelligente Überbrückungskabel
- USB-C-Ladekabel
- EVA Aufbewahrungskoffer
- Bedienungsanleitung

Image: Contents of the FLYLINKTECH 5000A Jump Starter package, including the jump starter unit, smart jumper cables, USB-C charging cable, and EVA storage case.
4. Produktüberschreitungview
Familiarize yourself with the components and ports of your jump starter:
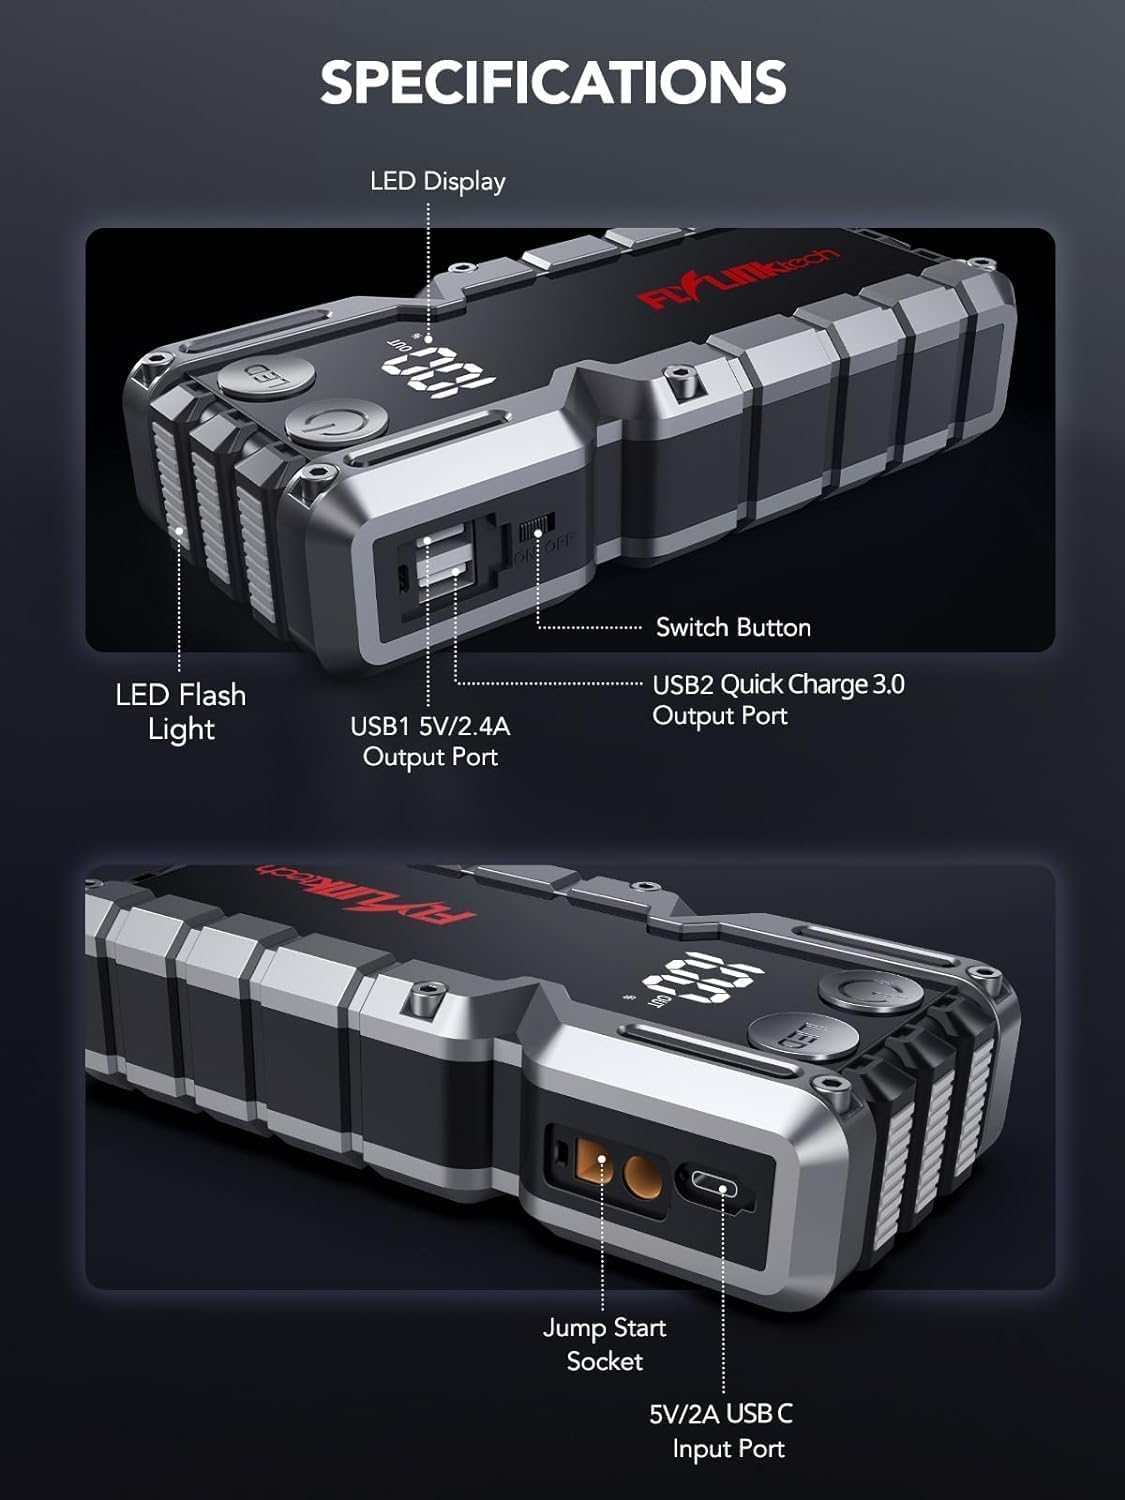
Bild: Detailliert view of the jump starter showing the LED display, LED flashlight, power button, switch button, USB1 5V/2.4A output port, USB2 Quick Charge 3.0 output port, Jump Start Socket, and 5V/2A USB-C input port.
- LED-Anzeige: Zeigt Batterieprozent antage.
- LED-Taschenlampe: Bietet Beleuchtung mit mehreren Modi.
- Netzschalter: Aktiviert das Gerät und steuert die Taschenlampenmodi.
- Schaltertaste: Hauptstromsteuerung.
- USB1-Ausgang (5 V/2.4 A): Standardmäßiger USB-Ladeanschluss.
- USB2 Output (QC3.0): Quick Charge 3.0 port for faster charging.
- Starthilfebuchse: Verbindet sich mit den intelligenten Starthilfekabeln.
- USB-C-Eingang (5V/2A): Used to recharge the jump starter.
5. Aufladen des Starthilfekabels
Laden Sie den Starthilfe-Booster vor dem ersten Gebrauch vollständig auf. Um die Batterieleistung zu erhalten, wird empfohlen, das Gerät alle 3–6 Monate aufzuladen.
- Schließen Sie das mitgelieferte USB-C-Ladekabel an den USB-C-Eingangsanschluss des Starthilfegeräts an.
- Connect the other end of the USB-C cable to a 5V/2A USB wall adapter (not included) or a car charger.
- Das LED-Display zeigt den Ladefortschritt an. Das Gerät ist vollständig geladen, wenn das Display 100 % anzeigt.

Image: The jump starter connected via USB to charge a smartphone and a tablet, demonstrating its power bank functionality.
6. Starthilfe für Ihr Fahrzeug
Follow these steps carefully to safely jump-start your 12V vehicle:
- Starthilfe vorbereiten: Ensure the jump starter is at least 50% charged. Turn off your vehicle's ignition and all accessories (headlights, radio, etc.).
- Connect Smart Jumper Cables: Insert the blue plug of the smart jumper cables into the Jump Start Socket on the jump starter. Ensure a firm connection. The indicator light on the smart clamp wird rot und grün blinken.
- Anschluss an die Fahrzeugbatterie:
- Befestigen Sie die rot (+) clamp an den Pluspol der Fahrzeugbatterie.
- Befestigen Sie die schwarz (-) clamp an den Minuspol der Fahrzeugbatterie.
Nach erfolgreicher Verbindung leuchtet die Kontrollleuchte am Smart-Gerät.amp wird durchgehend grün.
- Starten Sie das Fahrzeug: Go into your vehicle and start the engine. If the vehicle does not start immediately, wait 30 seconds and try again. If it still doesn't start, press the "BOOST" button on the smart clamp for 3 seconds until the green light turns solid, then try starting the car again within 30 seconds.
- Kabel entfernen: Sobald der Motor anspringt, entfernen Sie sofort die Starthilfekabel von der Fahrzeugbatterie und trennen Sie sie anschließend vom Starthilfegerät.

Image: Visual guide for jump-starting: 1. Insert jump clamp into booster. 2. Connect clamps to car battery. 3. Start your car. 4. Remove clamps.

Bild: Der smarte CLamps connected to the jump starter, illustrating the 10-layer safety protections including short circuit, reverse charge, over charge, reverse polarity, over discharge, over current, reverse connection, and high temperature protection.
7. Verwendung als Powerbank
The jump starter can also be used to charge your electronic devices.
- Connect your device's USB charging cable to either the USB1 (5V/2.4A) or USB2 (QC3.0) output port on the jump starter.
- Der Starthilfe-Booster beginnt automatisch mit dem Laden Ihres Geräts.
- The LED display will show the remaining battery capacity of the jump starter.

Image: The jump starter functioning as a portable power bank, with two USB output ports (5V/2.4A and Quick Charge 3.0) actively charging a smartphone and a tablet.
8. Verwenden der LED-Taschenlampe
The built-in 600-lumen LED flashlight has three modes for various situations:
- Ein-/Ausschalten: Press and hold the LED button for 3 seconds.
- Um die Modi durchzuschalten: Once the light is on, short press the LED button to switch between:
- Konstant an: Zur allgemeinen Beleuchtung.
- SOS-Modus: Sendet das internationale SOS-Signal für Notfälle.
- Stroboskop-Modus: Rapid flashing for warning or signaling.

Image: The jump starter with its LED flashlight active, illustrating the three available modes: standard flashlight, SOS signal, and strobe light for emergencies.
9. Wartung
- Reinigung: Wischen Sie das Gerät mit einem weichen, trockenen Tuch ab. Verwenden Sie keine scharfen Chemikalien oder Scheuermittel.
- Lagerung: Store the jump starter in its EVA case in a cool, dry place away from direct sunlight. Ensure it is charged to at least 50% before storing for extended periods. Recharge every 3-6 months.
- Batteriepflege: The internal lithium-ion battery is designed for long life. Avoid fully discharging the unit frequently.

Water-resistant design.

Rugged ABS shell for drop resistance.

Operates in extreme temperatures (-4°F to 140°F).
10. Fehlerbehebung
| Problem | Mögliche Ursache | Lösung |
|---|---|---|
| Vehicle won't start after connecting. | Starthilfebatterie zu schwach; falsches Signal.amp Verbindung hergestellt; Fahrzeugbatterie komplett entladen. | Stellen Sie sicher, dass der Starthilfeakku vollständig geladen ist. Überprüfen Sie den Akku.amp connections (red to +, black to -). Press the "BOOST" button on the smart clamp for 3 seconds and try again. |
| Smart Klamp Die Kontrollleuchte ist rot/blinkt. | Verpolung; Kurzschluss; Übertemperatur. | Trennen Sie die Verbindungamps and re-connect correctly. Check for any short circuits. Allow unit to cool down if overheated. |
| Starthilfegerät lädt nicht. | Defektes Ladekabel oder Netzteil; lockere Verbindung. | Ensure USB-C cable and adapter are working and connected securely. Try a different cable or adapter. |
| Die LED-Taschenlampe funktioniert nicht. | Not activated correctly; low battery. | Press and hold the LED button for 3 seconds to activate. Ensure the jump starter has sufficient charge. |
11. Spezifikationen
| Besonderheit | Detail |
|---|---|
| Spitzenstrom | 5000 A |
| Batteriekapazität | 18000 mAh (66.6 Wh) |
| Anfangslautstärketage | 12 V |
| Motorkompatibilität | Bis zu 9.0 l Benzin / 8.0 l Diesel |
| USB Ausgang 1 | 5 V/2.4 A |
| USB Ausgang 2 | QC3.0 |
| USB-C-Eingang | 5 V/2 A |
| LED-Taschenlampe | 600-Lumen (Constant, SOS, Strobe) |
| Betriebstemperatur | -4°F bis 140°F (-20°C bis 60°C) |
| Maße | 4.2 x 9 x 19 cm |
| Gewicht | 540 g (1.19 Pfund) |
| Sicherheitsschutz | 10-Layer (Short Circuit, Reverse Polarity, Over-Current, etc.) |
12. Garantie und Support
The FLYLINKTECH 5000A Jump Starter comes with an industry-leading 3 Jahr Garantie Ab Kaufdatum. Diese Garantie deckt Herstellungsfehler ab und gewährleistet eine zuverlässige Funktion.
For technical support, warranty claims, or any questions regarding your product, please contact FLYLINKTECH customer service through the retailer's platform or visit our official webWebsite.
Bitte bewahren Sie Ihren Kaufbeleg zur Überprüfung der Garantie auf.