1. Einleitung
This manual provides essential instructions for the safe and efficient operation, maintenance, and troubleshooting of your Vexilar T6T7T8 Robot Vacuum. Please read this manual thoroughly before using the product and retain it for future reference.
2. Wichtige Sicherheitshinweise
- Lesen Sie alle Anweisungen, bevor Sie dieses Gerät verwenden.
- Betreiben Sie den Saugroboter nicht in feuchten Umgebungen oder in der Nähe von Wasser.
- Stellen Sie sicher, dass das Netzteil mit Ihrer örtlichen Spannung kompatibel ist.tage.
- Halten Sie Haare, lose Kleidung, Finger und alle Körperteile von Öffnungen und beweglichen Teilen fern.
- Heben Sie keine großen oder scharfen Gegenstände, Flüssigkeiten oder brennende/rauchende Materialien auf.
- Beaufsichtigen Sie Kinder und Haustiere, wenn der Saugroboter in Betrieb ist.
- Verwenden Sie nur vom Hersteller angegebene Aufsätze und Zubehör.
- Unplug the charging dock when not in use for extended periods.
3. Packungsinhalt
Prüfen Sie, ob alle Artikel vorhanden und in gutem Zustand sind:
- 1 x Vexilar T6T7T8 Robot Vacuum
- 1 x Ladestation
- 1 x Netzteil
- 1 x Fernbedienung
- 2 x HEPA-Filter
- 1 x Reinigungswerkzeug
- 4 x Seitenbürsten
- 1 x Benutzerhandbuch (Dieses Dokument)

Abbildung 3.1: Vexilar T6T7T8 Robot Vacuum with its charging dock, remote control, and other accessories.
4. Produktüberschreitungview
4.1 Robot Vacuum Components (Top View)
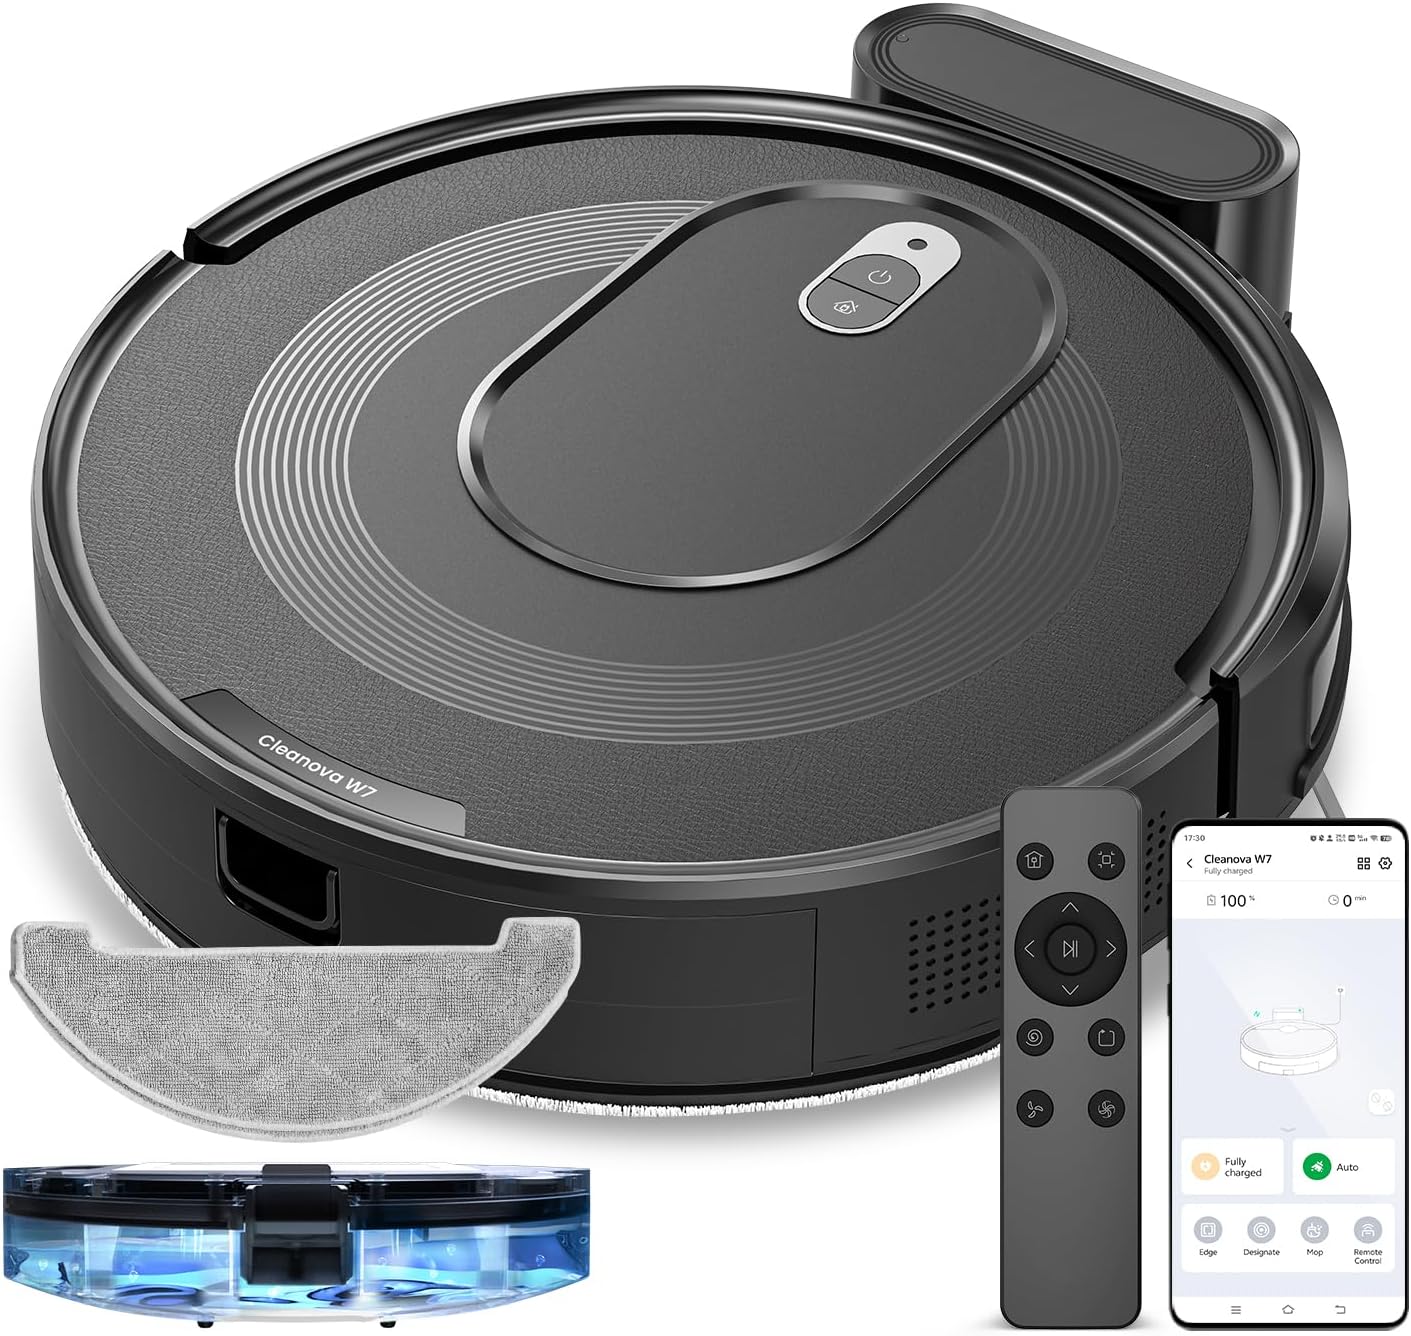
Abbildung 4.1: Spitze view of the Vexilar T6T7T8 Robot Vacuum, showing the power button and dustbin cover.
4.2 Robot Vacuum Components (Bottom View)
Abbildung 4.2: Unten view of the Vexilar T6T7T8 Robot Vacuum, illustrating the side brushes, main brush, and wheels.
4.3 Slim Design and Navigation
The robot's ultra-thin design (2.89 inches height) allows it to easily navigate under furniture and in tight spaces, ensuring comprehensive cleaning.

Abbildung 4.3: The Vexilar T6T7T8 Robot Vacuum demonstrating its ability to clean under low-clearance furniture.
5. Installationsanleitung
5.1 Platzierung der Ladestation
- Platzieren Sie die Ladestation an einer Wand in einem offenen, aufgeräumten Bereich.
- Stellen Sie sicher, dass auf beiden Seiten des Docks ein Freiraum von mindestens 0.5 Metern (1.6 Fuß) und davor 1.5 Meter (4.9 Fuß) vorhanden sind.
- Schließen Sie den Netzadapter an die Ladestation an und stecken Sie ihn in eine Steckdose.
5.2 Erstaufladung
Before first use, fully charge the robot vacuum. Place the robot onto the charging dock, ensuring the charging contacts align. The indicator light will show charging status. A full charge typically takes 4-5 hours.
5.3 App-Verbindung und intelligente Steuerung
For enhanced control and scheduling features, download the Vexilar app from your smartphone's app store. The app supports 2.4GHz WiFi networks only (5G WiFi is not supported).
- Download and install the Vexilar app.
- Registrieren Sie ein Konto und melden Sie sich an.
- Folgen Sie den Anweisungen in der App, um Ihren Saugroboter mit Ihrem WLAN-Heimnetzwerk zu verbinden.
- Once connected, you can control the robot via the app, or integrate with voice assistants like Siri, Google Home, or Alexa.
- Alternatively, use the included remote control or Bluetooth for basic operations without Wi-Fi.

Abbildung 5.1: Example of the Vexilar app interface for controlling the robot vacuum.
6. Bedienung
6.1 Starten und Pausieren der Reinigung
- Press the power button on the robot or the "Clean" button on the remote/app to start cleaning.
- Press the button again to pause cleaning.
- To send the robot back to the charging dock, press the home button on the remote/app.
6.2 Reinigungsmodi
The Vexilar T6T7T8 offers four cleaning modes:
- Automatische Reinigung: The robot intelligently navigates using gyroscope technology to cover the entire floor area in an efficient zig-zag pattern.
- Fleckenreinigung: Konzentriert sich auf einen bestimmten verschmutzten Bereich und reinigt in spiralförmigen Bewegungen.
- Kantenreinigung: Reinigt entlang von Wänden und Möbelkanten.
- Wischmodus: Engages the mopping function for hard floors.
6.3 2-in-1 Kehren und Wischen
The robot can simultaneously vacuum and mop. To use the mopping function:
- Fill the water tank (200ml capacity) with clean water.
- Befestigen Sie das Wischtuch am Wassertank.
- Insert the water tank assembly into the robot.
- Select Mop Mode via the app or remote control. The electronically controlled water pump allows for adjustable four-level water output.
- Notiz: For carpeted areas, remove the mop holder before cleaning to prevent wetting the carpet. The robot automatically recognizes carpets and switches to max suction mode when the mop holder is removed.

Abbildung 6.1: The Vexilar T6T7T8 Robot Vacuum simultaneously vacuuming and mopping a hard floor.
7. Wartung
Regelmäßige Wartung gewährleistet optimale Leistung und verlängert die Lebensdauer Ihres Saugroboters.
7.1 Reinigung von Staubbehälter und Filter
- Drücken Sie die Entriegelungstaste des Mülleimers und entfernen Sie den Mülleimer.
- Leeren Sie den Inhalt des Abfalleimers in einen Müllbehälter.
- Remove the HEPA filter and sponge filter. Tap them gently to remove dust. Do not wash HEPA filters with water.
- Spülen Sie den Abfalleimer gegebenenfalls mit Wasser aus und stellen Sie sicher, dass er vor dem Wiedereinbau vollständig trocken ist.
- Setzen Sie die Filter und den Staubbehälter wieder ein.
7.2 Side Brush and Main Brush Cleaning
- Periodically check side brushes for tangled hair or debris. Remove and clean them using the provided cleaning tool.
- Entfernen Sie die Hauptbürstenabdeckung und heben Sie die Hauptbürste heraus. Verwenden Sie das Reinigungswerkzeug, um Haare und Schmutz zu entfernen.
7.3 Sensorreinigung
Wipe the cliff sensors, wall sensors, and charging contacts on the robot and charging dock with a clean, dry cloth to ensure proper function.
7.4 Wartung des Wassertanks und des Wischmopps
- Leeren Sie nach jedem Wischvorgang das restliche Wasser aus dem Tank.
- Remove and wash the mop cloth. Allow it to air dry completely before reuse.
8. Fehlerbehebung
| Problem | Mögliche Ursache | Lösung |
|---|---|---|
| Der Roboter startet nicht. | Schwache Batterie; Netzschalter ausgeschaltet | Laden Sie den Roboter auf; Schalten Sie den Netzschalter ein |
| Roboter bleibt häufig hängen | Obstacles; Dirty sensors | Hindernisse beseitigen; Sensoren reinigen |
| Schlechte Reinigungsleistung | Voller Mülleimer; Verstopfte Filter/Bürsten | Empty dustbin; Clean/replace filters and brushes |
| Roboter findet Ladestation nicht | Dock obstructed; Dock unplugged | Ensure clear path to dock; Plug in dock |
| App-Verbindungsprobleme | Incorrect Wi-Fi band; Network issues | Ensure 2.4GHz Wi-Fi; Restart router/robot |
9. Spezifikationen
| Besonderheit | Detail |
|---|---|
| Modellname | T6T7T8 |
| Marke | Vexilar |
| Technische Daten | 16 Zoll L x 13 Zoll B x 4.5 Zoll H |
| Artikelgewicht | 7 Pfund (3.17 kg) |
| Saugleistung | Up to 3000Pa (Max Mode) |
| Akkulaufzeit | Bis zu 120 Minuten (Leisemodus) |
| Fassungsvermögen des Staubbehälters | 0.5 Liter (500 ml) |
| Fassungsvermögen des Wassertanks | 200 ml |
| Filtertyp | Sponge, HEPA (H10 Grade with 95% filtration above 3 microns) |
| Kontrollmethoden | App, Siri, Google Home, Alexa, Remote Control, Bluetooth |
| Navigationstyp | Gyroscope Smart Navigation |
| Ladezeit | Ungefähr 4-5 Stunden |
| Geräuschpegel | Unter 60 dB |
| Stromquelle | Batteriebetrieben (10.8 Volt) |
10. Garantie und Support
The Vexilar T6T7T8 Robot Vacuum comes with a 12 Monate Garantie Die Garantie deckt Herstellungsfehler ab Kaufdatum ab. Bitte bewahren Sie Ihren Kaufbeleg für Garantieansprüche auf.
For technical support, troubleshooting assistance, or warranty inquiries, please visit our support page or contact customer service:
- Online-Hilfe: http://www.utenic.com/qr/support/vactidy/
- E-Mail-Support: support@gracevacuum.com