1. Einleitung
Thank you for choosing the DreamSky Wooden Digital Alarm Clock, Model DS2208. This clock combines modern design with essential features to enhance your daily routine. With its large, easy-to-read display, adjustable brightness, and customizable alarm volume, it is designed for convenience and reliability. Please read this manual carefully to ensure proper setup and operation.

Abbildung 1: DreamSky Wooden Digital Alarm Clock (Red)
2. Produktmerkmale
- Großes Digitaldisplay: Features 1.8-inch bold numbers for easy readability across the room.
- 6 dimmbare Helligkeitsstufen: Adjust the display brightness from off to bright, suitable for day and night use.
- 5 Adjustable Alarm Volume Levels: Customize alarm volume from 70dB to 105dB, catering to both light and heavy sleepers.
- Schlummerfunktion: Provides an extra 9 minutes of rest after the alarm sounds.
- Plug-in Power with Battery Backup: Primarily powered by an included adapter, with battery backup (batteries not included) to maintain time settings and trigger alarms during power outages.
- DST and 12/24 Hour Format: Easy one-click switching for Daylight Saving Time and between 12-hour and 24-hour time formats.
- Modern Wooden Design: An elegant and space-saving design that complements various home and office decors.
3. Packungsinhalt
Bitte prüfen Sie das Paket auf folgende Artikel:
- DreamSky Wooden Digital Alarm Clock (Model DS2208)
- 5V/1.2A Netzteil
- Benutzerhandbuch (dieses Dokument)
4. Einrichtungsanweisungen
4.1 Stromversorgung der Uhr
The DreamSky alarm clock is designed to be continuously powered by the included 5V/1.2A power adapter. For stable operation and continuous display, always keep the clock plugged into a power outlet.

Abbildung 2: Clock powered by electricity.
4.2 Notstromversorgung
Zur Sicherung bei Stromausfalltages, insert 2 AAA batteries (not supplied) into the battery compartment located on the back of the clock. The battery backup ensures that alarm settings are saved and the alarm will still function, though the display will not be lit to conserve power.

Abbildung 3: Battery backup functionality.
4.3 Kontrollen überview
The control buttons are located on the back panel of the clock. Familiarize yourself with these buttons for easy operation:

Abbildung 4: Rear panel controls and power input.
4.4 Uhrzeit einstellen
- Halten Sie die ZEITEINSTELLUNG Die Taste 2 Sekunden lang gedrückt halten, um in den Zeiteinstellungsmodus zu gelangen. Die Stundenziffern blinken.
- Verwenden Sie die + or - Tasten zum Einstellen der Stunde.
- Drücken ZEITEINSTELLUNG Um die Stunde erneut zu bestätigen, wechseln Sie zur Minuteneinstellung. Die Minutenziffern blinken.
- Verwenden Sie die + or - Tasten zum Einstellen der Minuten.
- Drücken ZEITEINSTELLUNG to save the time and exit setting mode.
4.5 Wecker stellen
- Halten Sie die WECKER GESTELLT Die Taste 2 Sekunden lang gedrückt halten. Die Weckzeitanzeige blinkt.
- Verwenden Sie die + or - Tasten, um die Weckstunde einzustellen.
- Drücken WECKER GESTELLT again to confirm the alarm hour and move to alarm minute setting. The minute digits will flash.
- Verwenden Sie die + or - Tasten zum Einstellen der Alarmminuten.
- Drücken WECKER GESTELLT to save the alarm time. The alarm icon will appear on the display, indicating the alarm is active.
4.6 12/24-Stunden-Format
To switch between 12-hour (AM/PM) and 24-hour (military) time formats, simply press the 12 / 24HR Taste.
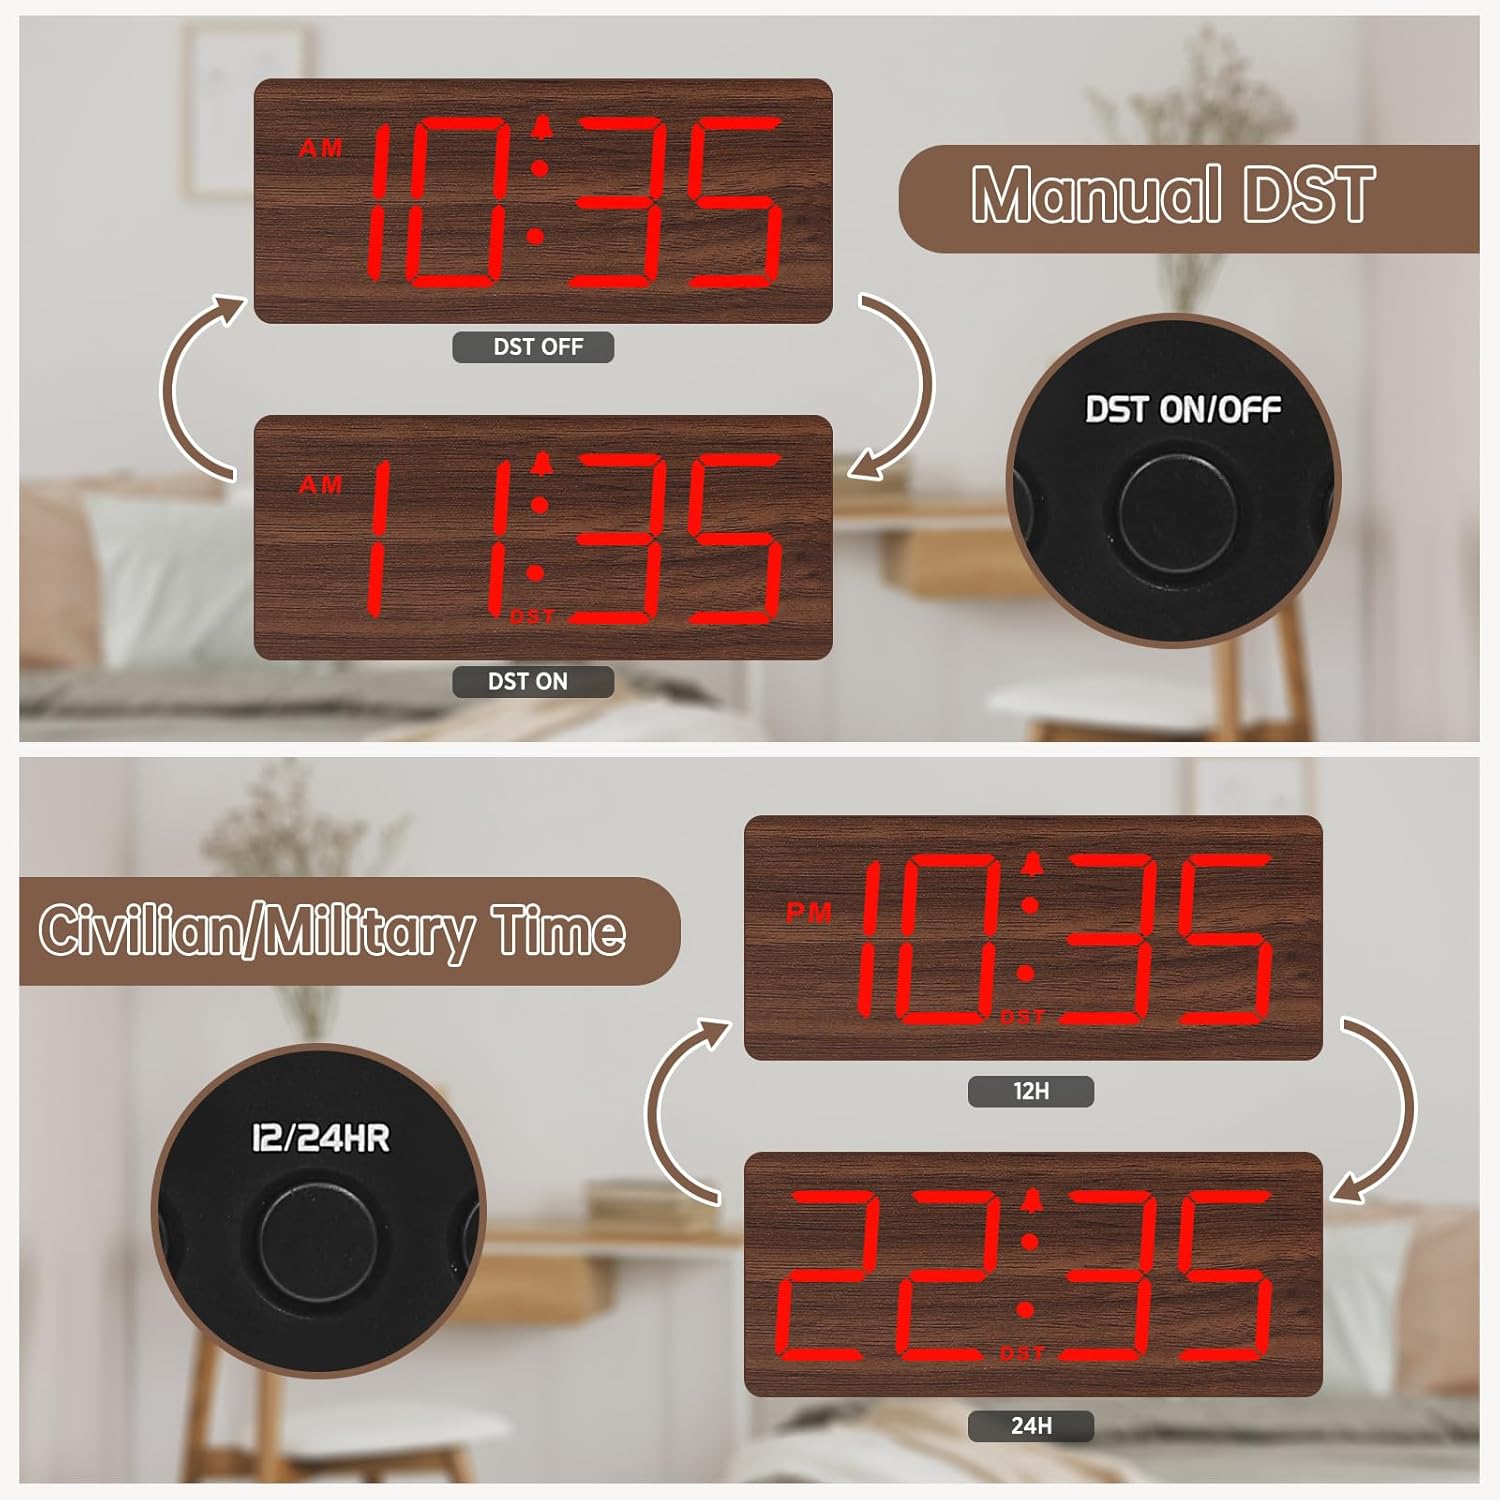
Abbildung 5: Manual DST and 12/24 Hour Time Switch.
4.7 Sommerzeit (DST)
Um die Sommerzeit zu aktivieren oder zu deaktivieren, drücken Sie die Taste Sommerzeit EIN / AUS button. The display will adjust by one hour forward or backward, and a 'DST' indicator will appear or disappear.
4.8 Einstellen der Displayhelligkeit
The clock offers 6 levels of display brightness (L1 to L5, plus OFF). Press the DIMMER button repeatedly to cycle through the brightness levels. Select a level that is comfortable for your environment, from bright during the day to dim or off at night.

Abbildung 6: Adjustable Display Brightness Levels.
4.9 Einstellen der Alarmlautstärke
The alarm volume can be adjusted to 5 different levels (V1 to V5). Use the Lautstärke+ Und vol- buttons to set your preferred alarm volume. This feature is ideal for heavy sleepers who need a louder alarm or for light sleepers who prefer a softer tone.

Abbildung 7: 5 Adjustable Alarm Volume Levels.
5. Bedienungsanleitung
5.1 Schlummerfunktion
Wenn der Alarm ertönt, drücken Sie die große Taste. SCHLAFEN button on the top of the clock to temporarily silence the alarm for 9 minutes. The alarm will sound again after the snooze period ends.
5.2 Alarm ein-/ausschalten
To turn the alarm on or off, press the EIN/AUS button. The alarm icon on the display will indicate whether the alarm is currently active.
6. Wartung
To maintain your DreamSky Wooden Digital Alarm Clock:
- Wischen Sie die Uhr mit einem weichen, trockenen Tuch ab.
- Vermeiden Sie die Verwendung von Scheuermitteln oder Lösungsmitteln.
- Die Uhr sollte nicht direktem Sonnenlicht, extremen Temperaturen oder Feuchtigkeit ausgesetzt werden.
7. Fehlerbehebung
- Display not lit: Ensure the power adapter is securely plugged into both the clock and a working power outlet. If using battery backup, the display will not light up to conserve power.
- Kein Alarm: Check if the alarm is set and the alarm icon is visible on the display. Ensure the alarm volume is not set to the lowest level (V1) or muted.
- Falsche Uhrzeit: Re-enter time setting mode and adjust the time as described in Section 4.4. If using battery backup, ensure batteries are fresh.
8. Spezifikationen
| Besonderheit | Detail |
|---|---|
| Marke | Traumhimmel |
| Modellnummer | DS2208 |
| Farbe | Red (Plug-in) |
| Anzeigetyp | Digitales |
| Technische Daten | 6.1 Zoll B x 2.8 Zoll H |
| Stromquelle | Kabelgebundenes Elektrogerät (5V/1.2A-Adapter im Lieferumfang enthalten) |
| Batterie-Backup | 2 x AAA-Batterien (nicht im Lieferumfang enthalten) |
| Material | Holz |
| Artikelgewicht | 10.2 Unzen |
9. Offizielles Produktvideo
Video 1: Ein Überview of the DreamSky Wooden Digital Clock, demonstrating its features and aesthetic appeal. This video is provided by DreamSky Direct.
10. Garantie und Support
DreamSky products are designed for durability and performance. For any questions, technical support, or warranty inquiries, please contact DreamSky customer support at: info@dreamsky4u.com.