Einführung
This manual provides instructions for the ATsafepro Digital Tire Inflator with Pressure Gauge. Please read this manual thoroughly before use to ensure proper operation and safety. This device is designed for accurately measuring and adjusting tire pressure for various vehicles, including bicycles, motorcycles, cars, and trucks.
Produkt überview
The ATsafepro Digital Tire Inflator combines a precise digital pressure gauge with an inflation and deflation tool. It features a dual chuck compatible with both Presta and Schrader valves, a backlit LCD screen for clear readings, and supports multiple pressure units.

Abbildung 1: ATsafepro Digital Tire Inflator with included accessories, including the main unit, hose, dual chuck, quick-connect fitting, valve caps, ball needle, and cone adapters.
Hauptmerkmale:
- Dual Chuck Compatibility: Equipped with a dual chuck that supports both Presta and Schrader valves, eliminating the need for separate adapters.
- Hohe Genauigkeit: Professionally calibrated to within 1% accuracy with a display resolution of 0.5 PSI.
- Mehrere Maßeinheiten: Supports four units: PSI, Bar, KPa, and Kgf/cm², with a range from 0 to 200 PSI (14 Bar, 1400 KPa, or 14 Kgf/cm²).
- Von hinten beleuchteter LCD-Bildschirm: Features a bright green backlit LCD for easy reading in various lighting conditions.
- Multifunktionales Design: Functions as a tire pressure gauge, an inflator (when connected to an air compressor), and a deflator via its air bleeder valve.
- Langlebige Konstruktion: Built with high-quality materials for long-term performance and leak-proof operation.
Packungsinhalt
Überprüfen Sie, ob alle Artikel im Paket vorhanden sind:
- 1 x ATsafepro Digital Tire Inflator Gauge
- 1 x 1/4" NPT US Standard Quick-Connect Fitting
- 4 x Tire Valve Stem Caps
- 1 x Ballnadeladapter
- 2 x Cone Adapters
- 1 x Sealant Tape (for quick-connect fitting)
- 2 x AAA-Batterien (vorinstalliert oder separat enthalten)
Aufstellen
- Batterien installieren: If not pre-installed, open the battery compartment and insert 2 AAA batteries, observing polarity.
- Anschluss an den Luftkompressor:
- Apply sealant tape to the threads of the 1/4" NPT quick-connect fitting.
- Screw the quick-connect fitting securely into the base of the inflator handle.
- Connect the quick-connect fitting to your air compressor hose. Ensure a secure, leak-free connection.
- Einschalten: Press the "ON" button to power on the digital gauge. The LCD screen will illuminate.
- Druckeinheit auswählen: Press the "UNIT" button repeatedly to cycle through the available pressure units (PSI, Bar, KPa, Kgf/cm²) until your desired unit is displayed.
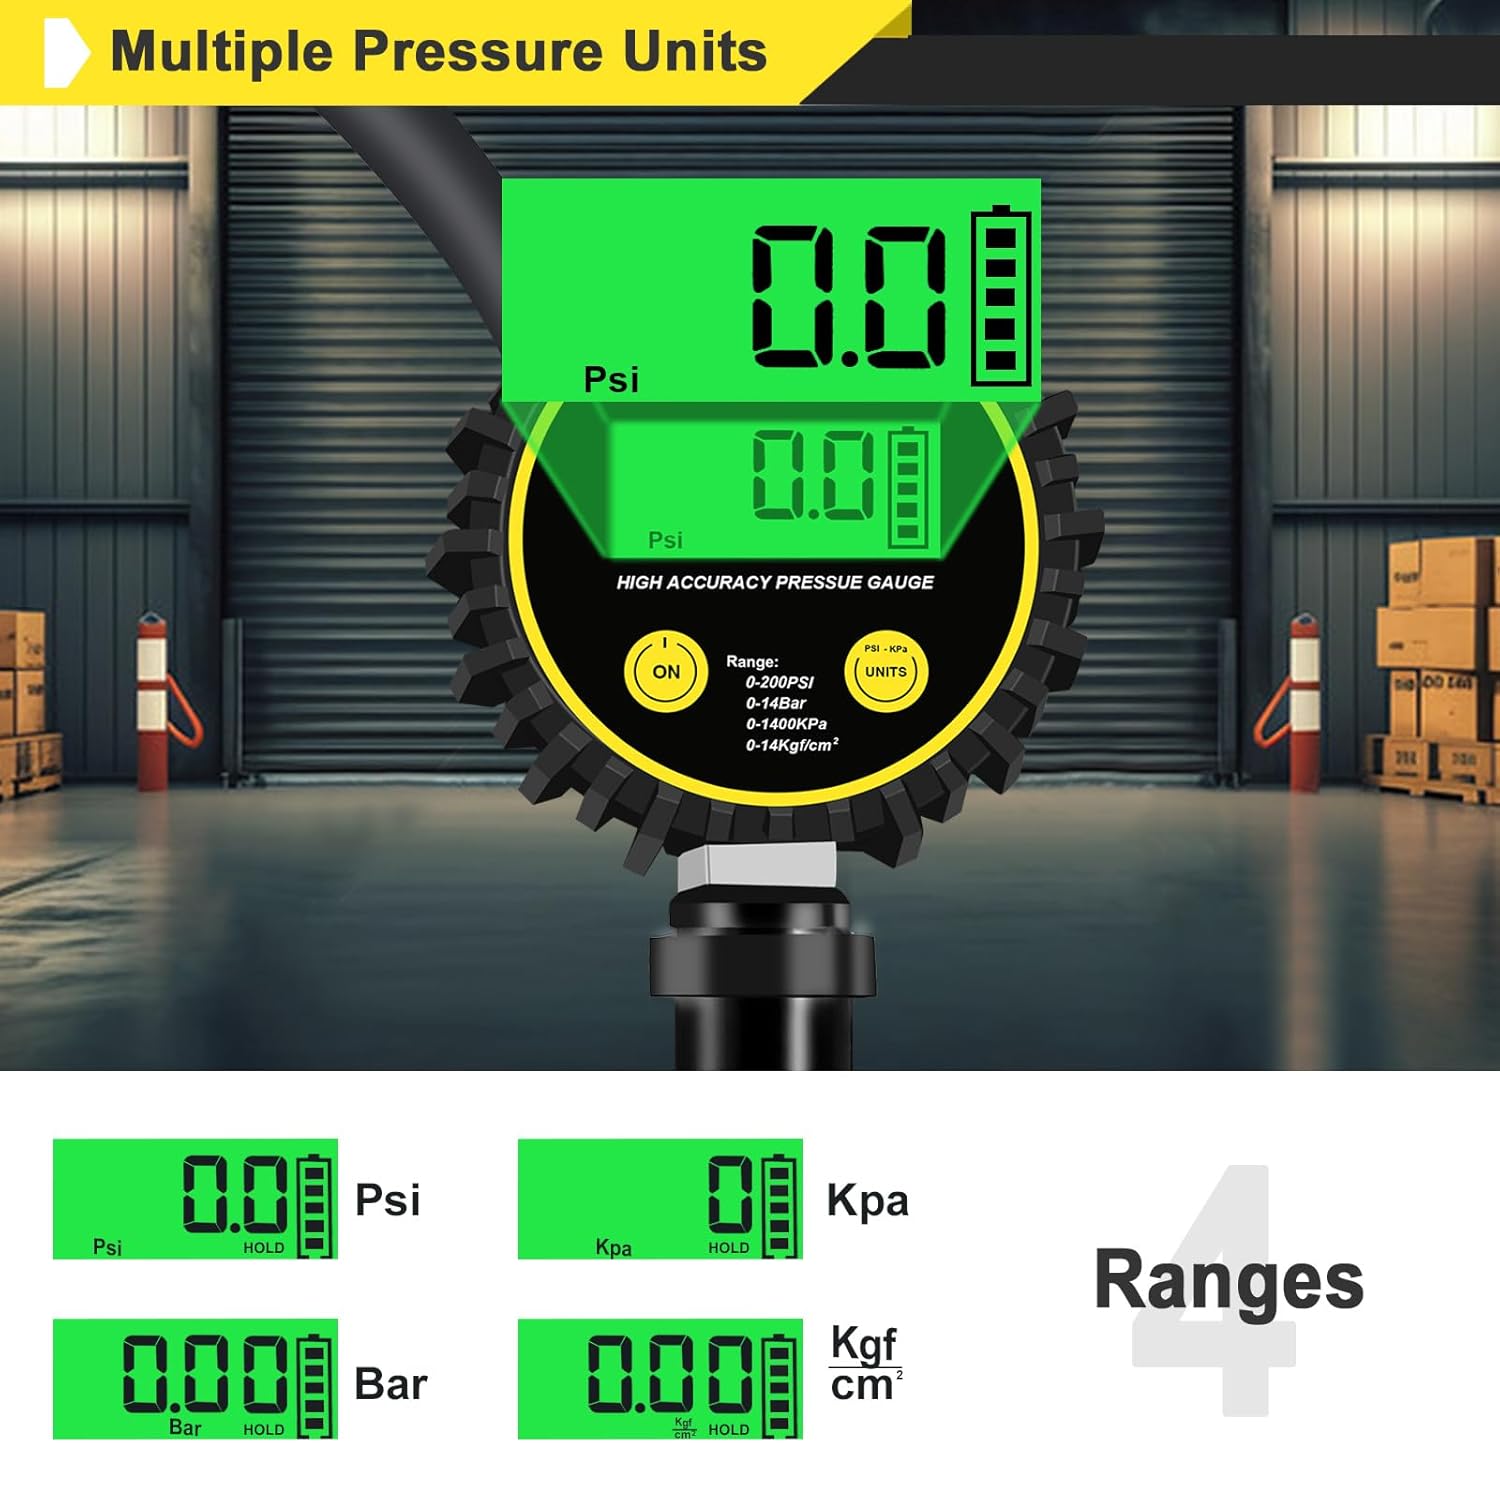
Abbildung 2: The digital display showing different pressure units (PSI, Bar, KPa, Kgf/cm²) and the "UNIT" button for selection.
Bedienungsanleitung
1. Reifendruck prüfen:
- Ensure the inflator is powered on and the correct pressure unit is selected.
- Entfernen Sie die Ventilkappe vom Reifen.
- Press the dual chuck firmly onto the tire valve stem. For Schrader valves, push straight on. For Presta valves, ensure the Presta side of the chuck is used. The gauge will display the current tire pressure.
- Read the pressure displayed on the LCD screen.
- Remove the chuck from the valve stem and replace the valve cap.

Abbildung 3: The dual chuck head, clearly labeled for both Schrader and Presta valve types, allowing direct connection without conversion.
2. Inflating Tires:
- Follow steps 1-3 from "Checking Tire Pressure" to attach the inflator to the tire valve.
- Ensure your air compressor is turned on and supplying air.
- Press and hold the trigger on the inflator handle to begin inflation. The digital gauge will show the pressure increasing in real-time.
- Release the trigger once the desired pressure is reached.
- Remove the chuck from the valve stem and replace the valve cap.
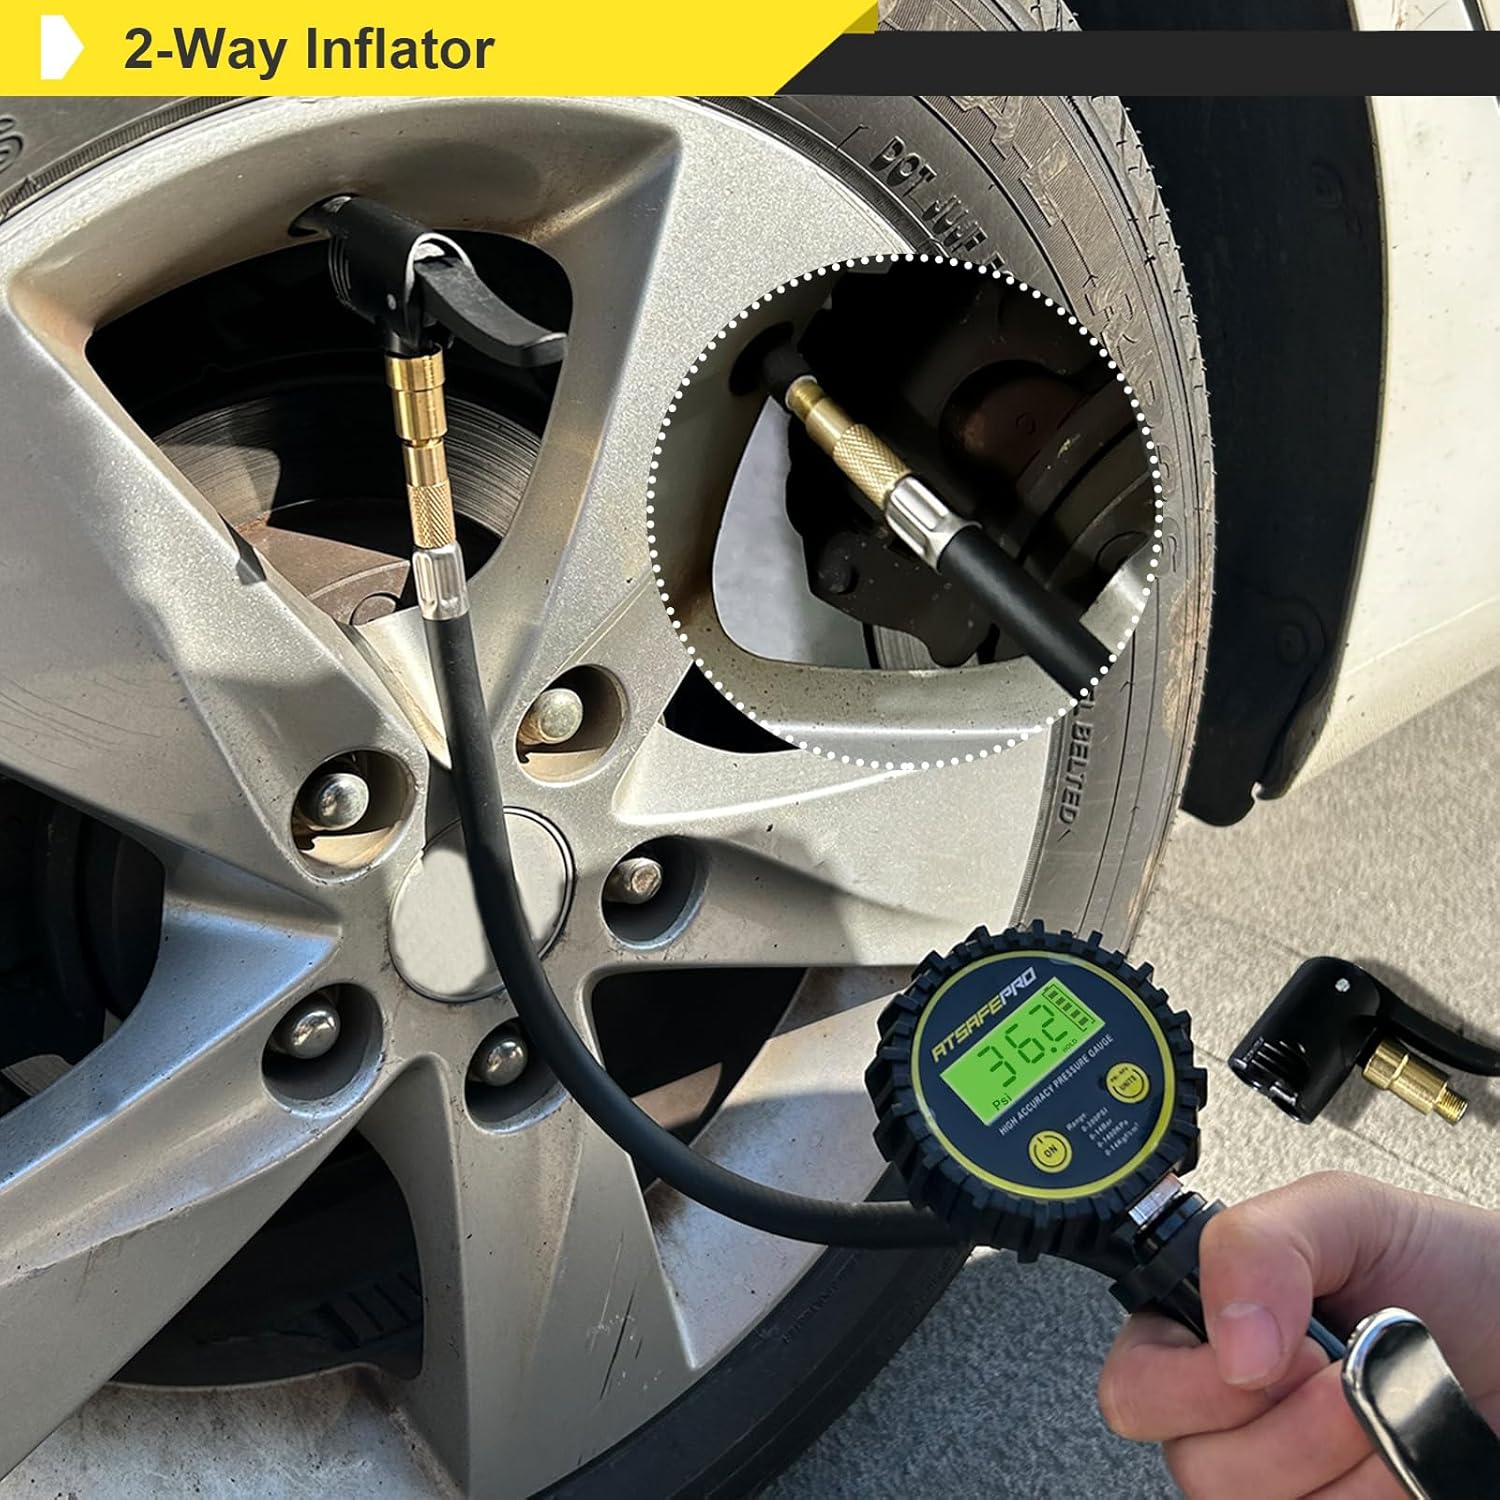
Abbildung 4: The ATsafepro inflator connected to a car tire valve, demonstrating its use for vehicle tire inflation.
3. Deflating Tires:
- Attach the inflator to the tire valve as described in "Checking Tire Pressure". The current pressure will be displayed.
- Press the air bleeder valve (small button or lever near the chuck) to release air from the tire.
- Beobachten Sie die Digitalanzeige, bis der gewünschte niedrigere Druck erreicht ist.
- Release the air bleeder valve, then remove the chuck and replace the valve cap.
4. Using Lock-On Feature (for Presta/Schrader):
The chuck features a lever to secure it onto the valve stem for hands-free operation during inflation.
- Push the chuck onto the valve stem.
- Push the lever down to lock the chuck onto the valve stem.
- To unlock, pull the lever up.

Abbildung 5: Top image shows the chuck unlocked and being placed on a bicycle tire valve. Bottom image shows the chuck locked onto the valve, securing the connection for inflation.
Wartung
- Reinigung: Wischen Sie das Gerät mit einem weichen, damp Mit einem Tuch abwischen. Keine Scheuermittel verwenden und das Gerät nicht in Wasser tauchen.
- Lagerung: Bewahren Sie den Aufblasapparat an einem trockenen, kühlen Ort fern von direkter Sonneneinstrahlung und extremen Temperaturen auf.
- Batteriewechsel: Replace batteries when the low battery indicator appears on the LCD screen. Ensure proper battery disposal.
- Schlauch- und Spannfutterprüfung: Regularly inspect the hose and chuck for any signs of wear, cracks, or damage. Replace if necessary to maintain air-tight seals.
Fehlerbehebung
| Problem | Mögliche Ursache | Lösung |
|---|---|---|
| Das Messgerät lässt sich nicht einschalten. | Defekte oder falsch eingesetzte Batterien. | Batterien austauschen und dabei auf die richtige Polarität achten. |
| Ungenaue Druckanzeige. | Improper connection to valve stem; unit needs recalibration (unlikely for new units). | Ensure chuck is firmly seated on the valve stem. If issues persist, contact customer support. |
| Beim Aufblasen entweicht Luft. | Loose connection to air compressor; chuck not properly sealed on valve stem; damaged hose/chuck. | Tighten quick-connect fitting. Ensure chuck is fully engaged and locked onto the valve. Inspect hose and chuck for damage. |
| Presta side of dual chuck does not work. | Internal mechanism issue or blockage. | Ensure the Presta valve core is open. If the issue persists, contact customer support for assistance. |
Technische Daten
| Marke | ATsafepro |
| Modell | B0DR8DMY7C |
| Druckbereich | 0-200 PSI (0-14 Bar, 0-1400 KPa, 0-14 Kgf/cm²) |
| Genauigkeit | ±1% with 0.5 PSI resolution |
| Ventilkompatibilität | Schrader, Presta |
| Stromquelle | 2 x AAA-Batterien |
| Produktabmessungen (L x B x H) | 1.5 x 3 x 7 Zoll |
| Artikelgewicht | 1.12 Pfund |
Garantie und Support
ATsafepro products are designed for reliability and performance. For warranty information, technical support, or assistance with your product, please refer to the contact information provided with your purchase or visit the official ATsafepro webWebsite.
For further assistance, you may contact ATsafepro customer service through their official channels. Please have your model number (B0DR8DMY7C) and purchase date available when contacting support.