1. Einleitung
This manual provides detailed instructions for the assembly, operation, and maintenance of your new Generic Chapella 2-Drawer Sideboard. Please read this manual thoroughly before beginning assembly and retain it for future reference. This sideboard is designed to offer functional storage and display space, featuring two drawers and two cabinets with internal shelving, all finished in a dark walnut hue.

Abbildung 1: Vorderseite view of the assembled Chapella 2-Drawer Sideboard.
2. Sicherheitshinweise
Please observe the following safety precautions during assembly and use of this product:
- Lesen Sie alle Anweisungen sorgfältig durch before assembly. Failure to follow instructions may result in injury or damage to the product.
- Halten Sie Kinder und Haustiere fern from the assembly area. Small parts can be a choking hazard.
- Assemble on a soft, clean surface (e.g., carpet or cardboard) to prevent scratching the furniture.
- Stellen Sie sicher, dass alle Verbindungen sicher sind before using the product. Periodically check and tighten all fasteners.
- Nicht überladen drawers or shelves. Distribute weight evenly.
- Use anti-tip hardware if provided, to secure the sideboard to a wall. This prevents tipping and serious injury.
- Do not stand or climb on the sideboard.
- Dispose of all packaging materials verantwortungsbewusst.
3. Aufbau und Montage
3.1 Packungsinhalt
Before beginning, verify that all parts and hardware are present. Refer to the included parts list (not provided in this document) to ensure nothing is missing. If any parts are damaged or missing, contact customer support.
3.2 Erforderliches Werkzeug
The following tools are typically required for assembly (not included):
- Kreuzschlitzschraubendreher
- Hammer (für Dübel/Nägel der Rückwand)
- Maßband (optional, zur Positionierung)
3.3 Montageschritte
Follow these general steps for assembly. Specific diagrams and part numbers would be found in the physical manual accompanying the product.
- Teile auspacken und identifizieren: Carefully remove all components from the packaging. Lay them out on a soft, clean surface. Identify each part using the provided labels or diagrams.
- Montieren Sie den Grundrahmen: Attach the bottom panel to the side panels using the designated fasteners (e.g., cam locks, dowels, screws). Ensure the structure is stable.
- Einbau von Innenregalen und Trennwänden: Insert the fixed and adjustable shelves into the cabinet sections. Secure any central dividers as instructed.
- Schubladen zusammenbauen: Construct the two drawers by attaching the sides, front, and back panels, then securing the bottom panel. Install drawer slides onto the drawer boxes and the sideboard frame.
- Rückwand anbringen: Secure the back panel to the main frame using small nails or screws. Ensure it is flush and square.
- Türen montieren: Attach the cabinet doors to the sideboard frame using the provided hinges. Adjust hinges for proper alignment and smooth operation.
- Griffe installieren: Bringen Sie die Griffe an den Schubladen und Schranktüren an.
- Attach Feet/Legs: Secure the support feet to the bottom of the sideboard.
- Final Inspection and Placement: Check all connections for tightness. Carefully move the assembled sideboard to its desired location.
- Sicherung mit Kippschutz: If applicable, install the anti-tip hardware to secure the sideboard to a wall, preventing accidental tipping.
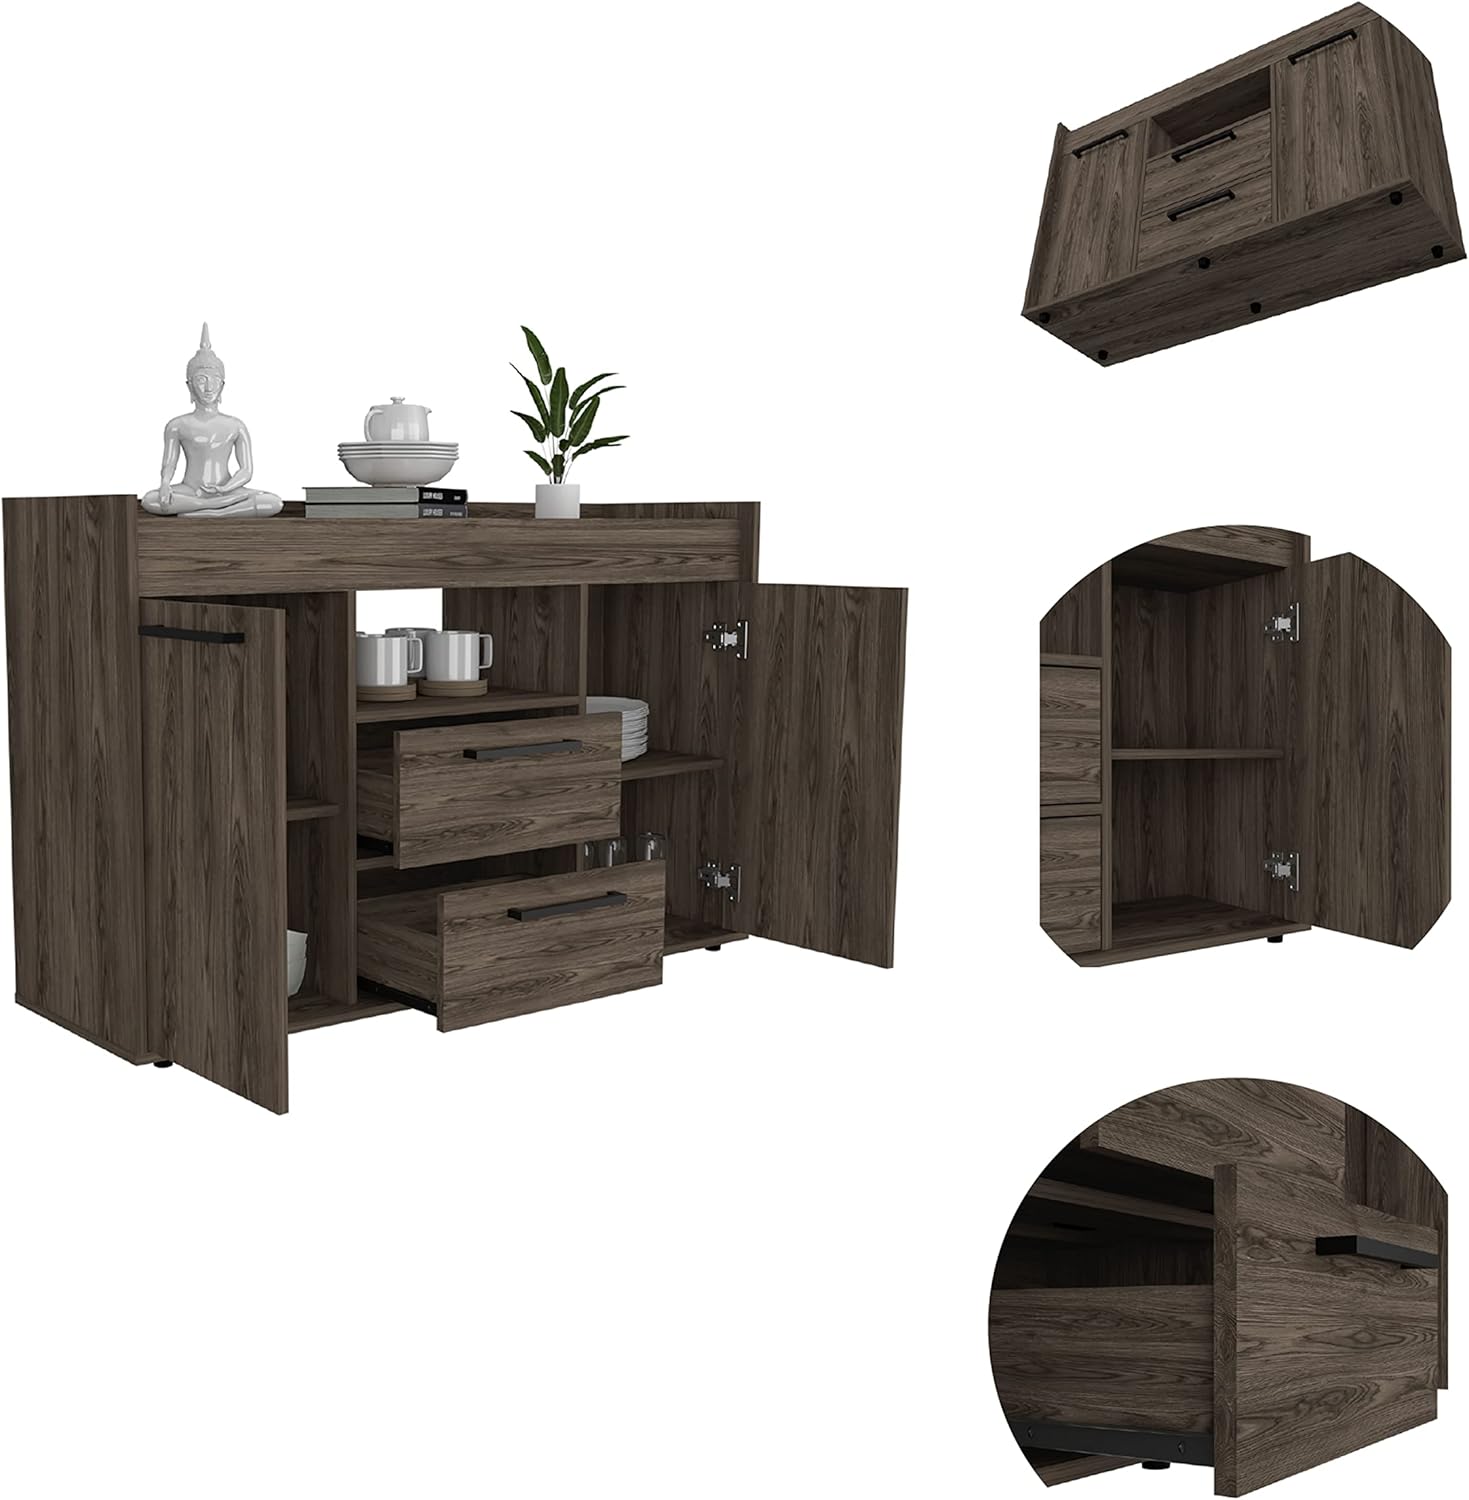
Abbildung 2: Ausführlich view showing the internal structure, drawers, and shelves of the sideboard.

Figure 3: The sideboard in a typical room setting, demonstrating its storage capabilities with open doors and drawers.
4. Bedienungsanleitung
4.1 Using Drawers and Cabinets
- Schubladen: Gently pull the handles to open the drawers. Push firmly to close them completely. Avoid slamming drawers to prevent damage to the slides and contents.
- Schränke: Pull the handles to open the cabinet doors. Push firmly to close. Ensure doors are fully closed to protect contents from dust and maintain a neat appearance.
- Regale: The internal shelves are designed for organized storage of various items. Distribute weight evenly across shelves to prevent warping or damage.
4.2 Display Surface
The spacious top surface can be used to display decorative items, lamps, or other functional objects. Avoid placing excessively heavy items on the top surface. Use coasters under drinks or hot items to protect the finish.
5. Wartung
5.1 Reinigung
- Abstauben: Regularly dust the sideboard with a soft, dry, lint-free cloth.
- Reinigung von verschütteten Flüssigkeiten: Immediately wipe up spills with a slightly damp cloth, then dry thoroughly. Avoid abrasive cleaners or harsh chemicals, as they can damage the dark walnut finish.
- Vermeiden Sie übermäßige Feuchtigkeit: Do not use excessive water when cleaning, as engineered wood can swell or warp.
5.2 Allgemeine Pflege
- Sonneneinstrahlung: Vermeiden Sie längere Einwirkung direkter Sonneneinstrahlung, da dies zu Ausbleichen oder Verfärbungen führen kann.
- Hitze und Luftfeuchtigkeit: Keep the sideboard away from direct heat sources and areas with extreme humidity fluctuations to prevent warping or cracking.
- Überprüfung der Befestigungselemente: Periodically check all screws, bolts, and other fasteners to ensure they remain tight. Tighten as necessary to maintain stability.
6. Fehlerbehebung
| Problem | Mögliche Ursache | Lösung |
|---|---|---|
| Sideboard is wobbly or unstable. | Lose Befestigungselemente; unebener Boden. | Ensure all screws and bolts are tightened. If floor is uneven, use shims under the feet. |
| Die Schubladen lassen sich nicht leichtgängig öffnen und schließen oder klemmen. | Improperly installed drawer slides; obstruction; overloaded drawer. | Check that drawer slides are correctly aligned and installed. Remove any obstructions. Reduce weight in the drawer. |
| Die Schranktüren sind falsch ausgerichtet oder schließen nicht richtig. | Die Scharniere sind locker oder falsch eingestellt. | Adjust the screws on the hinges to align the doors. Tighten all hinge screws. |
| Kratzer oder kleinere Beschädigungen der Oberfläche. | Unfallbedingter Aufprall; abrasive Reinigung. | For minor scratches, use a furniture repair marker or wax stick that matches the dark walnut finish. |
7. Spezifikationen
| Besonderheit | Detail |
|---|---|
| Produktabmessungen (insgesamt) | 14.96 Zoll (Tiefe) x 47.24 Zoll (Breite) x 30.31 Zoll (Höhe) |
| Artikelgewicht | 96.3 Pfund |
| Marke | Generisch |
| Farbe | Brown (Dark Walnut finish) |
| Material | Holzwerkstoff (Spanplatte) |
| Montagetyp | Bodenhalterung |
| Türstil | Platte |
| Speicherfunktionen | 2 Drawers, 2 Cabinets with 6 internal shelves |

Figure 4: Overall dimensions of the Chapella 2-Drawer Sideboard.

Figure 5: Detailed internal dimensions of the Chapella 2-Drawer Sideboard, showing shelf and drawer spacing.

Figure 6: Technical line drawing illustrating the dimensions of the Chapella 2-Drawer Sideboard.
8. Garantie und Support
For warranty information, please refer to the documentation included with your purchase or contact the retailer. If you require assistance with assembly, missing parts, or have any questions regarding your Chapella 2-Drawer Sideboard, please contact customer support through your point of purchase. Please have your model number (Chapella 2-Drawer Sideboard) and purchase date available when contacting support.
Kundendienst: Siehe Ihren Kaufbeleg oder die Angaben des Händlers. webWebsite für Kontaktinformationen.


