1. Einleitung
This manual provides instructions for the safe and efficient use of your ATEM POWER 300W Portable Foldable Solar Panel. Please read this manual thoroughly before operating the product and retain it for future reference. This solar panel is designed to provide portable power for 12V/24V batteries and various power stations, making it suitable for outdoor activities such as camping, RV travel, and hiking.

Image 1.1: The ATEM POWER 300W Portable Foldable Solar Panel kit, including the unfolded panel, carry bag, MPPT charge controller, and various connection cables.
2. Sicherheitshinweise
Beachten Sie die folgenden Sicherheitsvorkehrungen, um Verletzungen oder Schäden am Produkt zu vermeiden:
- Do not attempt to disassemble, repair, or modify the solar panel or controller. Unauthorized modifications can be dangerous and will void the warranty.
- Ensure all connections are secure and correct before operating. Incorrect wiring can cause damage or fire.
- Avoid touching exposed wires or terminals when the panel is exposed to sunlight, as it generates electricity.
- Keep the solar panel and controller away from water, excessive heat, and flammable materials.
- Treten Sie nicht auf das Solarpanel und stellen Sie keine schweren Gegenstände darauf.
- Always use appropriate personal protective equipment when handling electrical components.
- Ensure proper ventilation around the MPPT controller during operation.
3. Produktüberschreitungview
3.1 Komponenten
The ATEM POWER 300W Portable Foldable Solar Panel kit typically includes:
- 300W faltbares Solarpanel
- 20A MPPT Solarladeregler
- MC4 to Multi-connector Adapter Cable
- Batterie Clamp Kabel
- Carry Bag
3.2 Hauptmerkmale
- HPBC Cell Technology: The panel utilizes HPBC (Heterojunction with Back Contact) cells, which relocate metal contacts to the rear. This design minimizes shading on the front surface, enhancing sunlight absorption and contributing to a high power conversion efficiency of 25.8%.
- Strapazierfähige ETFE-Beschichtung: The panel features an anti-crack, flexible ETFE film. This coating provides strength, thermal stability, and resistance to physical stress, protecting the cells. It is corrosion-resistant, stain-proof, and has a self-cleaning, non-stick surface that improves light transmission.
- Integrierter MPPT-Laderegler: The included 20A MPPT (Maximum Power Point Tracking) controller optimizes charging for 12V/24V batteries, including Lead Acid, AGM, GEL, Calcium, and LiFePO4 types. It also features USB-A (18W Max) and USB-C (60W Max) ports for charging small electronic devices.
- Portabilität: The 300W solar panel weighs approximately 7.8kg (17.2 lbs) and folds into a compact size of 500x610x75mm (19.68"x24"x2.95") for easy transport and storage. It includes a sturdy carry handle and hanging loops.
- Sicherheitsschutz: The system includes protection against reverse polarity, overcurrent, undervoltage, übervoltage und Kurzschlüsse.
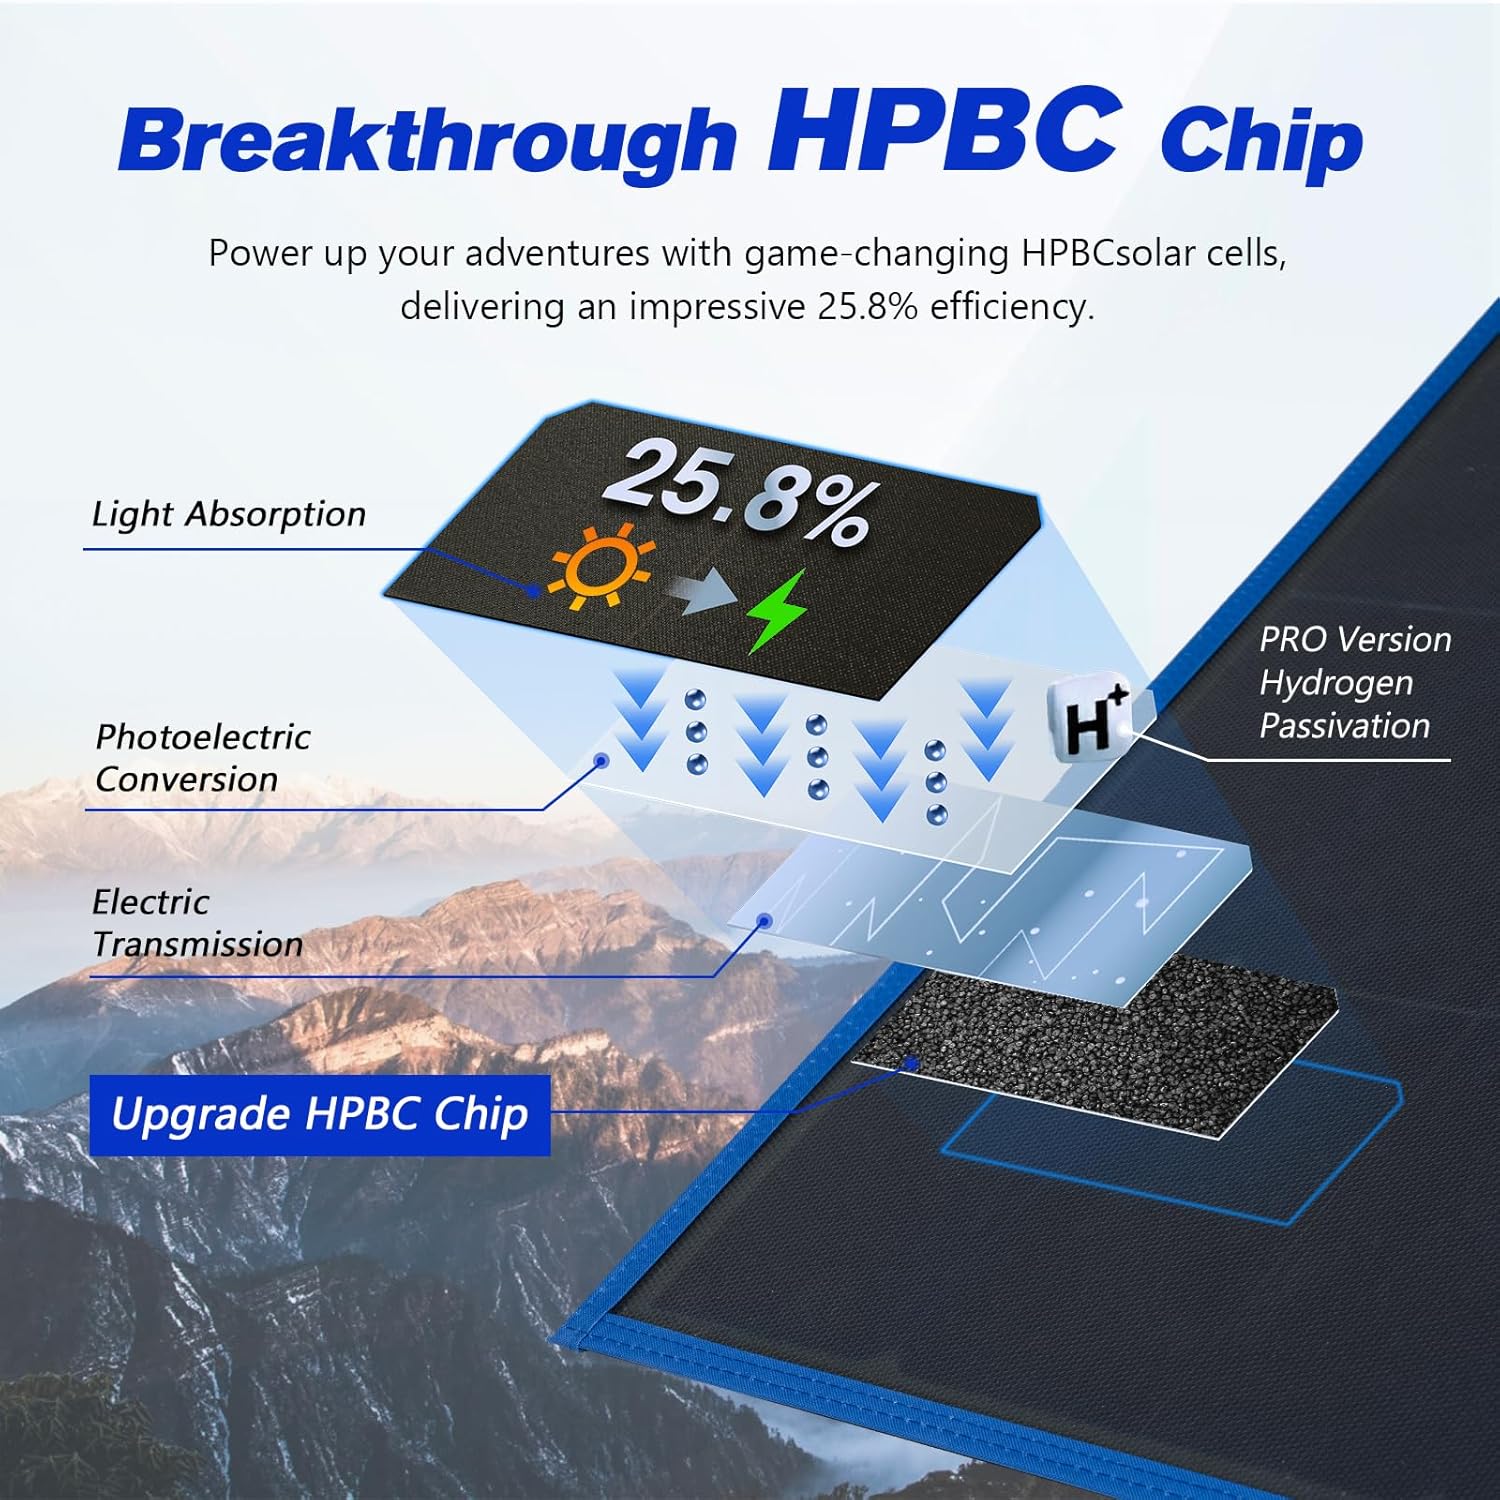
Image 3.1: Diagram illustrating the HPBC chip technology, showing light absorption, photoelectric conversion, and electric transmission layers.

Image 3.2: Illustration of the anti-crack flexible film used in the solar panel construction.

Image 3.3: Comparison showing the difference between a surface with anti-cracking coating and one without.

Image 3.4: The MPPT charge controller, highlighting its USB-A and USB-C output ports for device charging.

Image 3.5: A person carrying the folded solar panel, demonstrating its compact size and portability.

Image 3.6: Visual representation of the solar panel's folding and unfolding mechanism.

Image 3.7: Icons representing the various safety protections integrated into the MPPT controller, such as reverse current, overheat, short circuit, and overcharge protection.
4. Einrichtungsanweisungen
4.1 Ausklappen des Solarpanels
- Legen Sie das gefaltete Solarpanel auf eine ebene, stabile Oberfläche.
- Carefully unfold the panel sections until it is fully extended.
- Position the panel to face the sun directly for optimal performance.
4.2 Connecting the MPPT Controller
The MPPT controller is typically integrated or connected via MC4 connectors. Ensure the controller is connected to the solar panel before connecting to a battery or power station.
4.3 Connecting to a Battery or Power Station
The solar panel system offers wide compatibility for various charging scenarios:
- For 12V/24V Batteries: Connect the MPPT controller's battery terminals to your 12V or 24V battery using the provided battery clamp cable. Ensure correct polarity (positive to positive, negative to negative).
- Für Kraftwerke: Use the MC4 to multi-connector adapter cable to connect the solar panel directly to compatible portable power stations. The adapter typically includes various DC plugs (e.g., DC7909, DC5525, DC35135, DC5521, Anderson Plug, XT60).

Image 4.1: Diagram showing the connection of the solar panel and MPPT controller to a 12V/24V battery.
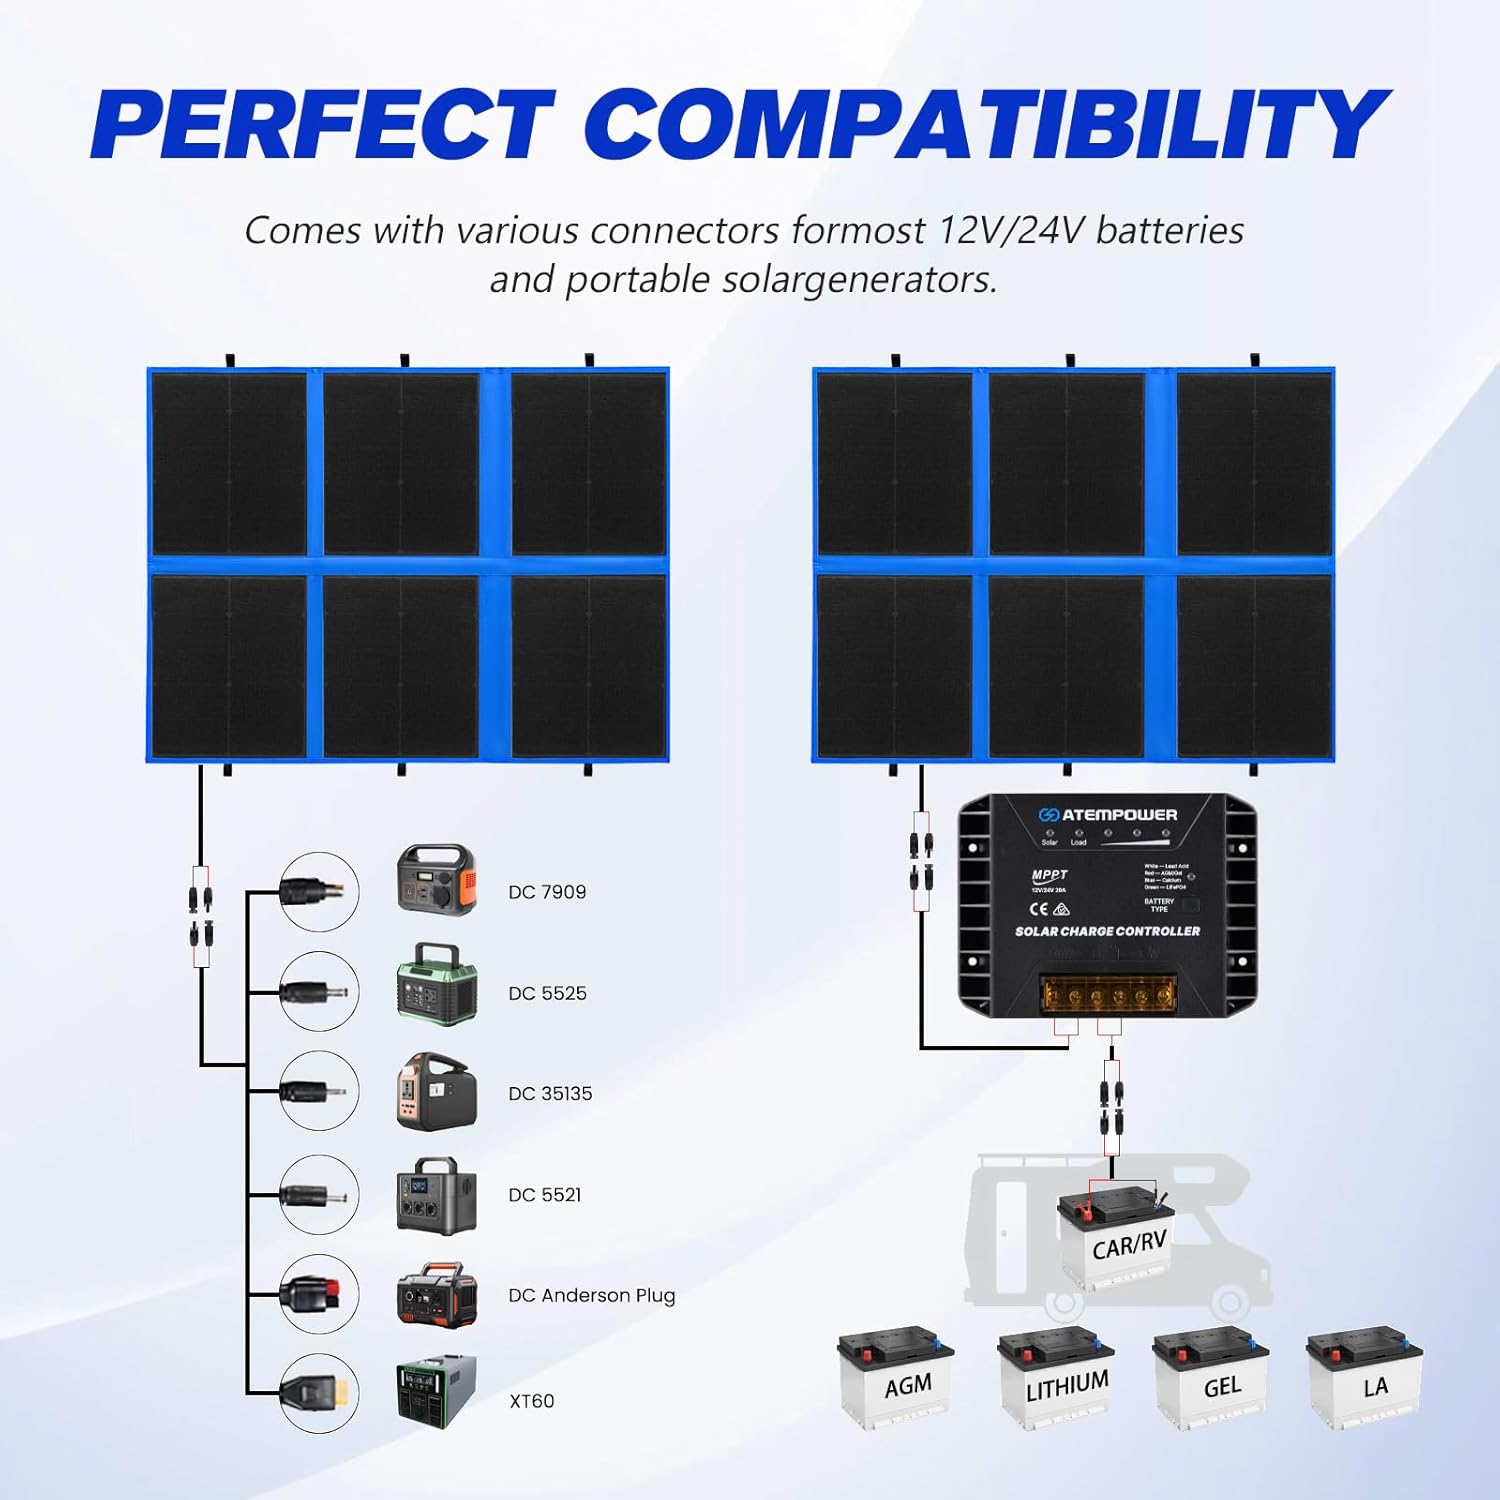
Image 4.2: Diagram illustrating the various connectors for compatibility with different power stations and battery types.

Image 4.3: Visual guide to the wide range of connectors provided for compatibility with various portable power stations and devices.
4.4 Selecting Battery Type (MPPT Controller)
To ensure optimal charging and battery longevity, select the correct battery type on the MPPT controller:
- Locate the 'BATTERY TYPE' button on the MPPT controller.
- Press and hold the button until the indicator light begins to flash.
- Cycle through the battery types (Lead Acid, AGM, GEL, Calcium, LiFePO4) by short-pressing the button.
- Release the button when the desired battery type's indicator light is solid. The controller will save the setting.

Image 4.4: Close-up of the MPPT controller showing the battery type selection button and indicator lights.
5. Bedienungsanleitung
5.1 Optimale Paneelplatzierung
For maximum power generation, position the solar panel directly facing the sun. Adjust the angle periodically throughout the day to track the sun's movement. Avoid shaded areas, as even partial shading can significantly reduce output.

Image 5.1: Illustration demonstrating how parallel wiring helps maintain efficiency even with partial shading on the solar panel.
5.2 Überwachung der Ladevorgänge
The MPPT controller features indicator lights for solar input and load status. Refer to the controller's specific LED indicators to monitor charging activity and battery status.
5.3 USB Output Usage
Connect compatible USB devices (smartphones, tablets, etc.) to the USB-A or USB-C ports on the MPPT controller for direct charging. Ensure the solar panel is receiving sufficient sunlight for stable power output.
6. Wartung
6.1 Reinigung des Solarpanels
The ETFE coating is designed to be self-cleaning. However, for optimal performance, periodically clean the panel surface with a soft, damp cloth to remove dust, dirt, or debris. Do not use abrasive cleaners or harsh chemicals.

Image 6.1: The solar panel being rinsed with water, demonstrating its weather-resistant and easy-to-clean ETFE surface.
6.2 Speicherung
When not in use, fold the solar panel and store it in its carry bag in a cool, dry place, away from direct sunlight and extreme temperatures. Ensure all cables are neatly coiled to prevent damage.
7. Fehlerbehebung
If you encounter issues with your solar panel, refer to the following common troubleshooting steps:
- Keine Leistungsabgabe:
- Stellen Sie sicher, dass das Panel direktem Sonnenlicht ausgesetzt und nicht beschattet ist.
- Prüfen Sie alle Kabelverbindungen auf festen Sitz und korrekte Polarität.
- Verify the battery type setting on the MPPT controller is correct.
- Überprüfen Sie Kabel und Steckverbinder auf sichtbare Beschädigungen.
- Niedriger Ladestrom:
- Ensure the panel surface is clean and free of dirt or debris.
- Adjust the panel's angle to face the sun more directly.
- Check for partial shading from trees, buildings, or other objects.
- Consider ambient temperature; extreme heat can reduce panel efficiency.
- Controller reagiert nicht:
- Disconnect and reconnect all power sources (solar panel first, then battery).
- Stellen Sie sicher, dass die Batterie voltage liegt innerhalb des Betriebsbereichs des Reglers.
8. Spezifikationen
| Besonderheit | Spezifikation |
|---|---|
| Modell | 300 W |
| Maximale Leistung | 300 Watt |
| Effizienz | 25.8% (HPBC Chip) |
| Artikelgewicht | 7.8 kg |
| Produktabmessungen (gefaltet) | 500 x 610 x 75 mm (19.68 x 24 x 2.95 Zoll) |
| Produktabmessungen (offen) | Approx. 77.37 x 38 x 0.2 inches (based on similar models, not explicitly stated for 300W in input) |
| MPPT Controller Output | 20A (12V/24V Auto) |
| USB-Ausgang | USB-A (18W Max), USB-C (60W Max) |
| Kompatible Batterietypen | Lead Acid, AGM, GEL, Calcium, LiFePO4 |
| Beschichtungsmaterial | ETFE (Anti-Cracking) |
9. Garantie und Support
The ATEM POWER 300W Portable Foldable Solar Panel comes with a two-year warranty from the date of purchase, covering manufacturing defects. Please retain your proof of purchase for warranty claims.
For technical support, troubleshooting assistance, or warranty inquiries, please contact ATEM POWER customer service through the retailer's platform or the official ATEM POWER webWebsite.
Weitere Informationen finden Sie unter: ATEM POWER Store