1. Einleitung
Thank you for choosing the HUANUO HNSS48B Monitor Arm. This mechanical spring monitor arm is designed to provide ergonomic positioning for your display, supporting monitors from 17 to 49 inches and weighing up to 20kg. It features multi-angle adjustment, VESA compatibility, and integrated cable management to optimize your workspace. Please read this manual carefully before installation and use to ensure safe and correct operation.
2. Sicherheitshinweise
- Vor der Installation sicherstellen, dass alle Komponenten vorhanden und unbeschädigt sind. Nicht verwenden, wenn Teile fehlen oder defekt sind.
- Dieses Produkt ist nur für den Gebrauch in Innenräumen vorgesehen.
- Die maximale Tragfähigkeit von 20 kg (44 lbs) darf nicht überschritten werden.
- Ensure the mounting surface (desk) is strong enough to support the combined weight of the monitor arm and your monitor.
- Always adjust the tension nach mounting the monitor to prevent sudden movement.
- Halten Sie Kinder und Haustiere während der Installation fern.
- Use appropriate tools and follow all instructions carefully. If you are unsure about any part of the installation, seek professional assistance.
3. Packungsinhalt
Bitte überprüfen Sie, ob alle Teile in Ihrem Paket enthalten sind:
- Monitorarm-Baugruppe
- Schreibtisch Clamp Base (Dual Clamp Design)
- Grommet Mount Option
- VESA-Platte
- Montagezubehör (Schrauben, Unterlegscheiben, Abstandshalter)
- Hex Keys for Adjustment
- Kabelmanagement-Clips/Abdeckungen
4. Spezifikationen
| Besonderheit | Spezifikation |
|---|---|
| Modellnummer | HNSS48B |
| Marke | HUANUO |
| Kompatibilität der Monitorgrößen | 17-49 Zoll |
| Gewichtskapazität | Bis zu 20 kg (44 lbs) |
| VESA-Kompatibilität | 75x75mm, 100x100mm |
| Montagetyp | Tischmontage (Clamp oder Öse) |
| Bewegungstyp | Tilt, Rotate, Swivel |
| Material | Legierter Stahl |
| Farbe | Schwarz |
| Garantie | 5 Jahr Herstellergarantie |
5. Installationsanleitung
Follow these steps to install your HUANUO monitor arm. You can choose between clamp mounting or grommet mounting.
5.1. Wählen Sie Ihre Montageart
The monitor arm supports both C-clamp and grommet installation. The C-clamp method is suitable for desk edges, while the grommet method uses an existing hole in your desk.
C-Clamp Installation (Desk Thickness 2-9cm)
- Attach the dual clamp Vom Fuß bis zum unteren Ende des Hauptmastes.
- Positionieren Sie dieamp Platziere es am Rand deines Schreibtisches.
- Ziehen Sie die Schrauben am Cl festamp until the base is securely fastened to the desk. The dual clamp design provides enhanced stability.
Grommet Installation (Desk Thickness 2-9cm)
- Zerlegen Sie die C-Cl-Verbindung.amp from the base and attach the grommet plate.
- Führen Sie die Hauptstange durch die Kabeldurchführung in Ihrem Schreibtisch.
- Secure the base from underneath the desk using the provided plate and tightening knob.
5.2. Assemble the Arm and Attach Monitor
- Insert the lower arm section into the base pole.
- Insert the upper arm section into the lower arm section.
- Attach the VESA plate to the back of your monitor using the appropriate screws. Ensure the VESA plate is securely fastened.
- Slide the monitor (with VESA plate attached) onto the VESA head of the arm.
- Secure the monitor by engaging the VESA lock lever. This one-click fixation ensures your monitor is safely attached.
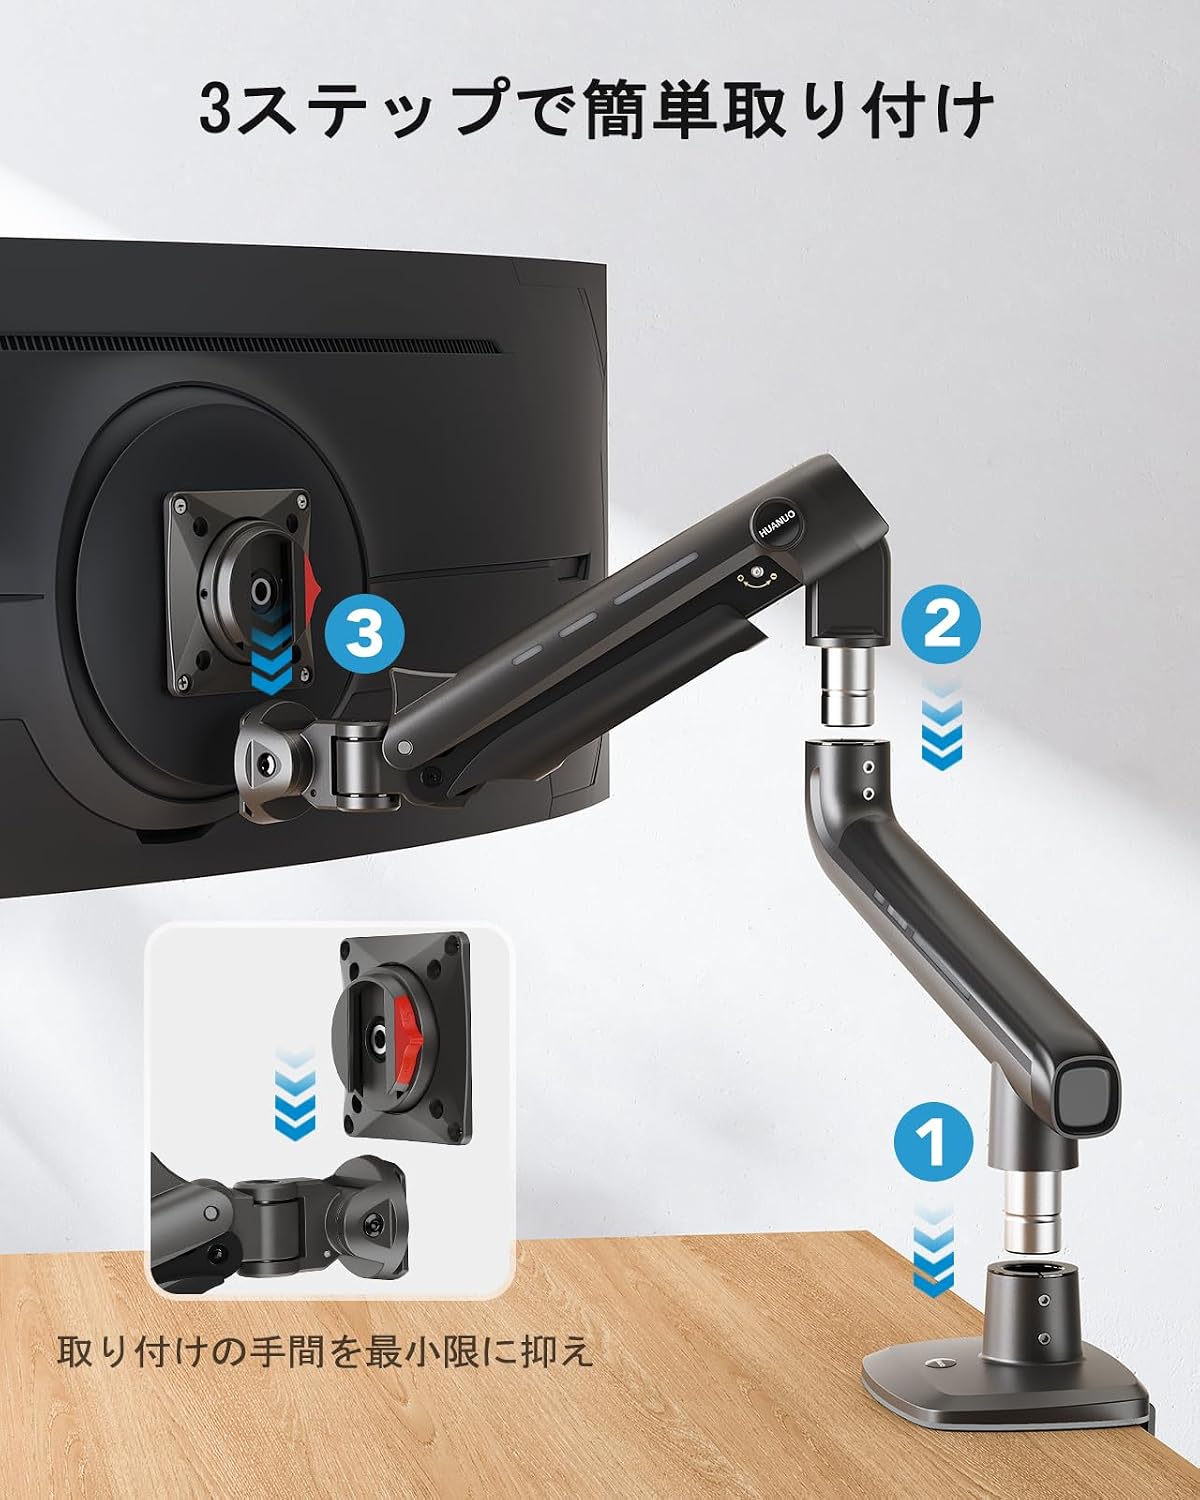
Image: Simplified 3-step installation process for the monitor arm, showing assembly of arm sections and VESA plate attachment.

Image: Illustration of the monitor arm's high load design, highlighting the thicker aluminum alloy arm and double clamp Basis für Stabilität.
6. Bedienungsanleitung und Einstellungen
The HUANUO monitor arm offers extensive adjustability to achieve your ideal view, um die Position zu ändern.
6.1. Höhenverstellung
The arm allows for vertical movement up to 50cm. Simply grasp the monitor and move it up or down to your desired height. The mechanical spring will hold it in place.

Image: A person adjusting a monitor on the arm, illustrating the maximum height of 50cm, 360-degree rotation, and +/-90 degree swivel.
6.2. Neigungseinstellung
The monitor can be tilted +/- 50 degrees to reduce glare and optimize viewing angles. Gently push or pull the top or bottom of your monitor to adjust the tilt.

Image: A user engaged in gaming with their monitor tilted at +/- 50 degrees, demonstrating the ergonomic benefit for immersive experiences.
6.3. Schwenk- und Drehgelenk
The arm allows for +/- 90 degrees of swivel (left/right movement) and 360 degrees of rotation at the VESA plate, enabling portrait or landscape orientation.

Image: A monitor arm displaying a large monitor in both horizontal (up to 49 inches) and vertical (up to 35 inches) orientations, demonstrating flexibility.
6.4. Spannungseinstellung
The arm's tension needs to be adjusted to match the weight of your monitor. This ensures the monitor stays in place and moves smoothly.
Important: Adjust tension erst nach the monitor is mounted.
- Locate the tension adjustment screw on the arm's joint.
- If the monitor sags or drops, lift the arm to a horizontal position and turn the screw gegen den uhrzeigersinn (towards the '+' sign) to increase tension.
- If the monitor rises or is difficult to push down, push the arm down to a horizontal position and turn the screw im Uhrzeigersinn (towards the '-' sign) to decrease tension.
- Adjust gradually and test the arm's movement until the monitor stays at your desired height with minimal effort.
Video: A demonstration of adjusting the monitor arm's tension to prevent sagging or rising, ensuring the monitor stays in position.
7. Kabelmanagement
The monitor arm features integrated cable management to keep your workspace tidy. Route your monitor and power cables along the underside of the arm and secure them with the provided clips or covers. This helps prevent cable clutter and protects cables from damage.
8. Wartung
- Überprüfen Sie regelmäßig alle Schrauben und Verbindungen, um sicherzustellen, dass sie fest und sicher sitzen.
- Reinigen Sie den Monitorarm mit einem weichen, fusselfreien Tuch.amp Mit einem Tuch abwischen. Vermeiden Sie scheuernde Reiniger oder Lösungsmittel.
- Schmieren Sie den mechanischen Federmechanismus nur dann, wenn dies vom Hersteller ausdrücklich vorgeschrieben ist.
9. Fehlerbehebung
9.1. Monitor Sags or Drops
Lösung: The tension is too low for your monitor's weight. Increase the tension by turning the adjustment screw gegen den uhrzeigersinn (towards '+') with the monitor arm in a horizontal position. Refer to Section 6.4 for detailed instructions.
9.2. Monitor Rises or is Difficult to Push Down
Lösung: The tension is too high for your monitor's weight. Decrease the tension by turning the adjustment screw im Uhrzeigersinn (towards '-') with the monitor arm in a horizontal position. Refer to Section 6.4 for detailed instructions.
9.3. Monitor Does Not Tilt Properly
Lösung: Check the tightness of the tilt mechanism screws on the VESA head. Tighten them if they are loose. Ensure your monitor's weight is within the specified range.
9.4. Arm Feels Loose on the Desk
Lösung: Ziehen Sie die C-Schraube wieder fest.amp or grommet mount screws. Ensure the desk thickness is within the supported range (2-9cm).
10. Garantie und Support
This HUANUO monitor arm comes with a 5-year manufacturer warranty. For warranty claims, technical support, or any questions regarding your product, please contact HUANUO customer service through your retailer or the official HUANUO website. Please have your model number (HNSS48B) and proof of purchase ready.