1. Sicherheitshinweise
Please read all safety instructions carefully before installation and use. Failure to follow these instructions may result in product damage, property damage, or personal injury.
- Gewichtskapazität: Do not exceed the maximum weight capacity of 59.4 lbs (27 kg) per monitor arm. Ensure your monitors are within this limit.
- Bildschirmgröße: This arm supports monitors from 17 inches to 57 inches.
- VESA-Kompatibilität: Stellen Sie sicher, dass Ihre Monitore über VESA-Befestigungsmuster von 75x75mm oder 100x100mm verfügen.
- Stabile Oberfläche: Install the monitor arm on a sturdy desk or surface capable of supporting the combined weight of the arm and monitors.
- Gasfedereinstellung: Adjust the gas spring tension erst nach the monitor is installed. Always hold the arm horizontally during adjustment to prevent sudden movement.
- Kinder: Halten Sie Kleinteile von Kindern fern, um Erstickungsgefahr vorzubeugen.
2. Packungsinhalt
Vergewissern Sie sich vor Beginn der Installation, dass alle Komponenten vorhanden sind.
- Hauptmast und Sockel
- Dual Monitor Arms (2 units)
- VESA-Platten (2 Stück)
- C-Clamp and Grommet Mounting Hardware
- Kabelmanagement-Clips
- Hex Keys and Screws (various sizes)
- Bedienungsanleitung

Image: All components included in the monTEK Dual Monitor Arm package.
3. Spezifikationen
| Modellnummer | MA1001PBK-D |
| Unterstützte Bildschirmgröße | 17" - 57" (Flat & Curved) |
| Gewichtskapazität | 4.4 lbs to 59.4 lbs (2 kg to 27 kg) per arm |
| VESA-Kompatibilität | 75x75mm, 100x100mm |
| Material | Stahl, Aluminium, Kunststoff |
| Montageoptionen | C-Clamp, Tülle |
| Neigungsbereich | +75° bis -75° |
| Schwenkbereich | ±90° |
| Bildschirmdrehung | ±90° |
| Höhenverstellung der Stange | Bis zu 19.2 Zoll (48.8 cm) |
| Arm Extension Range | Bis zu 22.2 Zoll (56.4 cm) |
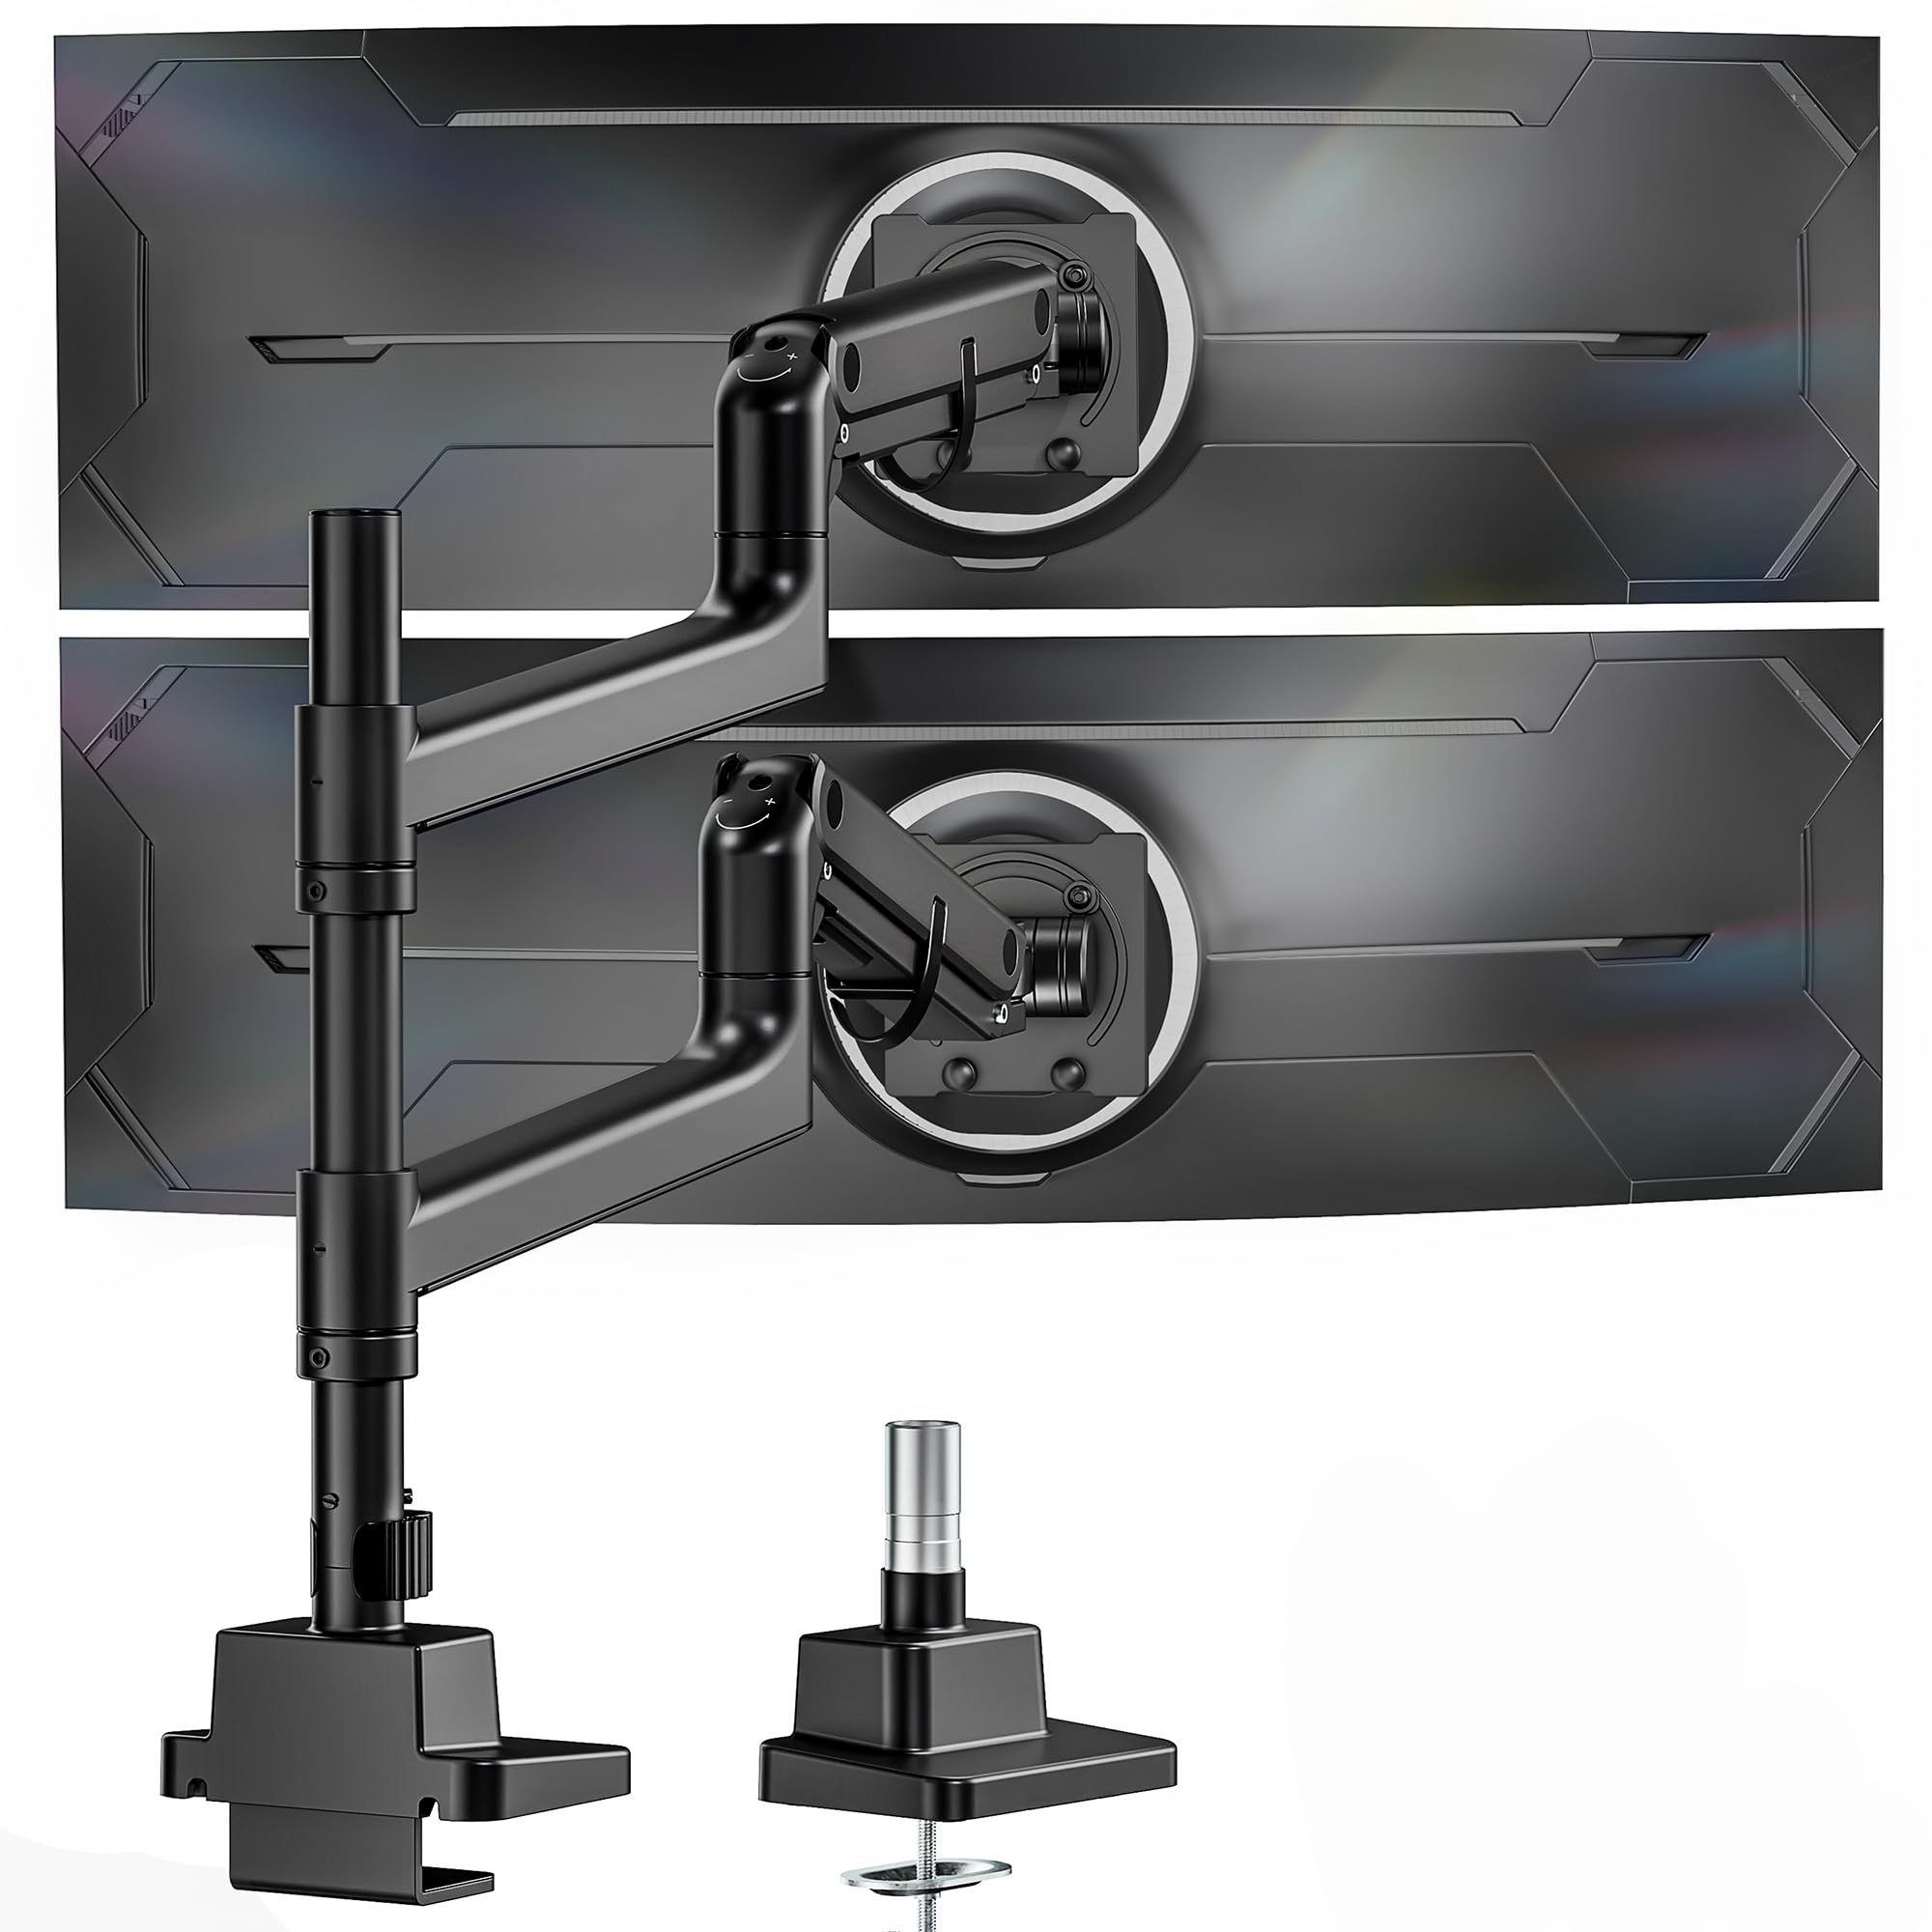
Image: The monTEK Dual Monitor Arm in use, demonstrating its compatibility with large and ultrawide screens.
4. Installationsanleitung
4.1 Wählen Sie Ihre Montageoption
The monTEK Dual Monitor Arm supports two installation methods: C-clamp and Grommet mount. Select the method best suited for your desk.
- C-Clamp: For desk thickness between 0.47" and 1.8" (12-45mm).
- Tülle: For desk thickness between 0.47" and 2" (12-50mm). Requires an existing desk hole or drilling a new one (diameter 0.39" to 2.36" / 10-60mm).

Abbildung: Visuelle Anleitung für C-Clamp and grommet mounting, including compatible desk thickness ranges.
4.2 Installationsschritte
Follow these steps to install your monitor arm. For a visual guide, please refer to the installation video below.
- Assemble the chosen desk mount (C-clamp or grommet) to your desk.
- Attach the main pole to the mounted base.
- Slide the monitor arms onto the main pole and secure them at your desired height.
- Attach the VESA plates to the back of your monitors using the provided screws and washers. Ensure VESA compatibility (75x75mm or 100x100mm).
- Carefully slide the monitors (with VESA plates attached) onto the monitor arms until they click into place.
- Secure the monitors to the VESA plates with the safety screws.
Video: Detailed installation guide for the monTEK Dual Monitor Arm, demonstrating step-by-step assembly for both C-clamp und Tüllenmontageoptionen.
5. Operating Your Monitor Arm
5.1 Adjusting Monitor Height and Position
The gas spring mechanism allows for smooth and effortless adjustment of your monitors. You can adjust the height, tilt, swivel, and rotation to achieve an ergonomic viewErfahrung.
- Höhenverstellung: The arms can be moved up and down along the 19.2-inch pole.
- Verlängerung: The arms extend up to 22.2 inches for optimal viewing-Distanz.
- Neigung: Adjust the screen tilt from +75° to -75° to reduce glare and improve viewwinkeln.
- Schwenken: Swivel your monitors ±90° horizontally.
- Drehung: Rotate your screens ±90° for portrait or landscape orientation.

Image: Visual representation of the monitor arm's flexible adjustment capabilities for tilt, swivel, and rotation.
5.2 Einstellung der Gasfederspannung
If your monitor arm does not hold its position or moves too easily/stiffly, you may need to adjust the gas spring tension. Use the provided hex key.
- Arm Drops: Turn the adjustment screw in the "+" direction to increase tension.
- Arm Rises: Turn the adjustment screw in the "-" direction to decrease tension.
- Wichtig: Always hold the arm horizontally during adjustment. Do not adjust tension before monitor installation.
Video: Instructions on how to adjust the gas spring tension of the monitor arm to ensure it holds the monitor's position correctly.
5.3 Kabelmanagement
Utilize the integrated cable management clips along the arms and pole to keep your cables organized and maintain a tidy workspace.
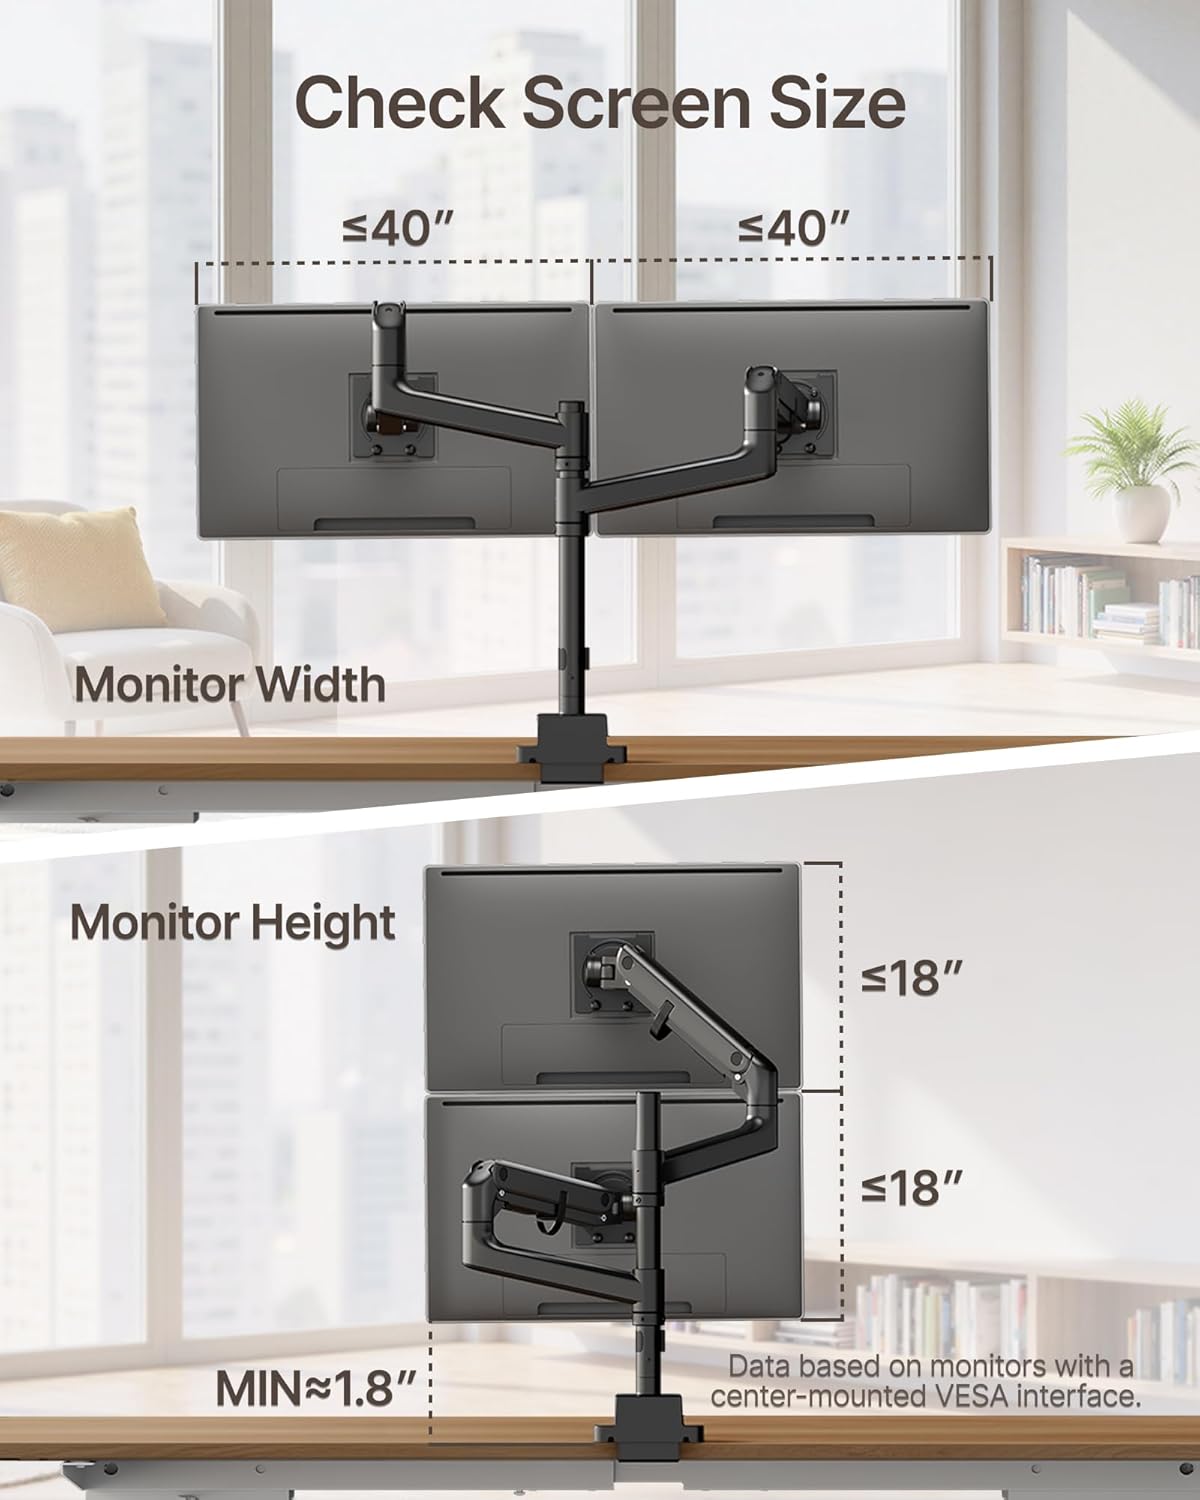
Image: The monitor arm with cables neatly routed through its integrated cable management system.
6. Wartung
Regular maintenance ensures the longevity and optimal performance of your monTEK Dual Monitor Arm.
- Reinigung: Wischen Sie die Oberfläche mit einem weichen, damp Mit einem Tuch abwischen. Vermeiden Sie scheuernde Reiniger oder Lösungsmittel.
- Inspektion: Überprüfen Sie regelmäßig alle Schrauben und Verbindungen, um sicherzustellen, dass sie fest sitzen. Ziehen Sie sie gegebenenfalls nach.
- Schmierung: No regular lubrication is required for the gas spring mechanism.
7. Fehlerbehebung
Sollten Sie auf Probleme stoßen, konsultieren Sie bitte die folgenden häufigen Probleme und Lösungen.
- Monitor Sags or Rises Unexpectedly: Adjust the gas spring tension as described in Section 5.2. Refer to the "How to Adjust the Gas Spring Tension" video.
- Monitor Cannot Tilt or Swivel: Ensure all adjustment screws for tilt and swivel are not overtightened. Loosen slightly if movement is restricted. Refer to the "Tips for screen adjustment" video.
- Monitor is Unstable: Check that the desk mount (C-clamp or grommet) is securely fastened to the desk and all VESA plate screws are tightened. Ensure the monitor weight is within the specified capacity.
- Die Kabel sind unordentlich: Re-route cables through the integrated cable management clips.
Video: Practical tips for adjusting your screen's position and movement, addressing common issues like tilting and swiveling.
8. Garantie und Support
monTEK products are designed for durability and performance. For specific warranty details, please refer to the warranty card included with your product or visit the official monTEK webWebsite.
If you require further assistance or have questions not covered in this manual, please contact monTEK customer support through the following channels:
- WebWebsite: Visit the official monTEK webWebsite mit häufig gestellten Fragen und Support-Ressourcen.
- E-Mail: Die E-Mail-Adresse des Kundendienstes finden Sie auf Ihrer Produktverpackung oder Garantiekarte.
- Telefon: Die Telefonnummer des Kundendienstes finden Sie auf Ihrer Produktverpackung oder Ihrer Garantiekarte.