1. Einleitung
This manual provides detailed instructions for the safe installation, operation, and maintenance of your Generic 52-inch Low Profile Ceiling Fan with Lights, Model W1367P185623. Please read all instructions carefully before beginning installation and retain this manual for future reference.
This modern black low-profile ceiling fan is designed to provide efficient air circulation and integrated lighting for residential or commercial spaces. It features a DC motor for energy efficiency and an integrated 24-watt LED light kit with adjustable color temperatures (3000K, 4000K, 6000K), all controllable via the included remote.

Image 1.1: The 52-inch low profile ceiling fan with lights, shown installed in a contemporary living space.
2. Sicherheitshinweise
WARNUNG: Um das Risiko von Bränden, Stromschlägen oder Verletzungen zu verringern, befolgen Sie stets diese Sicherheitsrichtlinien:
- Lesen Sie alle Anweisungen und Sicherheitshinweise, bevor Sie Ihren neuen Ventilator installieren.view die beigefügten Diagramme gründlich durchlesen.
- Alle Verkabelungen müssen den nationalen und lokalen Elektrovorschriften entsprechen. Wenn Sie mit Verkabelungen nicht vertraut sind, wenden Sie sich bitte an einen qualifizierten Elektriker.
- Vor der Installation muss die Stromzufuhr unterbrochen werden, indem die Leitungsschutzschalter am Hauptsicherungskasten ausgeschaltet werden.
- Ensure the installation site can support the fan's weight (approximately 15-20 lbs).
- Betreiben Sie den Ventilator nicht, wenn die Flügel oder das Gehäuse beschädigt sind.
- Platzieren Sie keine Gegenstände im Weg der Lüfterflügel.
- This fan is ETL safety listed, indicating compliance with safety standards.
3. Produktmerkmale
The Generic 52-inch Low Profile Ceiling Fan offers a range of features for enhanced comfort and convenience:
- Fernbedienung: Full function remote control for fan speed, light dimming, light color temperature, and fan direction.
- Umkehrmotor: Allows for both downdraft (summer mode) and updraft (winter mode) operation to optimize air circulation year-round.
- 3 Light Color Temperatures: Integrated LED light kit provides Warm White (3000K), Natural White (4000K), and Cool White (6000K) options.
- Dimmbare LED: Adjust the brightness of the integrated LED light.
- Timer-Funktion: Stellen Sie den Ventilator so ein, dass er sich nach 1, 3 oder 6 Stunden automatisch ausschaltet.
- Sechs Lüftergeschwindigkeiten: Choose from six distinct fan speeds for optimal airflow.
- Leiser Gleichstrommotor: Energy-efficient DC motor operates quietly.
- Niedriger Profile Design: Ideal for rooms with lower ceilings.
- Mattschwarzes Finish: Modern aesthetic to complement various decor styles.
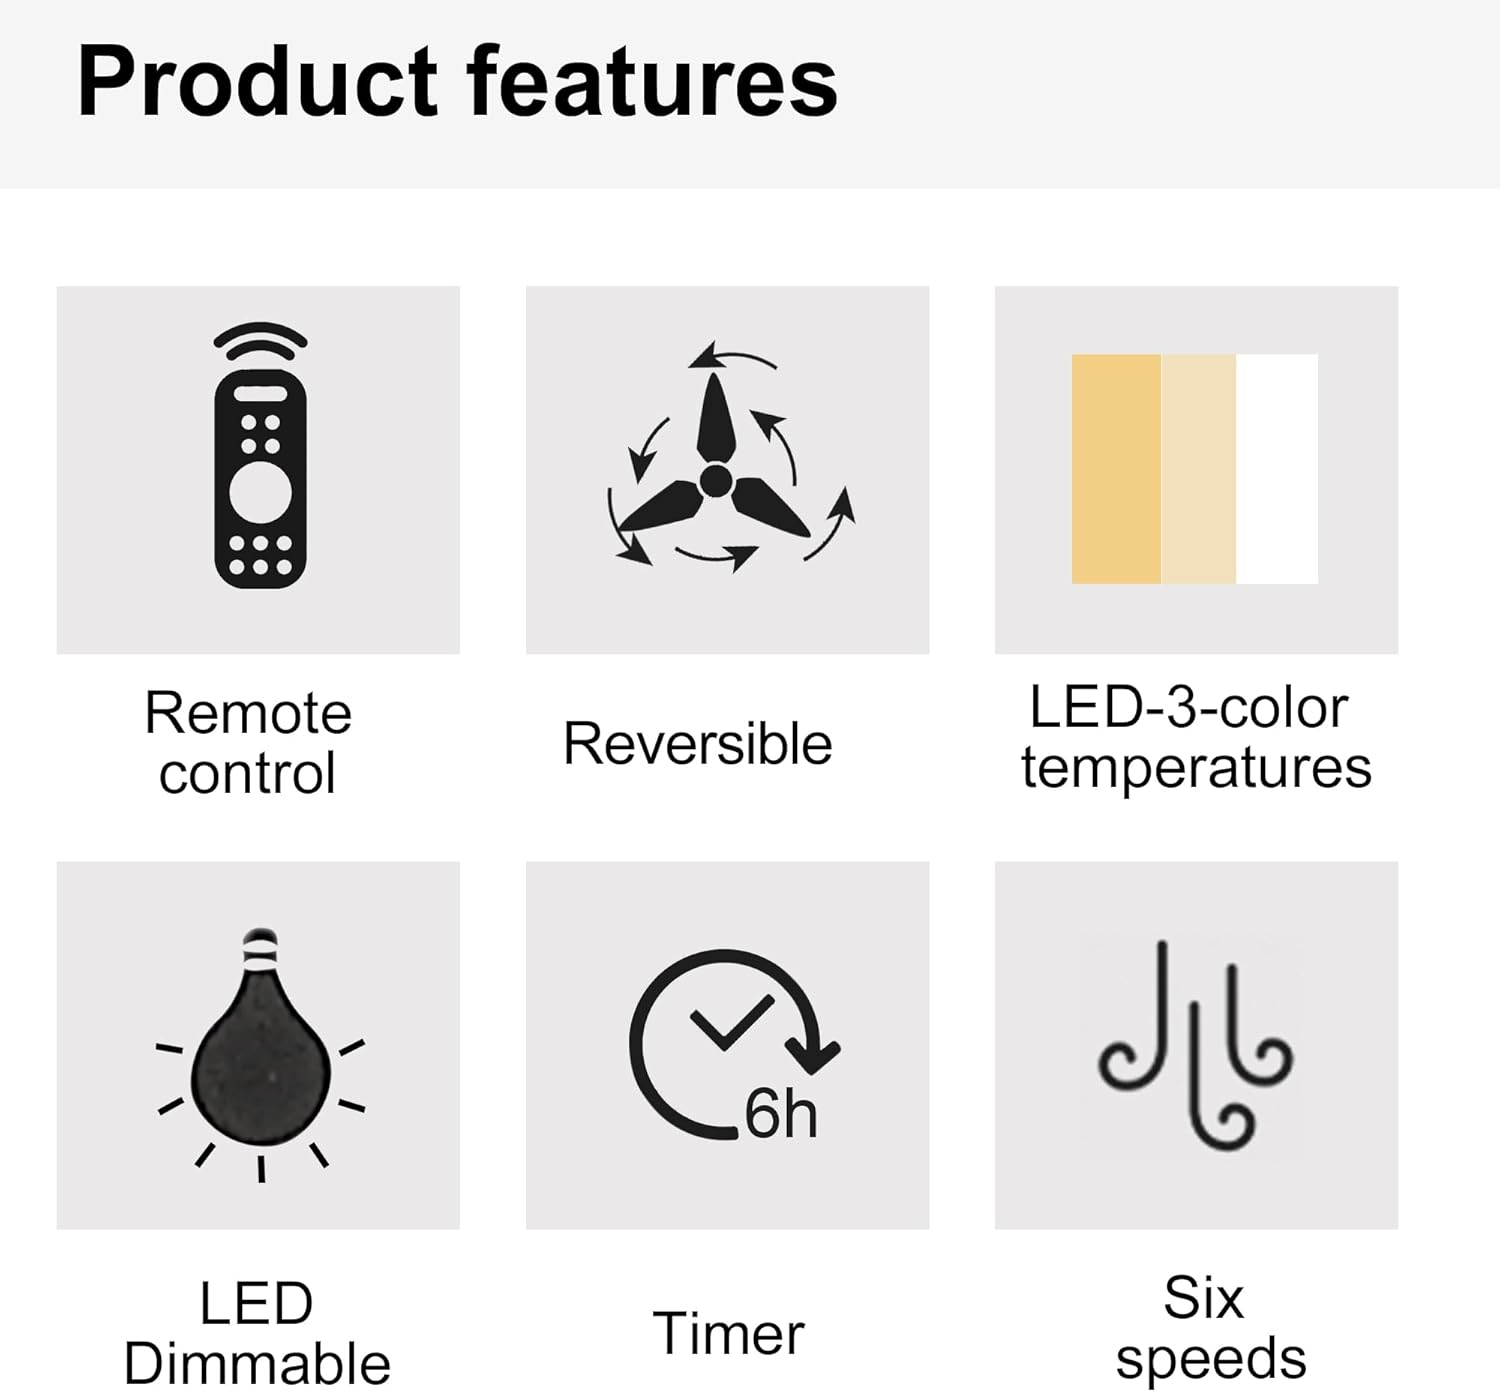
Image 3.1: Visual representation of key product features.

Image 3.2: Details of the fan's canopy and quiet DC motor.

Image 3.3: Details of the light cover and integrated 24W LED light kit.
4. Packungsinhalt
Before installation, verify that all components are present and undamaged. If any parts are missing or damaged, contact customer support.
- Deckenventilator-Motorbaugruppe
- Lüfterblätter (5)
- Light Kit Assembly (Integrated LED)
- Fernbedienung
- Wall Cradle for Remote Control
- AAA-Batterien für die Fernbedienung
- Montagehalterung
- Hardware-Paket (Schrauben, Lüsterklemmen, Unterlegscheiben usw.)
- Bedienungsanleitung
5. Einrichtung und Installation
Wichtig: Vor Beginn der Installation muss sichergestellt werden, dass die Stromzufuhr am Sicherungsautomaten unterbrochen ist.
- Bereiten Sie den Montageort vor: Befestigen Sie die Montagehalterung sicher an einem Deckenbalken oder einer für die Lüfterunterstützung geeigneten Anschlussdose.
- Verdrahten Sie den Lüfter: Connect the fan's electrical wires to the household wiring according to the wiring diagram provided in the full installation guide (not included here, but typically in a physical manual). Ensure all connections are secure with wire nuts.
- Attach the Fan Assembly: Heben Sie die Lüftermotoreinheit vorsichtig an und befestigen Sie sie an der Montagehalterung.
- Lüfterflügel montieren: Secure each fan blade to the motor housing using the provided screws.
- Beleuchtungsset installieren: Connect the light kit wiring and attach the light kit assembly to the bottom of the fan motor housing.
- Lichtabdeckung installieren: Secure the light cover to the light kit.
For detailed wiring diagrams and step-by-step illustrations, refer to the complete installation guide included with your product.
6. Bedienungsanleitung
Your ceiling fan is operated using the included remote control. Install the AAA batteries into the remote control before use.

Image 6.1: Remote control functions overview.
6.1 Lüfterbetrieb
- Ein-/Ausschalten: Press the power button (usually a circle with a vertical line) to turn the fan on or off.
- Lüftergeschwindigkeit: Use buttons labeled 1-6 to select the desired fan speed. '1' is the lowest speed, '6' is the highest.
- Lüfter AUS: Press the dedicated "Fan OFF" button to stop the fan.
- Forward/Reverse Mode: Press the forward/reverse button (often depicted with arrows circulating) to change the fan's direction.
- Sommermodus (Abwindmodus): Die Flügel drehen sich gegen den Uhrzeigersinn und drücken die Luft nach unten, um eine kühlende Brise zu erzeugen.
- Wintermodus (Aufwind): Die Flügel drehen sich im Uhrzeigersinn und saugen Luft nach oben, um die in der Nähe der Decke eingeschlossene warme Luft zu zirkulieren.
- Timer-Funktion: Press the "1H", "3H", or "6H" buttons to set the fan to turn off automatically after 1, 3, or 6 hours, respectively.

Image 6.2: Understanding Forward/Reverse (Summer/Winter) Modes.
6.2 Lichtbetrieb
- Licht EIN/AUS: Press the "LIGHT ON" or "LIGHT OFF" buttons to control the light.
- Adjust Light Color Temperature: Use the "WW" (Warm White), "NW" (Natural White), and "DW" (Cool White) buttons to cycle through the 3000K, 4000K, and 6000K color options.
- Dim the Light: Use the "+" and "-" buttons (often labeled "Dimmable +/-") to increase or decrease the light brightness.

Image 6.3: Adjustable light color temperatures.
7. Wartung
Regelmäßige Wartung gewährleistet optimale Leistung und verlängert die Lebensdauer Ihres Deckenventilators.
- Reinigung: Reinigen Sie die Lüfterflügel und das Motorgehäuse regelmäßig mit einem weichen, feuchten Tuch.amp Mit einem Tuch abwischen. Keine Scheuermittel oder Lösungsmittel verwenden. Vor der Reinigung sicherstellen, dass der Ventilator ausgeschaltet und die Stromzufuhr unterbrochen ist.
- Befestigungselemente festziehen: Überprüfen Sie jährlich alle Schrauben und Befestigungselemente auf festen Sitz. Lose Verbindungen können Geräusche oder Wackeln verursachen.
- Blattbalance: Wenn der Ventilator eiert, überprüfen Sie, ob alle Flügel fest sitzen und ausgewuchtet sind. Bei Bedarf kann ein Auswuchtset (nicht im Lieferumfang enthalten) verwendet werden.
- Beleuchtungsset: Das integrierte LED-Beleuchtungsset benötigt keinen Lampenwechsel. Bei Funktionsstörungen konsultieren Sie bitte den Abschnitt zur Fehlerbehebung oder wenden Sie sich an den Kundendienst.
8. Fehlerbehebung
Sollten Sie Probleme mit Ihrem Deckenventilator haben, beachten Sie bitte die folgenden häufigen Probleme und Lösungen:
| Problem | Mögliche Ursache | Lösung |
|---|---|---|
| Lüfter startet nicht | Der Ventilator erhält keinen Strom; lose Kabelverbindungen; Batterie der Fernbedienung leer. | Prüfen Sie den Sicherungsautomaten; Kontrollieren Sie alle Drahtverbindungen; Ersetzen Sie die Batterien der Fernbedienung. |
| Lüfter wackelt | Loose blades or mounting bracket; Unbalanced blades. | Ensure all screws are tight; Check blade balance and adjust if necessary. |
| Licht funktioniert nicht | Loose wire connection to light kit; Remote control battery dead; Light kit malfunction. | Check light kit wiring; Replace remote control batteries; Contact customer support if LED is faulty. |
| Fernbedienung funktioniert nicht | Leere Batterien; Fernbedienung nicht gekoppelt (falls zutreffend); Hindernis zwischen Fernbedienung und Empfänger. | Replace batteries; Refer to pairing instructions (if any); Ensure clear line of sight. |
Sollte das Problem nach Anwendung dieser Lösungsansätze weiterhin bestehen, wenden Sie sich bitte an den Kundendienst.
9. Spezifikationen
| Besonderheit | Detail |
|---|---|
| Modellnummer | W1367P185623 |
| Lüftergröße | 52 Zoll |
| Technische Daten | 52"T x 52"B x 10.63"H |
| Farbe | Matte Black (Antique Black) |
| Motortyp | Gleichstrommotor |
| Licht Kit | Integrierte 24-W-LED |
| Lichtfarbtemperaturen | 3000K (Warmweiß), 4000K (Neutralweiß), 6000K (Kaltweiß) |
| Steuerungstyp | Ferngesteuert |
| Montagetyp | Unterputz |
| Empfohlene Raumgröße | 12 ft. x 12 ft. to 18 ft. x 18 ft. (Large Room) |
| Zertifizierung | ETL-Sicherheitsliste |
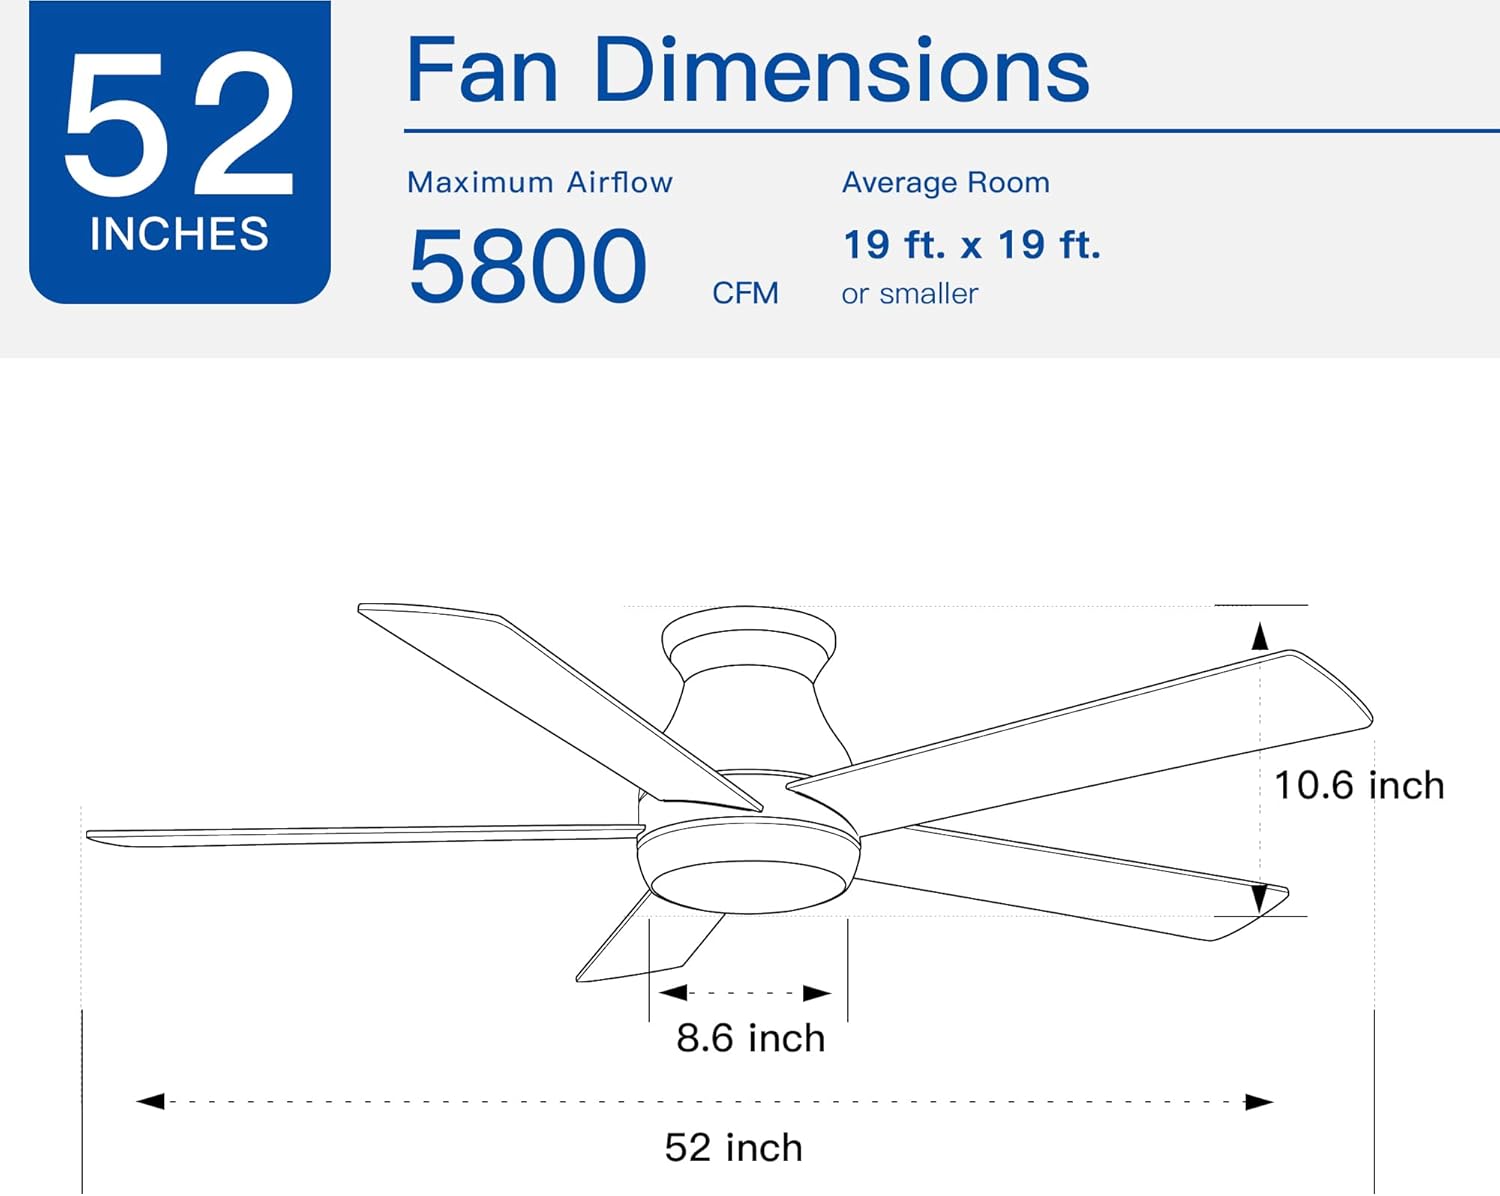
Image 9.1: Fan dimensions and airflow specifications.
10. Garantie und Support
This product comes with a standard manufacturer's warranty. For specific warranty details, including duration and coverage, please refer to the warranty card included in your product packaging or contact the retailer where the product was purchased.
For technical support, replacement parts, or any questions not covered in this manual, please contact Generic customer service through the retailer's support channels or the contact information provided in your product documentation.