1. Einleitung
This manual provides detailed instructions for the installation, operation, and maintenance of your ANKEWAY XBH-8801 car radio. Please read this manual thoroughly before use to ensure proper functionality and safety.
1.1 Produktüberschussview
The ANKEWAY XBH-8801 is an advanced car radio system designed for specific Opel models. It integrates modern features such as wireless Apple CarPlay, Android Auto, Bluetooth 5.0, FM/RDS radio, and supports a rearview camera. The system runs on an Android operating system, allowing for internet connectivity via Wi-Fi and installation of various applications.

Image 1.1: ANKEWAY XBH-8801 Car Radio and included accessories.
1.2 Fahrzeugkompatibilität
This car radio is specifically designed for the following Opel models and years:
- Astra (2004-2009)
- Antara (2006–2011)
- Vectra (2003–2008)
- Corsa (2006-2011)
- Zafira (2005-2011)
- Meriva (2006–2011)
- Kombi (2004-2011)
- Signum (2003–2011)
- Tigra Twin Top (2004-2011)
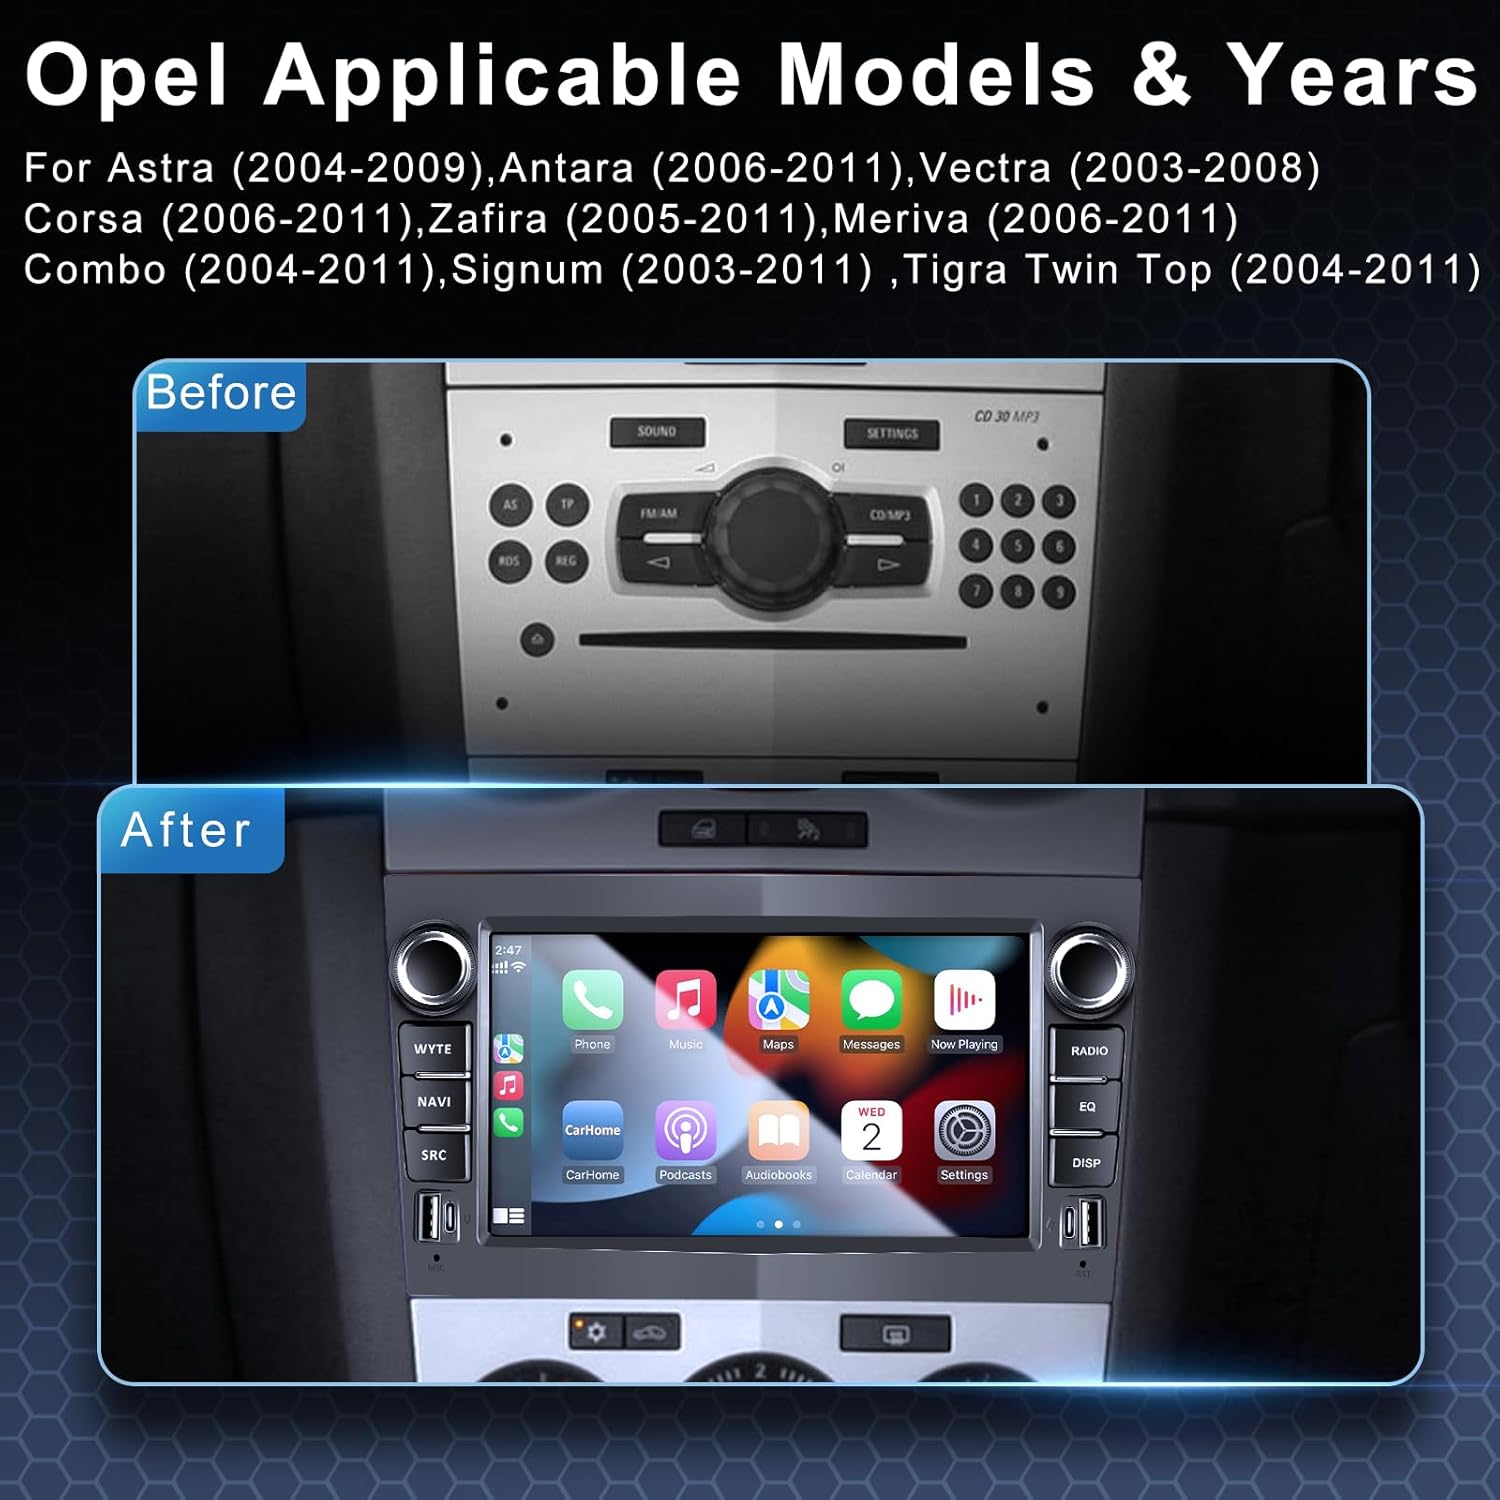
Image 1.2: Visual comparison of the original Opel dashboard and the ANKEWAY XBH-8801 installed.
2. Packungsinhalt
Bitte prüfen Sie, ob alle unten aufgeführten Artikel in Ihrem Paket enthalten sind. Sollten Artikel fehlen oder beschädigt sein, kontaktieren Sie bitte unseren Kundenservice.
- 1x ANKEWAY XBH-8801 Car Radio Unit
- 1x Hintenview Kamera
- 1x Mikrofon
- 1x CANBUS Decoder
- 2x Panel Removal Tools
- 2x Kamerakabel
- 2x Stromkabel
- 1x Radioantennenadapter
- 1x AHD Camera
- 1x GPS-Antenne
- 1x Cinch-Kabel
- 1x USB-Kabel

Image 2.1: Product dimensions and a visual list of all included components.
3. Installation
Professional installation is recommended. Ensure the vehicle's power is disconnected before beginning installation. The included CANBUS adapter ensures compatibility with original steering wheel controls.
3.1 Allgemeine Installationsschritte
- Carefully remove the original car radio using the provided panel removal tools.
- Connect the power cables, CANBUS decoder, and other necessary wiring harnesses to the vehicle's original connectors. The cables are pre-grouped for easier connection.
- Installieren Sie die GPS-Antenne an einem Ort mit freiem Blick view des Himmels.
- Schließen Sie die Rückseite anview camera cable and install the camera at the rear of the vehicle.
- Mount the ANKEWAY XBH-8801 unit into the dashboard opening.
- Schließen Sie die Stromversorgung des Fahrzeugs wieder an und testen Sie das Gerät.
3.2 Rückseiteview Kamerainstallation
Die mitgelieferte Rückseiteview camera supports high-definition input and night vision. Connect the camera to the designated input on the car radio. The system will automatically display the camera feed when the vehicle is in reverse gear.

Bild 3.1: Hintenview camera connection and display functionality.
4. Einrichtung
4.1 Erstes Einschalten und Sprachauswahl
Upon first power-on, the system may guide you through initial setup steps, including language selection. The system supports multiple languages, including Italian, Spanish, German, and French.
4.2 Wi-Fi-Verbindung
To access internet-dependent features and install applications, connect the unit to a Wi-Fi network. This can be done by tethering to your mobile phone's hotspot or connecting to an available Wi-Fi network.
- Navigieren Sie zu den Systemeinstellungen.
- Wählen Sie „Netzwerk & Internet“ oder „WLAN“.
- Schalten Sie WLAN ein und wählen Sie das gewünschte Netzwerk aus.
- Geben Sie das Kennwort ein, wenn Sie dazu aufgefordert werden.
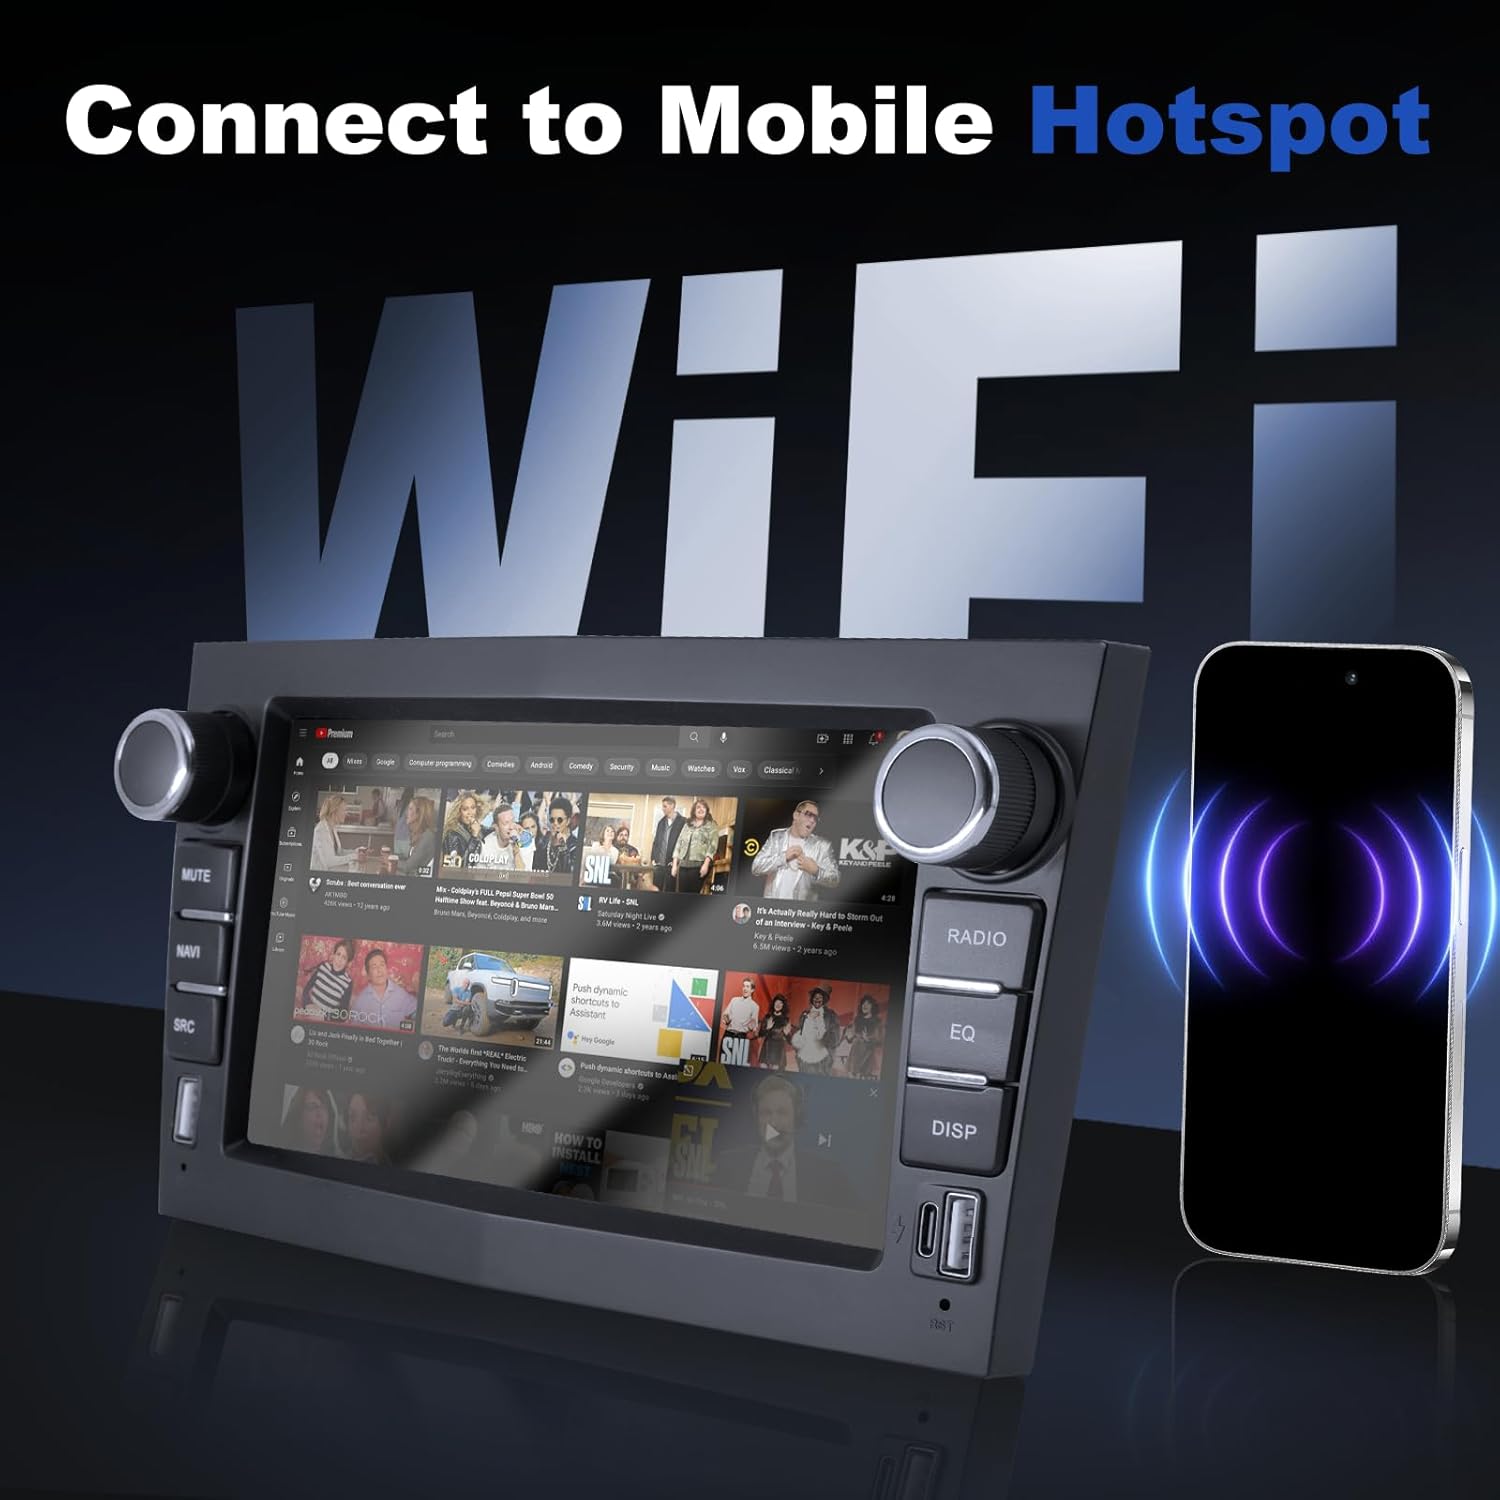
Image 4.1: Connecting the car radio to a mobile hotspot via Wi-Fi.
5. Bedienungsanleitung
5.1 CarPlay und Android Auto
The unit supports both wireless and wired Apple CarPlay and Android Auto. This allows seamless integration with your smartphone for navigation, music, calls, and other applications.
- Stellen Sie sicher, dass Bluetooth und WLAN auf Ihrem Smartphone aktiviert sind.
- Wählen Sie im Autoradio die CarPlay- oder Android Auto-Anwendung aus.
- Follow the on-screen prompts to connect your device. For wired connection, use a USB cable.

Image 5.1: Apple CarPlay interface displayed on the car radio.
5.2 Bluetooth-Funktionen
Bluetooth 5.0 enables hands-free calling and audio streaming.
- Öffne die Bluetooth-Einstellungen am Autoradio.
- Aktivieren Sie Bluetooth auf Ihrem Smartphone und suchen Sie nach verfügbaren Geräten.
- Select the car radio from your phone's list and pair.
- Nach der Kopplung können Sie Anrufe tätigen/empfangen und Audio streamen.
5.3 FM/RDS-Radio
The radio supports FM with RDS (Radio Data System) for displaying station information.
- Wählen Sie im Hauptmenü die Anwendung „Radio“ aus.
- Verwenden Sie die Bedienelemente auf dem Bildschirm oder die physischen Tasten, um nach Sendern zu suchen.
- Adjust audio settings using the built-in DSP and equalizer.

Image 5.2: FM/RDS Radio interface and Equalizer settings.
5.4 USB-Anschlüsse
The unit features 2 USB-A ports and 1 USB-C port for charging devices and playing media from USB storage.
- Schließen Sie USB-Laufwerke an, um Audio- oder Videodateien abzuspielen. files.
- Use the ports to charge compatible electronic devices.
5.5 System Settings and UI
The Android system allows for customization, including split-screen functionality and various user interface themes.
- Access the 'Settings' menu to configure system preferences, display, sound, and network options.
- Nutzen Sie die Split-Screen-Funktion, um zwei Anwendungen gleichzeitig auszuführen.
- Explore different UI interfaces available in the system settings.

Abbildung 5.3: Beispielamples of various Android user interfaces.
6. Spezifikationen
| Besonderheit | Spezifikation |
|---|---|
| Modell | XBH-8801 |
| Betriebssystem | Android |
| Speicher (RAM+ROM) | 2 GB RAM + 32 GB ROM |
| Konnektivität | Wi-Fi, Bluetooth 5.0, USB, USB-C |
| Smartphone-Integration | Wireless CarPlay, Android Auto, Mirror-Link |
| Audiofunktionen | FM/RDS Radio, DSP, Equalizer |
| Kamera-Unterstützung | Hinterenview Camera (included), Front Camera (optional) |
| CANBUS Adapter | Included (for steering wheel controls) |
| Abmessungen (Einheit) | Approximately 20.3 cm (width) x 12 cm (height) x 1 cm (depth) |
| Gewicht | 1.1 kg |
7. Fehlerbehebung
7.1 Häufige Probleme und Lösungen
- Kein Strom: Überprüfen Sie alle Stromanschlüsse und Sicherungen. Stellen Sie sicher, dass die Zündung des Fahrzeugs eingeschaltet ist.
- Kein Ton: Überprüfen Sie die Lautsprecheranschlüsse. Kontrollieren Sie die Lautstärke und die Audioausgabeeinstellungen. Stellen Sie sicher, dass die richtige Audioquelle ausgewählt ist.
- CarPlay/Android Auto verbindet sich nicht: Ensure Bluetooth and Wi-Fi are active on your phone and the car radio. Try restarting both devices. For wired connections, try a different USB cable.
- Lenkradbedienelemente funktionieren nicht: Confirm the CANBUS decoder is correctly installed and configured in the system settings.
- Schlechter Radioempfang: Überprüfen Sie den Anschluss der Radioantenne. Stellen Sie sicher, dass die Antenne ordnungsgemäß installiert und nicht verdeckt ist.
- Hinterenview Kamera zeigt kein Bild an: Prüfen Sie die Strom- und Videosignalanschlüsse der Kamera. Stellen Sie sicher, dass sich das Fahrzeug im Rückwärtsgang befindet.
8. Wartung
8.1 Reinigung
Reinigen Sie den Bildschirm und das Gehäuse des Geräts mit einem weichen, trockenen Tuch. Vermeiden Sie scheuernde Reiniger oder Lösungsmittel, die die Oberfläche beschädigen könnten.
8.2 Softwareaktualisierungen
The manufacturer regularly releases firmware updates to optimize system performance and add new features. To receive update packages, please contact customer support.
9. Garantie und Support
For warranty information, please refer to the documentation provided with your purchase or contact the seller directly. For technical assistance, troubleshooting, or software updates, please reach out to ANKEWAY customer support. They are available to assist with installation and operational queries.