Allsmartlife 1172X
Allsmartlife 50-inch Flush Mount Ceiling Fan with Lights
Model: 1172X | User Manual
1. Einleitung
Thank you for choosing the Allsmartlife 50-inch Flush Mount Ceiling Fan with Lights. This manual provides essential information for the safe installation, operation, and maintenance of your new ceiling fan. Please read these instructions thoroughly before beginning installation and retain them for future reference.
Wichtige Sicherheitsinformationen
- Vor Installation oder Wartung muss immer die Stromzufuhr am Hauptsicherungskasten oder Leitungsschutzschalter unterbrochen werden.
- Alle Verkabelungen müssen den nationalen und lokalen Elektrovorschriften entsprechen. Wenn Sie mit Verkabelungen nicht vertraut sind, wenden Sie sich bitte an einen qualifizierten Elektriker.
- Stellen Sie sicher, dass der Aufstellungsort das Gewicht des Ventilators (ca. 13.5 Pfund) tragen kann.
- Betreiben Sie den Ventilator nicht, wenn die Flügel oder das Gehäuse beschädigt sind.
- Halten Sie Hände, Kleidung und andere Gegenstände von den Ventilatorflügeln fern, wenn der Ventilator in Betrieb ist.

Figure 1: Allsmartlife 50-inch Flush Mount Ceiling Fan with Remote Control

Figure 2: Ceiling Fan in a Bedroom Setting
2. Packungsinhalt
Bitte prüfen Sie, ob alle unten aufgeführten Komponenten in Ihrem Paket enthalten sind. Sollten Teile fehlen oder beschädigt sein, kontaktieren Sie bitte unseren Kundenservice.
- Gehäuse des Deckenventilatormotors
- Lüfterblätter (5)
- Integriertes LED-Lichtset
- Fernbedienung
- Wandhalterung für Fernbedienung
- Befestigungsmaterial (Schrauben, Lüsterklemmen usw.)
- Bedienungsanleitung

Figure 3: Fan Dimensions and Blade Options
3. Installationsanleitung
Your Allsmartlife ceiling fan comes with pre-assembled parts to simplify installation. For detailed visual instructions, search for installation videos using the model number DY1172X on Google.
Allgemeine Installationsschritte:
- Stromabschaltung: Vor Beginn der Arbeiten muss sichergestellt werden, dass die Stromzufuhr zum Installationsbereich am Leitungsschutzschalter abgeschaltet ist.
- Installation der Montagehalterung: Secure the mounting bracket to the ceiling junction box. Ensure the junction box is adequately supported for the fan's weight.
- Verdrahtung: Connect the fan's electrical wires to the household wiring according to the provided wiring diagram in the full manual. Use appropriate wire nuts.
- Lüftermontage: Attach the fan motor housing to the mounting bracket.
- Klingenbefestigung: Securely attach the five fan blades to the motor housing.
- Installation des Beleuchtungskits: Schließen Sie das integrierte LED-Lichtset an und installieren Sie es.
- Wiederherstellung der Stromversorgung: Sobald die Installation abgeschlossen und alle Verbindungen sicher hergestellt sind, schalten Sie die Stromversorgung am Leistungsschalter wieder ein.

Figure 4: Aerodynamic Blade Design and Canopy Features
4. Bedienungsanleitung
Ihr Deckenventilator wird mit der mitgelieferten Fernbedienung gesteuert. Stellen Sie sicher, dass neue Batterien in der Fernbedienung eingelegt sind.
Fernbedienungsfunktionen:
- Lüfter EIN/AUS: Schaltet den Lüfter ein oder aus.
- Lüftergeschwindigkeit (1-6): Regelt die Lüftergeschwindigkeit von 1 (niedrigste Stufe) bis 6 (höchste Stufe).
- Licht EIN/AUS: Controls the integrated LED light independently.
- Farbtemperatur (3CCT): Cycles through 3000K (Warm White), 4000K (Natural White), and 6500K (Daylight White).
- Helligkeitsanpassung: Increases or decreases light brightness from 10% to 100%.
- Schlafmodus: Activates a patented mode that varies fan frequency to simulate natural wind.
- Vorwärts, rückwärts: Ändert die Drehrichtung der Klinge für den saisonalen Einsatz.
- Timer (1H/3H/6H): Stellt ein, dass sich der Ventilator nach 1, 3 oder 6 Stunden automatisch ausschaltet.

Abbildung 5: Fernbedienungsfunktionalitätview
Seasonal Operation (Forward/Reverse):
- Sommermodus (Luftstrom nach unten): Press the reverse button to set blades to rotate counter-clockwise, creating a downward breeze for cooling.
- Wintermodus (Luftstrom nach oben): Press the reverse button again to set blades to rotate clockwise, drawing warm air up and distributing it evenly without creating a direct draft.

Figure 6: Summer and Winter Airflow Modes
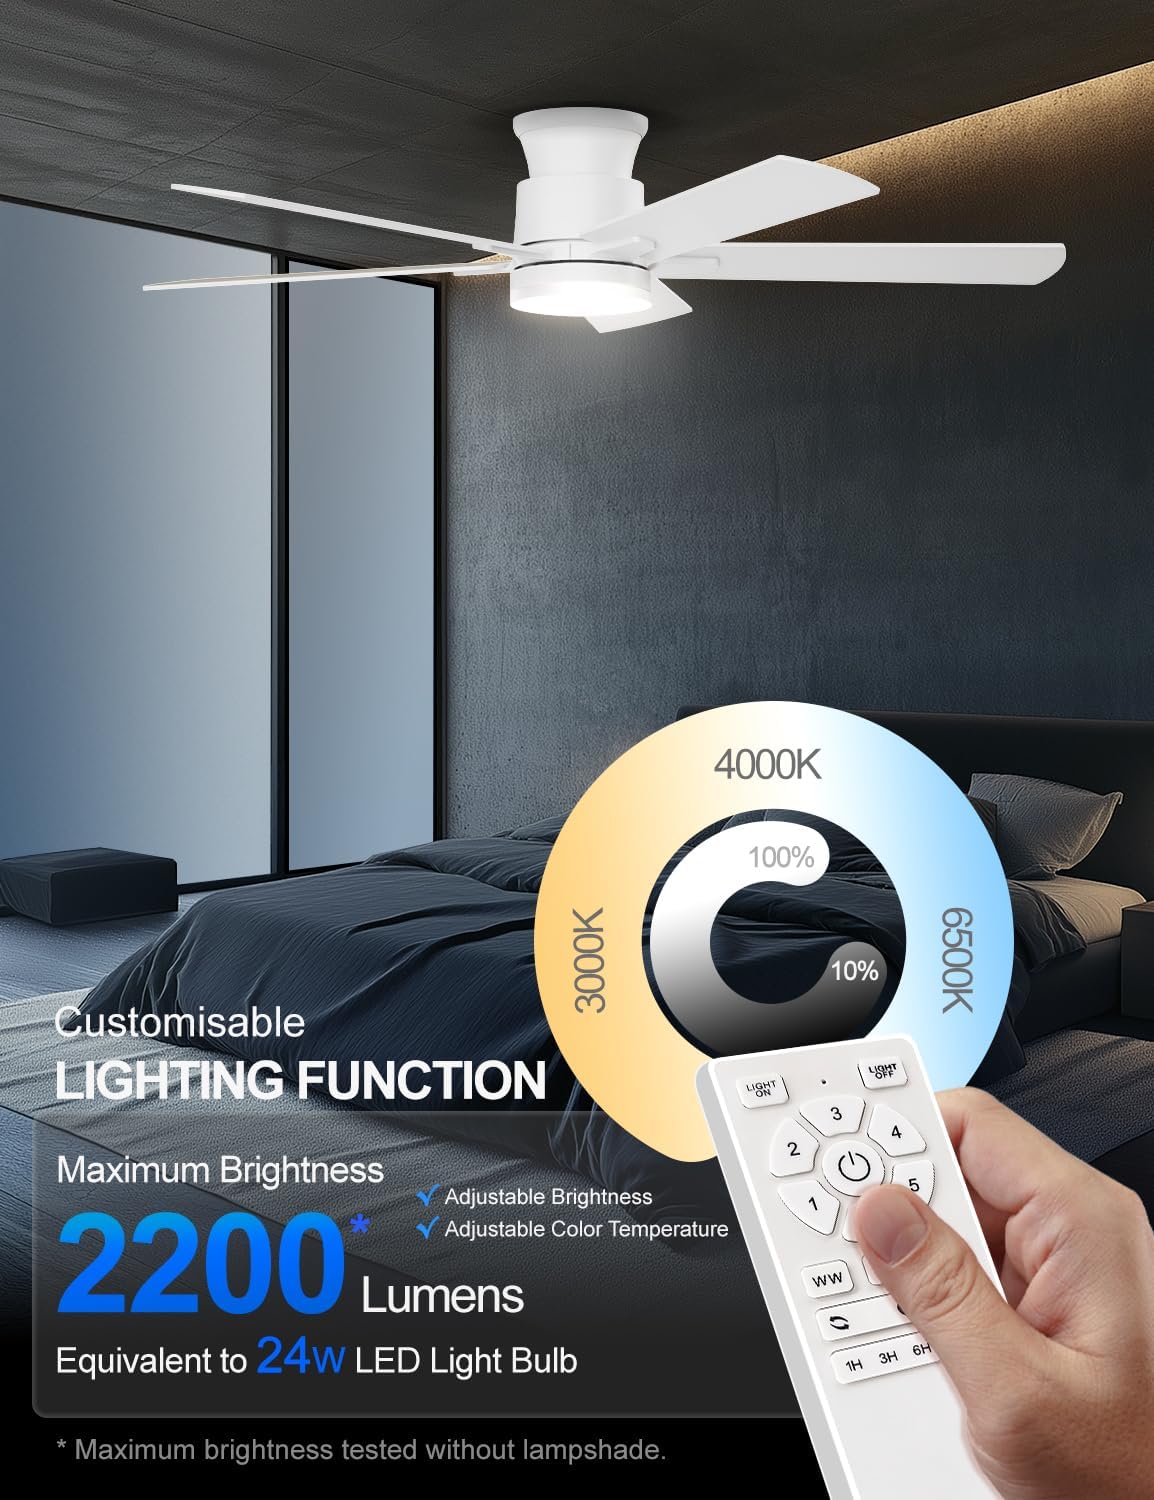
Figure 7: Customizable Lighting Functions
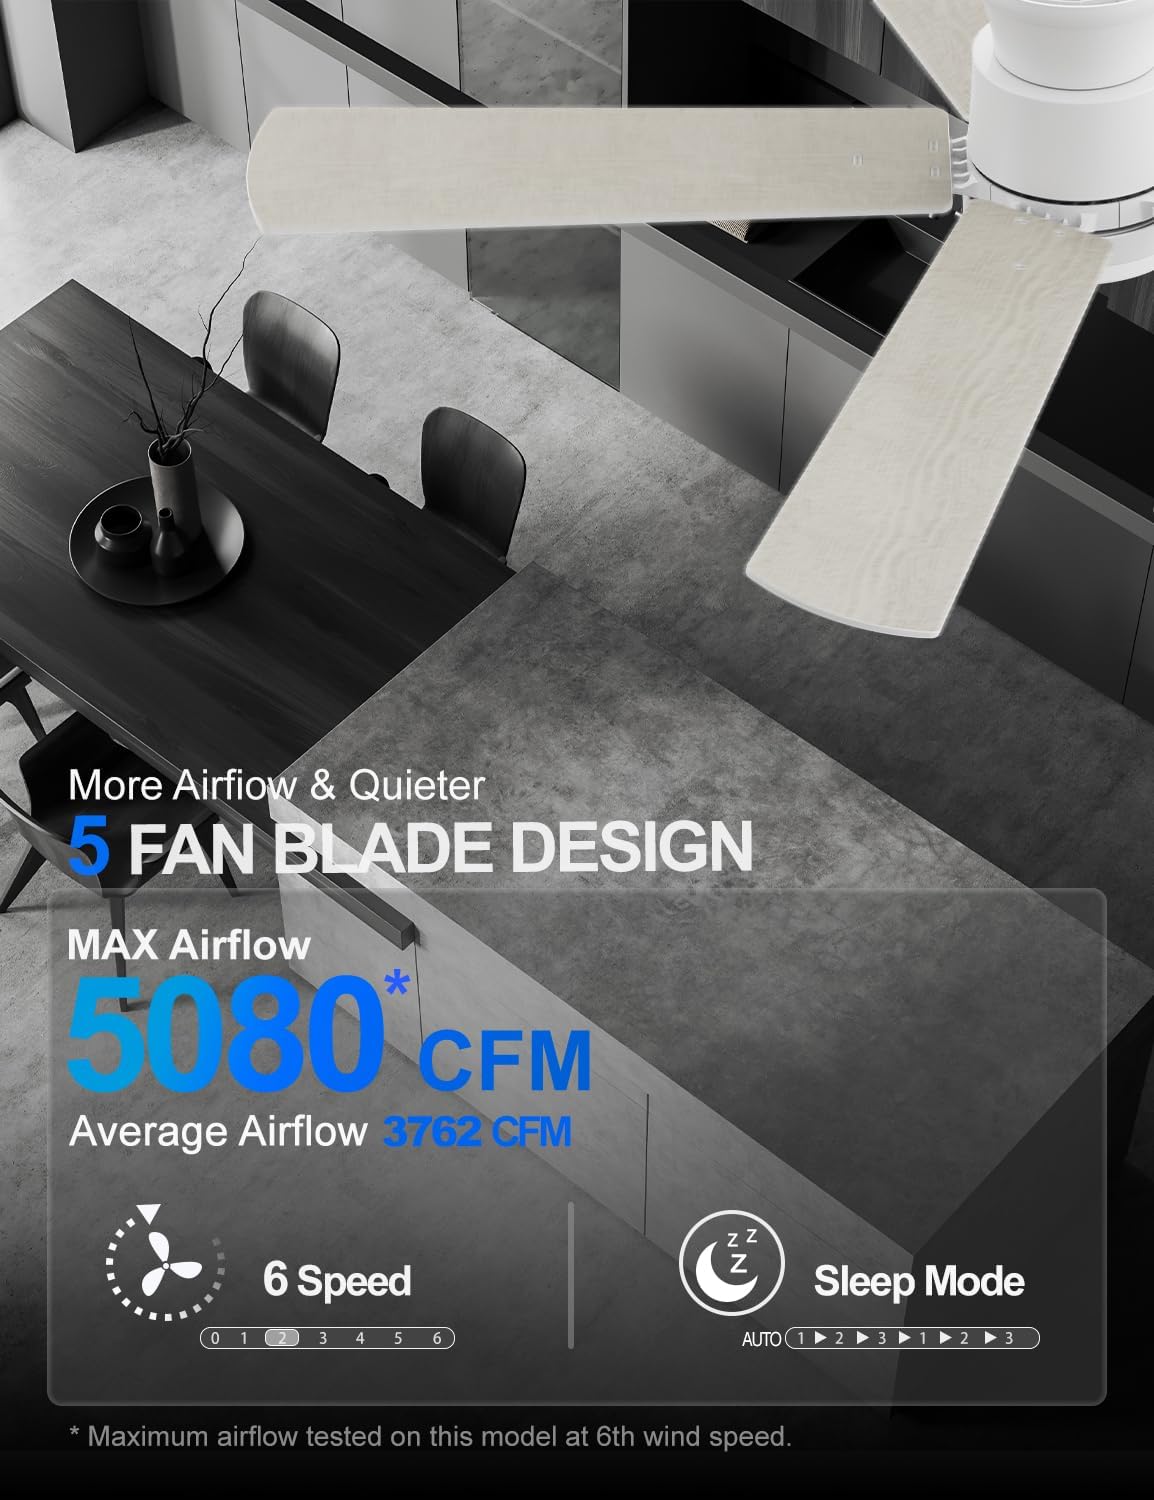
Figure 8: Airflow and Sleep Mode Features
5. Wartung
Regelmäßige Wartung gewährleistet optimale Leistung und verlängert die Lebensdauer Ihres Deckenventilators.
- Reinigung: Reinigen Sie die Lüfterflügel und das Motorgehäuse regelmäßig mit einem weichen, feuchten Tuch.amp Tuch. Keine Scheuer- oder Lösungsmittel verwenden.
- Klingeninspektion: Prüfen Sie die Lüfterflügel auf Risse oder Beschädigungen. Beschädigte Flügel müssen umgehend ausgetauscht werden.
- Dichtheitsprüfung: Ensure all screws and connections are tight at least once a year.
- Lichtquelle: The integrated LED light source is designed for long-term use and typically does not require replacement.
6. Fehlerbehebung
Sollten Sie Probleme mit Ihrem Lüfter haben, beachten Sie bitte die folgenden häufig auftretenden Probleme und Lösungen:
| Problem | Mögliche Ursache | Lösung |
|---|---|---|
| Lüfter startet nicht | Keine Stromversorgung Lose Kabelverbindungen Batterie der Fernbedienung leer | Prüfen Sie den Leitungsschutzschalter/die Sicherung. Prüfen Sie, ob alle Kabelverbindungen fest sitzen. Ersetzen der Fernbedienungsbatterien |
| Licht funktioniert nicht | Lichtschalter aus Lose Kabelverbindung Batterie der Fernbedienung leer | Ensure light is turned on via remote Überprüfen Sie die Verkabelung des Beleuchtungssatzes. Ersetzen der Fernbedienungsbatterien |
| Lüfter wackelt | Lose Klingenschrauben Unwuchtige Klingen Lose Montagehalterung | Ziehen Sie alle Messerschrauben fest Ensure blades are evenly weighted and installed Check mounting bracket for secure installation |
| Fernbedienung reagiert nicht | Batterie leer Fernbedienung nicht gekoppelt (falls zutreffend) Hindernis zwischen Fernbedienung und Empfänger | Batterien ersetzen Die Anweisungen zum Koppeln finden Sie im vollständigen Handbuch. Sorgen Sie für klare Sicht |
7. Produktspezifikationen
| Besonderheit | Detail |
|---|---|
| Marke | Allsmartlife |
| Modellname | 1172X |
| Größe | 50 Zoll |
| Farbe | Frisches Weiß |
| Technische Daten | 50"T x 50"B x 10.5"H |
| Artikelgewicht | 13.5 Pfund |
| Motortyp | Bürstenloser Gleichstrommotor |
| Anzahl der Klingen | 5 |
| Lüftergeschwindigkeiten | 6 |
| Luftstromkapazität | 3762 Kubikfuß pro Minute (CFM) |
| Lichtart | Integrierte LED |
| Helligkeit | Up to 2200 lumens (10%-100% adjustable) |
| Farbtemperatur | 3000 K (Warmweiß), 4000 K (Naturweiß), 6500 K (Tageslichtweiß) |
| Kontrollmethode | Fernbedienung |
| Bandtage | 120 Volt |
| Wastage | 32 Watt |
| Verwendung im Innen- und Außenbereich | Indoor, Outdoor (with specific humidity and rain exposure guidelines) |
| Zertifizierung | ETL |

Figure 9: DC Brushless Motor Noise Comparison

Figure 10: Room Size Recommendation Guide

Figure 11: Guidelines for Outdoor Use
8. Garantie und Support
Allsmartlife offers a lifetime of free replacement service for parts. If you require any assistance, have questions, or need to claim warranty service, please contact our customer support team. We are committed to providing prompt and effective solutions.
For further support, please refer to the contact information provided with your purchase or visit the official Allsmartlife webWebsite.
Ask a question about this manual
Ask about setup, troubleshooting, compatibility, parts, safety, or missing instructions. Manuals+ will review the question and use this page’s manual context to help answer it.