1. Einleitung
Thank you for choosing the TaskStar Cordless Stick Water Transfer Pump. This manual provides essential information for the safe and efficient operation, maintenance, and troubleshooting of your new pump. Please read it thoroughly before first use and keep it for future reference.
This portable, battery-powered pump is designed for various water transfer tasks, offering high flow rates and significant lift capacity for draining pools, ponds, rain barrels, boats, and other flooded areas.
2. Sicherheitshinweise
WARNUNG: Lesen Sie alle Sicherheitswarnungen und Anweisungen. Die Nichtbeachtung der Warnungen und Anweisungen kann zu elektrischem Schlag, Brand und/oder schweren Verletzungen führen.
- Always wear appropriate personal protective equipment (PPE) such as safety glasses and gloves when operating the pump.
- Do not operate the pump in explosive atmospheres, such as in the presence of flammable liquids, gases, or dust.
- Halten Sie Kinder und Zuschauer während des Betriebs der Pumpe fern.
- Stellen Sie sicher, dass der Akku vor der Verwendung vollständig aufgeladen ist.
- Do not immerse the motor housing in water. Only the pump head and shaft are designed for submersion.
- Avoid pumping flammable liquids, corrosive chemicals, or liquids containing large solid particles that could damage the pump.
- Vor jeglichen Wartungs- oder Reinigungsarbeiten muss die Batterie abgeklemmt werden.
- Store the pump and batteries in a dry, secure location away from direct sunlight and extreme temperatures.
3. Packungsinhalt
Bitte überprüfen Sie, ob alle unten aufgeführten Artikel in Ihrem Paket enthalten sind:
- Cordless Stick Transfer Pump (Main Unit)
- 4000mAh Akku (x2)
- 21V-Ladegerät (x1)
- 3.28 Feet of Water Pipe (x1)
- Benutzerhandbuch (dieses Dokument)
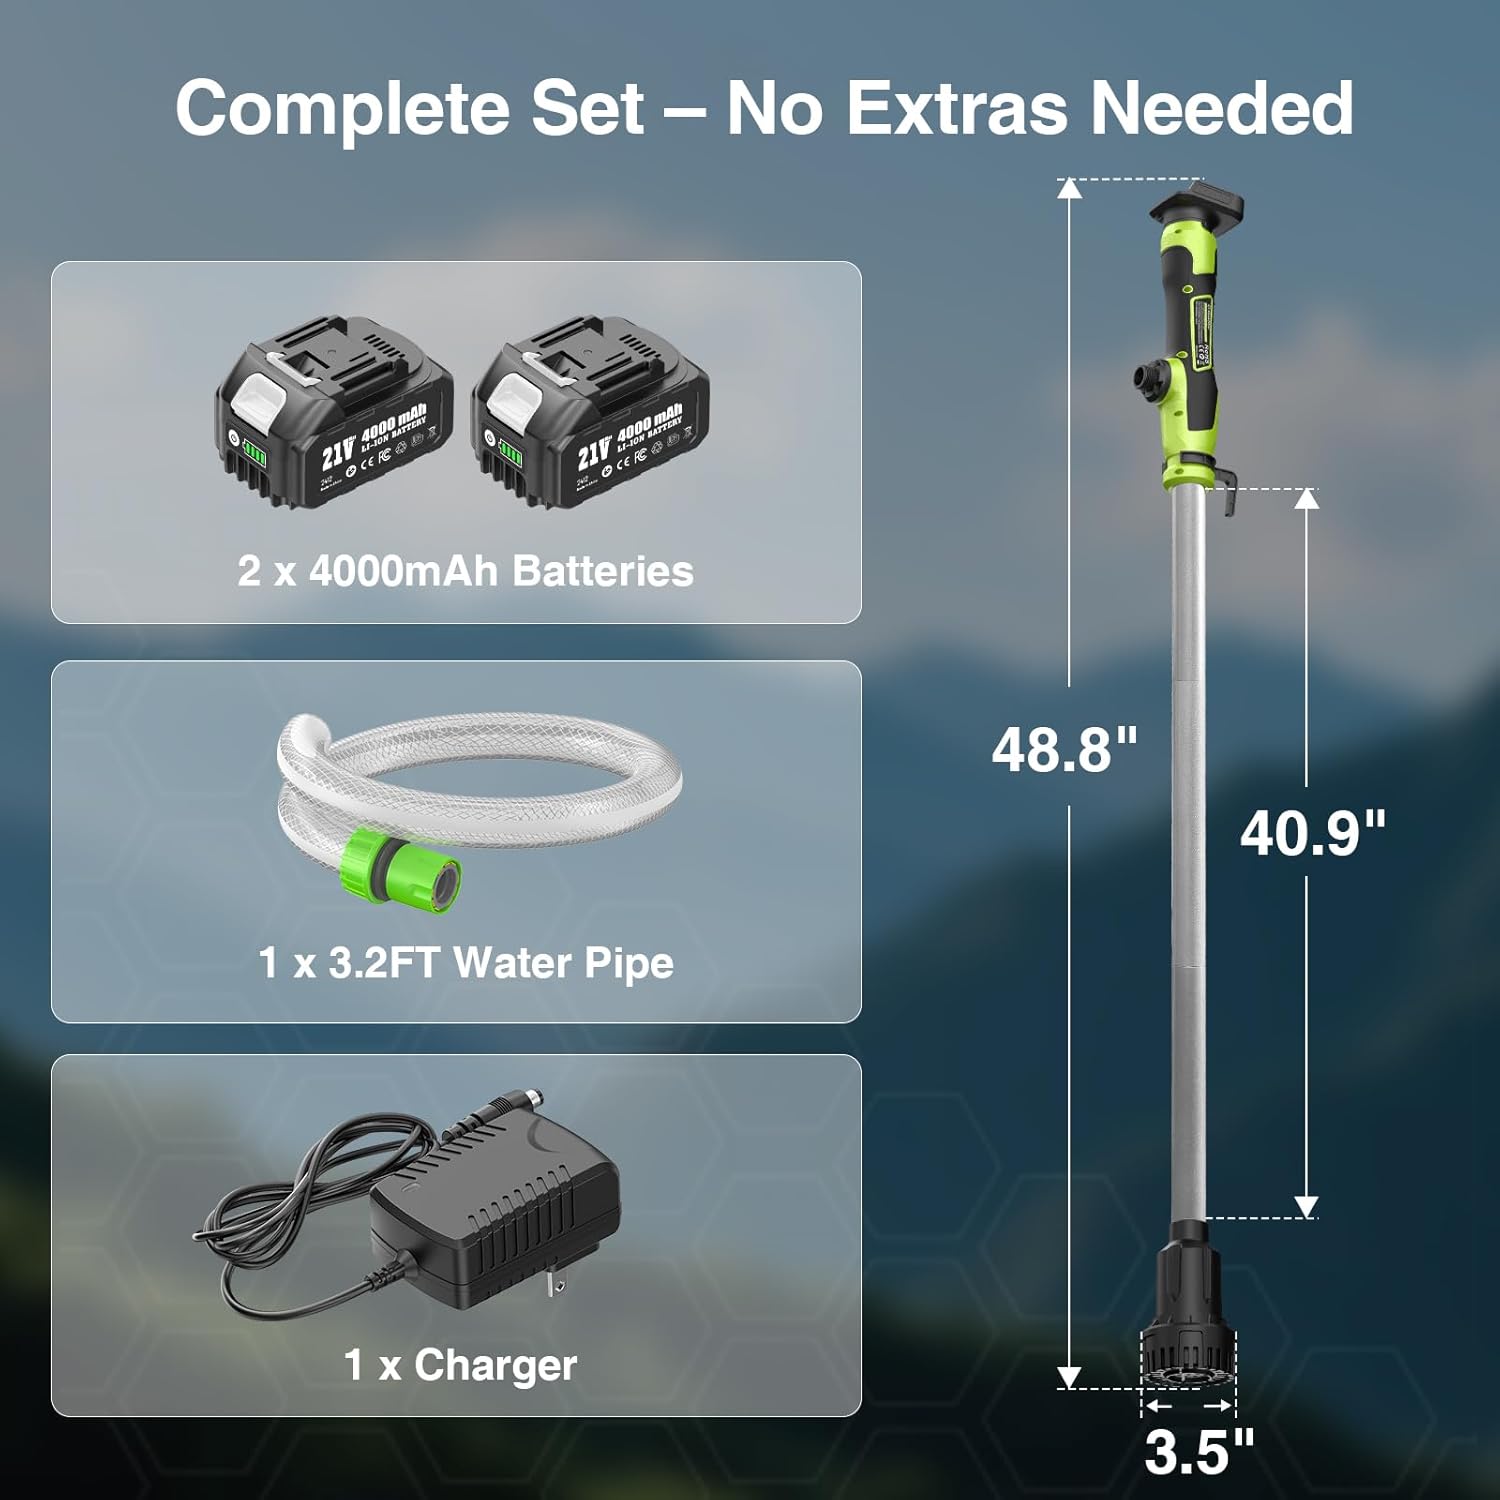
Abbildung 3.1: Alle im Paket enthaltenen Komponenten.
Video 3.1: A demonstration of the items included in the TaskStar Water Pump package.
4. Produktüberschreitungview und Montage
The TaskStar Cordless Stick Water Transfer Pump features a three-piece design for compact storage and easy transport. Familiarize yourself with the components before assembly.
4.1 Komponenten
- Pumpenkopf: Enthält den Motor und das Laufrad.
- Shaft Sections: Three detachable aluminum sections that connect to form the desired length.
- Batteriefach: Located at the top of the handle, where the battery is inserted.
- Steuerschalter: Ein-/Ausschalter für den Betrieb.
- Wasserabfluss: 3/4" locking outlet for connecting the water pipe.
- Filterbasis: Located at the bottom of the shaft, designed to prevent clogging.
4.2 Montageschritte
- Connect the shaft sections by twisting them securely together. Ensure the internal wiring aligns and connects properly.
- Attach the assembled shaft to the pump head by twisting until it locks into place.
- Connect the provided water pipe to the 3/4" locking outlet on the pump head. Ensure a tight connection to prevent leaks.

Figure 4.1: The pump's split design allows for compact storage and portability.
5. Akku laden und installieren
5.1 Aufladen der Akkus
The pump comes with two 4000mAh lithium-ion batteries. Use only the provided 21V charger.
- Schließen Sie das Ladegerät an eine normale Steckdose an.
- Insert the battery into the charger. The indicator light on the battery will show charging status.
- Eine vollständige Aufladung dauert in der Regel etwa 2 Stunden pro Akku.
- Sobald der Akku vollständig aufgeladen ist, trennen Sie ihn vom Ladegerät.
5.2 Einsetzen des Akkus
So installieren Sie den Akku:
- Align the battery with the battery compartment on top of the pump handle.
- Schieben Sie die Batterie in das Batteriefach, bis sie hörbar einrastet.
- Zum Entnehmen drücken Sie den Entriegelungsknopf an der Batterie und schieben diese heraus.

Figure 5.1: The dual 4000mAh batteries provide extended runtime.
6. Bedienungsanleitung
6.1 Allgemeine Bedienung
- Ensure the pump is fully assembled and the battery is installed.
- Place the pump head into the water source, ensuring the filter base is fully submerged.
- Direct the outlet hose to the desired drainage area.
- Press the power switch on the handle to turn the pump ON.
- To turn OFF, press the power switch again.

Figure 6.1: The pump is designed for easy, one-button operation.
Video 6.1: Demonstrates the effortless water transfer capability of the pump.
6.2 Water Transfer Performance
The TaskStar pump delivers a high flow rate of 720 gallons per hour (GPH), capable of moving 6 gallons in approximately 30 seconds. It can achieve a maximum lifting height of 32 feet, making it suitable for various vertical transfer needs. The low suction design allows it to drain water down to 5/8 inch, leaving minimal residual water.

Figure 6.2: High flow rate for quick water transfer.
Video 6.2: Demonstrates the impressive pumping head capacity.

Figure 6.3: Capable of 32 feet high lift.
Video 6.3: Shows the pump's long-distance water throw capability.
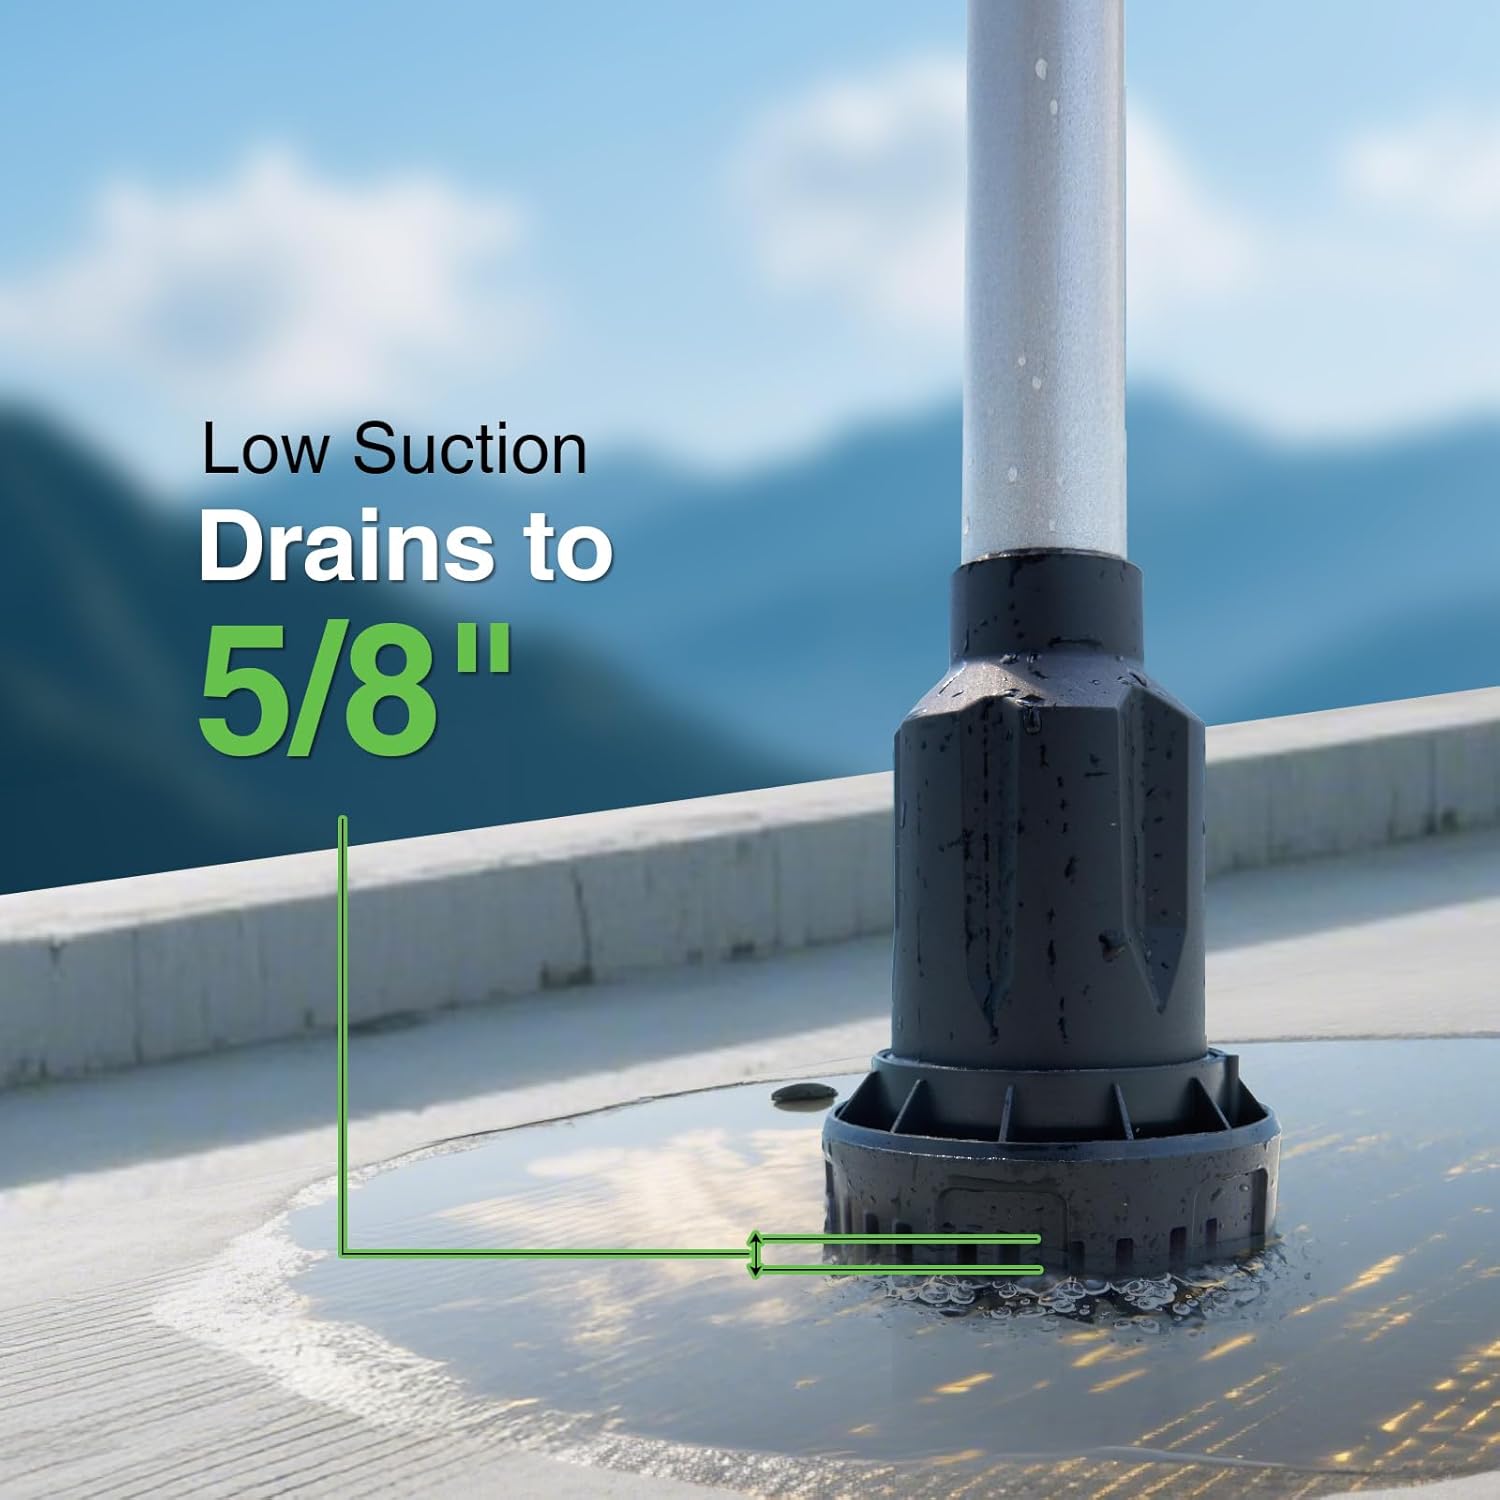
Figure 6.4: Low suction drains water down to 5/8 inch.
Video 6.4: Demonstrates the pump's quiet operation and ability to handle low water levels.
6.3 Anwendungen
This versatile pump is ideal for:
- Draining pools, hot tubs, and spas.
- Emptying rain barrels for garden irrigation.
- Removing water from flooded basements, garages, or construction sites.
- Draining water from boats or kayaks.
- Transferring water for RVs or outdoor camping-Bedürfnisse.

Figure 6.5: The pump is a reliable solution for emergency drainage.
Video 6.5: Shows the pump effectively draining water from a boat bilge.
7. Wartung
Regelmäßige Wartung gewährleistet optimale Leistung und verlängert die Lebensdauer Ihrer Pumpe.
7.1 Reinigung
- After each use, especially when pumping dirty water, flush the pump with clean water to remove any debris.
- Inspect the filter base for any clogs or accumulated debris. Clean as necessary.
- Wischen Sie die Außenseite der Pumpe mit Ad abamp Tuch. Verwenden Sie keine scharfen Chemikalien oder Scheuermittel.
7.2 Speicherung
- Ensure the pump is clean and dry before storing.
- Nehmen Sie die Batterie aus der Pumpe.
- Store the pump in a cool, dry place, away from direct sunlight and out of reach of children.
- For long-term storage, it is recommended to partially charge the batteries (around 50%) every few months to maintain battery health.
8. Fehlerbehebung
If you encounter issues with your pump, refer to the following table for common problems and solutions:
| Problem | Mögliche Ursache | Lösung |
|---|---|---|
| Pumpe startet nicht | Batterie nicht geladen oder falsch eingesetzt. | Laden Sie den Akku vollständig auf und vergewissern Sie sich, dass er fest installiert ist. |
| Niedriger Wasserdurchfluss | Clogged filter base or hose. | Clean the filter base and check the hose for obstructions. |
| Die Pumpe läuft, aber es wird kein Wasser gefördert. | Pump head not fully submerged; airlock. | Ensure pump head is completely submerged. Briefly lift and re-submerge to release airlock. |
| Wasser tritt an den Anschlüssen aus. | Loser Schlauchanschluss. | Tighten all hose connections. Check O-rings for damage. |
9. Spezifikationen
| Besonderheit | Detail |
|---|---|
| Marke | TaskStar |
| Modellnummer | P025 |
| Stromquelle | Batteriebetrieben |
| Bandtage | 21 Volt |
| Batteriekapazität | 2 x 4000mAh Lithium-Ionen |
| Maximaler Durchfluss | 720 Gallonen pro Stunde (12 GPM) |
| Maximale Hubhöhe | 32 Fuß |
| Low Suction Level | Drains to 5/8 inch |
| Technische Daten | 6 Zoll L x 4 Zoll B x 49 Zoll H |
| Artikelgewicht | 7.4 Pfund |
| Material | Aluminum; TPE |
| Farbe | Grün |
10. Garantie und Support
The TaskStar Cordless Stick Water Transfer Pump (Model P025) comes with a 1-year limited warranty from the date of purchase. This warranty covers defects in materials and workmanship under normal use. It does not cover damage resulting from misuse, abuse, accident, unauthorized repairs, or normal wear and tear.
For warranty claims, technical support, or replacement parts, please contact TaskStar customer service through the retailer where the product was purchased or visit our official webWebsite.