1. Einleitung
The OBET B62 Wireless Indoor Outdoor Thermometer is designed to provide accurate temperature and humidity readings for both indoor and outdoor environments. This device features a clear LCD color screen, a remote sensor with a long transmission range, and a 12-hour weather forecast function. This manual provides detailed instructions for setting up, operating, and maintaining your thermometer.
2. Produktüberschreitungview
The OBET B62 system consists of a main display unit and one wireless remote sensor. It can support up to three remote sensors (additional sensors sold separately) to monitor multiple locations simultaneously.
- Genaue Messwerte: Provides temperature accuracy of +/-0.5℉ and humidity accuracy of +/-2%.
- Wettervorhersage: Displays 7 weather icons to predict conditions for the next 12 hours based on atmospheric pressure changes.
- Erweiterte Reichweite: The remote sensor transmits data up to 500 feet (150 meters) in open areas.
- Einstellbares Display: LCD color screen with three brightness levels (high, low, off) when powered via USB.
- Mehrere Platzierungsoptionen: The main unit can be placed on a tabletop or wall-mounted.

Image: The main display unit and the remote sensor, illustrating their compact design and typical use.
3. Packungsinhalt
- 1 x OBET B62 Main Display Unit
- 1 x OBET Wireless Remote Sensor (Model: BTX2)
- 1 x USB Power Cable (Note: USB power adapter not included)
- 1 x Benutzerhandbuch
Batteries are NOT included. You will need:
- 3 x AAA batteries for the Main Display Unit (for backup power)
- 2 x AA batteries for the Wireless Remote Sensor
4. Einrichtungsanweisungen
4.1. Install Batteries in Remote Sensor
- Öffnen Sie das Batteriefach auf der Rückseite des Fernsensors.
- Legen Sie 2 x AA-Batterien ein und achten Sie dabei auf die richtige Polarität (+/-).
- Verschließen Sie das Batteriefach fest.
4.2. Power the Main Display Unit
The main display unit can be powered by a USB cable or by batteries for backup.
- USB-Stromversorgung: Connect the provided USB cable to the main unit and plug the other end into a USB power adapter (not included) or a USB port. This will keep the display continuously lit.
- Batterie-Backup: Open the battery compartment on the back of the main unit. Insert 3 x AAA batteries, observing the correct polarity (+/-). These batteries will provide backup power in case of a power outage or allow for portable use with a temporary display.

Image: Diagram showing the USB power input on the main display unit and the touch-sensitive light button for brightness control.
4.3. Pairing the Remote Sensor
The main unit and remote sensor should automatically pair once both are powered on. If pairing does not occur:
- Ensure both units have fresh batteries or are properly powered.
- Place the remote sensor near the main unit.
- Press the 'CH' (Channel) button on the back of the main unit to cycle through channels until the sensor's data appears.
4.4. Platzierung
For optimal performance, consider the following placement guidelines:
- Hauptanzeigeeinheit: Place indoors in a central location, away from direct sunlight or heat sources that could affect indoor temperature readings. It can be placed on a tabletop using its built-in stand or mounted on a wall using the hanging hole.
- Fernbedienungssensor: Place outdoors in a shaded area, protected from direct rain and sunlight, which can cause inaccurate readings. Ensure it is within the 500-foot transmission range of the main unit. Avoid placing it near large metal objects or electrical appliances that could interfere with the wireless signal.

Image: The main display unit showing both a hanging hole for wall mounting and a durable stand for tabletop placement.

Image: Illustrates the capability of the remote sensor to transmit a steady signal to the main unit from up to three different areas, such as a living room, baby room, or outdoor patio.
5. Bedienungsanleitung
5.1. Anzeige überview
The LCD color screen displays various information:
- Außentemperatur und Luftfeuchtigkeit: Messwerte des Fernsensors.
- Raumtemperatur und Luftfeuchtigkeit: Readings from the main unit's built-in sensor.
- Wettervorhersage: Symbole, die das vorhergesagte Wetter für die nächsten 12 Stunden anzeigen.
- Zeit Datum: Aktuelle Uhrzeit und Datum.
- MAX/MIN-Rekorde: Highest and lowest recorded temperatures and humidity.
- Durchschnittstemperatur: Average temperature over 24 hours or 30 days.
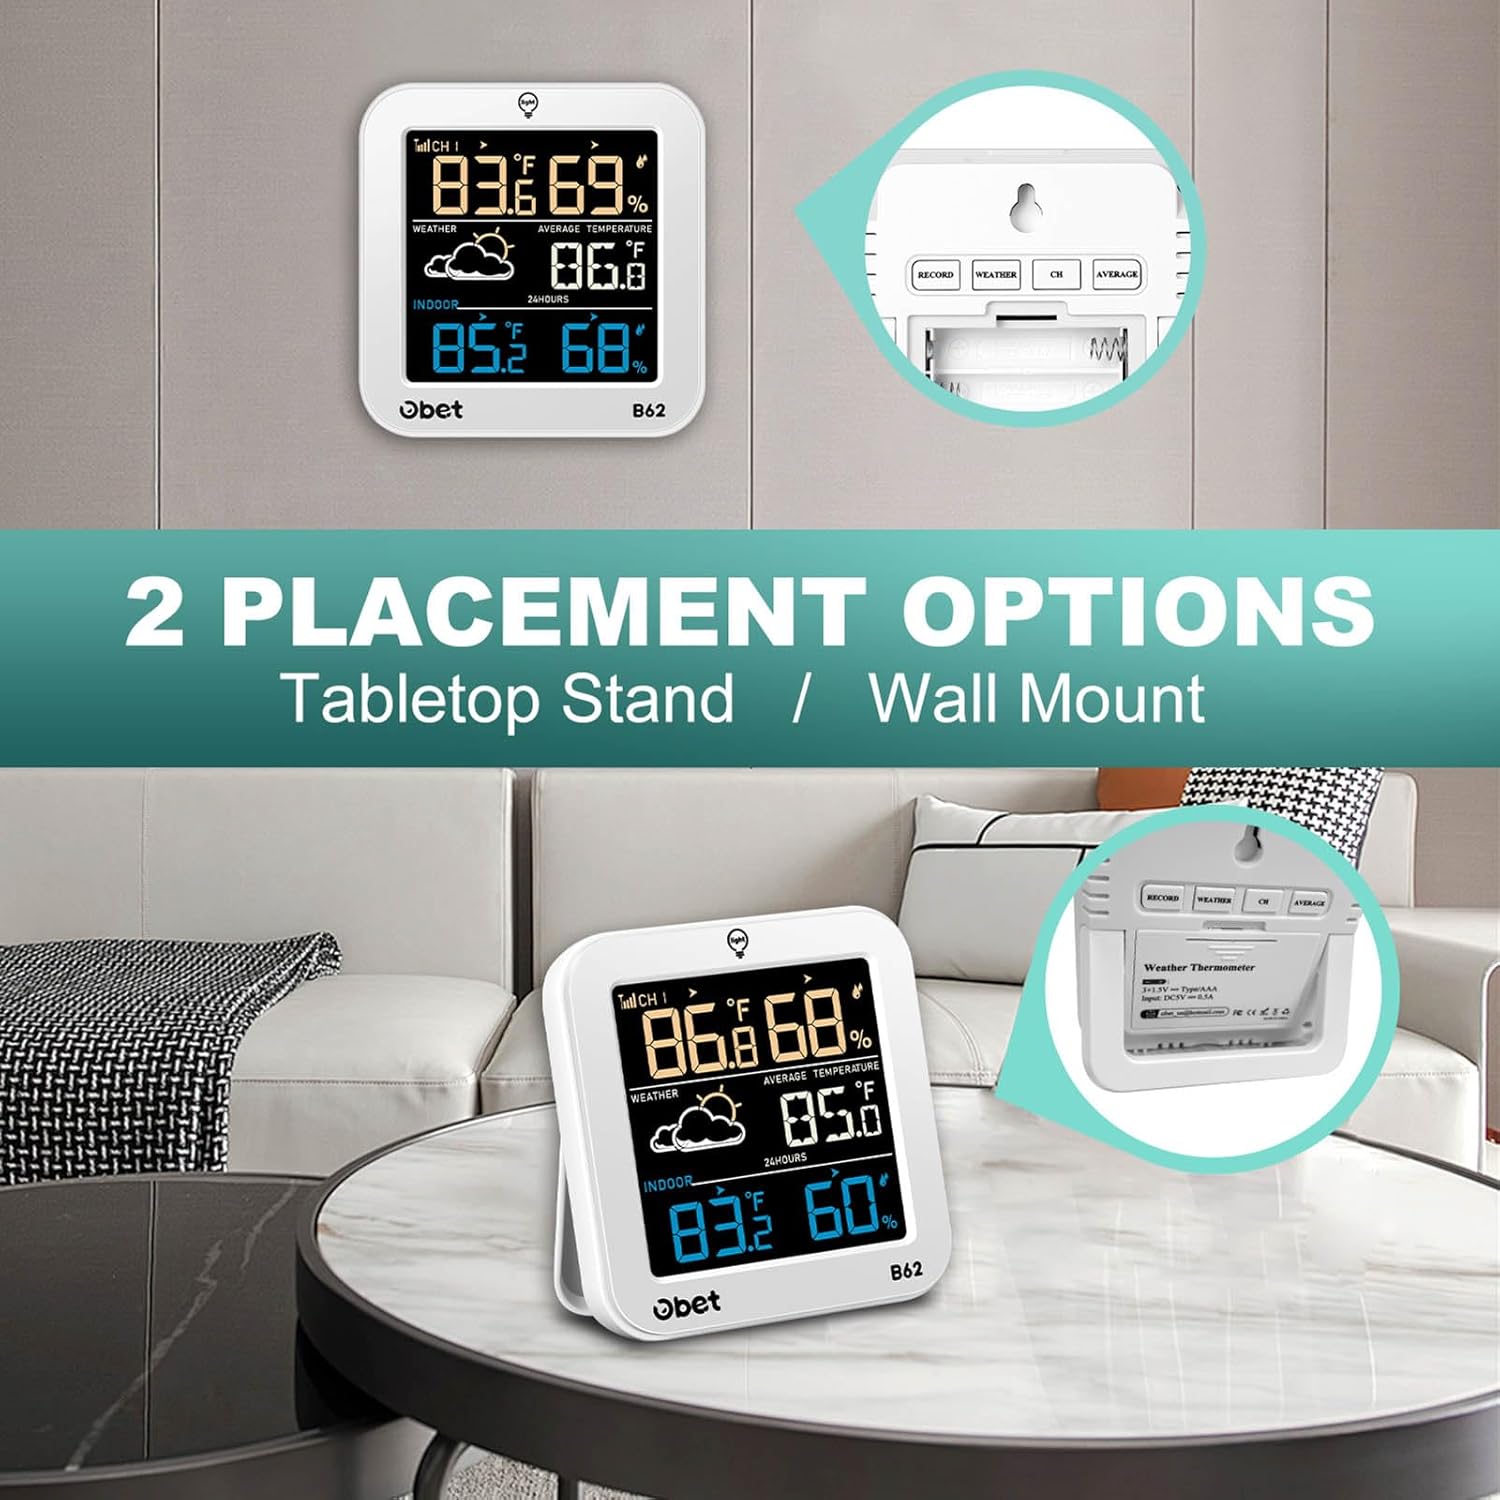
Image: A close-up of the main display unit, showing indoor and outdoor temperature and humidity, weather forecast icons, and time.
5.2. Einstellbare Helligkeit
When the main unit is powered via the USB cable, you can adjust the display brightness:
- Touch the 'LIGHT' button on the top of the main unit to cycle through High, Low, and Off brightness settings.
- If running on batteries only, the display will turn off after a few seconds to conserve power. Touch the 'LIGHT' button to temporarily illuminate the screen.

Image: Shows the main unit display with three different backlight intensities (100%, 50%, 0%) and highlights the USB power connection for continuous illumination.
5.3. Changing Temperature Units (°F/°C)
Press the 'WEATHER' button on the back of the main unit to switch between Fahrenheit (°F) and Celsius (°C) display.
5.4. Wettervorhersage
The weather station predicts the weather for the next 12 hours based on changes in atmospheric pressure. The displayed icon represents the forecast, not necessarily the current weather. The 7 forecast icons include Sunny, Partly Cloudy, Overcast, Rain, Thunderstorm, Snow, and Blizzard.

Image: Displays the seven different weather forecast icons (Sunny, Partly Cloudy, Overcast, Rain, Thunderstorm, Snow, Blizzard) and how they appear on the main unit's screen.
5.5. MAX/MIN Records and Trend Indicator
The unit records and stores the maximum and minimum temperature and humidity values within a 24-hour period. Trend indicators (arrows) show whether temperature and humidity are rising, falling, or remaining steady.
- Short press the 'RECORD' button on the back to view MAX- und MIN-Werte.
- Press and hold the 'RECORD' button for 3 seconds to clear the recorded data.

Image: Graphs illustrating the 24-hour maximum and minimum temperature and humidity records for both indoor and outdoor environments, along with trend indicators.
5.6. Average Temperature
The device can display the average temperature over 24 hours or 30 days.
- Press the 'AVERAGE' button on the back to cycle through average temperature displays.

Image: The main display unit showing the average temperature reading, with text indicating 24-hour and 30-day averages.
5.7. Kanalauswahl (für mehrere Sensoren)
If you have multiple remote sensors (up to 3), use the 'CH' button on the back of the main unit to switch between the channels (CH1, CH2, CH3) to view Daten von jedem Sensor.
6. Wartung
- Reinigung: Wischen Sie das Display und den Fernsensor mit einem weichen, fusselfreien Tuch ab.amp Tuch. Keine Scheuer- oder Lösungsmittel verwenden.
- Batteriewechsel: Tauschen Sie die Batterien in beiden Geräten aus, sobald die Anzeige für niedrigen Batteriestand erscheint. Achten Sie auf die richtige Polarität.
- Lagerung: Wenn Sie das Gerät über einen längeren Zeitraum lagern, entfernen Sie alle Batterien, um ein Auslaufen zu verhindern.
7. Fehlerbehebung
| Problem | Mögliche Ursache | Lösung |
|---|---|---|
| No outdoor reading / Dashes on display | Remote sensor out of range, low batteries, interference, or not paired. | Move sensor closer to main unit. Replace batteries in sensor. Avoid sources of interference (e.g., large metal objects, electronics). Re-pair by pressing 'CH' button. |
| Ungenaue Messwerte | Sensor, der direktem Sonnenlicht, Wärmequellen oder Feuchtigkeit ausgesetzt ist. | Relocate the remote sensor to a shaded, dry area. Ensure the main unit is not near heat/cold sources. |
| Display is dim or off (on battery power) | Batteriesparmodus aktiviert. | Touch the 'LIGHT' button to temporarily illuminate the display. For continuous illumination, use the USB power cable. |
| Die Wettervorhersage scheint fehlerhaft zu sein. | Forecast is for the next 12 hours, not current conditions. Unit needs time to learn atmospheric pressure patterns. | Allow 7-14 days for the weather station to calibrate to local atmospheric pressure. Understand that the forecast is a prediction, not a real-time report. |
8. Spezifikationen
| Besonderheit | Detail |
|---|---|
| Marke | OBET |
| Modell | B62 |
| Anzeigetyp | LCD-Farbbildschirm |
| Innentemperaturbereich | 14.2°F bis 122°F (-9.9°C bis 50°C) |
| Außentemperaturbereich | -40°F bis 158°F (-40°C bis 70°C) |
| Temperaturgenauigkeit | +/-0.5℉ (0.28°C) |
| Feuchtigkeitsbereich | 1 % bis 99 % relative Luftfeuchtigkeit |
| Feuchtigkeitsgenauigkeit | +/-2 % |
| Drahtlose Übertragungsreichweite | Bis zu 150 Meter (500 Fuß) im Freien |
| Anzahl der unterstützten Fernsensoren | Bis zu 3 (1 enthalten) |
| Stromversorgung (Haupteinheit) | USB Powered (for continuous display), 3 x AAA batteries (for backup/portable use) |
| Stromversorgung (Fernsensor) | 2 x AA-Batterien |
| Material | Metall, Kunststoff |
| Artikelgewicht | 8.1 Unzen (0.23 Kilogramm) |
| Verpackungsabmessungen | 5.91 x 4.72 x 1.34 Zoll |
9. Garantie und Support
OBET is committed to providing satisfactory products and services. This product comes with a Lebenslange Garantie.
If you have any questions, encounter issues, or require assistance with your OBET B62 Wireless Indoor Outdoor Thermometer, please contact OBET customer support. Refer to the product packaging or the official OBET webDie aktuellsten Kontaktinformationen finden Sie auf dieser Webseite.