
Einführung
This manual provides detailed instructions for the installation, operation, and maintenance of your JOYING Single Din Touchscreen Car Stereo, model JY-UTS08N8-R. Please read this manual thoroughly before using the product to ensure proper functionality and to prevent damage.

Figure 1: JOYING Single Din Touchscreen Car Stereo (JY-UTS08N8-R)
Aufstellen
1. Auspacken und Komponentenprüfung
Carefully unpack the unit and verify that all components are present. The package should include:
- 10.1" radio unit
- Single Din Cage
- Montagehülse
- Linke und rechte Klammern
- Plastic Trim Out
- Extraction Keys
- Installationshandbuch
- WLAN-Antenne (x1)
- GPS-Antenne (x1)
- 4G-Antenne (x2)
- Externes Mikrofon (x1)
- USB-Kabel (x2)
- AR Cable (x1)
- Screen Ribbon Cable (x1)
- ISO Cable (x1)
- Benutzerhandbuch (dieses Dokument)

Abbildung 2: Enthaltene Komponenten
2. Physische Installation
Installation may require an installation frame kit, special ISO harness, amplifier adapter, or CANbus decoder depending on your vehicle's specific requirements. Refer to the included Installationshandbuch for detailed steps. The unit features an upgraded installation structure allowing adjustment of left and right bracket positions for optimal fit in various car center consoles.

Figure 3: Installation Structure Adjustment
3. Verkabelung und Anschlüsse
Connect the provided cables to the corresponding ports on the rear of the head unit and to your vehicle's wiring harness. Ensure all connections are secure. The unit features various input/output ports including USB, HDMI, Optical, Coaxial, and RCA for audio and video.
- ISO Cable: Wird an den Hauptstrom- und Lautsprecherkabelbaum des Fahrzeugs angeschlossen.
- GPS-Antenne: Connect for satellite navigation functionality.
- WLAN-Antenne: Connect for stable wireless internet access.
- 4G-Antennen: Connect for mobile data access via SIM card.
- Externes Mikrofon: Connect für verbesserte Anrufqualität und Sprachbefehle.
- USB-Kabel: For connecting external devices or media.
- HDMI-Ausgang: For connecting external displays (e.g., headrest monitors).
- Optical Fiber and Coaxial Digital Output: For direct connection to external amplifiers with digital inputs for enhanced sound quality.

Figure 4: Rear Port Layout
4. 4G Module Setup
Insert a compatible SIM card into the designated slot for internet access. The unit supports FDD-LTE: B2/B4/B5/B7/B12/B13/B14/B17/B25/B26/B38/B66/B71 and TDD-LTE: B41. Note that the 4G module is for internet access only and does not support phone calls or SMS directly from the unit.
Bedienungsanleitung
1. Initial Boot and Fast Boot
The first boot-up may take approximately 30-40 seconds. Subsequent power-ons will utilize the fast boot feature, allowing the unit to start and enter the user interface within 2 seconds after the car key is turned.
2. Navigation (GPS)
The unit includes precise GPS engines and an antenna for accurate positioning and real-time navigation. You can download offline maps for use in areas without internet connectivity. Mobile phone map data can also be synchronized to the head unit via Apple CarPlay or Android Auto.
3. Apple CarPlay & Android Auto
Connect your mobile phone via USB cable or Bluetooth to access Apple CarPlay or Android Auto. This allows you to use phone applications for navigation, make calls, and stream music directly on the car stereo's display.

Abbildung 5: Apple CarPlay- und Android Auto-Schnittstelle
4. Multitasking im Splitscreen-Modus
The unit supports split-screen functionality, allowing you to run two applications simultaneously. For exampSie können view navigation on one side and media playback on the other. To activate, tap the recent apps icon, find the app you want to split, click its icon, and select the split-screen option. Then choose a second app from recent apps.

Abbildung 6: Multitasking im Split-Screen-Modus
5. Audiofunktionen
The unit features a TDA7851 DSP chip and a 48-band graphic equalizer for high-quality sound. It provides 4 audio outputs and 1 subwoofer output. Support for aftermarket amplifiers is available via Fiber Optical or SPDIF Coaxial outputs.

Figure 7: High-Quality Sound Features
6. HDMI-Ausgang
The HDMI output allows for a full digital image and sound signal to external displays. This supports projection screen displays for passengers or on-screen displays with 1080P clarity without stuttering. Note that the HDMI cable is not included.

Figure 8: HDMI Output Functionality
7. Lenkradsteuerung (SWC)
The unit supports steering wheel controls for easy switching of songs, radio channels, and volume adjustment. If your car has a CAN system, an extra CANbus cable may be required to retain this feature.

Abbildung 9: Lenkradsteuerung
8. Weitere Funktionen
The unit includes AM/FM radio, hands-free calling, Picture-in-Picture (PiP) mode, 3 USB ports, a Micro SD card slot, and a 4G SIM card slot.

Figure 10: Additional Features Overview
9. Personalisierte Einstellungen
Customize your user experience with options for changing the car boot logo, setting custom wallpapers, adjusting button light colors, and controlling screen brightness.
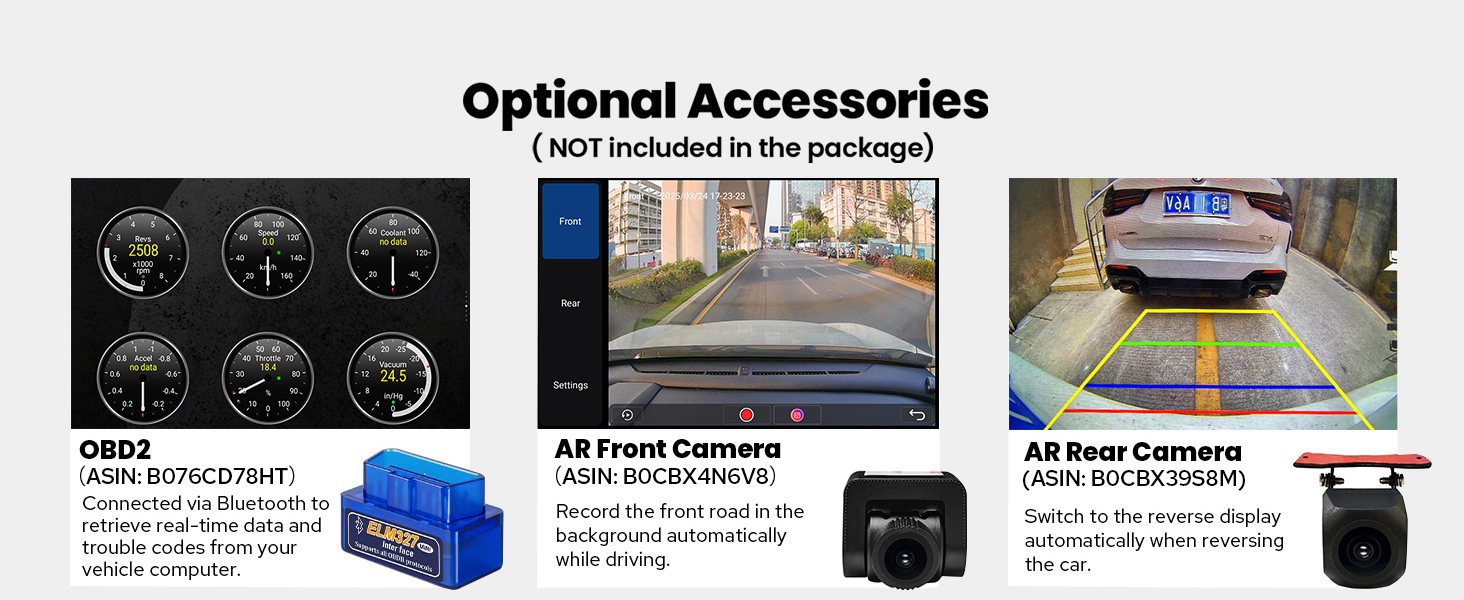
Figure 11: Personalized Settings
Wartung
To ensure the longevity and optimal performance of your JOYING car stereo, follow these maintenance guidelines:
- Reinigen des Bildschirms: Mit einem weichen, fusselfreien Tuch leichtampMit Wasser oder einem speziell für Elektronikbildschirme entwickelten Reiniger abspülen. Scharfe Chemikalien oder scheuernde Materialien vermeiden.
- Reinigung des Geräts: Wipe the exterior of the unit with a dry, soft cloth. Ensure no liquids enter the unit.
- Software-Updates: Überprüfen Sie regelmäßig die Herstellerangaben. website for available software updates to improve performance and add new features. Follow the provided instructions carefully when performing updates.
- Temperaturkontrolle: The unit features a dual heat sink design and a cooling fan. Ensure proper ventilation around the unit to prevent overheating. The system can be configured to automatically activate the fan if the CPU temperature or radio volume exceeds a set warning value.

Figure 12: Upgraded Cooling System

Figure 13: Independent WiFi Antenna
Fehlerbehebung
If you encounter issues with your JOYING car stereo, refer to the following common problems and solutions:
- Kein Strom: Ensure all power cables are correctly connected and the vehicle's fuse is intact.
- Kein Ton: Überprüfen Sie die Lautsprecheranschlüsse. amplifier connections (if applicable), and volume settings. Verify that the audio output mode is correctly configured.
- GPS-Signalverlust: Stellen Sie sicher, dass die GPS-Antenne ordnungsgemäß installiert ist und eine freie Sicht hat. view des Himmels. Vermeiden Sie es, es unter Metallgegenständen zu platzieren.
- Bluetooth-/WLAN-Verbindungsprobleme: Ensure Bluetooth/Wi-Fi is enabled on both the head unit and the connected device. Try restarting both devices.
- Touchscreen reagiert nicht: Perform a soft reset of the unit (refer to the Installation Manual for specific instructions). If the issue persists, contact support.
- CarPlay/Android Auto verbindet sich nicht: Ensure your phone's operating system is up to date and try a different USB cable. Verify that the feature is enabled on the head unit.
For persistent issues, consult the detailed troubleshooting section in the Installation Manual or contact JOYING customer support.
Technische Daten
| Besonderheit | Spezifikation |
|---|---|
| Marke | FREUDE |
| Modellname | UTS08N8 |
| Modellnummer | JY-UTS08N8-R |
| Bildschirmgröße | 10.1 Zoll |
| Betriebssystem | Android |
| Speicherkapazität | 128 GB |
| Touchscreen-Typ | Kapazitiv |
| Anzeigetyp | LED |
| Konnektivitätstechnologie | Bluetooth, Ethernet, HDMI, USB, WLAN |
| Konnektivitätsprotokoll | Bluetooth, Wi-Fi |
| Besondere Merkmale | Android Auto, Apple CarPlay, DSP, RCA, RDS |
| Audioausgabemodus | Stereo |
| Unterstütztes Satellitennavigationssystem | BeiDou, GLONASS, GPS |
| Kartentyp | Nordamerika |
| Kompatible Geräte | Amplifier, Camera, Speaker |
| Kontrollmethode | App, Touch, Sprache |
| Artikelgewicht | 1200 Gramm |
Optionales Zubehör
The following accessories are not included in the standard package but can be ordered separately to enhance your car stereo experience:
- OBD2-Scanner: Verbindet sich via Bluetooth, um Echtzeitdaten und Fehlercodes vom Fahrzeugcomputer abzurufen.
- AR-Frontkamera: Zeichnet während der Fahrt automatisch die Straße vor Ihnen auf.
- AR-Rückkamera: Switches to reverse display automatically when reversing the car.
- DAB+ Digital Radio Adapter
- DVR (Digitaler Videorecorder)
- TPMS (Reifendrucküberwachungssystem)
Abbildung 14: Optionales Zubehör
Garantie und Support
Your JOYING Single Din Touchscreen Radio (JY-UTS08N8-R) comes with a 2 Jahr Garantie Diese Garantie gilt ab Kaufdatum und deckt Herstellungsfehler sowie Funktionsstörungen bei normalem Gebrauch ab.
For warranty claims, technical assistance, or any questions regarding your product, please contact JOYING customer support through the retailer where the product was purchased or visit the official JOYING webWebsite für Support-Kontaktinformationen.
Bitte bewahren Sie Ihren Kaufbeleg zur Überprüfung der Garantie auf.