
1. Einleitung
This manual provides detailed instructions for the installation, operation, and maintenance of your JOYING Android 13 Car Stereo Head Unit (Model JY-HT145N8). This unit is designed to integrate seamlessly with Honda Civic models from 2016 to 2021, offering advanced features such as CarPlay, Android Auto, GPS navigation, and enhanced audio capabilities.
Bitte lesen Sie diese Bedienungsanleitung vor der Installation und Inbetriebnahme sorgfältig durch, um eine einwandfreie Funktion zu gewährleisten und Schäden am Gerät oder Ihrem Fahrzeug zu vermeiden.

Bild: Überview of the JOYING Android 13 Car Stereo Head Unit highlighting key features.
2. Sicherheitshinweise
- Always ensure the vehicle's ignition is off before performing any installation or wiring.
- Disconnect the vehicle's battery to prevent electrical shorts or damage.
- Wenn Sie sich bei einzelnen Arbeitsschritten unsicher sind, wenden Sie sich an einen professionellen Installateur.
- Bedienen Sie das Gerät nicht so, dass Sie vom Fahren abgelenkt werden.
- Ensure all connections are secure to prevent intermittent issues or hazards.
3. Packungsinhalt
Bitte überprüfen Sie, ob alle unten aufgeführten Artikel in Ihrem Paket enthalten sind:
- 9" radio x1
- Single Din Cage x1
- Left & Right Bracket x1
- WiFi-Antenne x1
- GPS-Antenne x1
- 4G-Antenne x2
- Externes Mikrofon x1
- USB-Kabel x2
- AR-Kabel x1
- Bildschirm-Flachbandkabel x1
- Netzkabel x1
- Benutzerhandbuch x1

Image: All components included in the JOYING Android 13 Car Stereo package.
4. Einrichtung und Installation
The JOYING head unit is designed for a plug-and-play installation, supporting factory reverse camera, steering wheel controls, USB, and lanewatch camera. Follow these general steps for installation:
- Remove Original Dashboard Components: Carefully remove the side panel trims and the original radio unit from your vehicle's dashboard.
- Kabelbäume anschließen: Connect the provided wiring harnesses to the new head unit and your vehicle's existing connectors. Ensure all compatible plugs are securely connected. Some plugs may not be used depending on your vehicle's configuration.
- Antennen anschließen: Attach the WiFi, GPS, and 4G antennas to their respective ports on the head unit.
- USB-Kabel anschließen: Plug in the USB cables for data transfer and charging.
- Kameraeingänge anschließen: Connect your reverse camera to the "CAM IN" port.
- CAN Bus Setting: If your vehicle is equipped with a CAN bus, ensure the communication protocol (white button) on the head unit is set to the right side (CAN).
- Radioantennenadapter: For sedan 4-door Honda Civic models, you may need to remove the rear passenger seat panel trim to access and bypass the HD radio box using the included green and gray cables.
- Testfunktionalität: Before fully reassembling the dashboard, loosely fit the head unit and test all functions (power, audio, navigation, camera, steering wheel controls) to ensure everything is working correctly.
- Armaturenbrett wieder zusammenbauen: Sobald alle Funktionen überprüft sind, setzen Sie die Komponenten des Armaturenbretts sorgfältig wieder zusammen.

Image: JOYING head unit seamlessly integrated into a Honda Civic dashboard.

Image: Purchase guide illustrating different wiring harnesses (A, B, C) based on OEM radio type.

Image: Important note on setting the CAN bus communication protocol.
Installationsvideos:
Video: Detailed installation guide for an Android 13 car stereo in a Honda Civic (from Dasaita Offical Store). This video provides comprehensive steps for removing the old unit and connecting the new one.
Video: Installation steps for a new radio in a Honda Civic (from Dasaita Offical Store). This video focuses on the initial removal and wiring process.
Video: Wiring installation guide (from Jingelsye-US). This video demonstrates the connection of various cables to the head unit.
5. Bedienungsanleitung
5.1 Grundfunktionen
- Ein-/Ausschalten: The unit will typically power on with the vehicle's ignition. A fast boot feature allows it to start in 2 seconds after the initial 30-40 second boot.
- Lautstärkeregelung: Use the physical volume knob or on-screen controls to adjust audio levels.
- Android OS Navigation: Navigate through the Android 13 interface using the touchscreen.
5.2 Konnektivitätsfunktionen
- CarPlay und Android Auto: Connect your mobile phone via USB cable or Bluetooth to mirror apps, access navigation, make calls, and listen to music on the larger screen.
- Bluetooth 5.0: Für Freisprechanrufe und Audiostreaming.
- Eingebautes 4G-Modul: Insert a SIM card for internet access (does not support phone calls or SMS). Supports FDD-LTE: B2/B4/B5/B7/B12/B13/B14/B17/B25/B26/B38/B66/B71 and TDD-LTE: B41.
- WLAN-Signal: Independent WiFi antenna ensures stable 2.4GHz/5GHz internet access.
- USB-Anschlüsse: Three USB ports are available for various connections.
- Micro-SD-Kartensteckplatz: Für zusätzlichen Stauraum.

Image: Demonstration of Built-in CarPlay and Android Auto connectivity.

Image: Illustration of the upgraded WiFi signal with an independent antenna.
5.3 Navigation und Multimedia
- GPS Navigation: Precise GPS engines with included GPS antennas for accurate positioning and faster real-time navigation. Supports offline maps.
- FM/AM-Radio: Built-in FM RDS tuner radio for selecting your favorite radio stations.
- DSP-Sound: TDA7851 chip, 48-band graphic equalizer, and 4x50W max output power for high-quality sound. Supports aftermarket amplifiers via optical fiber and coaxial digital output.
- Split-screen Multitasking: Führen Sie zwei Anwendungen gleichzeitig auf dem Bildschirm aus.
- HDMI-Ausgang: Full digital image and sound-sending interface for projection screen display or on-screen display (1080P clear picture, zero delays). HDMI cable not included.

Image: High-quality sound enjoyment features including DSP chip and graphic equalizer.
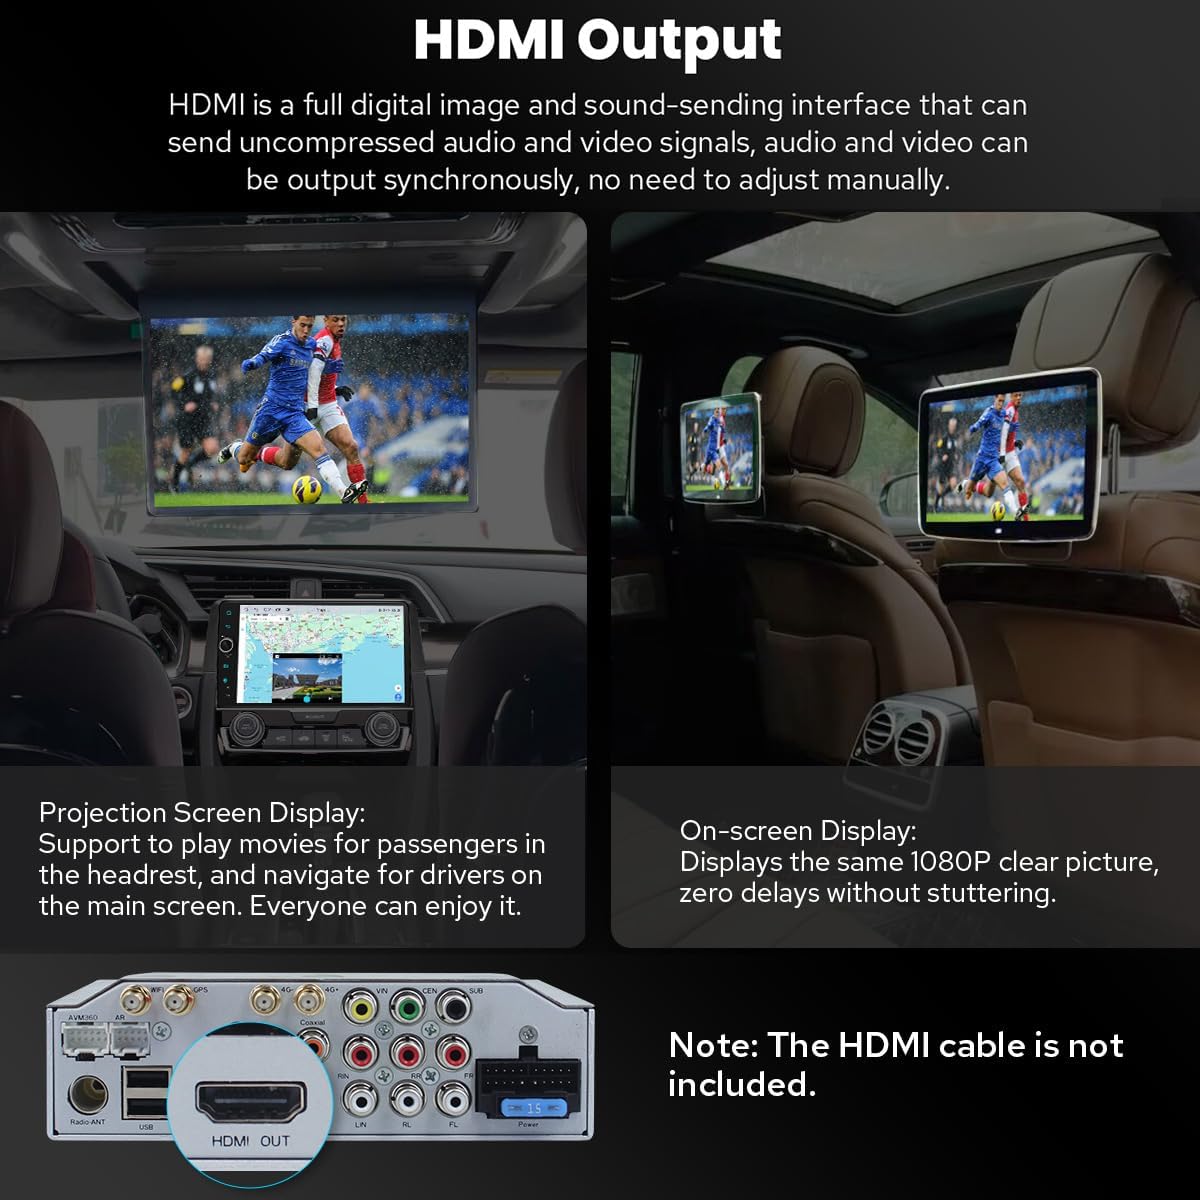
Image: HDMI output for connecting external displays.

Image: Demonstration of split-screen multitasking on the head unit.
5.4 Personalization and Other Features
- Personalisierte Einstellungen: Customize car boot logo, wallpapers, and changeable button colors. Adjustable screen brightness.
- Kühlsystem: Dual heat sink design for superior heat dissipation and temperature control. Fan automatically turns on if CPU temperature or radio volume exceeds a warning value.
- Optionales Zubehör: Supports external OBD2 (for real-time data and trouble codes), AR Front Camera (records front road), and AR Rear Camera (switches automatically when reversing).

Image: Personalized settings for the head unit interface.

Image: Illustration of the upgraded dual heat sink cooling system.

Image: Optional accessories that can be integrated with the head unit.
6. Wartung
- Reinigung: Reinigen Sie Bildschirm und Gerät mit einem weichen, trockenen Tuch. Vermeiden Sie Scheuermittel und Lösungsmittel.
- Software-Updates: Periodically check for software updates via the system settings. Updates can improve performance and add new features.
- Temperaturkontrolle: The dual heat sink design helps manage temperature. Ensure proper ventilation around the unit.
7. Fehlerbehebung
Sollten Probleme auftreten, beachten Sie bitte die folgenden allgemeinen Tipps zur Fehlerbehebung:
- Kein Strom: Prüfen Sie alle Stromkabelanschlüsse. Stellen Sie sicher, dass die Zündung des Fahrzeugs eingeschaltet ist.
- Kein Ton: Verify audio cable connections (RR, RL for touring amp). Check volume levels and DSP settings.
- Reverse Camera Not Working: Ensure the "CAM IN" cable is properly connected. Check factory settings for reversing camera (Setting > Factory settings > Others > Prohibit reverse and set "Enable").
- Lenkradbedienelemente funktionieren nicht: Check factory settings (Setting > Car > Factory settings > Canbus > Canbus Select and choose NO.21).
- GPS-Signalprobleme: Stellen Sie sicher, dass die GPS-Antenne fest angeschlossen ist und eine freie Sicht hat. view des Himmels.
- Wi-Fi/4G Connectivity Problems: Check antenna connections and ensure correct SIM card insertion (for 4G). Verify network settings.
- Langsame Leistung: Ensure the unit's cooling system is functioning. Close unnecessary background applications.
8. Spezifikationen
| Artikelgewicht | 6 Pfund |
| Verpackungsabmessungen | 12.6 x 9.06 x 7.68 Zoll |
| Artikelmodellnummer | JY-HT145N8 |
| Anzeigegröße | 9 Zoll |
| Sprachbefehl | Touch-Screen |
| Fahrzeug-Servicetyp | Auto |
| Besonderheit | Bluetooth, Touchscreen |
| Konnektivitätstechnologie | Bluetooth, Ethernet, USB, WLAN |
| Kartentyp | Nordamerika |
| Audioausgabemodus | Stereo |
| Montagetyp | Dashboard-Halterung |
| Betriebssystem | Android |
9. Garantie und Support
9.1 Garantieinformationen
The JOYING Android 13 Car Stereo Head Unit comes with a 2 Jahre GarantieBitte bewahren Sie Ihren Kaufbeleg für Garantieansprüche auf.
9.2 Produktsupport
For technical assistance, troubleshooting, or warranty inquiries, please contact JOYING customer support through the Amazon platform or visit the official JOYING website. Refer to the included warranty card for specific contact details.
Rückgaberecht: This product is eligible for a 30-day refund/replacement policy from the date of purchase, subject to Amazon's return guidelines.