1. Einleitung
This manual provides comprehensive instructions for the installation, operation, and maintenance of your Real HD 8 Port 2.5G Managed Ethernet Network Switch (Model SW8-25G-MGV2). This device is designed to enhance your network's speed and efficiency with its multi-gigabit capabilities. Please read this manual thoroughly before using the product to ensure proper functionality and safety.
2. Produktüberschreitungview
The Real HD SW8-25G-MGV2 is a managed Ethernet network switch featuring 8x 2.5 Gigabit RJ45 ports and 1x 10G SFP+ port. It supports a 60G bandwidth and is designed for plug-and-play operation. The fanless metal housing ensures quiet operation and efficient heat dissipation.
2.1 Hauptmerkmale
- 8x 2.5G RJ45 Ports: Provides high-speed connectivity for 2.5G Ethernet devices.
- 1x 10G SFP+ Port: Offers ultra-fast uplink or downlink capabilities.
- 60G Bandwidth: Ensures high data throughput for demanding network environments.
- Managed Control: Web-based interface for VLAN, QoS, security, multicast, and MAC address table configurations.
- Lüfterloses Design: Silent operation suitable for various environments.
- Robustes Metallgehäuse: Compact and sturdy design with 4KV lightning protection.
- 10Gb SFP+ to RJ45 Module Included: Supports 10GB/5GB/2.5GB/1GB data rates up to 98ft (30m) with CAT6A/CAT7 cable.
2.2 Layout der Vorder- und Rückseite

Abbildung: Vorder- und Rückseite view of the Real HD 8 Port 2.5G Managed Ethernet Network Switch. The front panel displays 8x 2.5G RJ45 ports and status LEDs. The rear panel shows the 1x 10G SFP+ port and the DC 12V 1A power input.

Image: Diagram illustrating the 2.5G network speed capability, which is 2.5 times faster than a regular 1G network. It highlights compatibility with CAT6, CAT6a, and CAT7 cables for optimal performance. The image also shows the included 10Gb SFP+ to RJ45 module and its specifications.
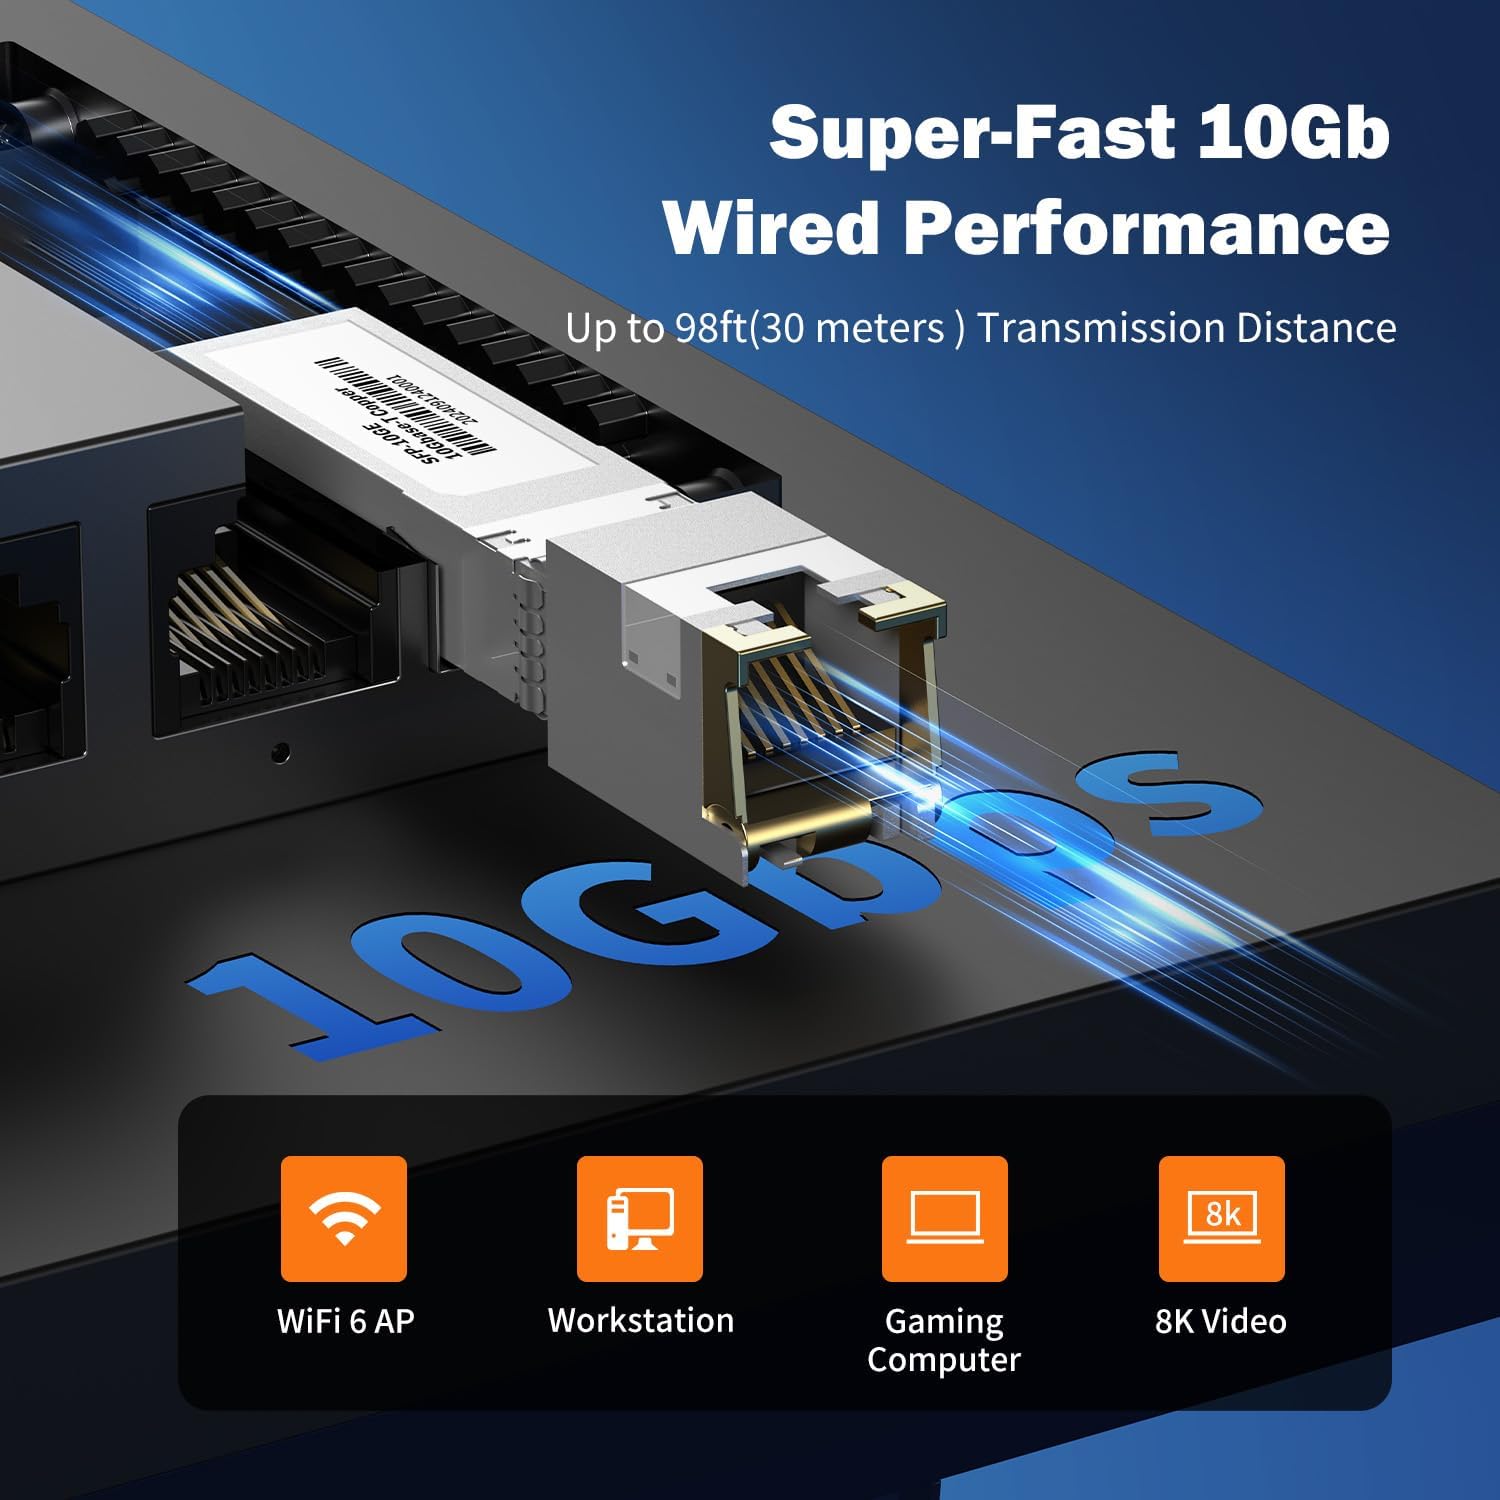
Bild: Nahaufnahme view of the 10Gb SFP+ module and port, illustrating its capability for super-fast 10Gb wired performance with a transmission distance of up to 98ft (30 meters).
3. Einrichtung und Installation
3.1 Packungsinhalt
Überprüfen Sie, ob Ihr Paket die folgenden Artikel enthält:
- Real HD 8 Port 2.5G Managed Ethernet Network Switch (SW8-25G-MGV2)
- Netzteil (DC 12 V 1 A)
- 10Gb SFP+ to RJ45 Module
- Benutzerhandbuch (dieses Dokument)
3.2 Anschließen des Schalters
- Stromanschluss: Connect the provided power adapter to the DC 12V 1A power input port on the switch and then plug it into a standard electrical outlet.
- Netzwerkgeräteverbindung:
- Connect your 2.5G compatible devices (e.g., PCs with 2.5G Ethernet adapters, Wi-Fi 6 routers/APs, NAS) to the 8x 2.5G RJ45 ports using CAT6 or higher-level pure copper Ethernet cables.
- For 10G connectivity, insert the included 10Gb SFP+ to RJ45 module into the SFP+ port. Connect a CAT6A or CAT7 cable from the module to your 10G compatible device.
- Überprüfung: Observe the LED indicators on the front panel. A green light indicates a 2.5G link, while a yellow light indicates a 10/100/1000Mbps link. A flashing light indicates data transmission.
NOTE: To achieve 2.5Gbps or 10Gbps network speeds, ensure all connected network products (network cards, cables, routers) are compatible with these speeds. The network speed will be determined by the slowest component in the chain.
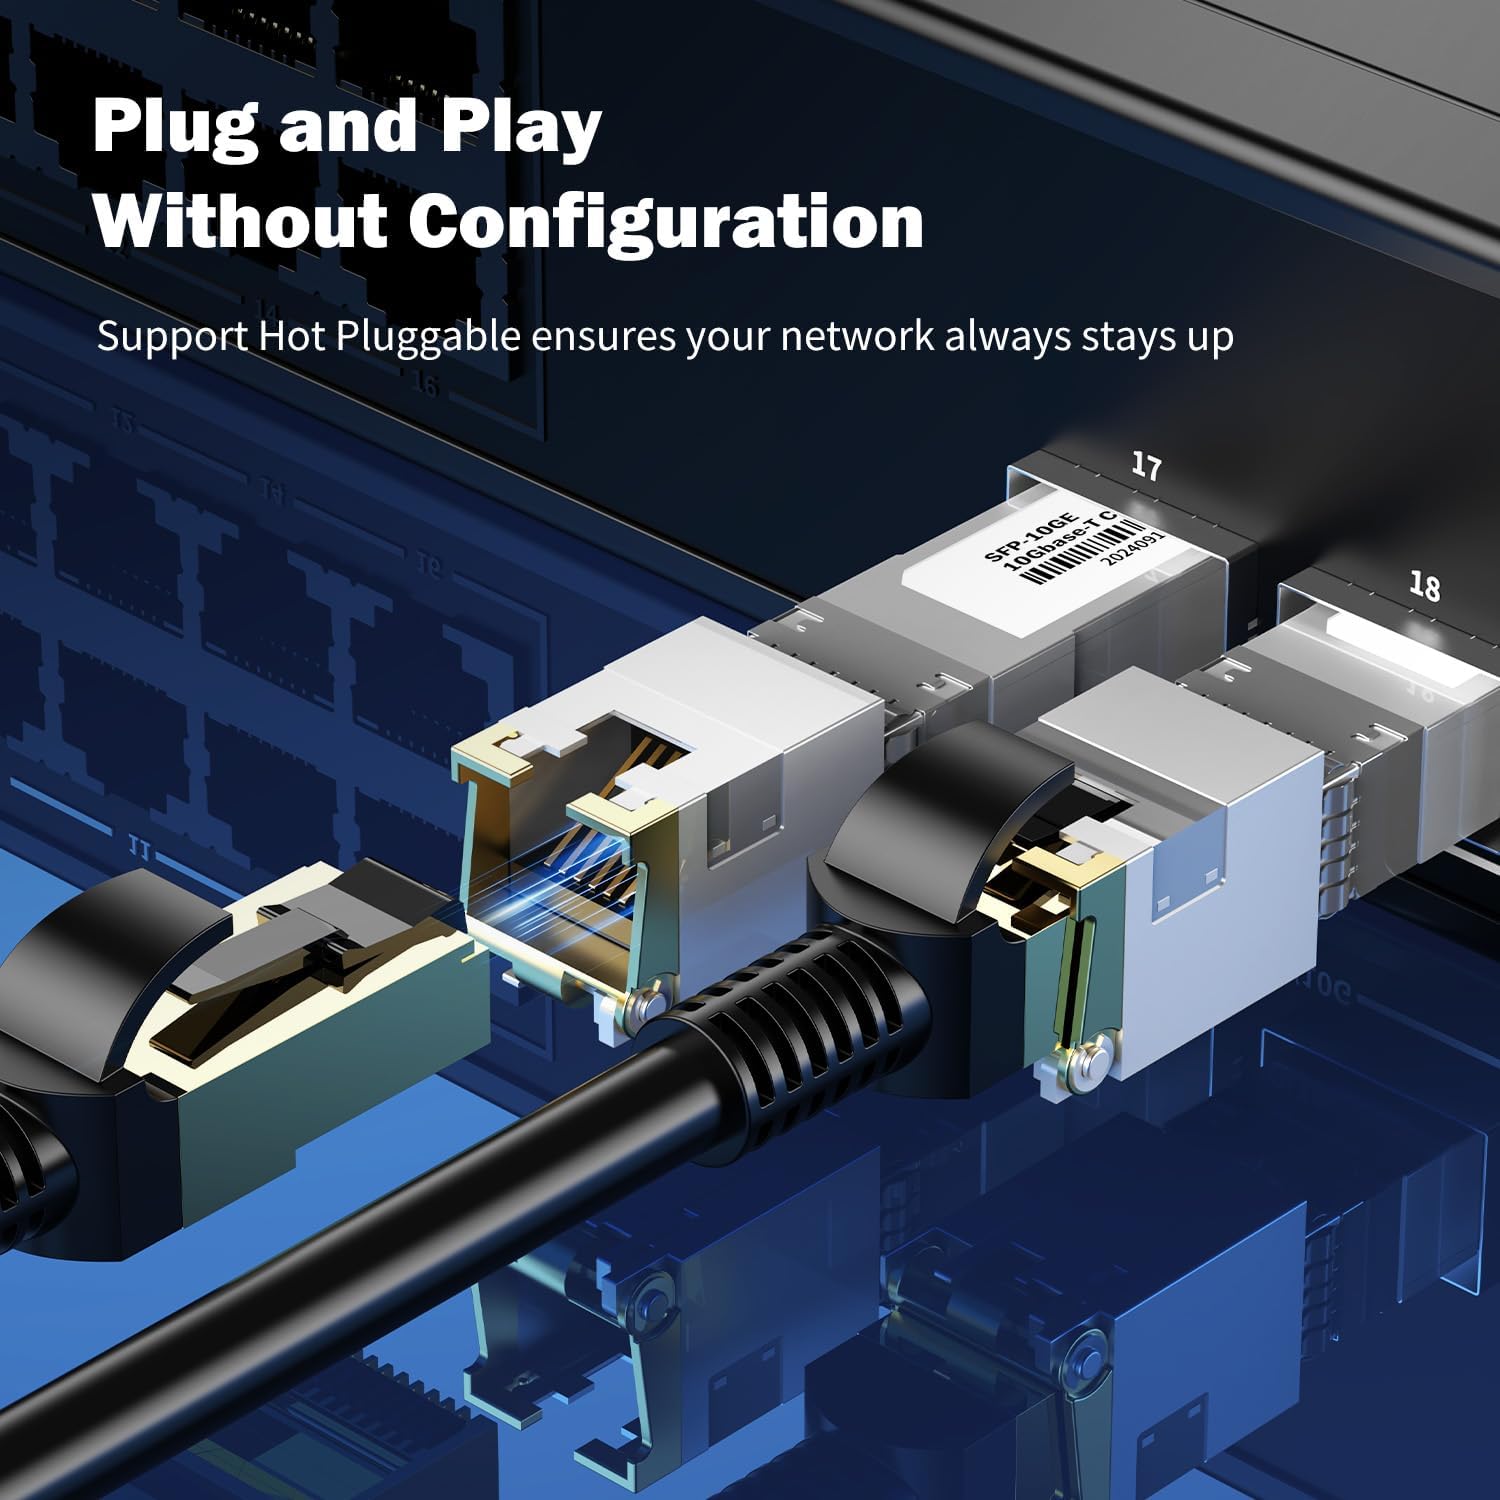
Bild: Nahaufnahme view of an SFP+ module being inserted into the switch, demonstrating the plug-and-play and hot-pluggable nature of the device, ensuring continuous network operation.
4. Bedienungsanleitung
4.1 Grundlegende Bedienung (Plug & Play)
The Real HD switch is designed for plug-and-play operation. Once powered on and connected to your network devices, it will automatically detect and configure the appropriate speeds for connected devices. No initial configuration is required for basic network extension.
4.2 Web Management-Schnittstelle
For advanced configurations, the switch features a web-basierte Verwaltungsschnittstelle.
- Stellen Sie sicher, dass Ihr Computer mit dem Switch verbunden ist.
- Öffnen Sie ein web Browser und geben Sie die Standard-IP-Adresse ein: 192.168.2.1
- Geben Sie die Standard-Anmeldedaten ein:
- Benutzername: Administrator
- Passwort: Administrator
- Upon successful login, you can access various settings such as VLAN, QoS, security, multicast, and MAC address table configurations.
NOTE: It is highly recommended to change the default password immediately after the first login for security purposes.
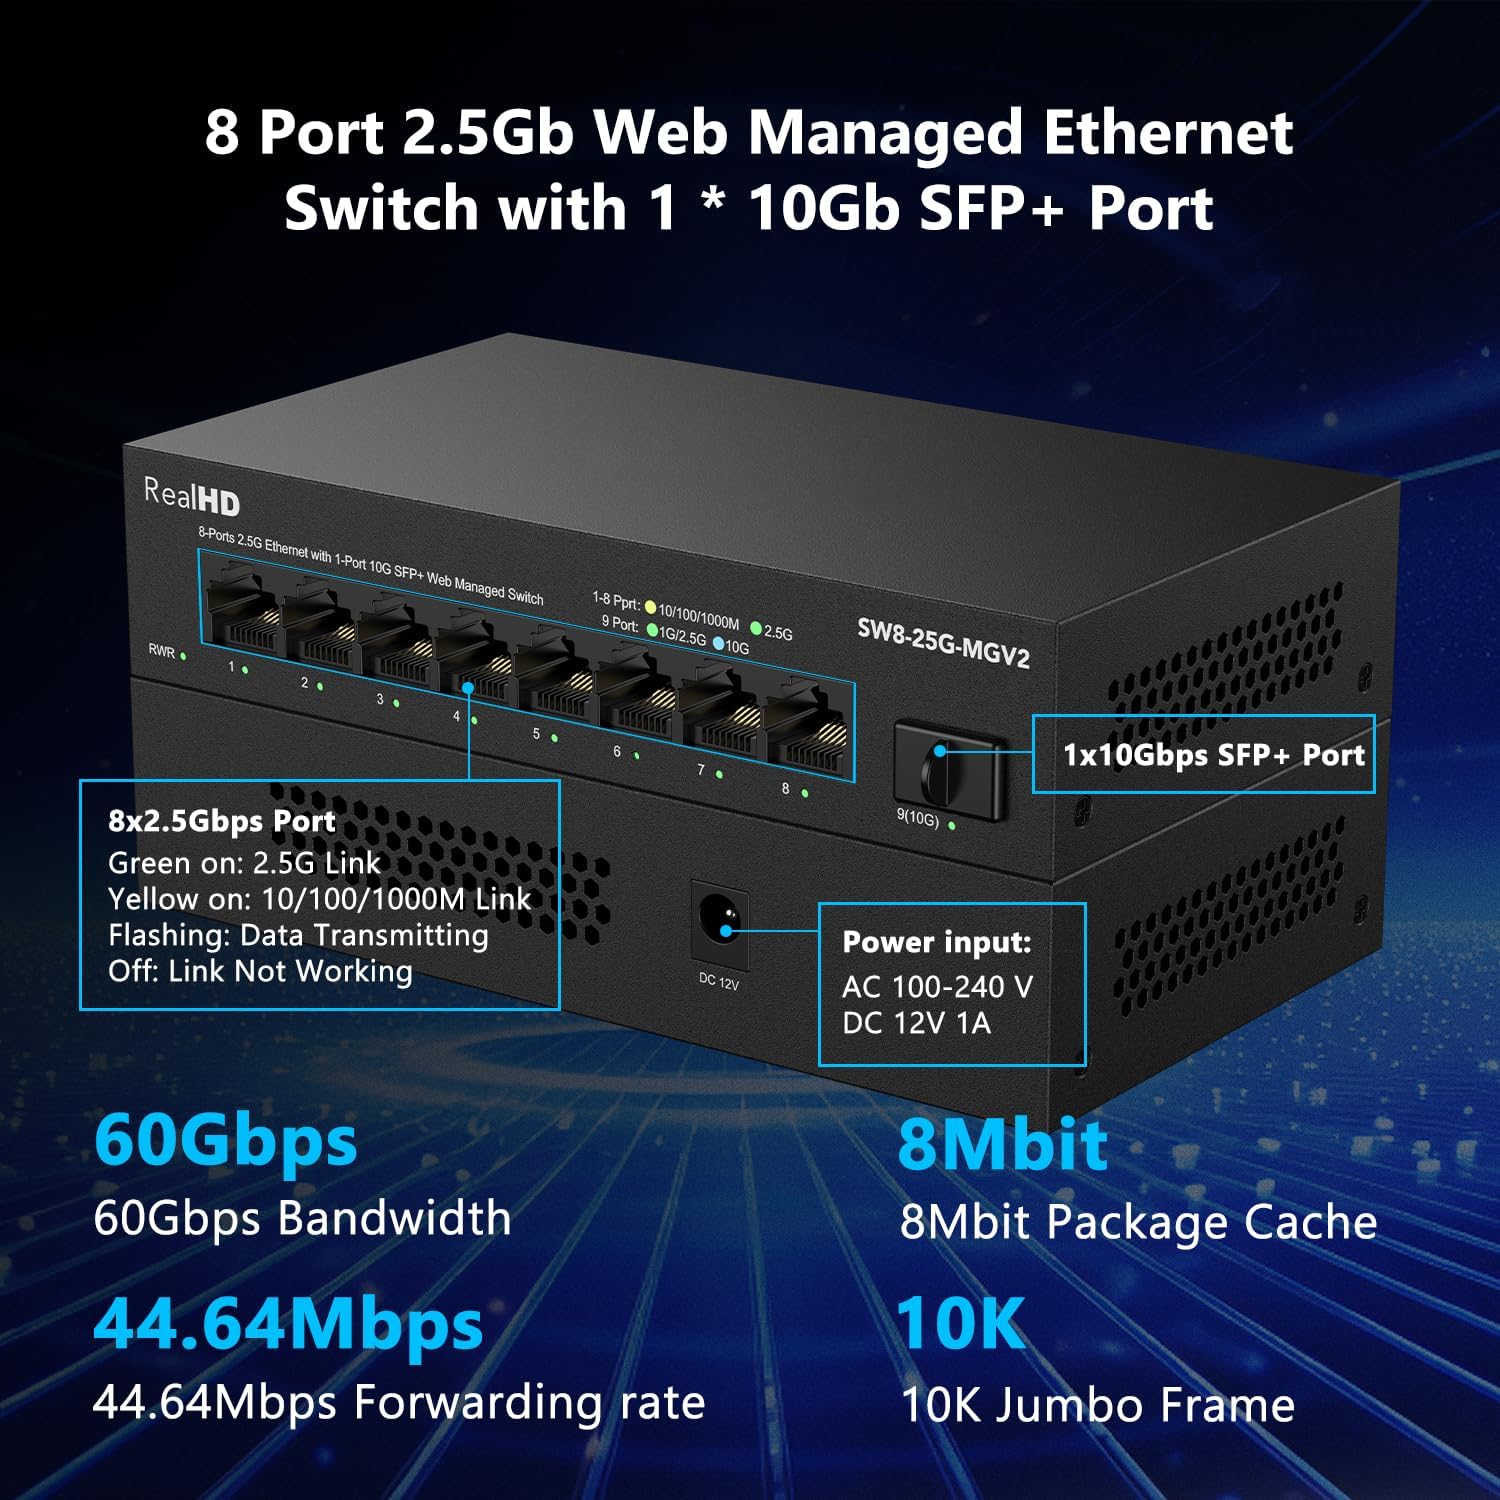
Bild: Überview of the switch's basic management features accessible via the web interface. These include VLAN, QoS, Jumbo Frame, Static Aggregation, LACP, Loop, and Spanning Tree Setting. The default IP address (192.168.2.1) and login credentials (User Name: admin, Password: admin) are also displayed.
4.3 Anwendungsszenarien
The switch is suitable for various high-bandwidth applications:
- 4K/8K Video Streaming: Provides stable bandwidth for high-resolution media.
- Gaming PCs: Reduces latency and improves online gaming experience.
- NAS (Network Attached Storage): Facilitates fast data transfer for backups and file Teilen.
- Wi-Fi 6 Routers/APs: Maximizes the performance of high-speed wireless networks.
- Arbeitsplätze: Supports demanding professional applications requiring high network throughput.

Image: Illustration of various 2.5G compatible devices that can benefit from the switch, such as 4K video devices, laptops with 2.5G Ethernet adapters, Wi-Fi 6 routers and access points, 2.5G gaming PCs, and 2.5G NAS systems.

Image: Four panels illustrating diverse application scenarios for the 2.5G network switch, including small and home offices, home entertainment setups, instant data transfer for workstations, and enhanced online gaming experiences.
5. Wartung
- Reinigung: Reinigen Sie die Außenseite des Schalters mit einem weichen, trockenen Tuch. Verwenden Sie keine flüssigen oder Aerosolreiniger.
- Belüftung: Ensure the switch is placed in a well-ventilated area to prevent overheating. Do not block ventilation openings.
- Firmware-Updates: Überprüfen Sie regelmäßig die Herstellerangaben. webWebsite für Firmware-Updates zur Gewährleistung optimaler Leistung und Sicherheit.
- Kabelmanagement: Keep network cables organized and free from kinks or excessive bends to maintain signal integrity.
6. Fehlerbehebung
- Kein Strom:
- Stellen Sie sicher, dass das Netzteil fest mit dem Schalter und einer funktionierenden Steckdose verbunden ist.
- Überprüfen Sie die Funktionsfähigkeit der Steckdose, indem Sie ein anderes Gerät anschließen.
- Keine Verbindungsleuchte:
- Prüfen Sie, ob das Ethernet-Kabel sowohl am Switch-Port als auch am Netzwerkgerät fest angeschlossen ist.
- Versuchen Sie es mit einem anderen Ethernet-Kabel.
- Stellen Sie sicher, dass das angeschlossene Gerät eingeschaltet ist und ordnungsgemäß funktioniert.
- Verify the cable type is appropriate for the desired speed (CAT6 or higher for 2.5G, CAT6A/CAT7 for 10G SFP+ module).
- Langsame Netzwerkgeschwindigkeit:
- Confirm that all devices in the network path (network cards, cables, routers) support 2.5G or 10G speeds. The network will operate at the speed of the slowest component.
- Ensure you are using CAT6 or higher-level pure copper Ethernet cables for 2.5G, and CAT6A/CAT7 for 10G SFP+ connections.
- Check for network congestion or other devices consuming significant bandwidth.
- Kein Zugriff möglich Web Verwaltungsschnittstelle:
- Ensure your computer is directly connected to the switch or on the same network segment.
- Verify your computer's IP address is in the same subnet as the switch (e.g., if switch is 192.168.2.1, your computer could be 192.168.2.x).
- Confirm you are using the correct default IP address (192.168.2.1) and credentials (admin/admin).
- If the password was changed and forgotten, a factory reset might be necessary (refer to advanced management documentation if available, or contact support).
7. Spezifikationen
| Modell | SW8-25G-MGV2 |
| Häfen | 8x 2.5G RJ45 Ports, 1x 10G SFP+ Port |
| Bandbreite | 60 Gbit/s |
| Weiterleitungsrate | 44.64 Mpps |
| Jumbo-Rahmen | 10 |
| Paketcache | 8 Mbit |
| Leistungsaufnahme | AC 100-240 V, DC 12V 1A |
| Betriebstemperatur | -20 bis 50 ℃ |
| Blitzschutz | 4 kV |
| Management | Web Managed (VLAN, QoS, Security, Multicast, MAC Address Table) |
| Included Module | 10Gb SFP+ to RJ45 Copper Module (up to 98ft/30m) |
Bild: Eine detaillierte view of the Real HD 8 Port 2.5G Managed Ethernet Switch, highlighting its physical ports, power input specifications, and key performance metrics such as 60Gbps bandwidth, 8Mbit package cache, 44.64Mpps forwarding rate, and 10K Jumbo Frame support.
8. Sicherheitshinweise
- Das Gerät darf weder Wasser noch übermäßiger Feuchtigkeit ausgesetzt werden.
- Versuchen Sie nicht, das Gerät selbst zu öffnen oder zu reparieren. Überlassen Sie alle Wartungsarbeiten qualifiziertem Fachpersonal.
- Verwenden Sie ausschließlich das mitgelieferte Netzteil. Die Verwendung eines falschen Netzteils kann das Gerät beschädigen und zum Erlöschen der Garantie führen.
- Place the device on a stable, flat surface away from direct sunlight, heat sources, and strong electromagnetic fields.
- Stellen Sie sicher, dass die örtlichen Elektrovorschriften dies vorschreiben.
9. Garantie und Support
For warranty information and technical support, please refer to the official Real HD webBesuchen Sie unsere Website oder wenden Sie sich an Ihren Händler vor Ort. Bewahren Sie Ihren Kaufbeleg für Garantieansprüche auf.
Kontaktinformationen: Bitte besuchen Sie die Real HD Store on Amazon for further support or product information.