1. Einleitung
This manual provides detailed instructions for the setup, operation, maintenance, and troubleshooting of your ATTACK SHARK G3PRO Wireless Gaming Mouse. Please read this manual thoroughly to ensure proper use and to maximize your gaming experience.

Bild: Ein überview of the ATTACK SHARK G3PRO mouse and its features, including magnetic fast charging, PAW3311 sensor, web cloud drive, RGB rapid charging dock, and lightweight design.
2. Packungsinhalt
Überprüfen Sie, ob alle Artikel in Ihrem Paket vorhanden sind:
- ATTACK SHARK G3PRO Wireless Gaming Mouse
- RGB Magnetic Charging Dock
- 2.4G USB-Empfänger
- USB-C-auf-USB-A-Lade-/Datenkabel
- Bedienungsanleitung
3. Einrichtung
3.1 Erstaufladung
Before first use, it is recommended to fully charge the mouse. Connect the USB-C cable to the charging dock and a power source. Place the mouse onto the magnetic charging dock. The RGB lighting on the dock will indicate charging status.
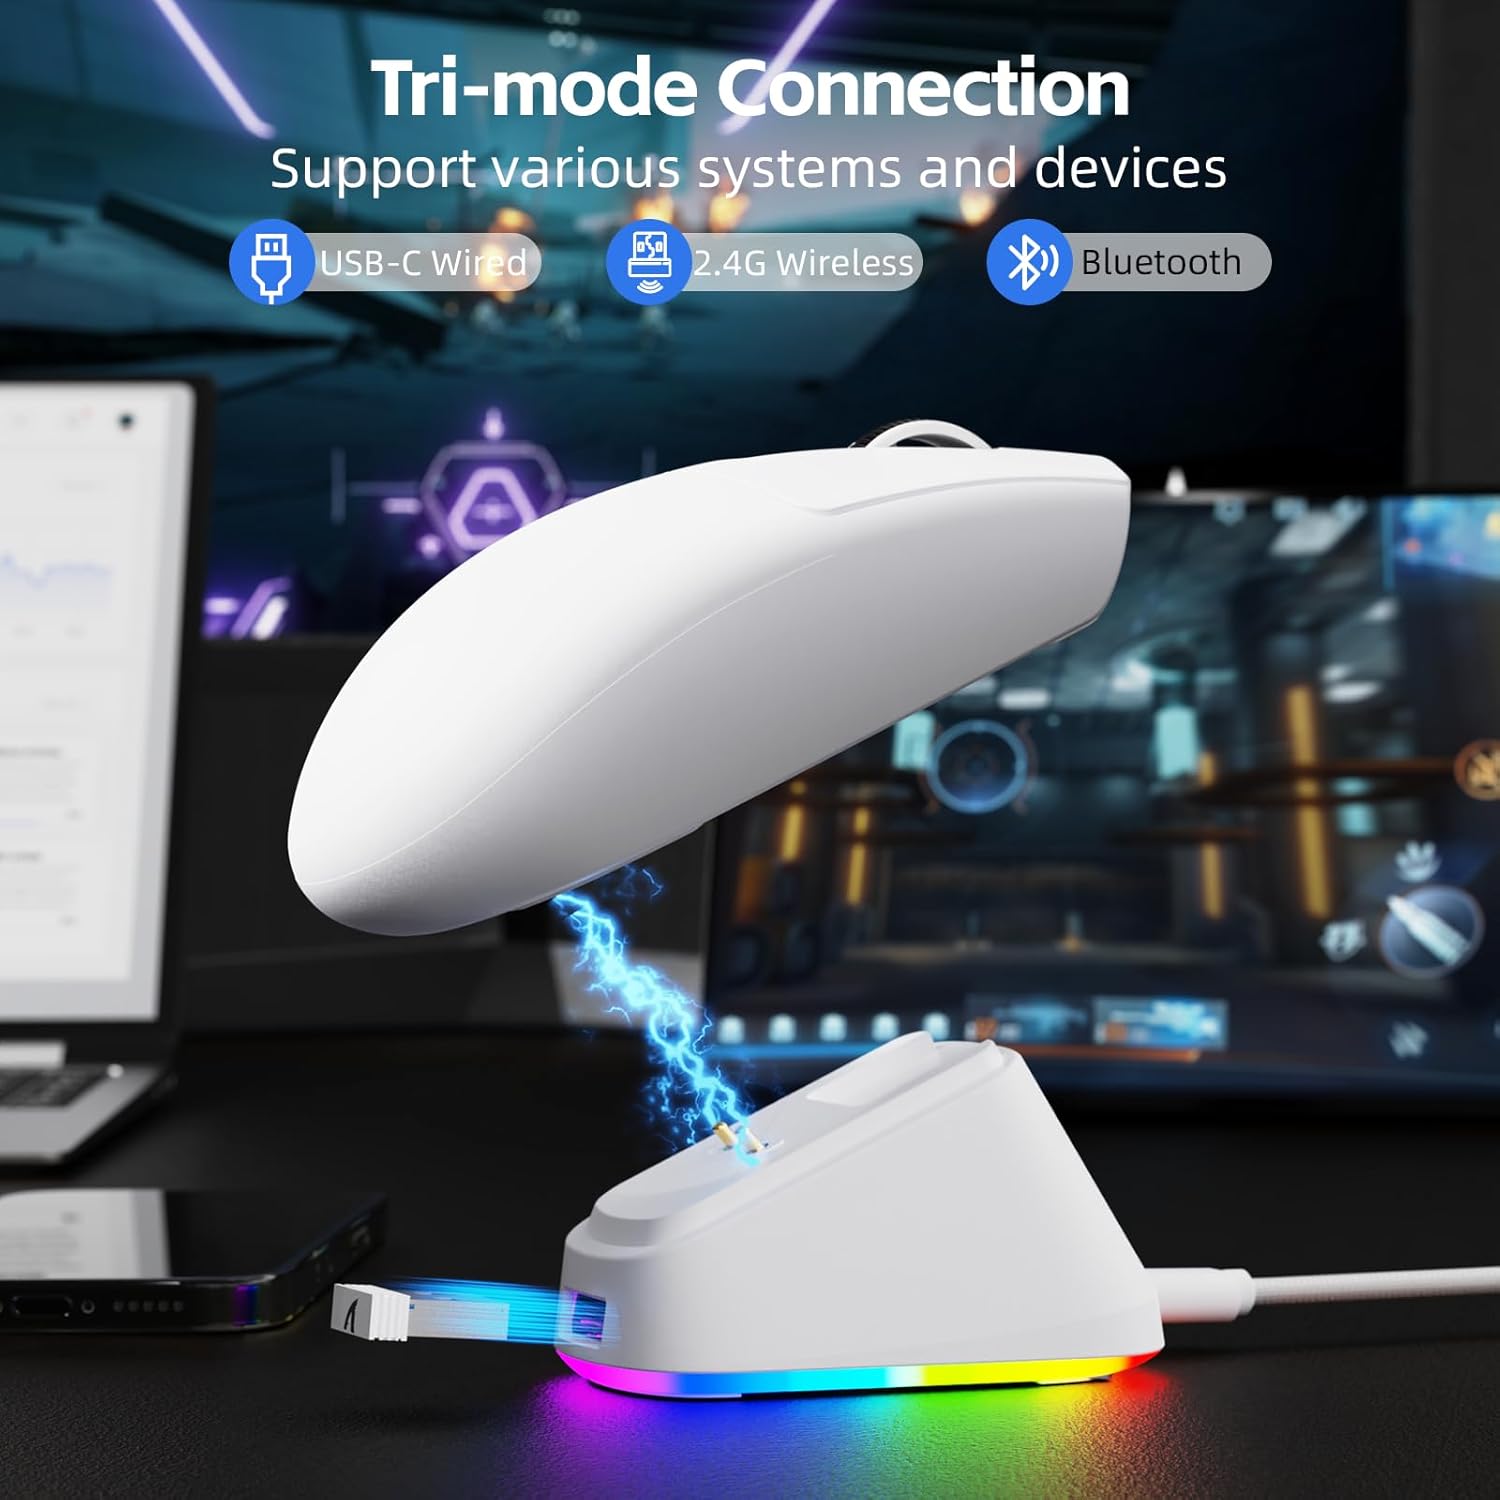
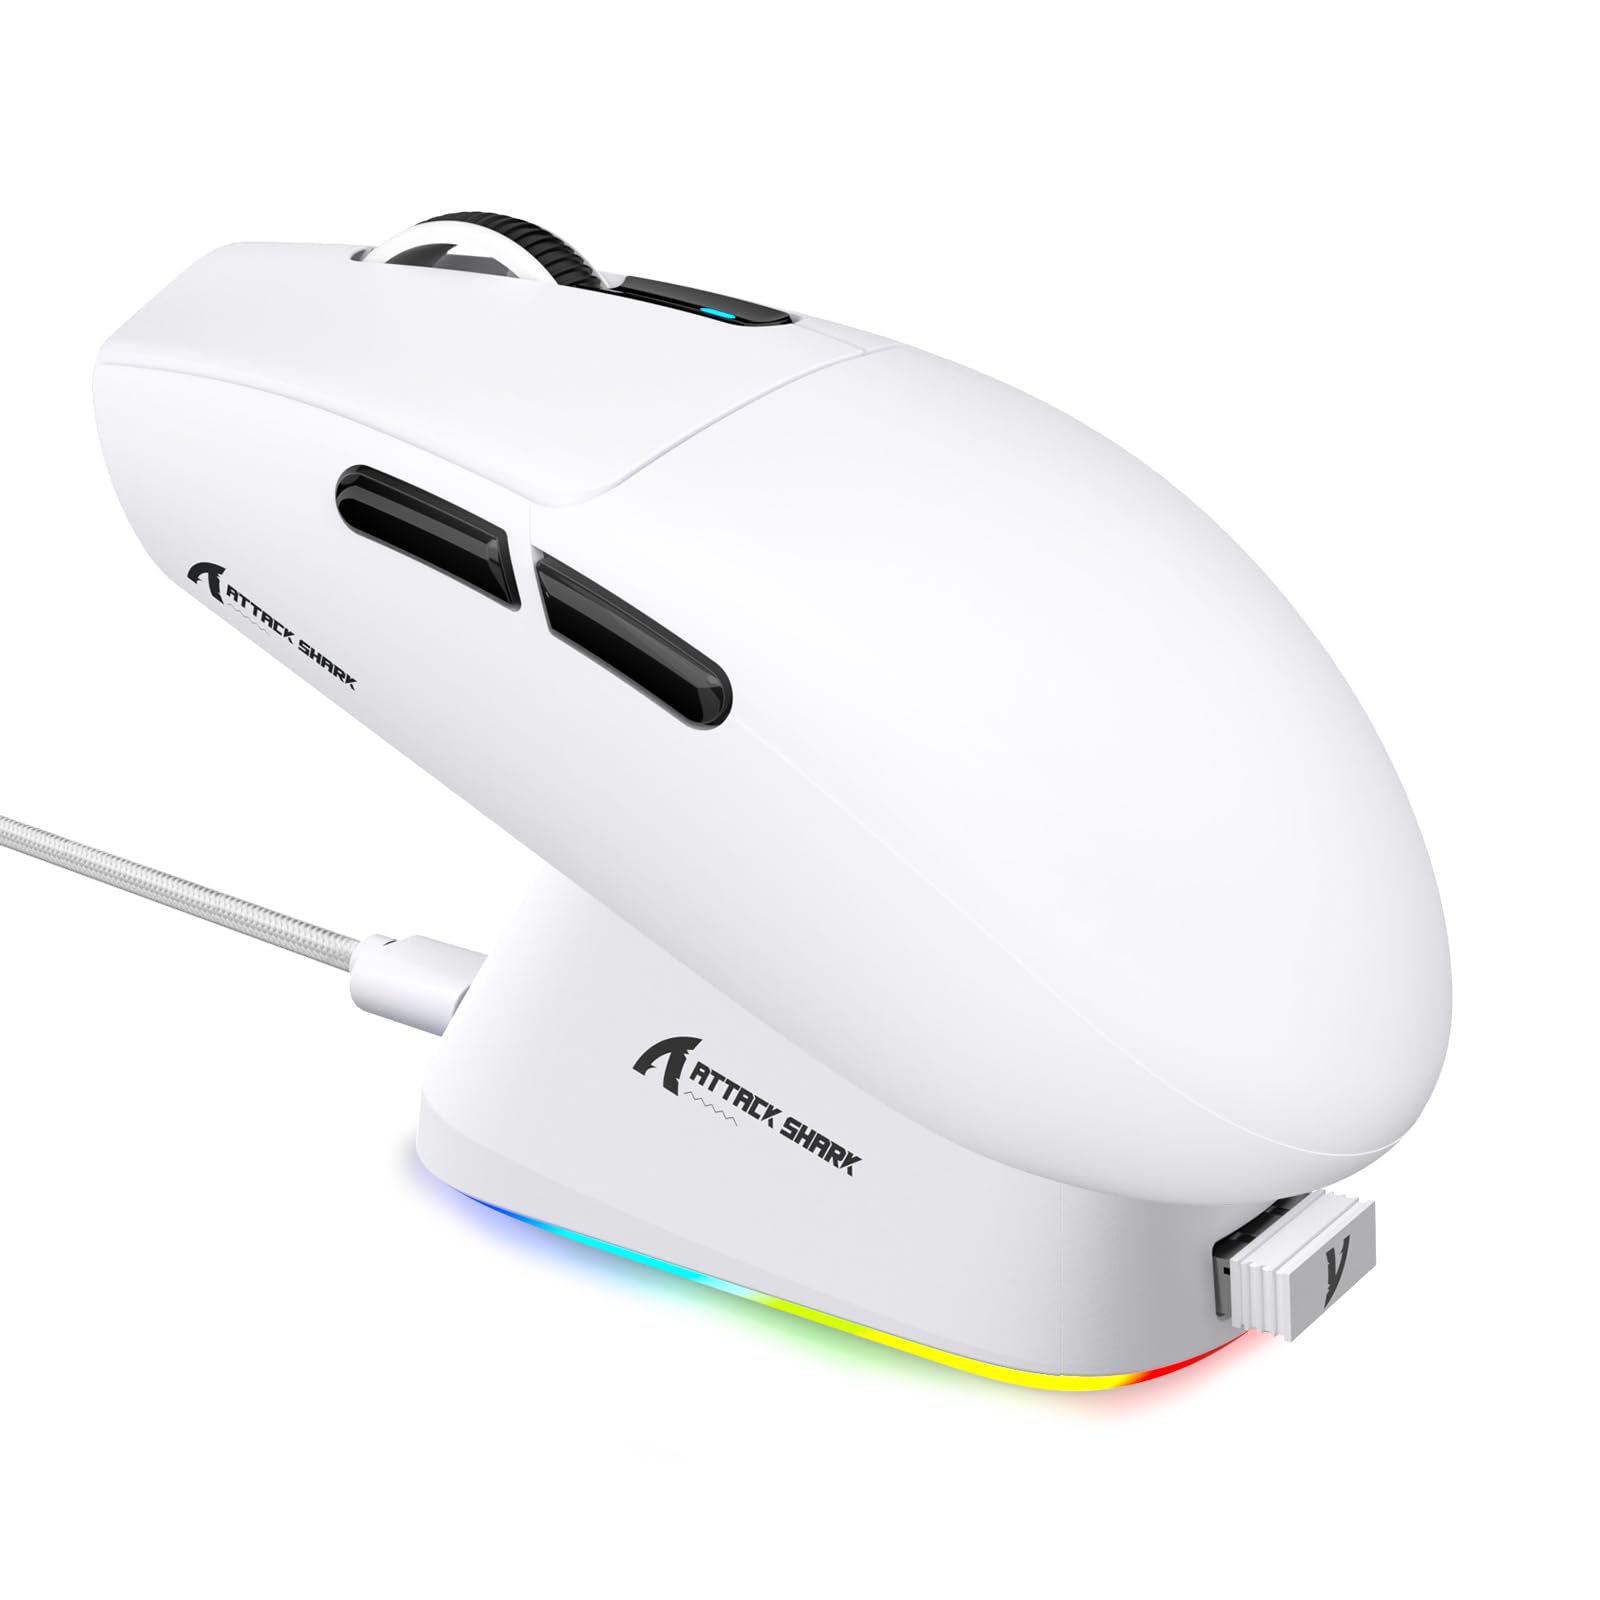
Image: The ATTACK SHARK G3PRO mouse magnetically attached to its RGB charging dock, showing the charging thimbles and USB-C port.
For a visual guide on charging, please watch the following video:
Video: This video demonstrates the magnetic charging dock and its features for the ATTACK SHARK G3PRO Wireless Gaming Mouse.
3.2 Anschließen der Maus
The G3PRO supports three connection modes: 2.4GHz Wireless, Bluetooth, and USB-C Wired. A switch on the bottom of the mouse allows you to select the desired mode.

Image: The ATTACK SHARK G3PRO mouse with visual indicators for Wired, 2.4G, and Bluetooth connectivity modes.
2.4-GHz-Wireless-Modus:
- Locate the 2.4G USB receiver, typically stored within the charging dock or the mouse itself.
- Stecken Sie den USB-Empfänger in einen freien USB-Port Ihres Computers.
- Set the switch on the bottom of the mouse to "2.4G".
- Die Maus sollte sich automatisch verbinden.
Bluetooth-Modus:
- Set the switch on the bottom of the mouse to "BT".
- Öffnen Sie auf Ihrem Computer oder Gerät die Bluetooth-Einstellungen und aktivieren Sie Bluetooth.
- Suchen nach new devices and select "ATTACK SHARK G3PRO" to pair.
USB-C-Kabelmodus:
- Verbinden Sie die Maus über das USB-C-Kabel direkt mit Ihrem Computer.
- Die Maus funktioniert wie eine kabelgebundene Maus und wird gleichzeitig aufgeladen.
For a visual guide on product features and connectivity, please watch the following video:
Video: This video demonstrates the various color options and the magnetic charging feature of the ATTACK SHARK G3PRO Wireless Gaming Mouse, showcasing sein Design und seine Funktionalität.
4. Bedienung der Maus
4.1 Tastenfunktionen
The ATTACK SHARK G3PRO features 5 programmable buttons:
- Links Klick: Primäre Maßnahme.
- Rechtsklick: Sekundäres Aktions-/Kontextmenü.
- Mittlerer Klick/Scrollrad: Scroll up/down, middle click for universal scroll or other functions.
- Vorwärts-Taste: Standardeinstellung für die Vorwärtsnavigation in web Browser/Ordner.
- Rückwärts-Taste: Standardeinstellung für die Rückwärtsnavigation in web Browser/Ordner.
- DPI-Schalter: Durchläuft voreingestellte DPI-Stufen.

Image: A detailed diagram illustrating the location and default functions of the multi-functional buttons on the ATTACK SHARK G3PRO mouse.

Bild: Eine explodierte view and labeled diagram of the G3PRO mouse components, including buttons, switches, charging points, and the 2.4G/OFF/BT mode switch.
4.2 DPI-Anpassung
The mouse features a dedicated DPI switch to cycle through various sensitivity levels, ranging from 800 to 25,000 DPI. The current DPI setting is indicated by an LED light.

Image: A visual representation of the 25,000 DPI optical sensor's precision and how mouse movement trajectory sensitivity scales with DPI settings.
4.3 Umfragequote
The G3PRO supports a 1000Hz polling rate in both wired and 2.4GHz wireless modes, ensuring rapid response times for competitive gaming.

Image: A diagram illustrating the 1000Hz polling rate capability in both wired and wireless modes, highlighting millisecond response times.
5. Software und Anpassung
Customize your G3PRO mouse settings using the intuitive web driver or downloadable software from ATTACK SHARK. This allows for personalization of DPI, polling rate, macros, and more.
- Web Treiber: Zugriff auf die web-based configuration tool for quick adjustments without installation.
- Downloadable Software: For advanced customization and profile management, download the dedicated software.

Image: A screenshot of the ATTACK SHARK Hub software interface, showing options for mouse settings, DPI settings, parameter settings, macro editing, and personal center.

Image: The cloud-driven programming interface for the G3PRO mouse, displaying options for button settings, DPI adjustments, polling rate settings, and power management.
6. Wartung
6.1 Reinigung
Um eine optimale Leistung zu gewährleisten, reinigen Sie Ihre Maus regelmäßig. Verwenden Sie ein weiches, trockenes Tuch, um die Oberfläche abzuwischen. Bei hartnäckigem Schmutz kann ein leicht feuchtes Tuch hilfreich sein.amp Ein Tuch kann verwendet werden, um sicherzustellen, dass keine Feuchtigkeit in die internen Komponenten eindringt. Vermeiden Sie aggressive Chemikalien oder scheuernde Materialien.
6.2 Speicherung
When not in use for extended periods, store the mouse and charging dock in a cool, dry place. Ensure the USB receiver is securely stored, ideally within the charging dock's designated slot, to prevent loss.
7. Fehlerbehebung
| Problem | Mögliche Ursache | Lösung |
|---|---|---|
| Maus reagiert nicht (2.4 G) | Low battery; Receiver not plugged in; Incorrect mode selected; Driver issue. | Charge the mouse; Ensure receiver is firmly plugged in; Set mouse to "2.4G" mode; Reinstall mouse drivers. |
| Maus reagiert nicht (Bluetooth) | Low battery; Bluetooth not enabled on device; Not paired; Incorrect mode selected. | Charge the mouse; Enable Bluetooth on your device; Re-pair the mouse in Bluetooth settings; Set mouse to "BT" mode. |
| Charging dock RGB not lighting up | Cable not connected; Power source issue. | Ensure USB-C cable is securely connected to dock and power source; Try a different USB port or power adapter. |
| Inkonsistente Nachverfolgung | Dirty sensor; Uneven surface; Interference (wireless). | Clean the optical sensor; Use a clean, even mouse pad; Reduce wireless interference by moving other devices or using wired mode. |
| Tasten reagieren nicht | Softwarekonflikt; Physischer Schaden. | Check software settings for button remapping; Test on another computer; Contact support if physical damage is suspected. |
8. Spezifikationen
| Besonderheit | Detail |
|---|---|
| Marke | ANGRIFFSHAI |
| Modell | G3PRO |
| Farbe | Weiß |
| Konnektivitätstechnologie | 2.4-GHz-Funkverbindung, Bluetooth, USB-C-Kabel |
| Bewegungserkennungstechnologie | Optischer Sensor (PAW3311) |
| Max. DPI | 25,000 DPI |
| Abfragerate | 1000 Hz |
| Beschleunigung | 40 G |
| Tracking-Geschwindigkeit | 400 IPS |
| Schalter | Mechanical (100 Million Clicks) |
| Batteriekapazität | 500 mAh |
| Akkulaufzeit | Bis zu 200 Stunden |
| Gewicht | 59g ± 3g |
| Schaltflächen | 5 |
| Handausrichtung | Beidhändig |
| Kompatible Geräte | Laptop, PC, Smartphone, Tablet |
| Betriebssystem | Windows, macOS |
For a comparison of G3 and G3PRO models, refer to the image below:

Image: A table comparing the specifications of the ATTACK SHARK G3 and G3PRO models, highlighting differences in components and features.
9. Sicherheitshinweise
- Setzen Sie das Gerät keinen extremen Temperaturen oder Feuchtigkeit aus.
- Lassen Sie das Gerät nicht fallen und setzen Sie es keinen starken Stößen aus.
- Außerhalb der Reichweite von Kindern aufbewahren.
- Versuchen Sie nicht, das Gerät zu zerlegen oder zu verändern, da dies zum Erlöschen der Garantie führt und Schäden verursachen kann.
- Use only the provided charging cable and dock.
10. Garantie und Support
The ATTACK SHARK G3PRO Wireless Gaming Mouse comes with a standard manufacturer's warranty. For detailed warranty information, please refer to the warranty card included in your package or visit the official ATTACK SHARK webWebsite.
For technical support, troubleshooting assistance, or to inquire about replacement parts, please contact ATTACK SHARK customer service through their official webWebsite oder die Kontaktinformationen, die auf Ihrer Produktverpackung angegeben sind.
Offiziell WebWebsite: ATTACK SHARK Store bei Amazon