
Flyrivergo B0FGTY8C8C
Flyrivergo Jewelry Polishing Machine and 3-inch Ball Vise User Manual
Model: B0FGTY8C8C
Einführung
This manual provides detailed instructions for the safe and efficient operation, setup, and maintenance of your Flyrivergo Jewelry Polishing Machine and 3-inch Ball Vise. This combination tool is designed for precision work in jewelry making, polishing, engraving, and other intricate tasks. Please read this manual thoroughly before using the product to ensure proper function and safety.
Sicherheitshinweise
Befolgen Sie immer die grundlegenden Sicherheitsvorkehrungen, um das Risiko von Bränden, Stromschlägen und Verletzungen zu verringern.
- Lesen Sie alle Anweisungen, bevor Sie die Maschine in Betrieb nehmen.
- Wear appropriate personal protective equipment (PPE), including safety glasses, gloves, and a dust mask, especially when polishing.
- Ensure the work area is well-lit and clean. Cluttered benches invite accidents.
- Halten Sie Kinder und Unbeteiligte fern.
- Betreiben Sie Elektrowerkzeuge nicht in explosionsgefährdeten Bereichen, in denen sich beispielsweise brennbare Flüssigkeiten, Gase oder Staub befinden.
- Vermeiden Sie ein unbeabsichtigtes Einschalten. Stellen Sie vor dem Einstecken sicher, dass sich der Schalter in der Aus-Position befindet.
- Überstrecken Sie sich nicht. Sorgen Sie stets für einen sicheren Stand und halten Sie das Gleichgewicht.
- Ziehen Sie den Stecker aus der Steckdose, bevor Sie Einstellungen vornehmen, Zubehör wechseln oder das Werkzeug weglegen.
- Use the correct tool for the application. Do not force a small tool or attachment to do the job of a heavy-duty tool.
- Behandeln Sie Werkzeuge sorgfältig. Halten Sie die Schneidwerkzeuge scharf und sauber, um eine bessere und sicherere Leistung zu erzielen.
- Check for misalignment or binding of moving parts, breakage of parts, and any other condition that may affect the tool’s operation. If damaged, have the tool repaired before use.
Packungsinhalt
Carefully unpack all items and ensure all components are present and undamaged. If any items are missing or damaged, contact customer support.

Bild: Überview of the complete package contents, including the ball vise, polishing machine accessories, and various attachments.
- Jewelry Polishing Machine (Bench Buffer Polisher)
- 3-inch Ball Vise
- Polishing Wheels (e.g., Yellow, White, Fiber)
- Polishing Compounds (e.g., White, Green)
- Various Ball Vise Attachments (pins, jaws, T-wrench)
- Bedienungsanleitung
Produkt überview
Jewelry Polishing Machine
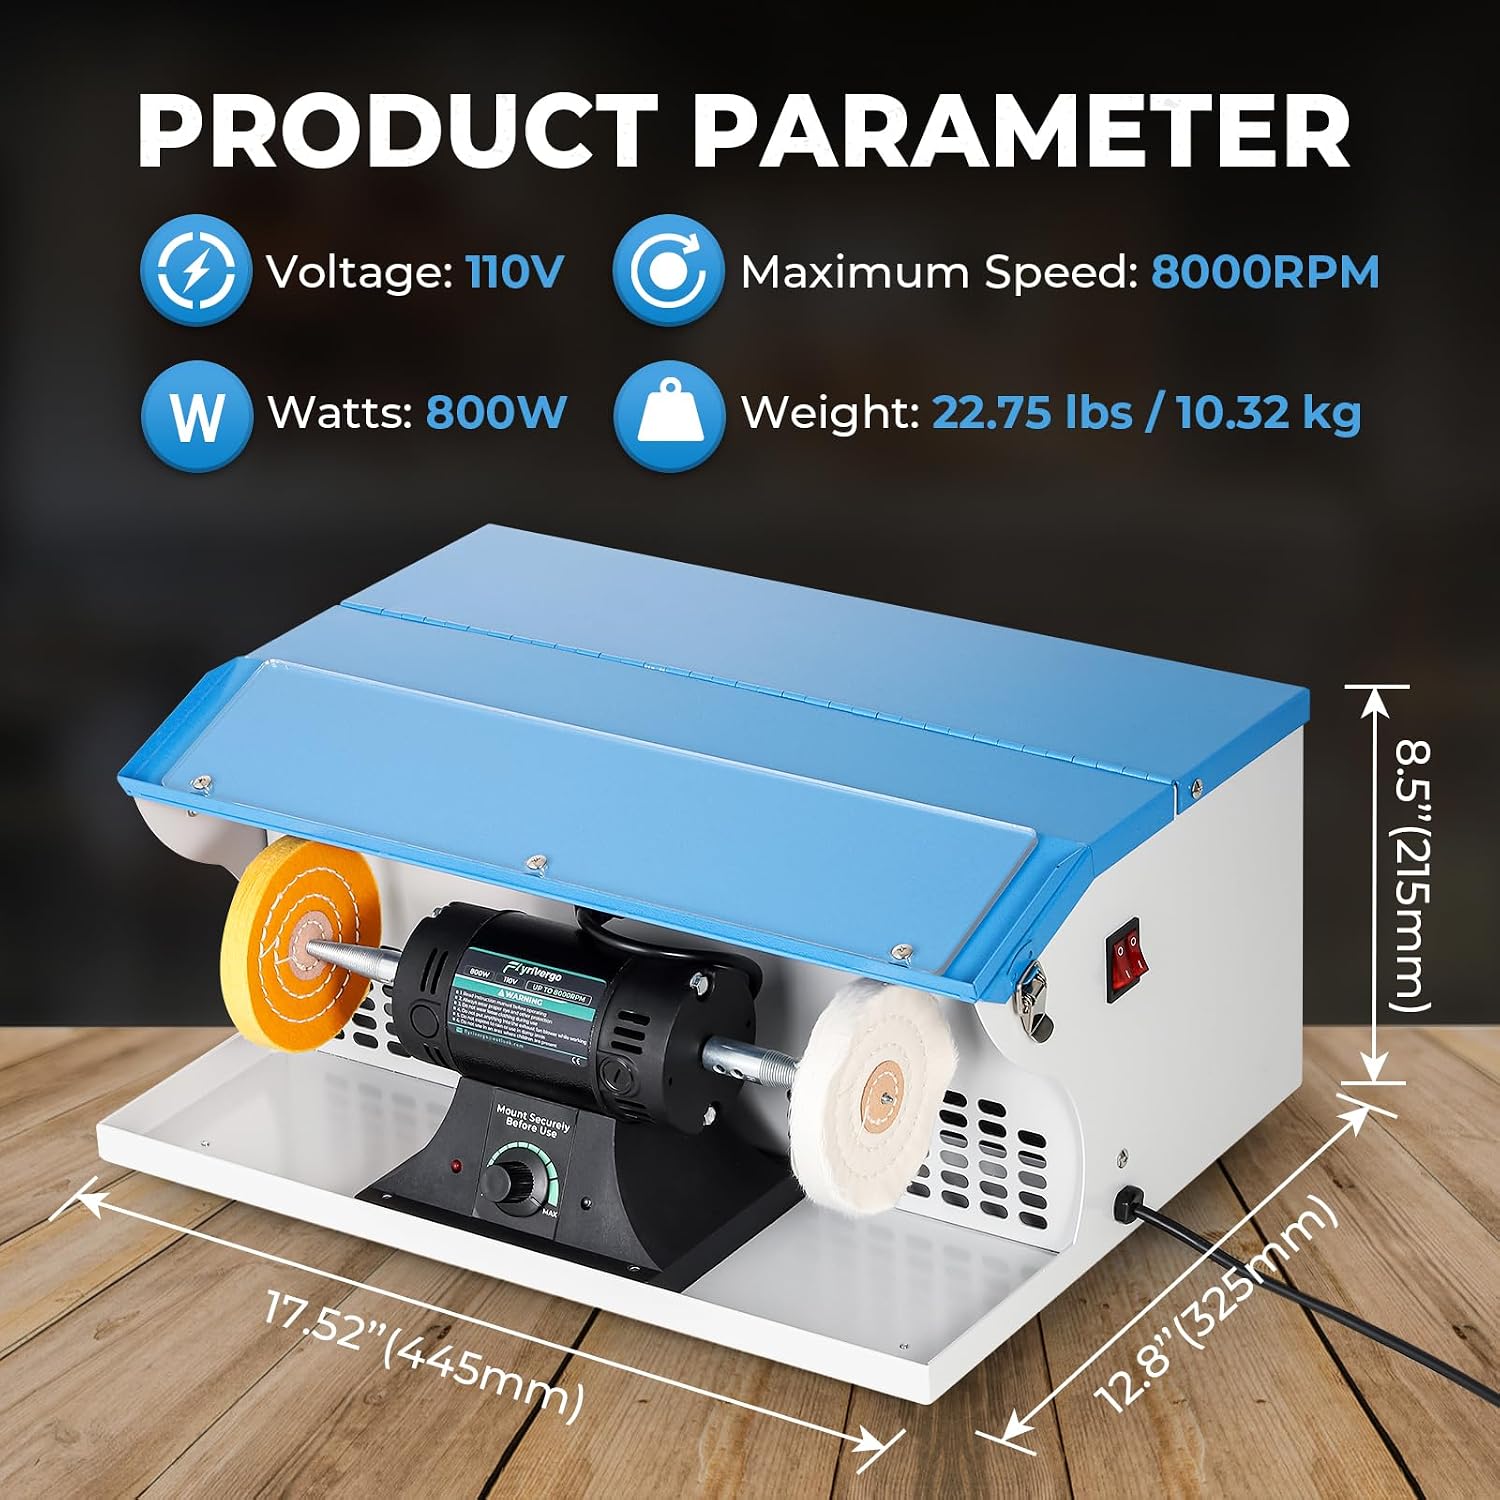
Bild: Vorderseite view of the polishing machine, showing its dimensions (17.52" L x 12.8" W x 8.5" H) and key parameters like 110V voltage, 8000 RPM max speed, 800W power, and 22.75 lbs weight.
The polishing machine features a powerful motor for efficient polishing of various materials. It includes a protective cover, a light tube for improved visibility, a dust collector, and an exhaust fan blower for maintaining a clean work environment.

Bild: Nahaufnahme view highlighting the machine's features: integrated light tube, dust collector, exhaust fan blower, and the motor housing.
Different polishing wheels and compounds are available for various applications, from initial buffing to final high-shine polishing.

Image: Display of different polishing accessories: Yellow Wheel, White Wheel, Fiber Wheel, White Compound, and Green Compound.
3-inch Ball Vise

Image: The ball vise showing its adjustable clamping mechanism and the ability for 360-degree free rotation, indicated by arrows.
The 3-inch ball vise provides a stable and adjustable platform for holding small items during intricate work such as engraving, stone setting, and detailed jewelry repair. It features adjustable clamping force and 360-degree free rotation for optimal positioning.
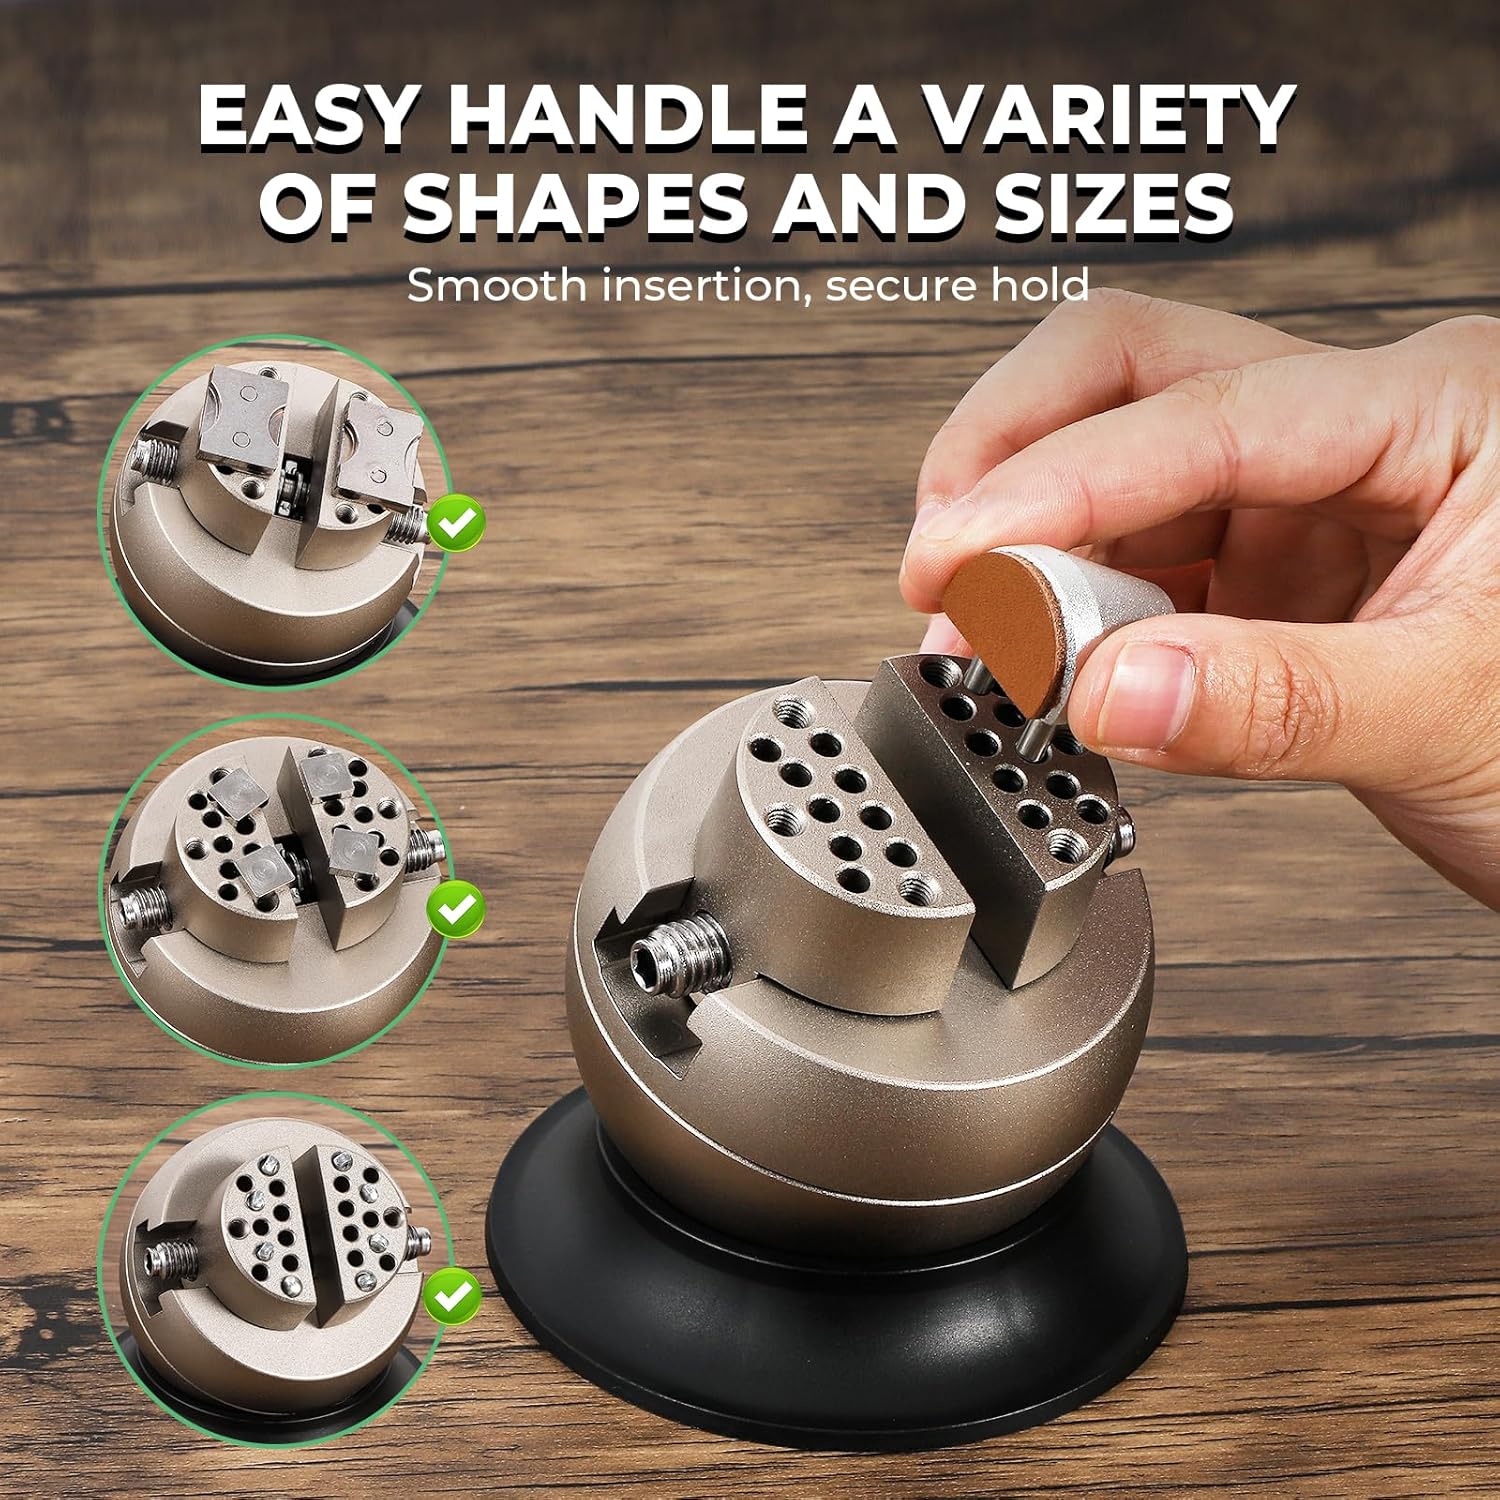
Image: The ball vise demonstrating its versatility in securely holding objects of different shapes and sizes.
Technische Daten
| Besonderheit | Detail |
|---|---|
| Modellnummer | B0FGTY8C8C |
| Bandtage | 110 V |
| Leistung (Watt) | 800 W |
| Höchstgeschwindigkeit | 8000 U/min |
| Polishing Machine Dimensions (L x W x H) | 17.52" x 12.8" x 8.5" (445 mm x 325 mm x 215 mm) |
| Polishing Machine Weight | 22.75 kg |
| Ball Vise Diameter | 3 Zoll (ca. 76 mm) |
| Ball Vise Height | 3.35" (85 mm) |
| Ball Vise Base Diameter | 3.78" (96 mm) |
Aufstellen
1. Polishing Machine Setup
- Auspacken: Remove the polishing machine and all accessories from the packaging. Inspect for any shipping damage.
- Platzierung: Place the polishing machine on a stable, level workbench. Ensure adequate clearance around the machine for ventilation and safe operation.
- Mounting Polishing Wheels:
- Select the appropriate polishing wheel and compound for your task.
- Securely attach the desired polishing wheel to the spindle on each side of the motor. Use the provided wrench to tighten the retaining nuts firmly.

Image: A hand using a wrench to securely attach a polishing wheel onto the machine's spindle.
- Stromanschluss: Ensure the power switch is in the "OFF" position. Plug the power cord into a standard 110V electrical outlet.
2. Ball Vise Setup
- Platzierung: Place the ball vise on a clean, stable surface. The suction base helps secure it.
- Attaching Jaws/Pins: Select the appropriate jaws or pins from the accessory set based on the item you intend to hold. Insert them into the vise head and secure them as needed.
Bedienungsanleitung
1. Using the Jewelry Polishing Machine
- Sicherheit geht vor: Always wear safety glasses and a dust mask before operating.
- Einschalten: Flip the power switch to the "ON" position. The motor will start, and the polishing wheels will begin to spin.
- Geschwindigkeit anpassen: Use the speed control knob (if available) to set the desired RPM for your polishing task. Start with a lower speed and gradually increase if necessary.
- Apply Compound: Lightly touch the polishing compound to the spinning wheel to transfer a small amount of compound onto the wheel. Do not over-apply.
- Polieren: Gently bring the item to be polished into contact with the spinning wheel. Apply light, even pressure and move the item continuously to avoid overheating or creating flat spots.
Image: A close-up of a hand holding a ring against a spinning polishing wheel on the machine.
- Staubsammlung: The integrated dust collector and exhaust fan will help manage polishing debris. Ensure these are clear and functioning.
- Ausschalten: Once finished, turn the power switch to "OFF" and allow the wheels to come to a complete stop before leaving the machine.
2. Using the 3-inch Ball Vise
- Sicherheitsgegenstand: Place the item you wish to work on between the jaws or pins of the ball vise.
- Cl einstellenampKraft: Use the adjustment mechanism to gently tighten the jaws until the item is held securely without being damaged.
Image: A hand turning the adjustment knob on the ball vise to control the clampKraft ein.
- Positionierung: The ball vise allows for 360-degree rotation and tilting. Adjust the position of your workpiece as needed for optimal access and comfort.

Bild: Drei Examples demonstrating the ball vise's application in watch maintenance, ring grinding, and holding a rock sample zur Analyse.
- Veröffentlichungsartikel: Once your work is complete, loosen the jaws and carefully remove the item.
Wartung
- Reinigung: Regularly clean the polishing machine and ball vise to prevent buildup of dust and debris. Use a soft, dry cloth. For stubborn grime, a slightly damp Es kann ein Tuch verwendet werden, um sicherzustellen, dass keine Feuchtigkeit in die elektrischen Bauteile eindringt.
- Staubfänger: Periodically empty and clean the dust collector to maintain optimal suction and prevent motor strain.
- Polishing Wheels: Replace polishing wheels when they become worn, glazed, or contaminated with different compounds. Ensure the machine is unplugged before changing wheels.
- Ball Vise Jaws: Clean the jaws and pins of the ball vise to ensure a secure grip. Lubricate moving parts of the vise periodically with a light machine oil to maintain smooth operation.
- Lagerung: Store the tools in a clean, dry environment away from direct sunlight and extreme temperatures.
Fehlerbehebung
| Problem | Mögliche Ursache | Lösung |
|---|---|---|
| Polishing machine does not start. | Keine Stromversorgung; Netzschalter ausgeschaltet; Kabel/Stecker defekt. | Überprüfen Sie die Steckdose; Stellen Sie sicher, dass der Schalter eingeschaltet ist; Überprüfen Sie das Kabel auf Beschädigungen, wenden Sie sich im Schadensfall an den Support. |
| Excessive vibration or noise from polisher. | Unbalanced polishing wheel; Loose mounting; Worn bearings. | Re-seat or replace polishing wheel; Tighten mounting nuts; Contact support for bearing issues. |
| Schlechtes Polierergebnis. | Incorrect wheel/compound; Worn wheel; Insufficient pressure; Overheating workpiece. | Use appropriate wheel/compound; Replace worn wheel; Adjust pressure; Allow workpiece to cool. |
| Ball vise not holding item securely. | Jaws/pins not tightened; Incorrect jaw/pin selection; Dirty jaws. | Tighten adjustment knob; Select appropriate jaws; Clean jaws and pins. |
Garantie und Support
For warranty information, technical support, or to order replacement parts, please contact Flyrivergo customer service. Refer to your purchase documentation for specific warranty terms and contact details.
Kundendienst: Please visit the official Flyrivergo webBesuchen Sie die Website oder konsultieren Sie die Kontaktinformationen, die Ihrer Produktverpackung beiliegen.
Ask a question about this manual
Ask about setup, troubleshooting, compatibility, parts, safety, or missing instructions. Manuals+ will review the question and use this page’s manual context to help answer it.