
ATTACK SHARK X820 Ultra Kabellose Mechanische Tastatur – Benutzerhandbuch
Modell: X820Ultra
1. Einleitung
This manual provides detailed instructions for the setup, operation, maintenance, and troubleshooting of your ATTACK SHARK X820 Ultra Wireless Mechanical Keyboard. Please read this manual thoroughly before using the product to ensure optimal performance and longevity.
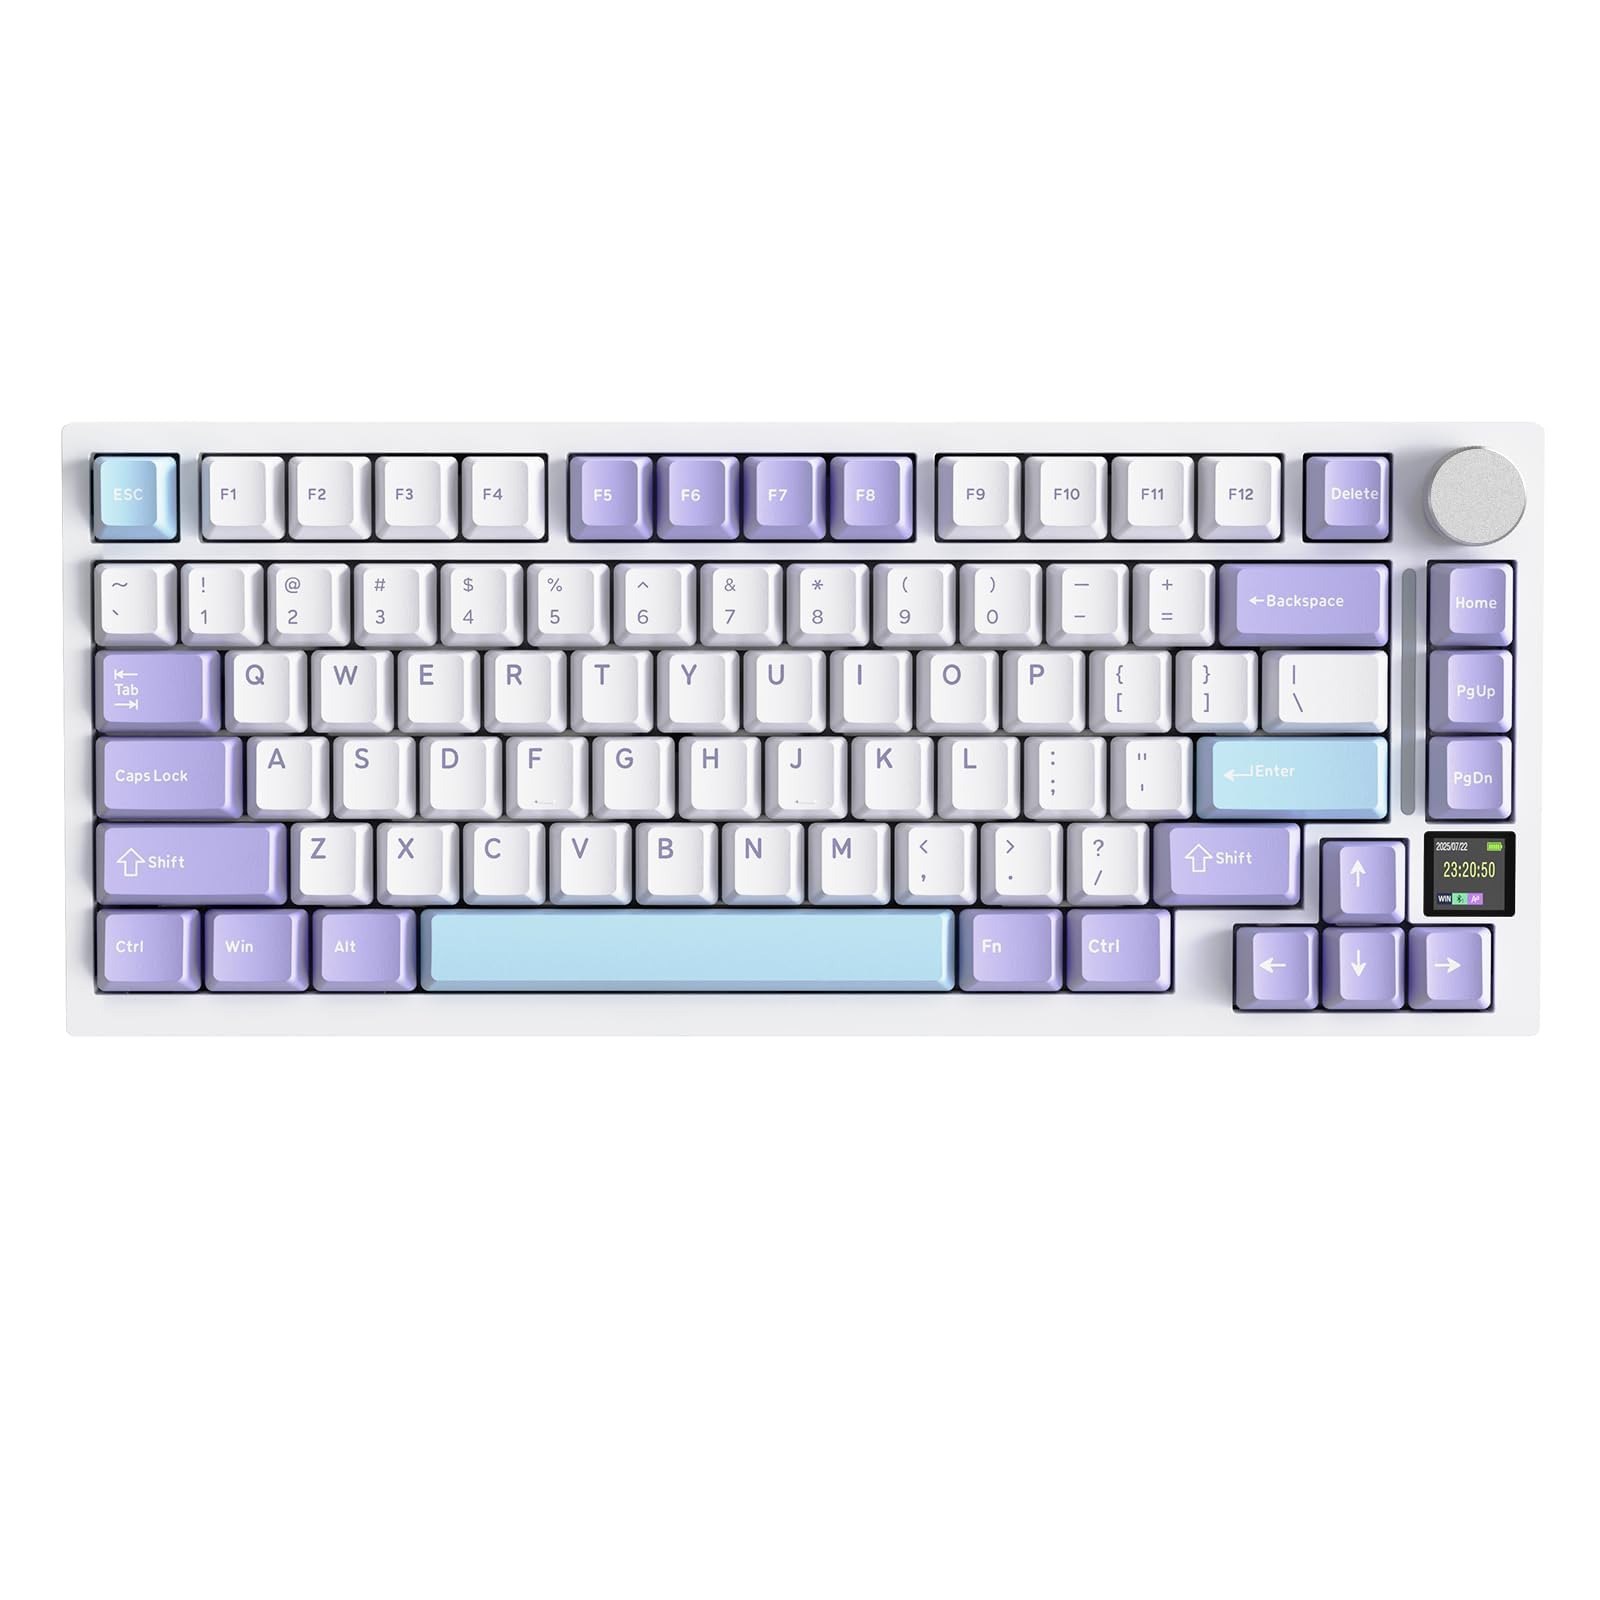
Image 1.1: ATTACK SHARK X820 Ultra Wireless Mechanical Keyboard in white with purple and light blue keycaps.
2. Packungsinhalt
Bitte prüfen Sie, ob alle unten aufgeführten Artikel in Ihrem Paket enthalten sind. Sollten Artikel fehlen oder beschädigt sein, kontaktieren Sie bitte unseren Kundenservice.
- X820 Ultra Keyboard x1
- USB-C-Kabel x1
- 2-in-1 Keycap/Switch Puller x1
- Benutzerhandbuch x1
- Ersatzschalter x2
- ATTACK SHARK Mascot Stickers x2

Image 2.1: All items included in the ATTACK SHARK X820 Ultra package, including the keyboard, USB-C cable, keycap puller, user manual, spare switches, and stickers.

Image 2.2: A visual representation of the package contents, including the keyboard, keyboard cover, spare switches, 2-in-1 key puller, manual, and 2.4GHz wireless receiver.
3. Produktüberschreitungview
The ATTACK SHARK X820 Ultra is a 75% layout mechanical keyboard designed for versatility and performance. Key features include:
- 75% Layout: Compact design with 80 keys and a multi-function knob.
- Full RGB Backlight: Customizable lighting with 16.8 million colors and 19 preset effects.
- 4000mAh Akku: Long-lasting rechargeable battery for extended use.
- Dreifach-Konnektivität: Supports Bluetooth, 2.4GHz wireless, and USB-C wired connections.
- Five-Layer Padding: Enhanced gasket structure for improved typing feel and reduced noise.
- PBT-Tastenkappen: Durable double-shot PBT keycaps for longevity and comfort.
- Web Treiber: Innovativ web-based software for customization.
- Hot-Swap-fähig: Supports 3/5-pin mechanical switches for easy customization without soldering.
- TFT Custom Screen: Intelligent color TFT screen displaying time, battery level, connection status, and RGB effects.
- Metal Knob Design: Precision CNC metallic knob for menu navigation and settings adjustment.

Bild 3.1: Überview of the keyboard's main features, including its 75% layout, RGB lighting, 4000mAh battery, triple connectivity modes, five-layer padding, PBT keycaps, web driver, hot-swappable switches, TFT custom screen, and metal knob design.

Image 3.2: Dimensions of the 75% layout keyboard, showing its length of 32.7cm, width of 13.6cm, and height of 4cm, along with the QWERTY layout and 80 keys plus one knob.

Image 3.3: Illustration of the OEM keycap profile, MX structure compatibility, and double-shot PBT keycaps.
4. Einrichtung
4.1 Physische Einrichtung
- Packen Sie die Tastatur und sämtliches Zubehör aus dem Karton aus.
- Stellen Sie die Tastatur auf eine stabile, ebene Fläche.
- Adjust the 2-level feet at the back of the keyboard for your preferred typing angle.
- Ensure the anti-slip pads on the bottom of the keyboard are clean and provide good grip.
4.2 Erstaufladung
Before first use, it is recommended to fully charge the keyboard. Connect the supplied USB-C cable to the keyboard's USB-C port and the other end to a power source (e.g., computer USB port, USB wall adapter).
4.3 Modusschalter
Locate the 3-mode switch on the back of the keyboard. This switch allows you to select between Windows (Win) and Mac operating system layouts, and also between 2.4G wireless, USB wired, and Bluetooth modes. Ensure the switch is set to the correct operating system and connection mode before pairing or connecting.

Image 4.1: Details of the keyboard's physical features, including the 2.4G receiver storage compartment, the 3-mode switch for Win/Mac and connectivity, anti-slip pads, and 2-level height adjustable feet.
5. Bedienungsanleitung
5.1 Verbindungsmodi
The X820 Ultra keyboard supports three connection modes: Bluetooth, 2.4GHz Wireless, and USB-C Wired.
5.1.1 Kabelgebundene USB-C-Verbindung
- Stellen Sie sicher, dass der Modusschalter auf der Rückseite der Tastatur auf „USB“ eingestellt ist.
- Verbinden Sie das USB-C-Kabel mit der Tastatur und Ihrem Computer.
- Die Tastatur wird automatisch erkannt und ist sofort einsatzbereit.
5.1.2 2.4-GHz-Funkverbindung
- Locate the 2.4G wireless receiver, usually stored in a compartment on the keyboard.
- Ensure the mode switch on the back of the keyboard is set to '2.4G'.
- Schließen Sie den 2.4-GHz-Empfänger an einen freien USB-Anschluss Ihres Computers an.
- Die Tastatur sollte sich automatisch verbinden. Falls nicht, drücken Sie Fn + 4 um die Kopplung einzuleiten.
5.1.3 Bluetooth-Verbindung
- Ensure the mode switch on the back of the keyboard is set to 'BT'.
- Drücken Fn + 1, Fn + 2, oder Fn + 3 Um einen Bluetooth-Kanal auszuwählen. Die entsprechende Taste blinkt und signalisiert damit den Kopplungsmodus.
- On your device (PC, smartphone, tablet), search for Bluetooth devices and select "ATTACK SHARK X820 Ultra".
- Once paired, the key will stop flashing and remain lit. You can switch between up to 3 paired Bluetooth devices using FN + 1/2/3.

Image 5.1: Illustration of the keyboard's triple mode connectivity options: USB-C wired, Bluetooth, and 2.4GHz wireless, compatible with various devices and systems.

Image 5.2: Visual guide for switching between Bluetooth, 2.4G, and USB-C wired modes using the physical switch on the back of the keyboard, and the corresponding key combinations.
5.2 TFT Smart Screen & Knob Functions
The integrated TFT smart screen displays useful information and allows for quick adjustments using the CNC metallic knob.
5.2.1 Lautstärke anpassen
- Drücken FN + Drehknopf to activate volume control.
- Scroll the knob to adjust volume up or down.
5.2.2 Navigation in Menüs
- Rotate the knob to scroll through menu options on the TFT screen.
- Short press the knob to select an option or confirm.
The screen can display time, battery level, connection status, and RGB backlight effects. Custom GIF animations can also be uploaded via the driver software.

Abbildung 5.3: Detailansicht view of the multi-function knob and TFT screen, showing how to adjust volume and navigate menus for settings like connection mode, lighting effect, light intensity, light speed, light color, and language choice. Also displays custom GIF/image functionality.

Image 5.4: Explains how to use the CNC knob for volume control (FN + Press, then Scroll) and menu navigation (Rotate to select, Press to confirm), with examples of screen displays for light speed, lighting effect, and connect mode.

Image 5.5: Highlights the 0.85-inch TFT Smart Screen's capabilities, including displaying the home page with time and battery, custom GIF/image support, and settings for connection mode, lighting effect, light intensity, light speed, light color, and language.
5.3 RGB-Hintergrundbeleuchtungsanpassung
The keyboard features south-facing RGB LEDs with 16.8 million colors and 19 predefined effects.
- RGB umschalten: Drücken FN + { to turn RGB on/off.
- Änderungseffekt: Drücken FN + | to cycle through preset lighting effects.
- Farbe ändern: Drücken FN + Eingabe Die Farbe des aktuellen Effekts ändern.
- Custom Light Effect: Use the software for advanced customization.

Image 5.6: Demonstrates RGB backlight features, including 16 million colors, turning RGB on/off with FN+{, changing color with FN+Enter, and custom light effects.
5.4 Software Customization (QMK/VIA)
The keyboard is fully programmable via QMK (qmk.top) and supports VIA software for advanced customization. This allows you to:
- Tasten neu belegen.
- Makros erstellen und bearbeiten.
- Customize RGB lighting per key.
- Synchronize screen content.
- Upload custom GIFs to the TFT screen.
Der web driver can be accessed directly in a browser, eliminating the need for downloads. For detailed instructions on using QMK/VIA, refer to the official QMK website or the provided software documentation.

Image 5.7: Screenshot of the innovative web driver interface, showing options for macro editing, key remapping, screen sync, and GIF upload, accessible directly in a browser.

Image 5.8: Highlights the programmable web software features, including remapping keys, macro editing, and RGB design, with a note to download the web driver from qmk.top or bit.ly/X820SOFTWARE.
5.5 Überprüfung des Batteriestatus
To check the current battery level, long press FN + Rücktaste. The TFT screen will display the battery percentage.

Image 5.9: Instructions on how to check the keyboard's battery level by long-pressing FN + Backspace, with visual indicators for 25%, 50%, 75%, and 100% charge.
6. Wartung und Anpassung
6.1 Hot-Swap-fähige Schalter
The X820 Ultra features hot-swappable sockets compatible with 3-pin and 5-pin mechanical switches, allowing you to change switches without soldering.
6.1.1 Schalterwechsel
- Use the included 2-in-1 keycap/switch puller to carefully remove the keycap from the desired switch.
- Use the switch puller to gently grip the switch from the top and pull it straight up to remove it from the PCB.
- Richten Sie die Pins des neuen Schalters an den Löchern auf der Leiterplatte aus. Achten Sie darauf, dass die Pins gerade sind, um ein Verbiegen zu vermeiden.
- Drücken Sie den neuen Schalter fest ein, bis er einrastet.
- Bringen Sie die Tastenkappe wieder an.
The keyboard comes with pre-lubricated linear switches for a smooth and responsive typing experience. Plate-mounted stabilizers are also used for larger keys.

Image 6.1: Demonstrates the hot-swappable PCB, supporting 3/5-pin mechanical switches, with views of pre-lubed linear switches, hot-swap sockets, and plate-mounted stabilizers.

Image 6.2: Illustrates the full key hot-swappable feature, compatible with 3 or 5-pin mechanical switches, showing pre-lubed linear switches, hot-swap sockets, and south-facing LEDs.

Image 6.3: Table comparing specifications for 'Gift Switch' and 'Shark Switch', including actuation travel, total travel, actuation force, and bottom force, both being linear type switches.
6.2 Dichtungsstruktur
The keyboard incorporates an enhanced gasket mount design with multiple layers of sound-dampening materials. This structure improves typing feel, reduces noise and vibration, and provides a soft touch and premium sound experience.
- PCB Plant
- PORON DampEndschaum
- Dichtung
- IXPE-Schalterfeld
- PET Acoustic Pad
- DEPDM Slot Foam
- Silikon-Basisplatte

Abbildung 6.4: Explosionszeichnung view diagram illustrating the multi-layered gasket structure of the keyboard, detailing components like the PCB, PORON foam, gasket, IXPE switch pad, PET acoustic pad, DEPDM slot foam, and silicone base pad.

Image 6.5: Highlights the benefits of the gasket structure, including improved typing feel, reduced noise and vibration, and a soft touch with premium sound experience, showing 80% more stable layers and 60% noise reduction.
7. Spezifikationen
| Besonderheit | Detail |
|---|---|
| Marke | ANGRIFFSHAI |
| Modellnummer | X820Ultra |
| Konnektivitätstechnologie | Bluetooth, 2.4-GHz-Funkverbindung, USB-C-Kabelverbindung |
| Kompatible Geräte | Laptop, PC, Smartphone, Tablet |
| Tastaturbeschreibung | Spiele |
| Empfohlene Verwendung | Gaming, Multimedia, Personal, Programming, Education |
| Besondere Merkmale | 4000mAh Battery, QMK Compatibility, CNC Knob, Enhanced Gasket Mount, TFT Smart Screen |
| Farbe | Weiß |
| Farbverwaltung der Tastatur-Hintergrundbeleuchtung | RGB |
| Produktabmessungen (L x B x H) | 32.7L x 13.6B x 4H Zentimeter |
| Material | Plastik |
| Stromquelle | Batteriebetrieben |
| Schaltertyp | Linear |
| Tastaturlayout | QWERTY |
| Anzahl der Schlüssel | 80 |
| Kompatible Betriebssystemfamilie | Windows |
| Innenmaterial | Plastik |
| Keyboard Plate Material | FR4 |
| GTIN | 752010424092 |
8. Fehlerbehebung
8.1 Verbindungsprobleme
- Keyboard not connecting via Bluetooth/2.4G: Ensure the mode switch on the back of the keyboard is set to the correct mode (BT or 2.4G). For Bluetooth, try selecting a different channel (FN+1/2/3) and re-pairing. For 2.4G, ensure the receiver is securely plugged in and try pressing FN+4 to re-establish connection.
- Unterbrechungsverbindung: Ensure the keyboard is within range of your device (for wireless modes) and there are no major obstructions. Check for interference from other wireless devices.
- Kabelverbindung funktioniert nicht: Ensure the USB-C cable is fully inserted into both the keyboard and the computer. Try a different USB port or cable.
8.2 Wichtige Funktionsprobleme
- Tasten reagieren nicht: Check if the keyboard is powered on and connected. If a specific key is not working, it might be a faulty switch. Utilize the hot-swappable feature to replace the switch.
- Incorrect key output (e.g., QWERTY vs. AZERTY): Ensure the Win/Mac switch on the back of the keyboard is set correctly for your operating system. If using QMK/VIA software, verify key mappings.
8.3 Probleme mit der RGB-Beleuchtung
- RGB leuchtet nicht: Ensure RGB is enabled (FN+{). Check brightness settings via the knob or software.
- Falsche Farben/Effekte: Cycle through effects (FN+|) or colors (FN+Enter). Use the software for advanced customization if needed.
8.4 TFT Screen Issues
- Screen blank or unresponsive: Ensure the keyboard is powered on. Try restarting the keyboard. If the issue persists, a firmware update via the web driver might be necessary.
9. Garantie und Support
9.1 Garantieinformationen
The ATTACK SHARK X820 Ultra keyboard comes with a 6 Monate Garantie Diese Garantie gilt ab Kaufdatum und deckt Herstellungsfehler und Funktionsstörungen bei normalem Gebrauch ab. Sie deckt keine Schäden ab, die durch Missbrauch, Unfälle, unbefugte Änderungen oder normale Abnutzung verursacht wurden.
9.2 Kundendienst
For technical assistance, warranty claims, or any other inquiries, please contact ATTACK SHARK customer support through the retailer where you purchased the product or visit the official ATTACK SHARK webWebsite für Kontaktinformationen.
Bitte bewahren Sie Ihren Kaufbeleg für Garantieleistungen auf.