
BONTEC GDM7505
BONTEC GDM7505 Ergonomische Gasfeder-Einzelmonitorhalterung – Bedienungsanleitung
Für 15-34 Zoll Bildschirme
1. Einleitung
Thank you for choosing the BONTEC GDM7505 Ergonomic Gas Spring Single Monitor Mount. This manual provides detailed instructions for the safe and efficient installation, operation, and maintenance of your monitor arm. Please read this manual thoroughly before assembly and retain it for future reference.
2. Sicherheitshinweise
Bitte beachten Sie bei der Installation und Verwendung die folgenden Sicherheitsvorkehrungen:
- Vor der Montage sicherstellen, dass alle Komponenten vorhanden und unbeschädigt sind. Nicht verwenden, wenn Teile fehlen oder defekt sind.
- This monitor mount is designed for screens between 15 and 34 inches, with a maximum weight capacity of 26.5 lbs (12 kg). Do not exceed these limits.
- The gas spring mechanism is under high pressure. Do not attempt to disassemble the gas spring cylinder.
- Always use appropriate tools and follow the instructions carefully. Overtightening screws may cause damage.
- Ensure the desk surface is stable and thick enough to support the mount and monitor weight.
- Halten Sie Kinder und Haustiere während der Installation fern.
3. Packungsinhalt
Bitte überprüfen Sie, ob alle unten aufgeführten Teile in Ihrem Paket enthalten sind:

Image: All components of the BONTEC Monitor Arm, including the main arm sections, base, C-clamp, grommet parts, various screws, and Allen keys, are displayed on a white surface.
- A: Upper Arm with VESA Plate
- A1: Cable Cover for Upper Arm
- B: Lower Arm
- C: Base
- D: C-Klamp
- E: Klammer für C-clamp
- F: Small Screws (for C-clamp/Grommet)
- G: Wingnut (for Grommet)
- H: Carriage Bolt (for Grommet)
- I, J, K: Inbusschlüssel (verschiedene Größen)
- L: Small Screws (for VESA plate)
- M-A, M-B, M-C, M-D, M-E: Monitor Screws and Washers (various sizes for VESA mounting)
4. Einrichtung und Installation
This section guides you through the assembly process. An assembly video is available for visual reference.
Video: Assembly Manual for BONTEC Upgraded Single Monitor Arm. This video demonstrates the complete installation process for the monitor arm, including both C-clamp and grommet mounting options, and attaching the monitor.
4.1. Wählen Sie Ihre Montageart
The BONTEC GDM7505 supports two installation methods: C-clamp and Grommet Base. Select the method suitable for your desk.

Image: This image illustrates the two available installation methods: C-clamp mounting, suitable for desk thicknesses from 0.39 to 3.15 inches, and Grommet mounting, for desk thicknesses from 0.39 to 2.76 inches and hole diameters from 0.39 to 2.36 inches.
4.1.1. C-clamp Installation
- Attach the Brace (E) to the Base (C) using the small screws (F).
- Reparieren Sie den C-clamp (D) to the Brace (E) and tighten the screws securely.
- Place the assembled C-clamp onto your desk edge and tighten the clamp screw until the mount is stable. Use an Allen key for a more secure clamp.
4.1.2. Montage der Tüllenbasis
- Remove the clip plate (D2) from the C-clamp (D) wenn es befestigt ist.
- Tighten the Carriage Bolt (H) to the Base (C).
- Insert the bolt through the grommet hole in your desk.
- Secure the base from underneath the desk using the clip plate (D2) and Wingnut (G).
4.2. Install the Arm onto the Base
- Slide the Lower Arm (B) onto the pole of the installed Base (C).
- Tighten the set screw on the Lower Arm (B) using the appropriate Allen key (I or J) to secure it.
- Slide the Upper Arm (A) onto the Lower Arm (B).
- Tighten the set screw on the Upper Arm (A) using the appropriate Allen key (I or J) to secure it.
4.3. VESA-Platte am Monitor anbringen
- Legen Sie Ihren Monitor vorsichtig mit dem Bildschirm nach unten auf eine weiche, saubere Oberfläche.
- Align the VESA plate on the Upper Arm (A) with the mounting holes on the back of your monitor.
- Insert the appropriate screws (M-A/M-B or M-C/M-D/M-E) and washers loosely, leaving a 3-4mm gap. Avoid using power tools to prevent damage.
- Once all screws are in place, tighten them securely.
5. Bedienungsanleitung
The BONTEC GDM7505 monitor arm offers full motion adjustability for optimal viewKomfort.
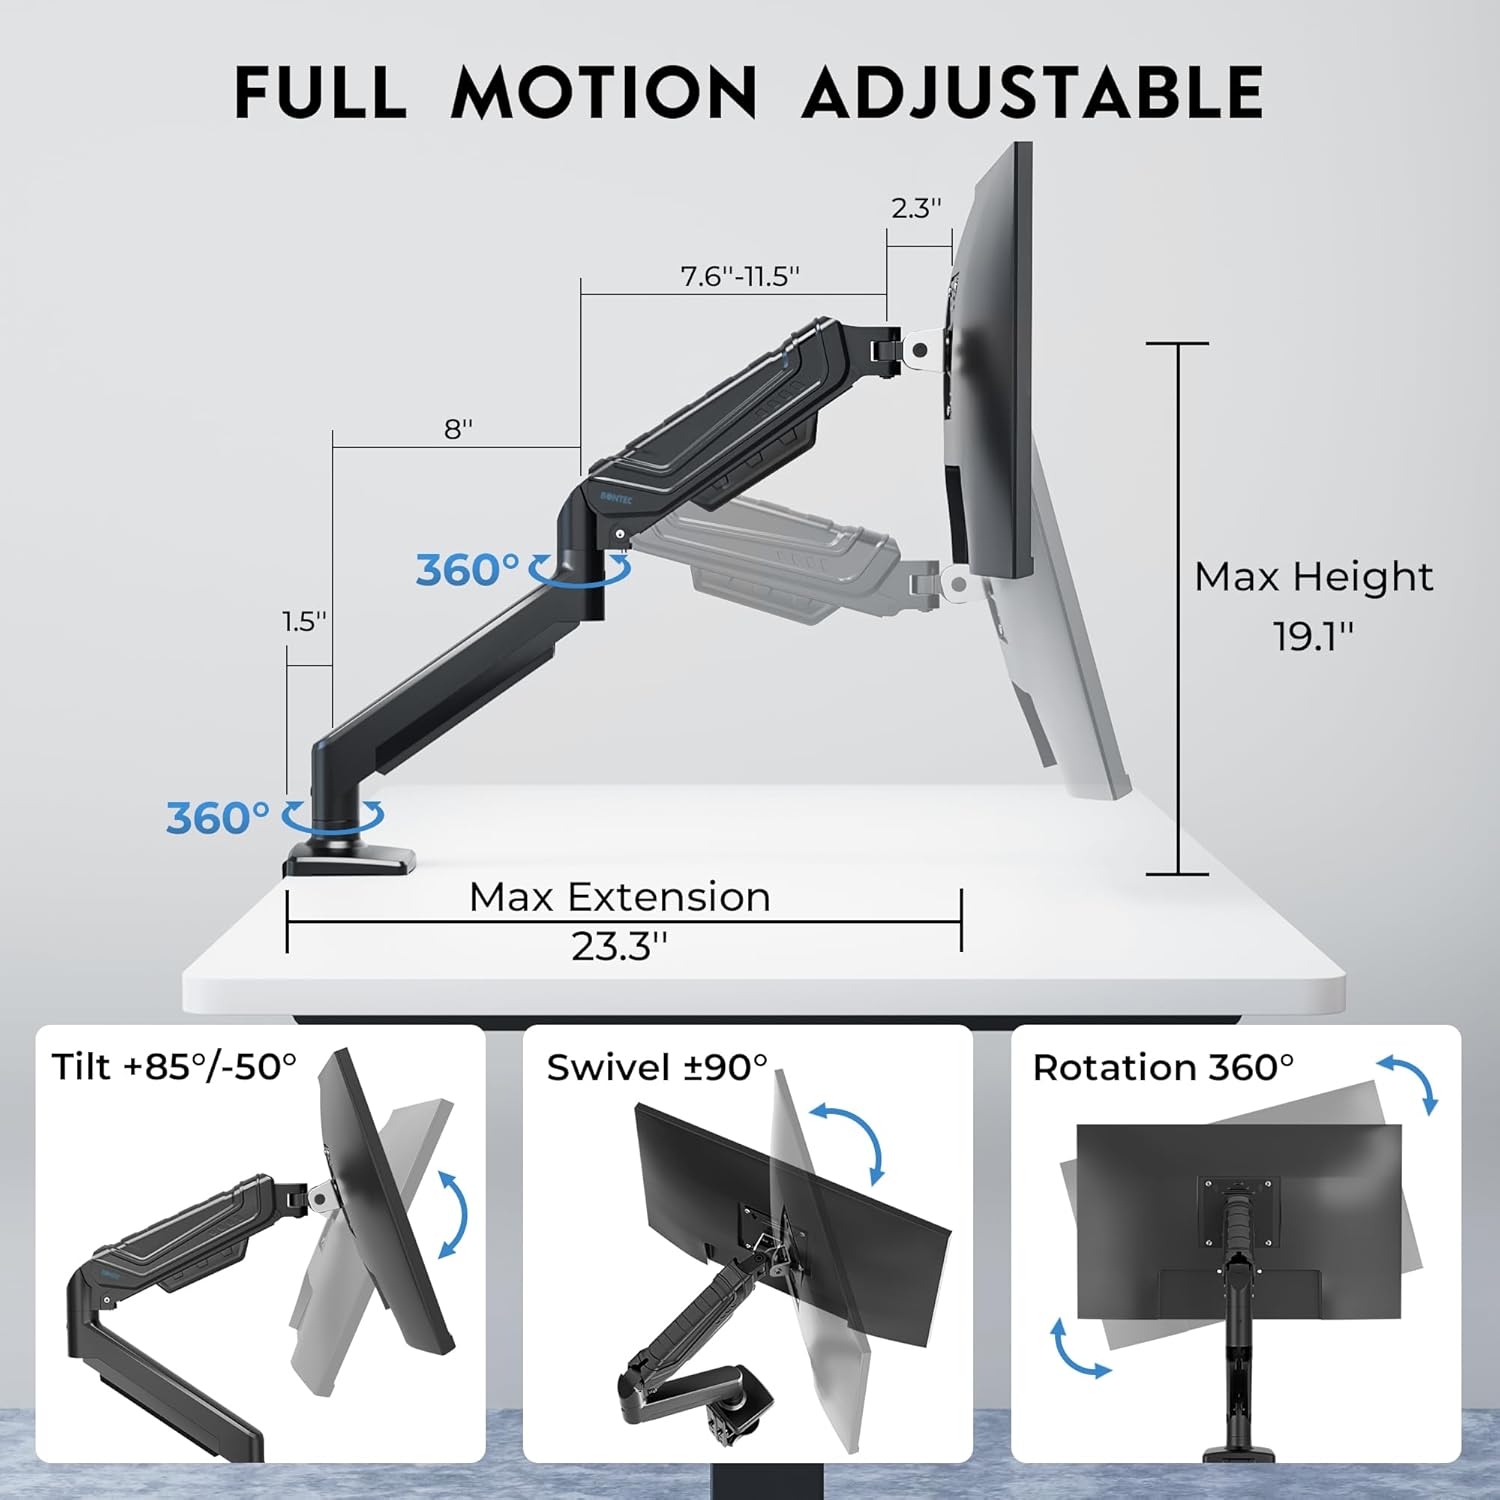
Image: This diagram illustrates the extensive adjustability of the monitor arm, featuring a maximum height of 19.1 inches, a maximum extension of 23.3 inches, tilt angles from +85 to -50 degrees, swivel of +/-90 degrees, and 360-degree rotation for flexible monitor positioning.
Video: Tips for Using BONTEC Upgraded Single Monitor Mount. This video provides guidance on adjusting the tilt, swivel, and gas spring tension of the monitor arm to ensure stable and smooth movement.
5.1. Neigungseinstellung
If the monitor head is dropping down, you may need to tighten the tilt screw. Use the appropriate Allen key (I or J) to turn the screw clockwise until the tilt adjustment is effective and smooth.
5.2. Schwenkverstellung
If the monitor swivels too easily or is too sensitive, tighten the swivel screw. Use the appropriate Allen key (I or J) to turn the screw clockwise until the swivel adjustment is smooth and controlled.
5.3. Tension Adjustment (Gas Spring)
The gas spring tension needs to be adjusted according to your monitor's weight to ensure the arm stays balanced and holds its position.
- Monitor Drooping? If your monitor is too heavy for the current tension and droops, turn the tension screw counterclockwise to increase tension.
- Monitor Rising? If your monitor is too light for the current tension and rises, turn the tension screw clockwise to reduce tension.
- Adjust gradually, with a maximum of 20 turns in either direction. Test the arm's balance after every few turns.
5.4. Kabelmanagement
To maintain a clean and organized workspace, route your cables through the integrated cable management channels on the arm. Open the cable covers, place the cables inside, and snap the covers back into place.
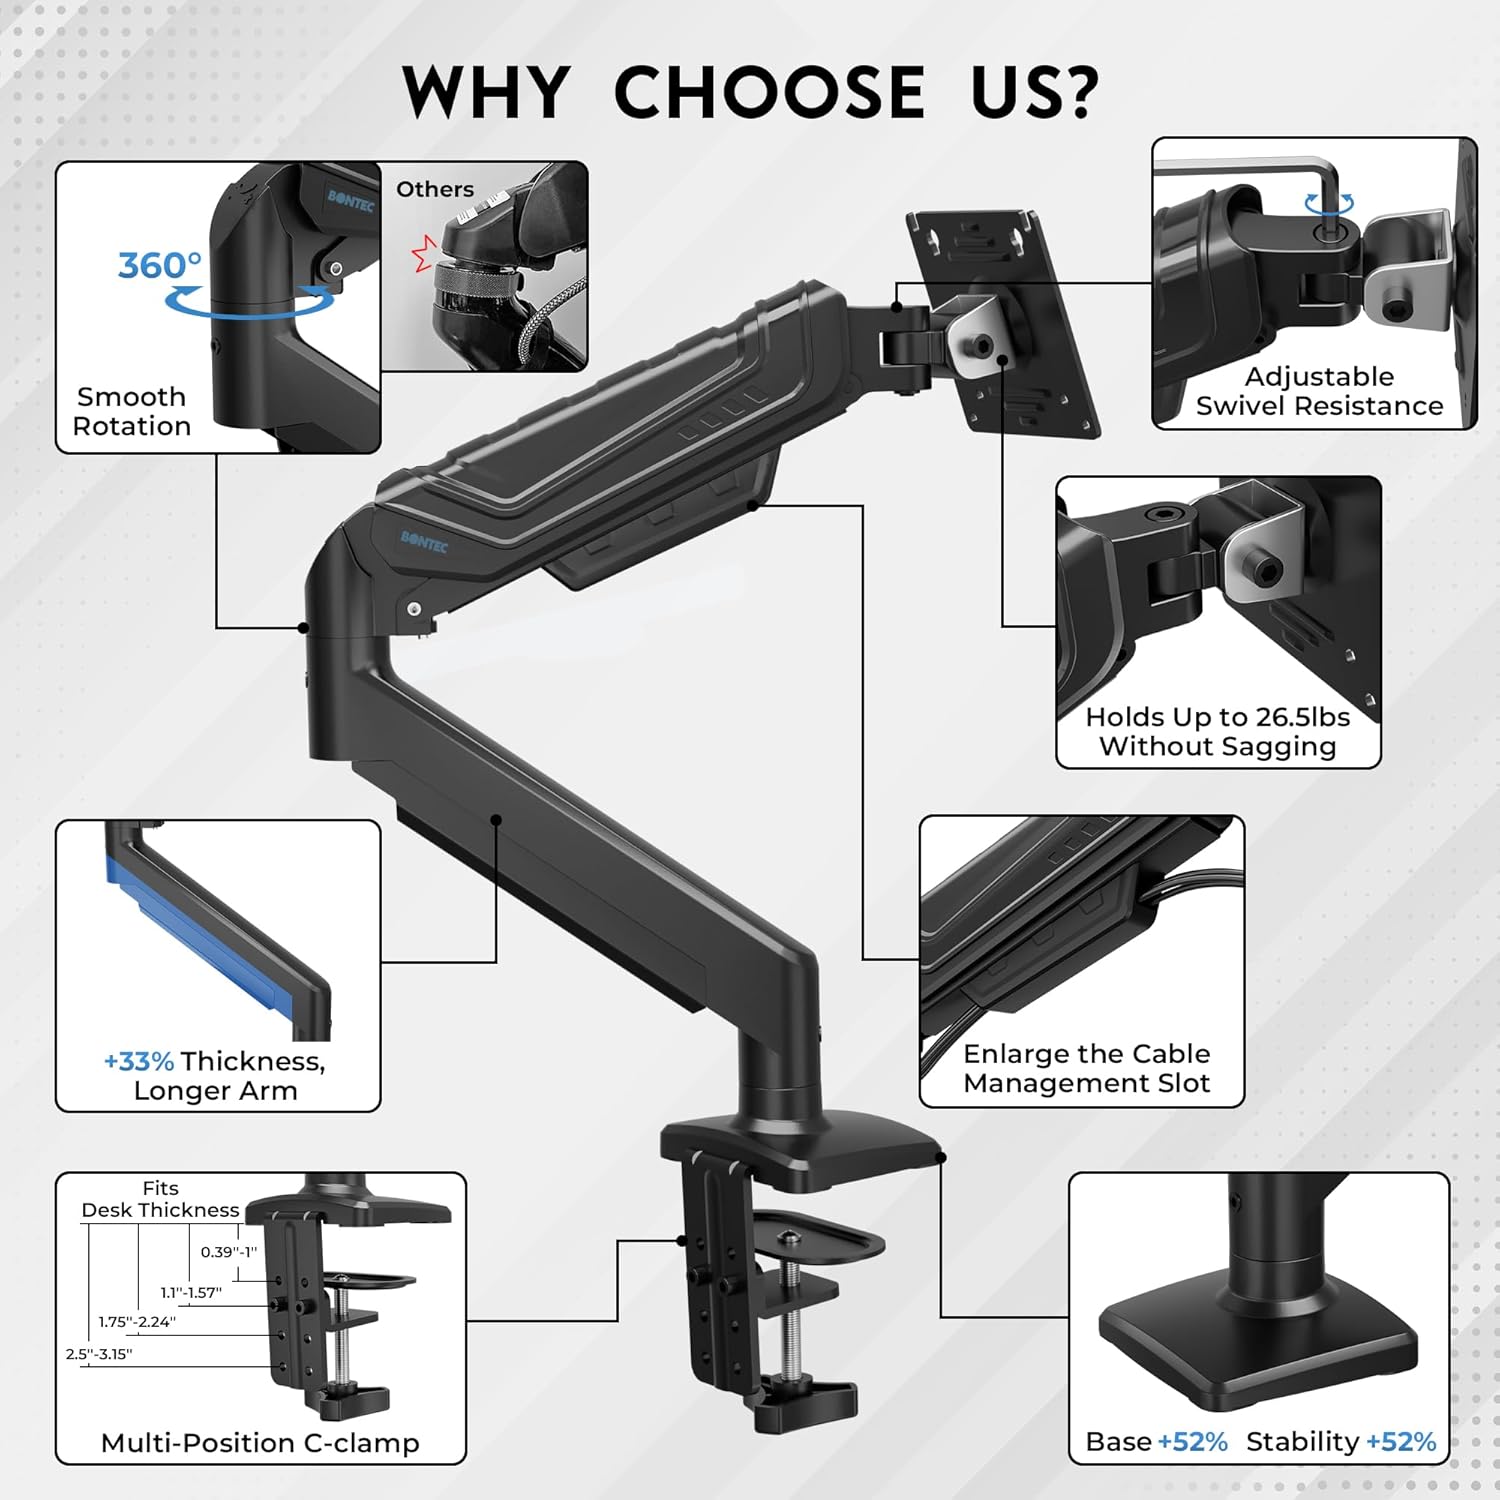
Image: This image highlights the integrated cable management feature, demonstrating how power and data cables can be neatly routed through the arm's channels to keep the desk organized.
6. Wartung
Regular maintenance ensures the longevity and optimal performance of your monitor arm:
- Überprüfen Sie regelmäßig alle Schrauben und Verbindungen, um sicherzustellen, dass sie fest und sicher sitzen.
- Reinigen Sie die Oberfläche des Monitorarms mit einem weichen, fusselfreien Tuch.amp Mit einem Tuch abwischen. Vermeiden Sie scheuernde Reiniger oder Lösungsmittel.
- If the arm's movement becomes stiff or loose over time, re-adjust the gas spring tension as described in Section 5.3.
7. Fehlerbehebung
If you encounter issues with your monitor arm, refer to the following common solutions:
| Problem | Mögliche Ursache | Lösung |
|---|---|---|
| Monitor droops or falls | Die Gasfederspannung ist für das Gewicht des Monitors zu gering. | Increase gas spring tension by turning the adjustment screw counterclockwise (refer to Section 5.3). |
| Der Monitor schwebt nach oben oder lässt sich nur schwer herunterdrücken. | Die Gasfederspannung ist für das Gewicht des Monitors zu hoch. | Die Gasfederspannung kann durch Drehen der Einstellschraube im Uhrzeigersinn verringert werden (siehe Abschnitt 5.3). |
| Monitor tilts forward or backward too easily | Tilt mechanism screw is loose. | Tighten the tilt adjustment screw (refer to Section 5.1). |
| Monitor swivels too freely or is too stiff | Swivel mechanism screw is loose or too tight. | Adjust the swivel adjustment screw (refer to Section 5.2). |
| Arm is unstable or wobbles | Mounting base is not securely fastened to the desk. | Ziehen Sie die C-Schraube wieder fest.amp or grommet base screws (refer to Section 4.1). |
8. Spezifikationen
| Besonderheit | Spezifikation |
|---|---|
| Modellnummer | GDM7505 |
| Kompatibilität mit Bildschirmgrößen | 15-34 Zoll |
| Gewichtskapazität | Bis zu 26.5 kg (12 Pfund) |
| VESA-Kompatibilität | 75x75mm, 100x100mm |
| Neigungswinkel | +85° bis -50° |
| Schwenkwinkel | ±90° |
| Drehung | 360° |
| Maximale Höhe | 19.1 Zoll |
| Maximale Ausdehnung | 23.3 Zoll |
| Tischplattenstärke (C-clamp) | 0.39-3.15 Zoll |
| Tischplattenstärke (Tülle) | 0.39-2.76 Zoll |
| Durchmesser der Tüllenöffnung | 0.39-2.36 Zoll |
| Material | Metall |
| Farbe | Schwarz |
9. Garantie und Support
For warranty information or technical support, please refer to the product packaging or contact BONTEC customer service directly. Contact details can typically be found on the manufacturer's official webWebsite oder über Ihre Einkaufsplattform.
Ask a question about this manual
Ask about setup, troubleshooting, compatibility, parts, safety, or missing instructions. Manuals+ will review the question and use this page’s manual context to help answer it.