
1. Einleitung
This manual provides detailed instructions for the MAGEX 10.1 Inch Touch Screen Monitor, Model GH101TP-C. This monitor is designed for versatility, offering a high-resolution IPS display with 10-point touch functionality, integrated dual speakers, and a cooling fan. It is specifically optimized for use with Raspberry Pi models and various other devices and operating systems.
The monitor features a robust case that allows for direct installation of a Raspberry Pi, ensuring a compact and tidy setup. Its full HD resolution (1920x1200) and wide viewing angles provide a clear and vibrant visual experience, while eye-care technologies reduce strain during extended use.

Image: The MAGEX 10.1 inch touch screen monitor used in diverse applications such as a Raspberry Pi display, secondary camera screen, car dashboard, smart home interface, retail kiosk, and 3D printer control panel.
2. Packungsinhalt
Bitte überprüfen Sie, ob alle unten aufgeführten Artikel in Ihrem Paket enthalten sind. Sollten Artikel fehlen oder beschädigt sein, kontaktieren Sie bitte unseren Kundenservice.
- MAGEX 10.1 Inch Touch Screen Monitor
- 12V/3A DC Power Charger
- USB-A-auf-USB-C-Kabel
- Standard-HDMI-Kabel
- Typ-C-auf-Typ-C-Kabel
- 3-poliges Touch-Kabel
- HDMI-A Board (for Pi 1B/2B/3B)
- HDMI-D Board (for Pi 4B/5)
- Micro USB Board (for Pi 1B/2B/3B)
- Type-C Board (for Pi 4B/5)
- Pi3 Side Panel (for Pi 1B/2B/3B/5)
- Pi4 Side Panel (for Pi 4B)
- M2.5 Screw * 4
- Phillips Schraubendreher

Image: A visual representation of all items included in the product package, detailing the monitor, power supply, various connection cables (HDMI, USB-C), Raspberry Pi adapter boards, side panels, and a screwdriver for assembly.
Video: An unboxing demonstration of the MAGEX 10.1 inch touch screen monitor, showing all components included in the package.
3. Einrichtungsanweisungen
3.1 Verbindung zum Raspberry Pi
The monitor is designed for direct integration with Raspberry Pi boards. Follow these steps for a secure and tidy setup:
- Connect the Pi board to the monitor's PCB: Carefully align and connect your Raspberry Pi (e.g., Pi 5) to the designated pins on the monitor's Printed Circuit Board (PCB).
- Mount Pi on the Monitor: Secure the Raspberry Pi board within the monitor's casing using the provided screws.
- Secure the Pi to the monitor's PCB: Ensure the Pi is firmly attached to prevent movement.
- Plug in the USB touch cable: Connect the appropriate USB touch cable from the Raspberry Pi to the monitor's USB touch port.
- Attach the back cover: Once all connections are made, attach the detachable back cover to enclose the Raspberry Pi and conceal all cables.
- Start using the touchscreen: Power on your Raspberry Pi and the monitor. The touchscreen should be ready for use.
Note for Raspberry Pi 5 Users: If you experience insufficient power issues with Raspberry Pi 5, it is recommended to edit the `config.txt` file located in `/boot/firmware/` by adding the following lines:
hdmi_force_hotplug=1
config_hdmi_boost=7
Additionally, to force the correct resolution, you may add the following line to `cmdline.txt` in `/boot/firmware/`:
video=HDMI-A-1:1280x800@60D
Image: A visual guide illustrating the process of integrating a Raspberry Pi 5 into the monitor's casing, connecting the necessary cables, and securing the back cover for a complete setup.
Video: A detailed guide on how to connect a Raspberry Pi 5 to the MAGEX 10.1-inch touchscreen display, demonstrating the physical installation and cable connections.
3.2 General Device Connection
For other devices, connect the monitor using the appropriate cables:
- Video-Eingang: Use the HDMI port for video signal.
- Touch-Funktionalität: Connect the USB touch port to your device to enable touch input. No drivers are typically required for Windows, Raspbian, and other compatible OS.
- Leistung: Connect the 12V/3A DC power charger to the monitor.
Notiz: Touch functionality is not supported when connected to iOS phones, iPads, or Mac devices.
4. Bedienungsanleitung
4.1 Touchscreen-Bedienung
The monitor features a 10-point capacitive touchscreen with a fast response time (3-5ms). It supports standard multi-touch gestures for intuitive interaction:
- Click/Tap: Eine einzige Berührung genügt zur Auswahl.
- Rein / rauszoomen: Pinch gestures with two fingers.
- Scroll/Move: Drag with one or more fingers.
- Doppelklick: Two quick taps for specific actions.
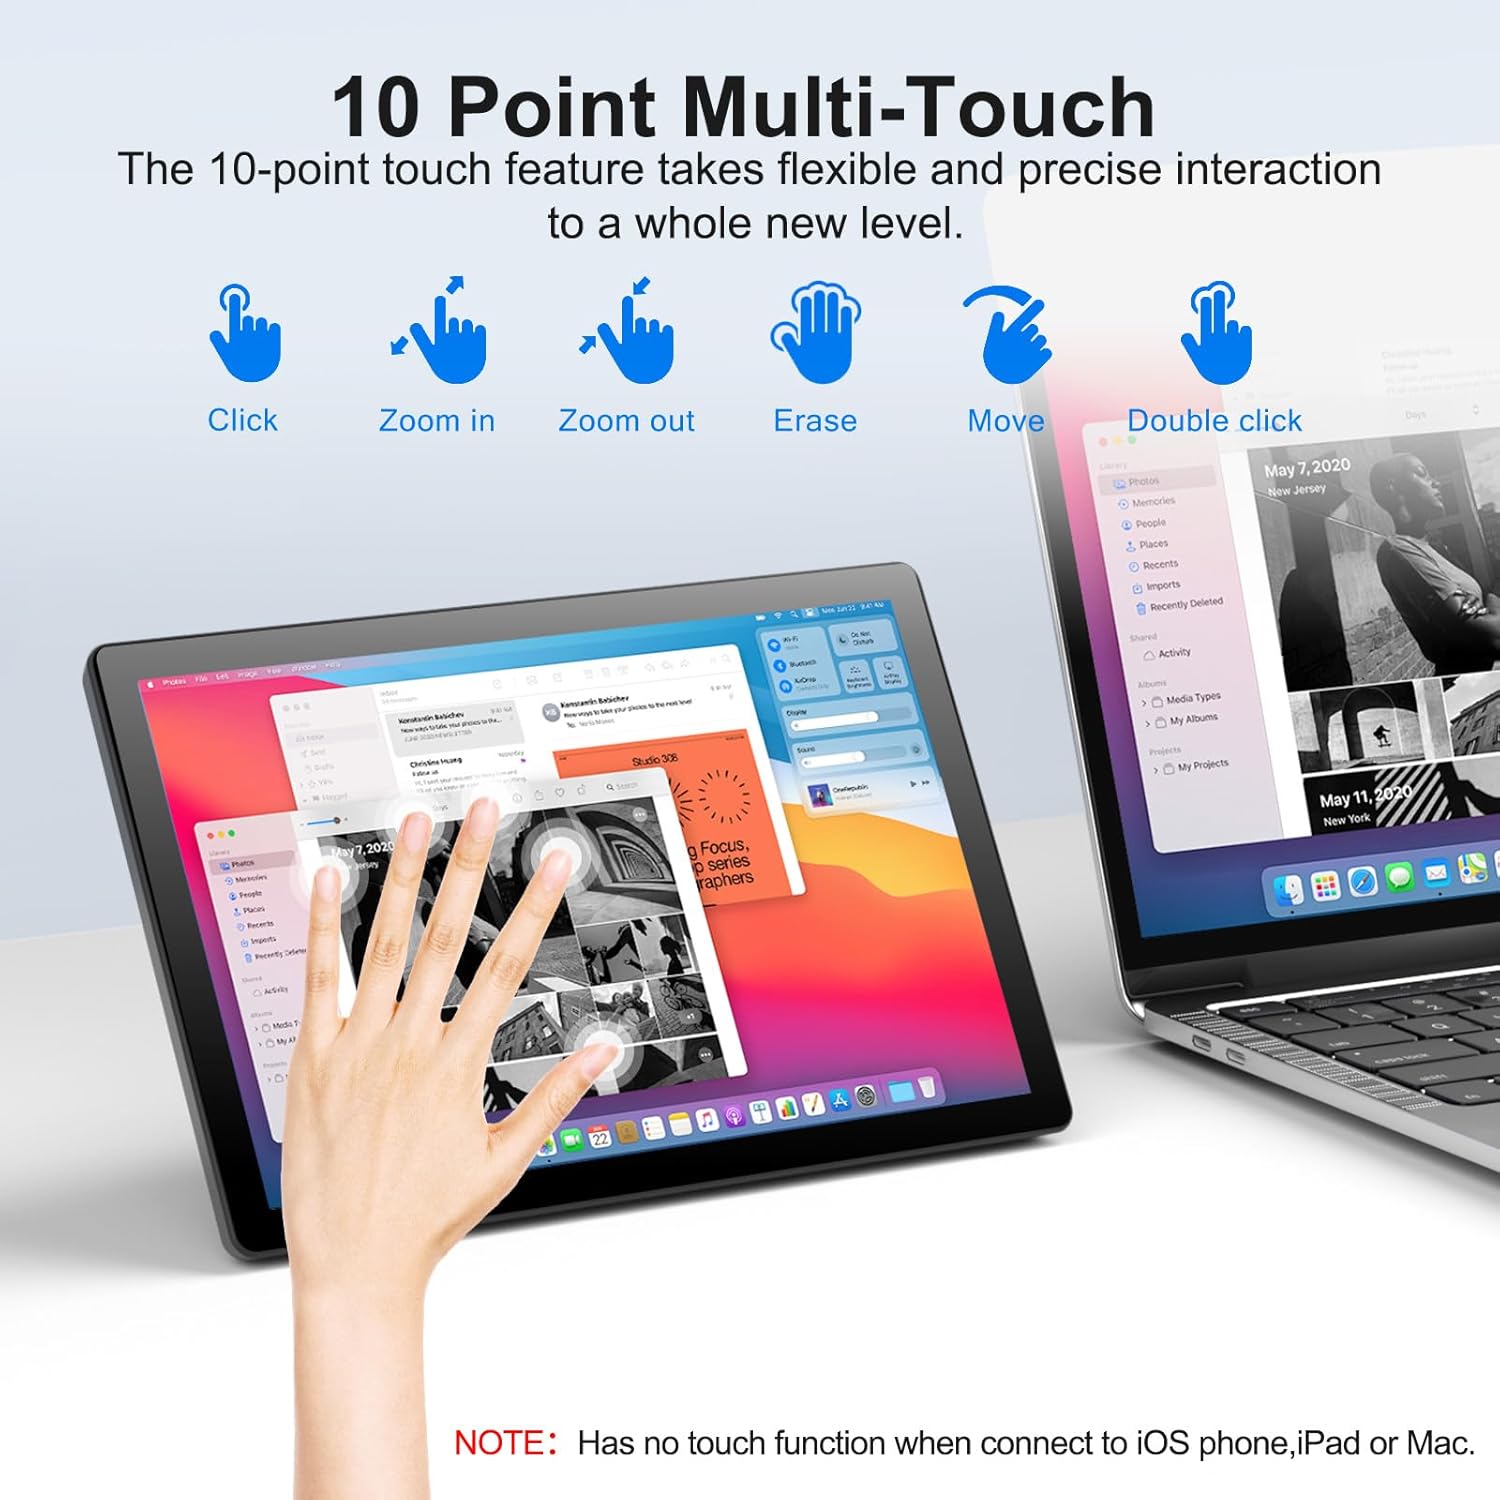
Image: A visual guide demonstrating various 10-point multi-touch gestures supported by the monitor, such as single tap, pinch-to-zoom, and dragging.
4.2 Bildschirmmenü (OSD)
The monitor includes physical buttons for accessing and navigating the On-Screen Display (OSD) menu. These buttons are typically located on the back or side of the monitor.
- Netzschalter: Schaltet den Monitor ein/aus.
- Menü-Schaltfläche: Öffnet das OSD-Menü.
- Auf/Ab-Tasten: Navigieren Sie durch die Menüoptionen.
- Exit-Taste: Verlässt das aktuelle Menü oder OSD.
Through the OSD menu, you can adjust settings such as brightness, contrast, color temperature, and input source.

Image: A visual representation of the monitor's brightness adjustment feature, accessible via the OSD menu.
Video: A demonstration of the MAGEX 10.1-inch touchscreen display running RetroPie, showcasing its performance and touch responsiveness for gaming applications.
5. Kompatibilität
The MAGEX 10.1 Inch Touch Screen Monitor offers broad compatibility with various devices and operating systems:
5.1 unterstützte Geräte
- Raspberry Pi: Compatible with Pi 5, Pi 4, Pi 3B+, Pi 3, Pi 2, and Pi Zero.
- Other Single Board Computers: OctoPi, BB Black, Banana Pi, Orange Pi, RetroPi.
- Spielkonsolen: XBOX, PS4, PS5.
- Allgemeines Rechnen: Computers (Laptops, Desktops), TV boxes.
5.2 Unterstützte Betriebssysteme
- Windows (11/10/8/7)
- Raspbian
- NOOBS
- Kali-Linux
- Debian
- Ubuntu
- Kodi
- Mac OS (video output only, no touch)

Image: A comprehensive chart showcasing the monitor's compatibility with different operating systems (e.g., Windows, Mac OS, Raspbian, Ubuntu) and hardware platforms (e.g., Raspberry Pi 1B to 5, XBOX, PS4/5, laptops, desktops).
6. Funktionen
6.1 IPS Full-Color Display & Eye-Care
- Bildschirmgröße: 10.1 Zoll
- Auflösung: FHD 1920 x 1200P
- Anzeigetechnologie: Advanced IPS glossy screen
- Viewing-Winkel: 178° breit viewing angles for consistent image quality from various positions.
- Farbwiedergabe: Delivers sharp, vivid visuals with accurate color.
- Augenpflege: Features blue light reduction and flicker-free technology for comfortable long viewSitzungen.

Image: A visual demonstration of the monitor's 178-degree wide viewing angle, ensuring consistent color and clarity from almost any position.
6.2 10-Point Capacitive Touch
- Technologie: High-sensitivity capacitive touchscreen.
- Ansprechzeit: Ultra-fast 3-5ms.
- Multi-Touch: Supports 10-point touch for precise and intuitive gestures.
- Driver-Free: Plug-and-play functionality for most compatible operating systems (Windows, Raspbian, etc.).
6.3 Built-in Dual Speakers and Mini Fan
- Doppellautsprecher: Integrated speakers provide clear audio for your projects and multimedia.
- Mini Fan: An integrated mini fan actively circulates air for efficient heat dissipation, preventing CPU overheating and ensuring stable operation.

Bild: Eine detaillierte view of the monitor's rear, highlighting the built-in mini fan for cooling and the dual speakers for audio output.
6.4 VESA Mountable & Integrated Stand
- VESA-Kompatibilität: Supports VESA mounting standards for flexible installation options.
- Integrierter Ständer: Features a 90° adjustable kickstand for desktop use, allowing for various viewwinkeln.
Image: The monitor displayed on a VESA mount, illustrating its adaptability for various setups beyond its integrated kickstand.
7. Spezifikationen
| Besonderheit | Spezifikation |
|---|---|
| Marke | MAGEX |
| Modellnummer | GH101TP-C |
| Bildschirmgröße | 10.1 Zoll |
| Auflösung | FHD 1920 x 1200P |
| Seitenverhältnis | 16:10 |
| Beschreibung der Bildschirmoberfläche | Glänzend |
| Kontrastverhältnis | 2000:1 |
| Bildwiederholrate | 60 Hz |
| Anzeigetyp | LCD |
| Display-Technologie | LCD (IPS) |
| Viewing-Winkel | 178 Grad |
| Helligkeit | 370 Candela |
| Picture Quality Enhancement | IPS, Eye Care (Blue Light Reduction, Flicker-Free) |
| Artikelabmessungen (T x B x H) | 0.38"T x 9.65"B x 6.3"H |
| Total Number of HDMI Ports | 1 |
| Konnektivitätstechnologie | HDMI, USB Typ C |
| Zusätzliche Merkmale | Built-In Speakers, Eye Care, Touchscreen, VESA |
| Ansprechzeit | 2 Millisekunden |
8. Fehlerbehebung
This section addresses common issues you might encounter with your MAGEX 10.1 Inch Touch Screen Monitor.
8.1 Kein Bild / Schwarzer Bildschirm
- Überprüfen Sie die Leistung: Ensure the 12V/3A DC power adapter is securely connected to the monitor and a working power outlet.
- HDMI-Verbindung prüfen: Verify that the HDMI cable is firmly connected to both the monitor and your source device (e.g., Raspberry Pi, computer). Try a different HDMI cable if available.
- Eingabequelle: Use the OSD menu buttons to ensure the correct input source (HDMI) is selected.
- Raspberry Pi Configuration: For Raspberry Pi 5, refer to the 'Setup Instructions' section (3.1) regarding `config.txt` and `cmdline.txt` modifications for power and resolution issues.
- Geräteausgang: Confirm that your source device is outputting a video signal. Try connecting your source device to another known working display.
8.2 Touch-Funktionalität funktioniert nicht
- USB Touch Cable: Ensure the USB touch cable is correctly connected from the monitor's USB touch port to your source device.
- Kompatibilität: Confirm your operating system and device support touch input. Remember, iOS devices (iPhone, iPad, Mac) do not support touch functionality with this monitor.
- Driver-Free: While generally driver-free, ensure your OS is up-to-date. For some Linux distributions, specific configurations might be needed, though typically not for Raspbian.
- Geräte neu starten: Versuchen Sie, sowohl den Monitor als auch das angeschlossene Gerät neu zu starten.
8.3 Overheating Issues (Raspberry Pi)
- Integrierter Lüfter: Ensure the built-in mini fan is operating. If not, check its connection.
- Belüftung: Ensure the monitor's casing has adequate airflow and is not obstructed.
- Stromversorgung: An insufficient power supply to the Raspberry Pi can cause instability and heat. Use the recommended 12V/3A power adapter for the monitor and an appropriate power supply for your Raspberry Pi.
9. Wartung
Durch sachgemäße Wartung wird die Langlebigkeit und optimale Leistung Ihres Monitors sichergestellt.
- Reinigen des Bildschirms: Verwenden Sie ein weiches, fusselfreies Tuch, das speziell für Elektronikgeräte entwickelt wurde. Leicht abwischen.ampen the cloth with water or a screen-cleaning solution. Avoid harsh chemicals, abrasive materials, or direct spraying onto the screen.
- Reinigung des Casing: Wischen Sie die Oberfläche des Monitors ab.asinMit einem weichen, trockenen Tuch abwischen. Bei hartnäckigem Schmutz leicht damp Man kann ein Tuch verwenden und anschließend mit einem trockenen Tuch nachwischen.
- Belüftung: Keep the ventilation openings clear of dust and debris to ensure efficient heat dissipation by the internal fan.
- Lagerung: Bei längerer Nichtbenutzung sollte der Monitor an einem kühlen, trockenen Ort, fern von direkter Sonneneinstrahlung und extremen Temperaturen aufbewahrt werden.
- Handhabung: Vermeiden Sie es, übermäßigen Druck auf den Bildschirm auszuüben oder den Monitor fallen zu lassen.
10. Garantie und Support
The MAGEX 10.1 Inch Touch Screen Monitor comes with a 2 Jahre Qualitätsgarantie ab Kaufdatum.
If you encounter any issues or have questions regarding your product, please do not hesitate to contact our professional after-sales service team. We offer 24-Stunden-Support um Ihnen zu helfen.
For warranty claims or technical assistance, please refer to the contact information provided with your product packaging or visit the official MAGEX webWebsite.