
1. Einleitung
This manual provides detailed instructions for the installation, operation, and maintenance of your plplaaoo 100A MPPT Solar Charge Controller. This advanced controller is designed to optimize energy harvest from your solar panels and manage battery charging efficiently for 12V, 24V, 36V, and 48V solar power systems. Please read this manual thoroughly before installation and use to ensure proper function and safety.
2. Sicherheitshinweise
Bitte beachten Sie bei der Installation und dem Betrieb die folgenden Sicherheitsvorkehrungen:
- Ensure all wiring is correctly connected and securely fastened to prevent loose connections and overheating.
- Vor der Installation oder Justierung des Reglers muss immer die Stromversorgung des Solarmoduls und der Batterie unterbrochen werden.
- Use appropriate tools and wear protective gear, including eye protection, during installation.
- Install the controller in a well-ventilated area, away from flammable gases and liquids.
- Zerlegen Sie den Controller nicht und versuchen Sie nicht, ihn selbst zu reparieren. Wenden Sie sich zur Reparatur an qualifiziertes Fachpersonal.
- Ensure the battery bank is properly sized and compatible with the controller's voltage und Stromstärken.
- Vermeiden Sie Kurzschlüsse an den Anschlüssen des Solarmoduls, der Batterie oder der Last.
3. Produktmerkmale
- Maximum Power Point Tracking (MPPT): Achieves up to 98% conversion efficiency by intelligently tracking the maximum power point of solar panels under varying conditions.
- Automatische Lautstärketage Adaptation: Automatically detects and adapts to 12V, 24V, 36V, or 48V battery systems.
- Multifunktionale Steuerung: Supports various operating modes including PWM charging, constant current output, and voltage Verordnung.
- Integrated USB and DC Outputs: Features dual 5V 1A USB ports and a 2A DC output for charging external devices.
- Umfassender Schutz: Includes safeguards against overvoltage, overcurrent, overtemperature, overload, short circuits, and reverse polarity.
- Benutzerfreundliche Oberfläche: Equipped with a backlit LCD display for real-time monitoring and intuitive buttons for configuration.
- Langlebige Konstruktion: Features an aluminum heatsink for efficient cooling and robust design for harsh environments (0°C to 60°C).
- Batteriekompatibilität: Compatible with gel, sealed lead-acid, and lithium batteries.
4. Packungsinhalt
- 1 x plplaaoo 100A MPPT Solar Charge Controller
- 1 x Benutzerhandbuch
5. Produktüberschreitungview und Komponenten
Familiarize yourself with the main components and interface of the solar charge controller.

Abbildung 5.1: Front view of the solar charge controller, highlighting the LCD screen and various connection terminals.
The controller features an intuitive LCD display and clearly labeled ports for easy connection. The display provides real-time information about the system's status.
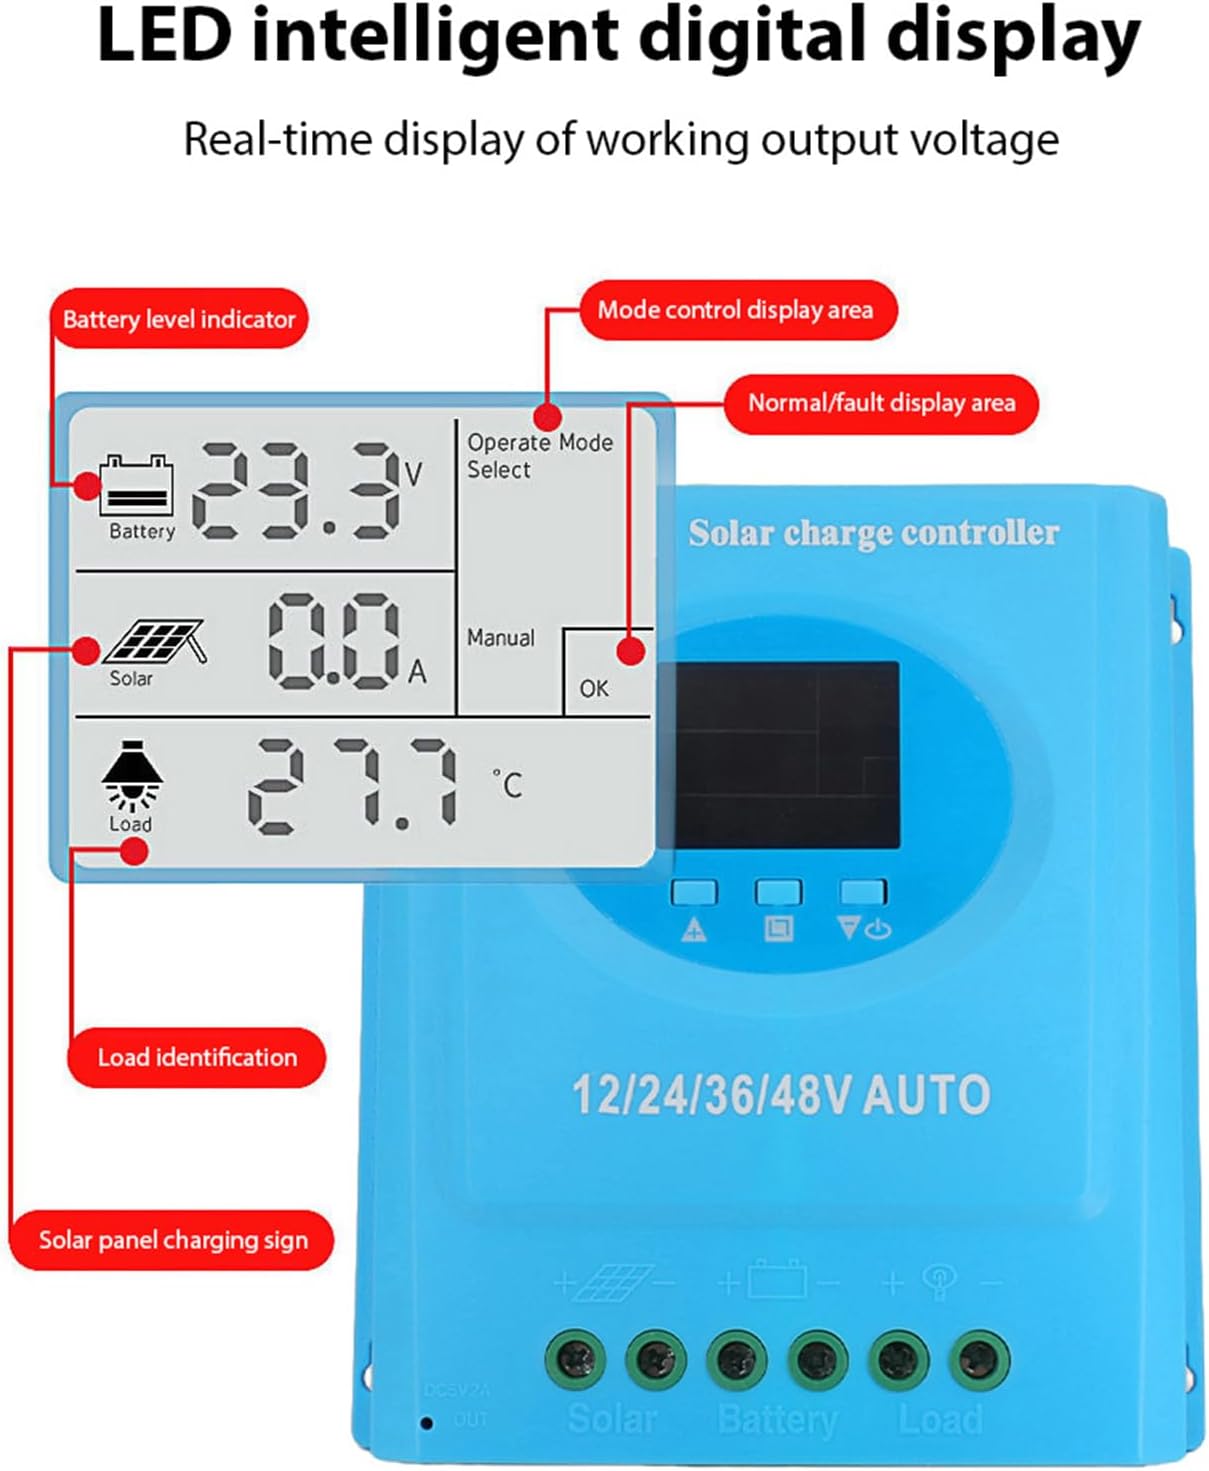
Abbildung 5.2: Detaillierte view of the controller's connection ports.

Abbildung 5.3: Detaillierte view of the LCD display, indicating battery level, solar panel charging sign, load identification, operating mode, and real-time voltage.
5.1. Anschlussports
- Duale USB-Schnittstelle: Two 5V 1A USB ports for charging mobile devices.
- Solarpanel-Anschluss: Connects to your solar panels (positive and negative).
- Batterieanschluss: Connects to your battery bank (positive and negative).
- Gleichstrom-Lastanschluss: Connects to your DC loads (positive and negative).
- DC-Ausgangsport: Additional DC output.
6. Einrichtung und Installation
Follow these steps for proper installation of the solar charge controller. Ensure all power sources are disconnected before beginning.
6.1. Verdrahtungsmethode
Um Beschädigungen zu vermeiden, verbinden Sie die Komponenten in der folgenden Reihenfolge:
- Schließen Sie die Batterie an: Connect the battery to the controller's battery terminals (positive to positive, negative to negative). The controller will automatically detect the battery voltage.
- Schließen Sie das Solarpanel an: Connect the solar panel to the controller's solar panel terminals (positive to positive, negative to negative).
- Gleichstromlast anschließen: Connect the DC load to the controller's load terminals (positive to positive, negative to negative).
Wichtig: Schließen Sie immer zuerst die Batterie, dann das Solarpanel und zuletzt den Verbraucher an. Trennen Sie die Verbraucher in umgekehrter Reihenfolge.

Abbildung 6.1: Solar energy system wiring diagram. Note the correct polarity for all connections.
6.2. Montage
Mount the controller vertically on a flat surface in a well-ventilated area, ensuring adequate clearance for air circulation around the heatsink. Avoid direct sunlight, high temperatures, and humid environments.
7. Bedienungsanleitung
Once installed, the controller will automatically begin operating. The LCD display provides real-time system status.
7.1. LCD-Display-Informationen
Auf dem LCD-Bildschirm werden verschiedene Parameter angezeigt:
- Batteriestandsanzeige: Shows the current charge status of the battery.
- Solar Panel Charging Sign: Indicates when the solar panels are actively charging the battery.
- Load Identification: Shows the status of the connected DC load.
- Operating Mode Display Area: Zeigt den aktuellen Betriebsmodus an (z. B. manuell, automatisch).
- Normal/Fault Display Area: Indicates normal operation or displays error codes if a fault occurs.
- Real-time Working Output Voltage: Zeigt die aktuelle Lautstärke antage des Systems.
7.2. Tastenfunktionen
The controller typically features multiple buttons for navigation and setting adjustments:
- Menü-Schaltfläche: Used to enter and exit the menu settings.
- Auf/Ab-Tasten: Dient zur Navigation durch Menüoptionen und zur Anpassung von Parameterwerten.
- OK-Taste: Used to confirm selections and save settings.
Refer to the on-screen menu for specific parameter adjustments such as battery type, load control mode, and charging thresholds.
8. Wartung
Regelmäßige Wartung gewährleistet optimale Leistung und Langlebigkeit Ihres Solarladereglers.
- Reinigung: Reinigen Sie die Außenseite des Controllers regelmäßig mit einem trockenen Tuch, um Staub und Schmutz zu entfernen. Stellen Sie sicher, dass die Lüftungsöffnungen frei sind.
- Verbindungsprüfung: Überprüfen Sie jährlich alle Kabelverbindungen auf festen Sitz und Korrosion. Ziehen Sie sie gegebenenfalls nach.
- Umweltcheck: Ensure the installation environment remains within the specified operating temperature range and is free from excessive moisture or dust.
- Batterieinspektion: Überprüfen Sie regelmäßig die Batteriepole auf Korrosion und stellen Sie sicher, dass sich die Batterie in einem guten Zustand befindet.
9. Fehlerbehebung
Sollten Sie Probleme mit Ihrem Solarladeregler haben, beachten Sie bitte die folgenden häufig auftretenden Probleme und Lösungen:
| Problem | Mögliche Ursache | Lösung |
|---|---|---|
| Controller lässt sich nicht einschalten / LCD-Bildschirm bleibt schwarz |
|
|
| Akku wird nicht geladen |
|
|
| Laden funktioniert nicht |
|
|
| Angezeigter Fehlercode | Spezifischer Systemfehler. | Refer to the controller's display for the specific error code and consult the full product documentation or contact support for detailed interpretation and resolution. |
10. Spezifikationen
| Parameter | Wert |
|---|---|
| Modell | plplaaoozi6egog4wm-0A |
| Marke | plplaaoo |
| Nennstrom | 100 A |
| Systemlautstärketage | 12V / 24V / 36V / 48V Automatic Adaptation |
| Ladeart | MPPT (Maximum Power Point Tracking) |
| Umwandlungseffizienz | Bis zu 98% |
| USB-Ausgang | Dual 5V 1A ports |
| DC-Ausgang | 2A |
| Betriebstemperatur | 0°C bis 60°C |
| Abmessungen (ca.) | 19.5 cm x 18.3 cm x 6.8 cm (7.7 Zoll x 7.2 Zoll x 2.7 Zoll) |

Abbildung 10.1: Approximate dimensions of the solar charge controller.
11. Garantie und Support
Informationen zu Garantie, technischem Support oder Serviceanfragen erhalten Sie bei Ihrem Händler oder direkt beim Hersteller. Bewahren Sie Ihren Kaufbeleg als Kaufnachweis auf.