Einführung
Thank you for choosing the Keenstar Electric Milk Frother. This appliance is designed to create perfect milk foam for your favorite beverages, including lattes, cappuccinos, and macchiatos. It offers multiple functions for both warm and cold milk preparations. Please read this manual carefully before use to ensure safe and optimal operation.
Wichtige Sicherheitsinformationen
- Lesen Sie vor der Verwendung des Geräts alle Anweisungen.
- Do not immerse the base or cord in water or other liquids.
- Stellen Sie sicher, dass die Stromversorgungslautstärketage entspricht dem Typenschild des Geräts.
- Den Milchaufschäumer immer vom Stromnetz trennen, wenn er nicht benutzt wird und vor der Reinigung.
- Betreiben Sie das Gerät nicht mit beschädigtem Kabel oder Stecker.
- Außerhalb der Reichweite von Kindern aufbewahren.
- Nur auf einer ebenen, stabilen und hitzebeständigen Oberfläche verwenden.
- Berühren Sie keine heißen Oberflächen. Benutzen Sie Griffe oder Knöpfe.
- Dieses Gerät ist nur für den Hausgebrauch bestimmt.
Packungsinhalt
Bitte überprüfen Sie beim Auspacken, ob alle Artikel vorhanden und in gutem Zustand sind:
- Keenstar Electric Milk Frother unit (stainless steel jug with handle)
- Netzteil mit Kabel
- Transparenter Deckel
- Frothing whisk (pre-installed)
- Bedienungsanleitung

Image: Unboxing the Keenstar Electric Milk Frother, showing the frother unit, power base, and manual.
Produkt überview
Familiarize yourself with the components of your Keenstar Electric Milk Frother:
- Edelstahlkrug: The main container for milk, featuring a non-stick interior.
- Handhaben: Ergonomisch gestaltet für komfortables Ausgießen.
- Netzschalter: Located on the front, used to select frothing modes.
- Transparenter Deckel: Allows you to monitor the frothing process.
- Schaumbesen: Detachable whisk for creating foam.
- Heizquirl: Wird zum Erwärmen von Milch ohne Aufschäumen verwendet.
- Machtbasis: Detachable base that supplies power to the frother.
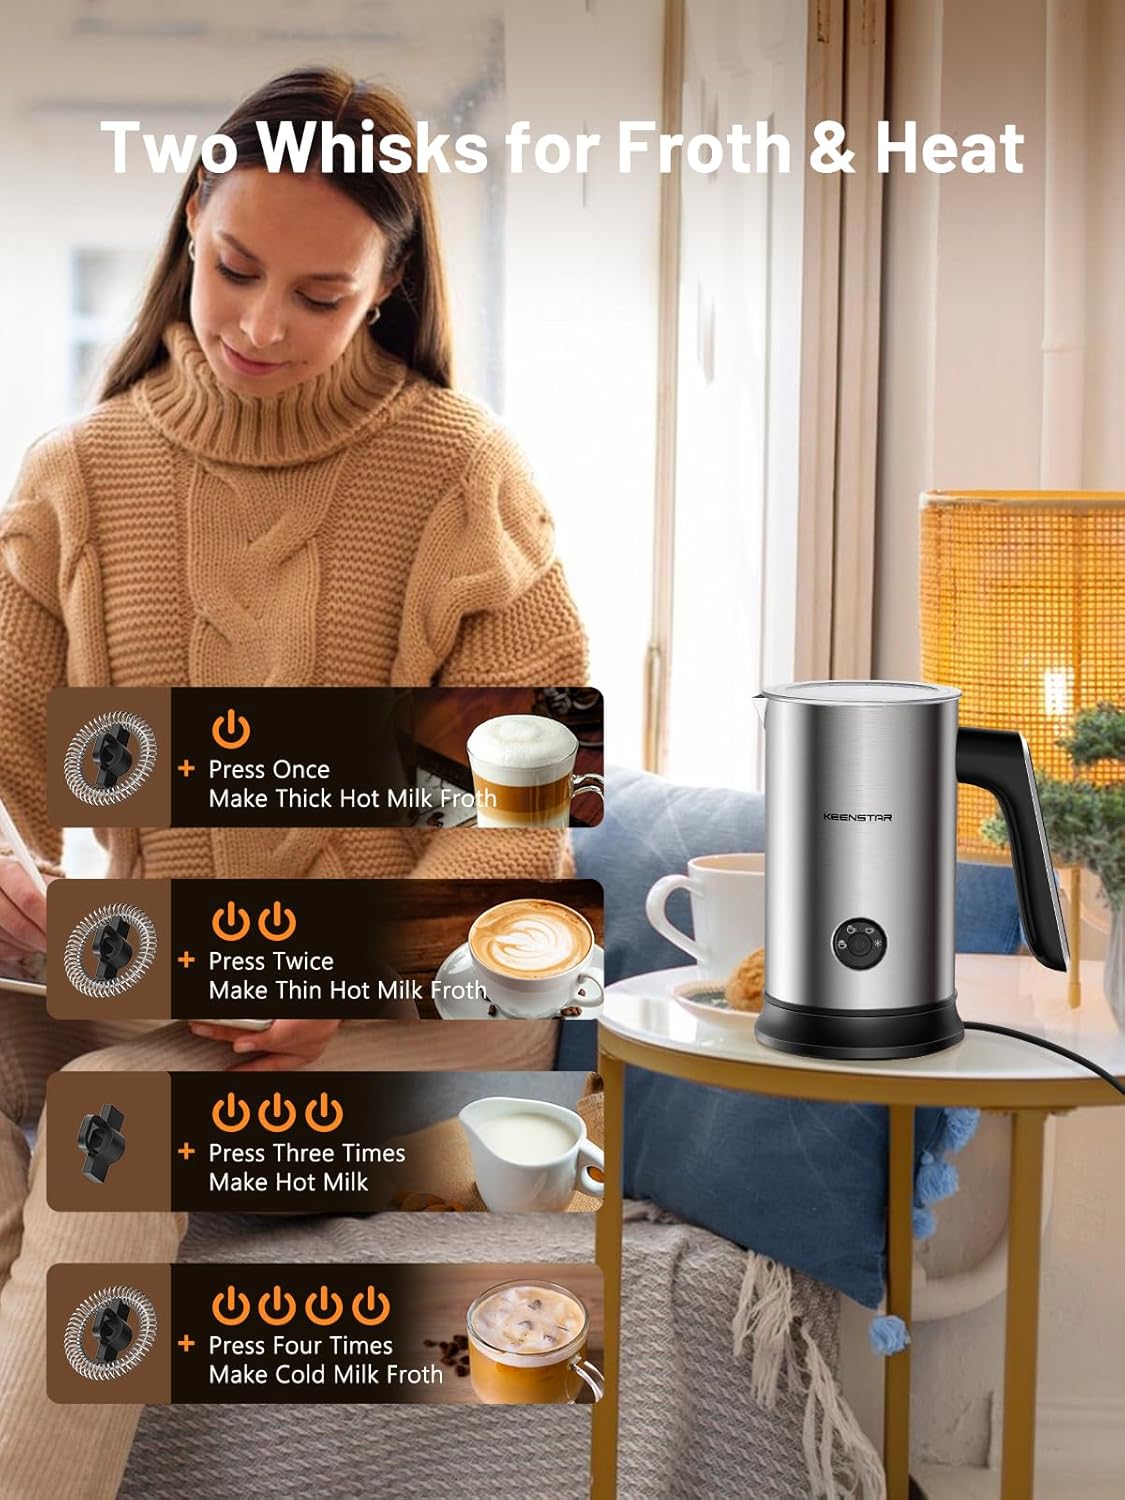
Bild: Eine detaillierte view of the Keenstar Electric Milk Frother, highlighting its stainless steel body, handle, power button, and lid.
Aufstellen
- Auspacken: Carefully remove all packaging materials and inspect the frother for any damage.
- Sauber: Before first use, clean the inside of the jug and the whisk with warm soapy water. Wipe the exterior with a damp Tuch. Stellen Sie sicher, dass alle Teile vor der Montage trocken sind.
- Auf die Basis legen: Place the frother jug securely onto the power base.
- Strom anschließen: Stecken Sie die Stromversorgungsstation in eine normale Steckdose.
Bedienungsanleitung
The Keenstar Electric Milk Frother offers 4-in-1 functionality. Always ensure the correct whisk is installed for your desired function and observe the fill lines inside the jug.

Image: Diagram illustrating the four functions: Thick Hot Milk Froth, Thin Hot Milk Froth, Hot Milk, and Cold Milk Froth, with corresponding button presses.
Allgemeine Nutzungstipps:
- For best frothing results, use milk with a fat content greater than 3%.
- Maximum capacity for heating: 8.12oz/240ml.
- Maximum capacity for frothing: 3.9oz/115ml.
- Minimum capacity for heating & frothing: 2.7oz/80ml.
- Do not overfill the jug beyond the MAX fill line for frothing to prevent overflow.
Funktionen:
- Warmer, dicker Schaum:
- Ensure the frothing whisk is installed.
- Add milk up to the frothing MAX line.
- Drücken Sie den Netzschalter einmal. The indicator light will turn red.
- Der Milchaufschäumer schaltet sich automatisch ab, sobald der Vorgang abgeschlossen ist.

Image: A cup of coffee with thick, warm milk foam, illustrating the result of the warm thick foam function.
- Warm Light Foam:
- Ensure the frothing whisk is installed.
- Add milk up to the frothing MAX line.
- Drücken Sie den Netzschalter zweimal. The indicator light will turn red.
- Der Milchaufschäumer schaltet sich automatisch ab, sobald der Vorgang abgeschlossen ist.

Image: A cup of coffee with light, warm milk foam, demonstrating the outcome of the warm light foam function.
- Warm Milk or Chocolate (No Foam):
- Replace the frothing whisk with the heating whisk (if not already installed).
- Add milk or chocolate up to the heating MAX line.
- Drücken Sie den Netzschalter dreimal. The indicator light will turn red.
- Der Milchaufschäumer schaltet sich automatisch ab, sobald der Vorgang abgeschlossen ist.

Image: A mug of warm chocolate, showing the result of the warm milk/chocolate function without foam.
- Kaltschaum:
- Ensure the frothing whisk is installed.
- Add cold milk up to the frothing MAX line.
- Drücken Sie den Netzschalter viermal. The indicator light will turn blue.
- Der Milchaufschäumer schaltet sich automatisch ab, sobald der Vorgang abgeschlossen ist.

Image: A glass of iced coffee with cold milk foam, demonstrating the outcome of the cold foam function.
Wartung und Reinigung
Eine ordnungsgemäße Reinigung gewährleistet die Langlebigkeit und Hygiene Ihres Milchaufschäumers.
- Stecker ziehen: Vor der Reinigung den Milchaufschäumer immer vom Stromnetz trennen und vollständig abkühlen lassen.
- Schneebesen entfernen: Den Schneebesen vorsichtig vom Boden des Krugs entfernen.
- Hand Wash Jug: The stainless steel jug has a non-stick coating. Rinse the interior of the jug under running water and wipe it dry with a soft cloth. Do not use abrasive cleaners or scourers.
- Deckel und Schneebesen reinigen: Wash the lid and whisk with warm soapy water and rinse thoroughly.
- Sauberes Äußeres: Wischen Sie die Außenseite des Milchaufschäumers und den Sockel mit einem Tuch ab.amp cloth. Do not immerse the frother jug or power base in water.
- Trocknen: Stellen Sie sicher, dass alle Teile vollständig trocken sind, bevor Sie sie wieder zusammenbauen oder lagern.
Important: The frother jug is not dishwasher safe. Hand wash only.

Image: A person hand-washing the interior of the Keenstar Electric Milk Frother jug under running water, emphasizing the non-stick coating.
Fehlerbehebung
If you encounter any issues with your Keenstar Electric Milk Frother, please refer to the following common problems and solutions:
| Problem | Mögliche Ursache | Lösung |
|---|---|---|
| Der Aufschäumer lässt sich nicht einschalten. | Nicht angeschlossen; Stromausfalltage; Milchaufschäumer nicht korrekt auf der Basis platziert. | Check power connection; ensure frother is seated properly on the base. |
| Die Milch schäumt nicht oder der Schaum ist mangelhaft. | Incorrect whisk used; insufficient milk fat content; milk level too low/high. | Ensure frothing whisk is installed; use milk with >3% fat; check milk levels against MIN/MAX lines. |
| Die Milch erwärmt sich nicht. | Heating whisk not installed (if applicable); incorrect mode selected. | Ensure heating whisk is installed for heating-only functions; select appropriate mode. |
| Brandgeruch oder anhaftende Milch. | Overfilling; residue from previous use. | Do not exceed MAX fill line; clean thoroughly after each use. |
Sollte das Problem weiterhin bestehen, wenden Sie sich bitte an den Kundendienst.
Technische Daten
| Besonderheit | Detail |
|---|---|
| Marke | KEENSTAR |
| Modellname | MK701N |
| Material | Edelstahl |
| Farbe | Silber |
| Stromquelle | Kabelgebundene Elektrik |
| Wastage | 500 Watt |
| Leistung (Heizung) | 8.12 oz / 240 ml |
| Kapazität (Schäumen) | 3.9 oz / 115 ml |
| Mindestkapazität | 2.7 oz / 80 ml |
| Artikelgewicht | 1.7 Pfund |
| Besondere Merkmale | Lightweight, Non-Stick, Auto Shut Off, Temperature Control, 30 Minutes Auto-Warming |
| Produktpflege | Handwäsche nur |

Image: The Keenstar Electric Milk Frother next to a smartphone for size comparison, showing its compact dimensions (7.3in/18.5cm height, 4.3in/11cm width).
Garantie und Support
Keenstar offers a 30-day money-back guarantee and a free replacement within 1 year from the date of purchase. We also provide lifetime after-customer service to ensure your satisfaction.
For any questions, concerns, or support needs, please contact our customer service team through the retailer's platform or visit the official Keenstar webWebsite für Kontaktinformationen.