1. Einleitung
Thank you for choosing the KEENSTAR 20Bar Espresso Machine. This manual provides essential information for the safe operation, maintenance, and troubleshooting of your new espresso machine. Please read it thoroughly before first use and keep it for future reference.
2. Wichtige Sicherheitshinweise
- Lesen Sie vor der Verwendung des Geräts alle Anweisungen.
- Berühren Sie keine heißen Oberflächen. Benutzen Sie Griffe oder Knöpfe.
- Zum Schutz vor Feuer, Stromschlag und Verletzungen dürfen Kabel, Stecker oder Geräte nicht in Wasser oder andere Flüssigkeiten getaucht werden.
- Bei der Benutzung von Geräten durch oder in der Nähe von Kindern ist eine genaue Aufsicht erforderlich.
- Ziehen Sie den Stecker aus der Steckdose, wenn Sie das Gerät nicht verwenden und bevor Sie es reinigen. Lassen Sie das Gerät abkühlen, bevor Sie Teile anbringen oder abnehmen und bevor Sie es reinigen.
- Betreiben Sie kein Gerät, wenn das Kabel oder der Stecker beschädigt ist oder wenn das Gerät eine Fehlfunktion aufweist oder auf sonstige Weise beschädigt wurde.
- Die Verwendung von Zubehör, das vom Gerätehersteller nicht empfohlen wird, kann zu Bränden, Stromschlägen oder Verletzungen führen.
- Nicht im Freien verwenden.
- Lassen Sie das Kabel nicht über die Tisch- oder Thekenkante hängen oder heiße Oberflächen berühren.
- Nicht auf oder in die Nähe eines heißen Gas- oder Elektrobrenners oder in einen beheizten Ofen stellen.
- Stecken Sie den Stecker immer zuerst in das Gerät und dann das Netzkabel in die Steckdose. Zum Trennen vom Stromnetz schalten Sie alle Bedienelemente auf „Aus“ und ziehen Sie dann den Stecker aus der Steckdose.
- Das Gerät darf nur für den vorgesehenen Zweck verwendet werden.
- Beim Entsorgen von heißem Dampf ist äußerste Vorsicht geboten.
- Dieses Gerät ist nur für den Hausgebrauch bestimmt.
3. Packungsinhalt
Bitte überprüfen Sie beim Auspacken den Packungsinhalt, um sicherzustellen, dass alle Artikel vorhanden und unbeschädigt sind.
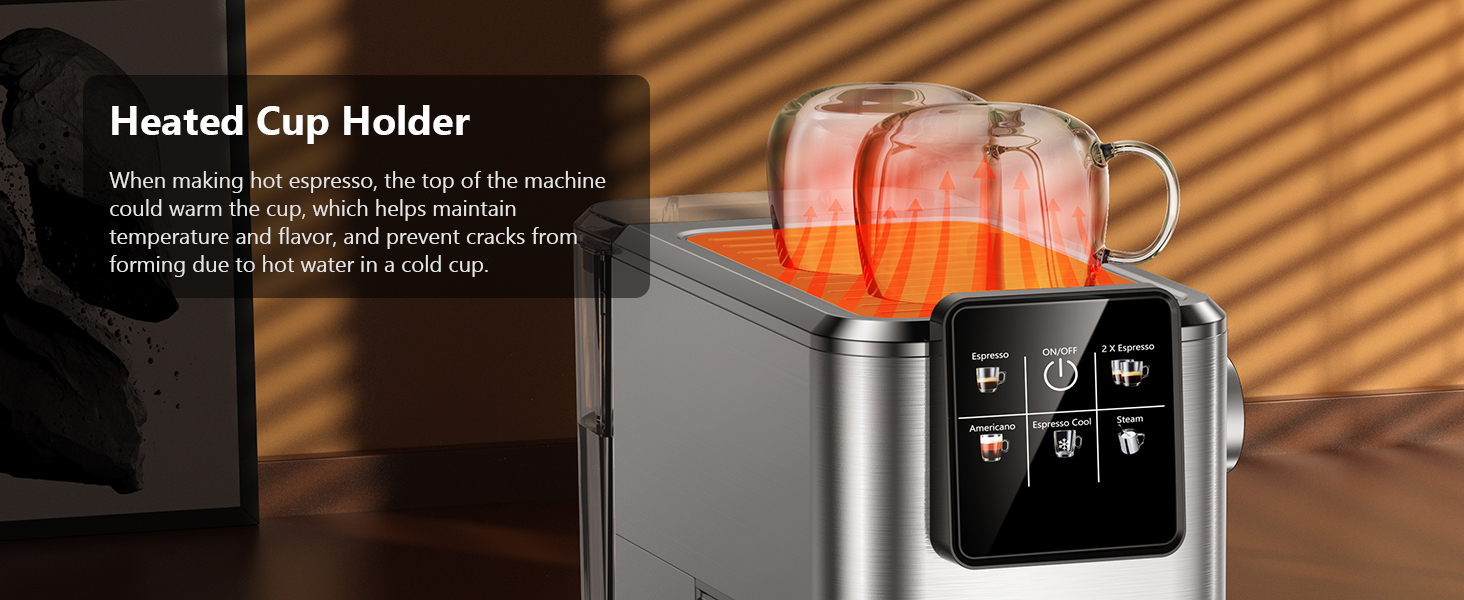
Bild: All components included in the KEENSTAR 20Bar Espresso Machine package. This includes the main unit, portafilter with handle, single and double shot filters, coffee spoon with tamper, and a removable drip tray. The water tank and steam nozzle are also visible.
- KEENSTAR 20Bar Espresso Machine Main Unit
- Siebträgergriff
- 1-Shot Filter Basket
- 2-Shot Filter Basket
- Kaffeelöffel mit Tamper
- Abnehmbare Tropfschale
- Bedienungsanleitung
4. Produktüberschreitungview
Machen Sie sich mit den verschiedenen Teilen Ihrer Espressomaschine vertraut.

Bild: Front view of the KEENSTAR 20Bar Espresso Machine, showcasing its sleek stainless steel design and key operational areas.
- Wassertank: Detachable, 1.1 Liter capacity. Located at the back of the machine.
- Bedienfeld: Intuitive touch screen for selecting brew options (Espresso, Americano, Espresso Cool, Steam, ON/OFF, 2X Espresso).
- Siebträger: Hält gemahlenen Kaffee zum Aufbrühen.
- Dampfdüse: For frothing milk for lattes and cappuccinos. Features a 360-degree rotation.
- Tropfschale: Abnehmbar für einfache Reinigung.
- Heated Cup Holder: Located on top of the machine to warm cups, maintaining coffee temperature.
5. Einrichtung
5.1 Initial Use and Priming
Before first use, or if the machine has not been used for a long time, it is essential to prime the system to ensure proper operation and remove any air from the pipes.
- Fill the water tank with fresh water and place it back into the machine. Ensure the tank cover is properly closed.
- Plug the machine into a power outlet. The ON/OFF button on the touch screen will illuminate.
- Press the ON/OFF button to turn on the machine. The indicator lights will blink as the machine preheats.
- Once the indicator lights are steady, the machine is ready.
- Stellen Sie eine leere Tasse unter die Dampfdüse.
- Turn the steam knob to the "ON" position. Water will run out from the steam wand like a line. Let it run for about 10-15 seconds to purge air.
- Turn the steam knob to the "OFF" position.
- Press the ON/OFF button to turn off the machine. The machine is now primed and ready for use.

Bild: Visual steps for priming the espresso machine before its first use or after a period of inactivity. This process drains air from the internal pipes.
5.2 Füllen des Wassertanks
The water tank has a maximum capacity of 1200ml. Do not exceed the maximum fill line to prevent overflow.
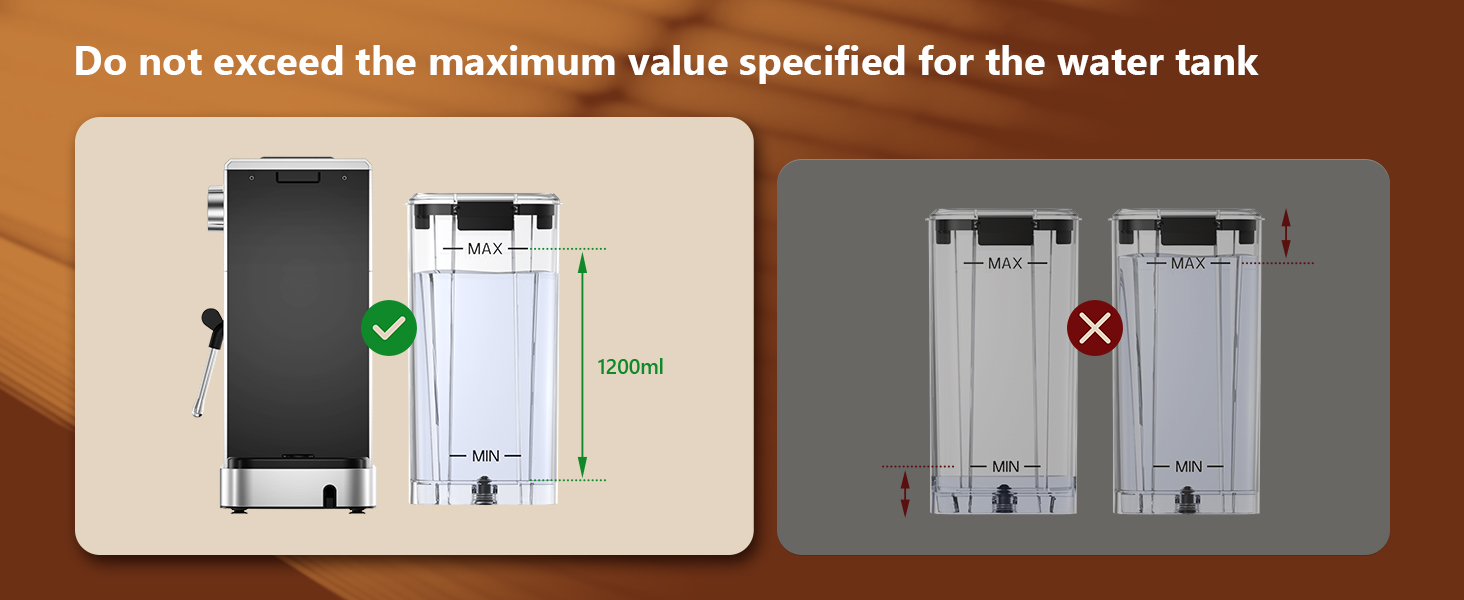
Bild: Guidance on filling the water tank, indicating the 1200ml maximum fill level to avoid overfilling.
6. Bedienungsanleitung
6.1 Espresso zubereiten
The machine features a 20-bar pressure system and pre-soak technology for rich espresso extraction.
- Ensure the steam knob is set to the "OFF" position before brewing coffee.
- Fill the water tank with fresh water and press the ON/OFF button to power on. Wait for the indicator to become steady, signifying preheating is complete.
- Select the appropriate filter basket (1-shot or 2-shot) and place it into the portafilter.
- Add ground coffee to the filter basket. Use medium ground coffee (greater than 0.5mm) for optimal results.
- Tamp the ground coffee firmly and evenly using the coffee tampäh.
- Attach the portafilter to the machine, ensuring it is fully locked into place.
- Stellen Sie Ihre Tasse(n) auf die Abtropfschale unterhalb des Siebträgers.
- Select "Espresso" for a single shot or "2 X Espresso" for a double shot on the touch screen. The machine will begin brewing.
- Sobald der Brühvorgang abgeschlossen ist, schaltet sich die Maschine automatisch ab.

Bild: Step-by-step visual instructions for brewing espresso, from preparing the machine to the final extraction.
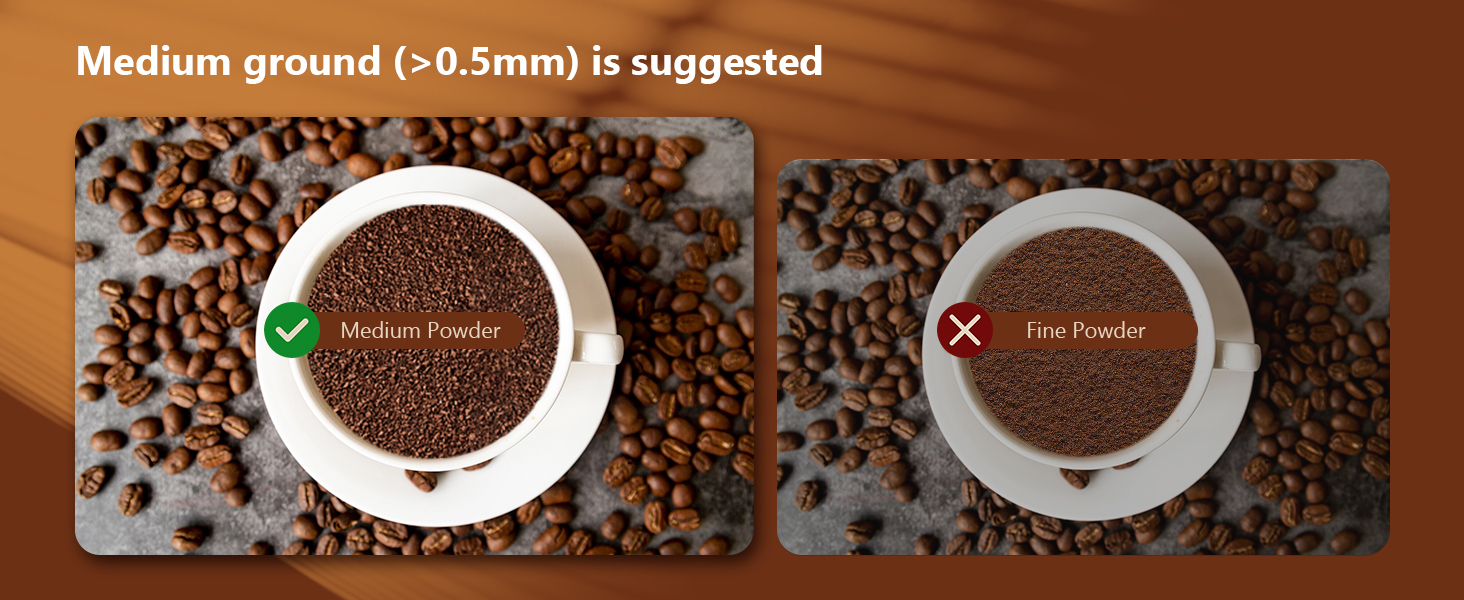
Bild: Illustration demonstrating the correct way to lock the portafilter before brewing to prevent leaks and ensure proper extraction.

Bild: Recommended coffee grind size (medium, >0.5mm) for optimal espresso extraction, contrasting it with fine ground coffee.
6.2 Making Cold Brew Espresso
This machine offers a rapid cold brew function, producing smooth cold brew in as little as 10 minutes.
- Ensure the water tank is filled with iced water for the cold brew function.
- Prepare the portafilter with ground coffee as described in Section 6.1.
- Attach the portafilter to the machine and place a cup underneath.
- Select "Espresso Cool" on the touch screen. The machine will begin the cold brew process.
- Enjoy your rapid cold brew espresso.

Bild: The espresso machine preparing cold brew, emphasizing the requirement for iced water in the tank.
6.3 Milch aufschäumen
The powerful steam wand allows you to create creamy microfoam for lattes and cappuccinos.
- Fill the water tank with fresh water and press the ON/OFF button to power on.
- Press the "Steam" button on the touch screen to preheat the steam function. The indicator will blink during preheating and become steady when ready.
- After preheating, turn the steam knob to the "ON" position to release any remaining water in the pipe before frothing.
- Insert the steam nozzle approximately 1 inch into the surface of your milk.
- Gradually turn the steam knob to increase steam until the desired foam consistency is achieved.
- Once finished, turn the steam knob to the "OFF" position and clean the steam wand immediately.
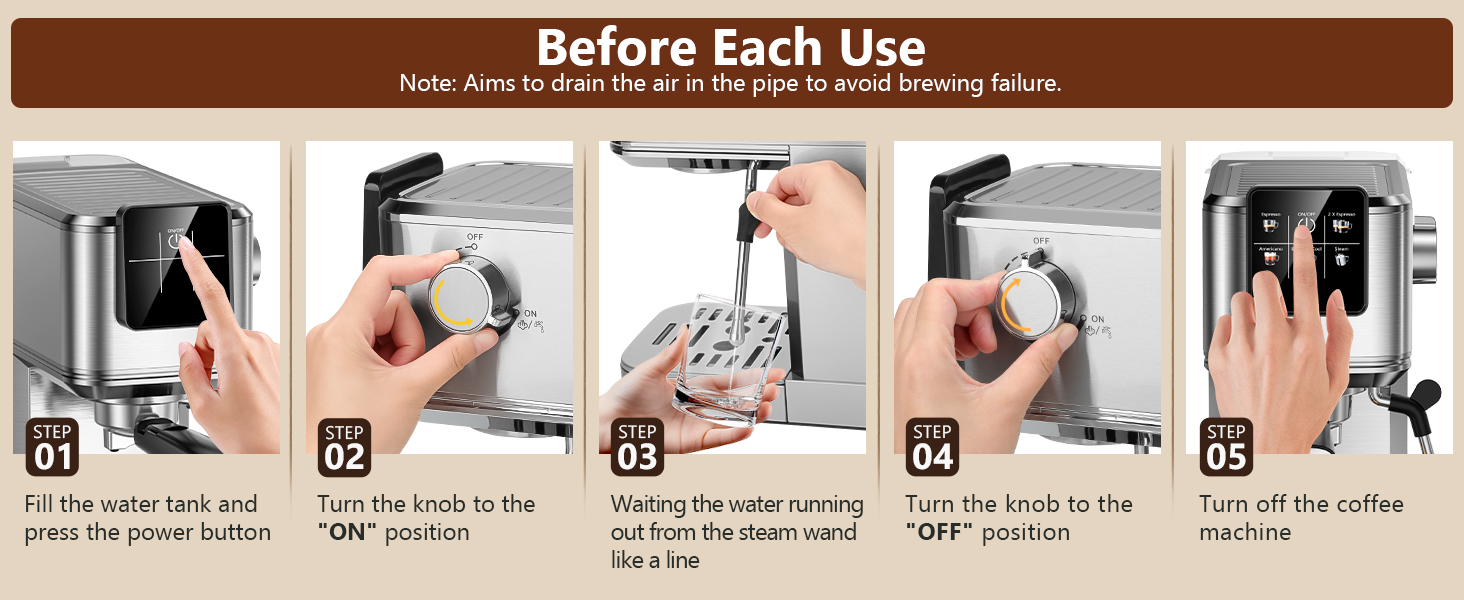
Bild: Visual instructions for frothing milk, detailing the steps from preheating to creating microfoam.
7. Wartung und Reinigung
Regelmäßige Reinigung gewährleistet die Langlebigkeit und optimale Leistung Ihrer Espressomaschine.
- Allgemeine Reinigung: Wischen Sie die Außenseite der Maschine mitamp Tuch. Verwenden Sie keine Scheuermittel oder Topfreiniger.
- Tropfschale: Die herausnehmbare Tropfschale sollte regelmäßig geleert und gereinigt werden.
- Siebträger und Filterkörbe: Nach jedem Gebrauch den Siebträger entnehmen und den Kaffeesatz entsorgen. Siebträger und Filterkorb unter fließendem Wasser abspülen.
- Dampfdüse: Wischen Sie die Dampfdüse unmittelbar nach dem Aufschäumen der Milch mit einem feuchten Tuch ab.amp cloth to prevent milk residue from drying. Purge steam briefly to clear any internal blockages.
- Wassertank: Reinigen Sie den Wassertank regelmäßig mit einem milden Reinigungsmittel und spülen Sie ihn gründlich aus.
- Entkalkung: Depending on water hardness, descale the machine every 2-3 months. Follow the instructions provided with a suitable descaling solution.

Bild: Important cleaning instruction: All accessories must be washed by hand and are not dishwasher safe.
8. Fehlerbehebung
In diesem Abschnitt finden Sie häufig auftretende Probleme und deren Lösungen.
| Problem | Mögliche Ursache | Lösung |
|---|---|---|
| Kein Kaffeespender / Langsamer Durchfluss |
|
|
| Water leaks from portafilter edge |
|
|
| Die Dampfdüse produziert keinen Dampf. |
|
|
| Kaffee ist nicht heiß genug |
|
|
9. Spezifikationen
- Marke: KEENSTAR
- Modellname: JH-C5210
- Drucksystem: 20 Bar
- Leistung: 1350 W
- Fassungsvermögen Wassertank: 1.1 Liter (37 oz)
- Produktabmessungen: 11.8"T x 12.6"B x 5.5"H
- Artikelgewicht: 4.6 Pfund
- Material: Edelstahl
- Besonderheit: Programmable, Touch Screen, Milk Frother, Hot & Rapid Cold Brew
- Kaffeeeingabeart: Gemahlener Kaffee
- Filtertyp: Wiederverwendbar
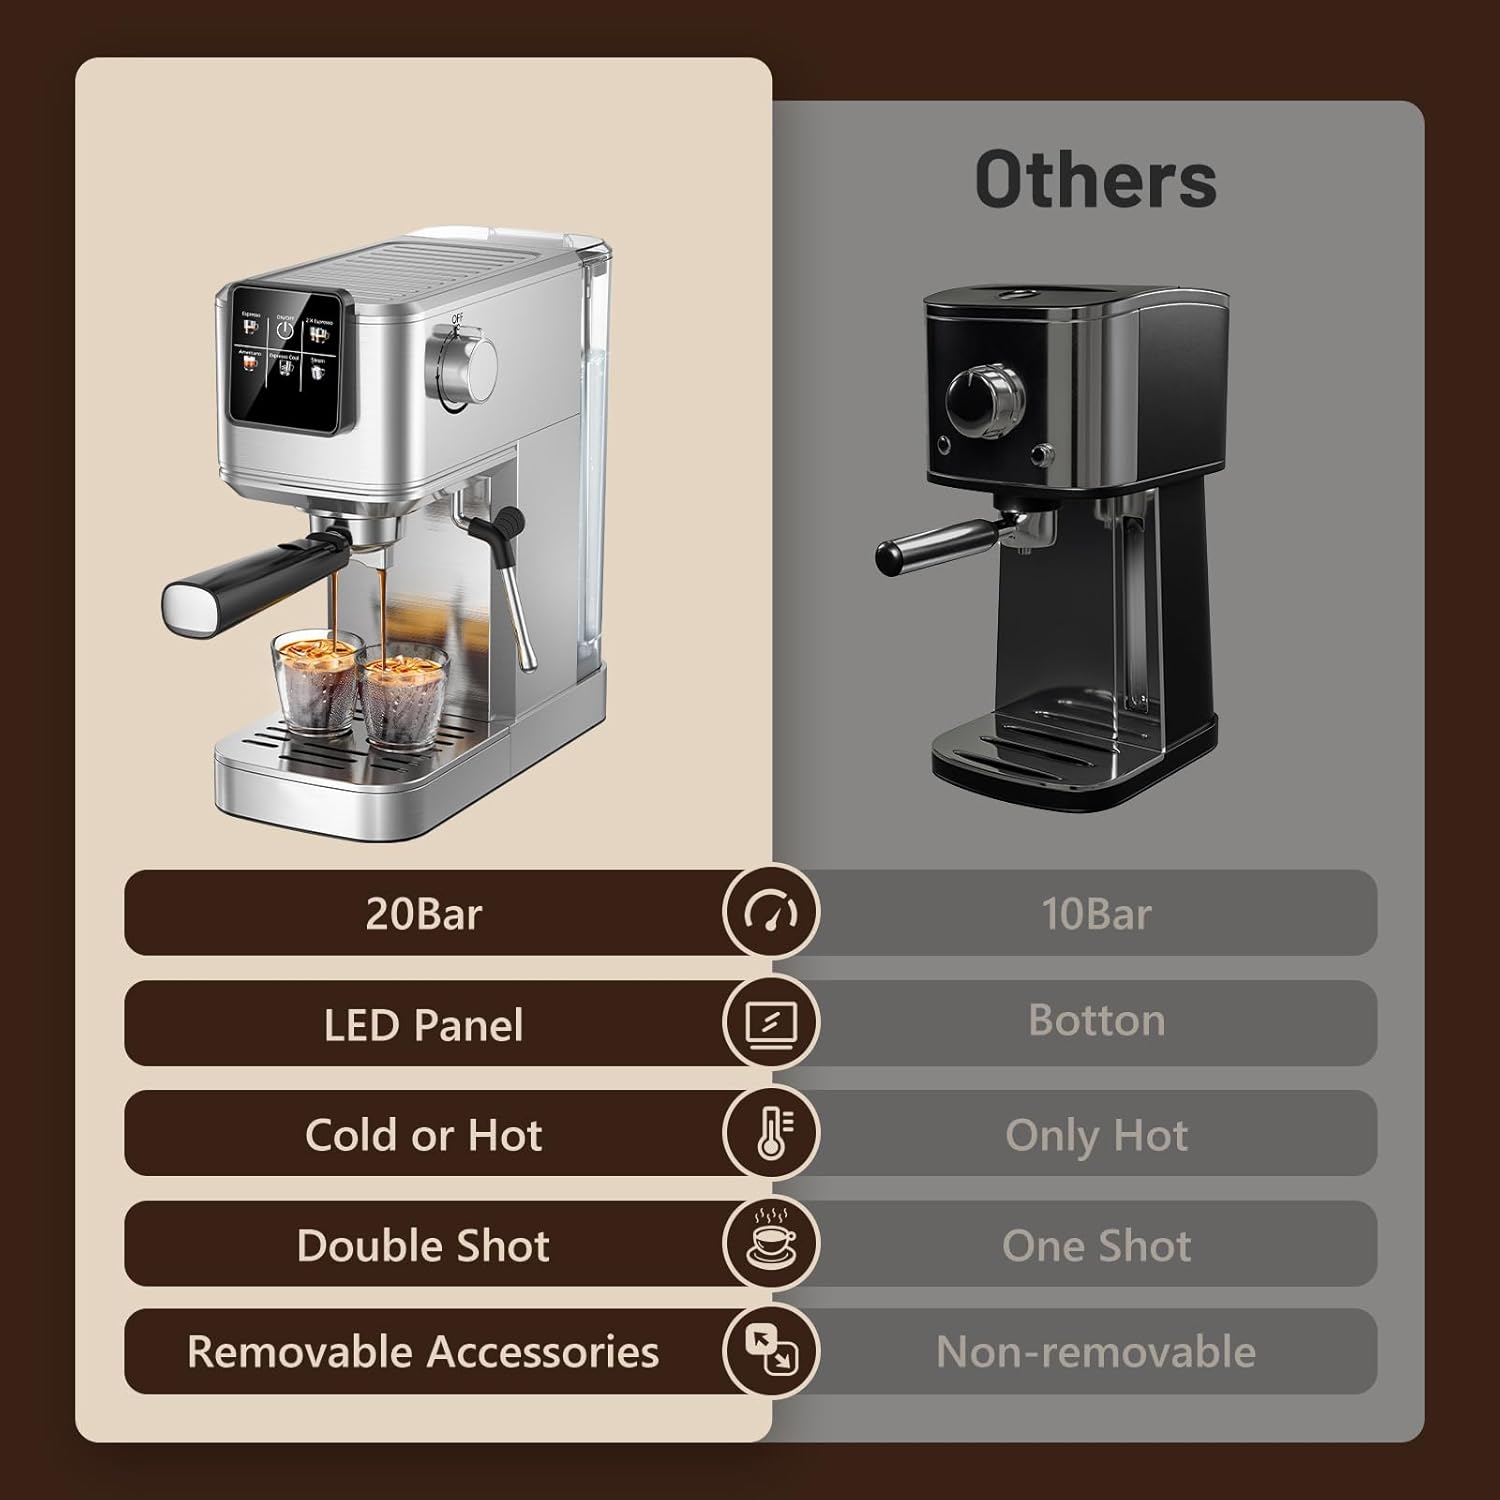
Bild: Feature comparison of the KEENSTAR machine, emphasizing its 20Bar pressure, LED panel, and versatility for hot and cold beverages.

Bild: Dimensions of the KEENSTAR espresso machine, indicating its compact size.
10. Garantie und Support
For warranty information or technical support, please refer to the contact details provided on the product packaging or visit the official KEENSTAR webBewahren Sie Ihren Kaufbeleg für eventuelle Garantieansprüche auf.